Paying independent contractors is simpler and often cheaper than paying employees because employers don’t have to withhold or pay taxes. Although year-end reports are required to show amounts paid, employment and labor laws that cover employees—like minimum wage—don’t apply. We walk through the five steps on how to pay independent contractors below.
Key Takeaways:
- Independent contractors are paid by the hour or by project—NEVER by salary
- Always be aware of the DOL’s and your state’s regulation on classifying contractors and employees
- Effective March 11, 2024, there’s a new test for classifying workers
- Make sure you have an independent contractor agreement in place with all contractors
Step 1: Determine How to Pay Contractors
Paying independent contractors isn’t difficult, but it is different from handling employee payroll. During the hiring process, you’ll want to determine how you’re going to pay your independent contractors (using payroll software in-house vs outsourcing to a payroll service) and how much to pay them to ensure the process goes smoothly.
Unlike with employees, you don’t pay contractors a salary—contractors are paid by the hour or by the project. In fact, paying a worker a salary is one of the considerations under IRS guidelines that will make a worker an employee, not an independent contractor.
Before starting any work, you and your contractor should reach an agreement regarding pay, something that should be explicitly outlined in your independent contractor agreement. If you’ve contracted with independent contractors for similar work before, you may already have an idea as to the going rate; if not, you can call around and request an anonymous quote from your competitors. Contractors usually have their own rates, so you’ll need to ensure you’re on the same page.
Also, consider the type of work your contractor performs; if it’s work for which it’s difficult to estimate the required time to complete, a per-project rate sounds ideal. Being unable to estimate costs is bad for your business and could create conflict between you and the contractor if you’re charged more than expected.
Another point to keep in mind when negotiating a project or hourly rate is that independent contractors pay taxes on the money you pay them. You’re not required to withhold the taxes, but it is important to realize that the contractor won’t be able to pocket all the money you pay.
They’ll pay federal and state income taxes in addition to local taxes—if they’re in an area like New York City that requires it. They’ll also pay self-employment tax of 15.3% (12.4% for Social Security and 2.9% for Medicare). In 2024, only the first $168,600 of earnings is subject to the Social Security portion.
These withholdings can quickly add up to 30% or more, which explains the need to pay contractors more than you would an employee. Employees pay half of the self-employment tax, although it’s termed Federal Insurance Contributions Act (FICA), and employers pay the other half.
Once you and your contractor agree on payment terms—including project due dates, required deposit, rates, and so forth—you’re ready to complete an official independent contractor agreement. This solidifies the deal and binds you both to deliver accordingly.
Thank you for downloading!
Quick Tip:
If you want an easy way to send, receive, and update employment contracts as well as onboard employees, try Gusto.
It’s small business payroll provider that lets employees sign forms and contracts in addition to enrolling in payroll and benefits, all online.
You also get a secure document vault where you can store important employee documents like contract agreements.
As you determine how you’re paying, be sure to reflect on the length and size of the project.
- Is it a month-long project? Or will the contractor finish it in a week?
- How much time will your contractor need to devote to the project daily?
- Are you expecting a big project to have a quick turnaround?
Depending on your answers and the contractor’s terms, you may need to pay a deposit or make payments at predetermined intervals. If you’re working with a contractor for the first time, be flexible; some contractors have had bad experiences with clients using their services without ever issuing payment. Most experienced contractors, however, are comfortable being paid monthly, so long as this is noted in the contract.
Step 2: Collect W-9 Forms From Contractors
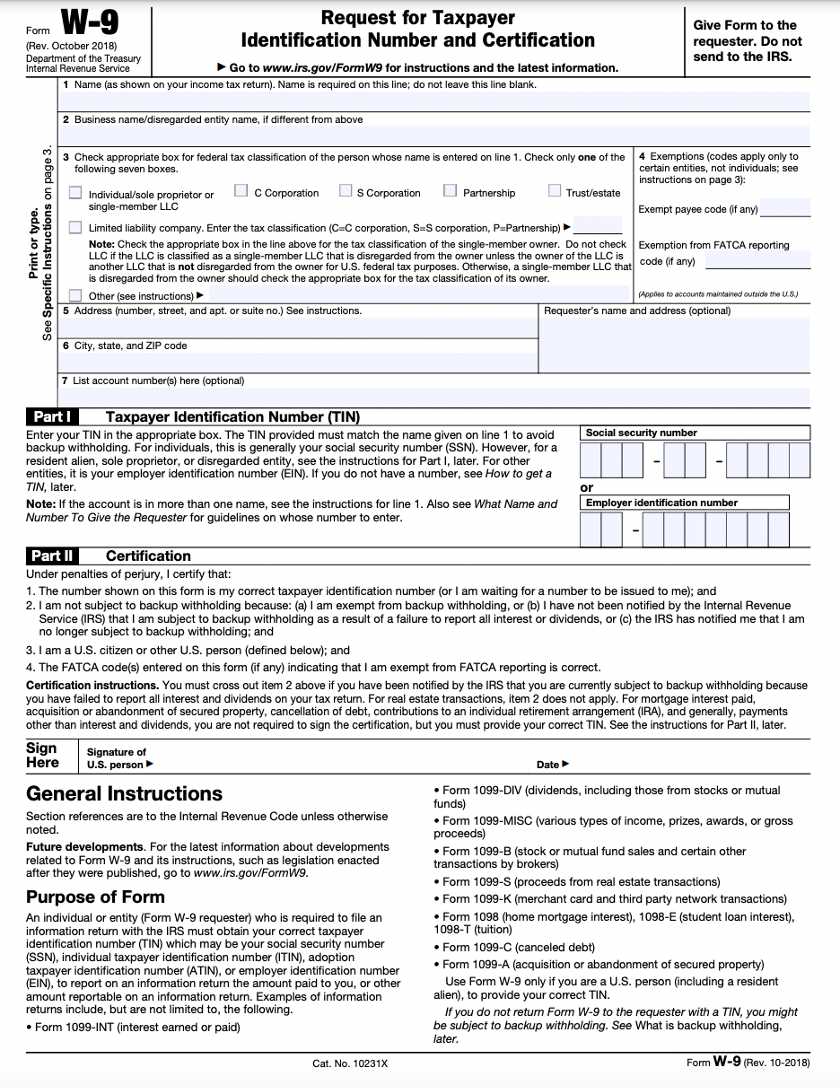
Once you decide how much and often to pay your contractors, you’ll have them complete a W-9 Form, which includes personal information, like name and Social Security number, or if they operate under their own business entity, an Employer Identification Number (EIN). It’s important to have all contractors complete this form before beginning work because you’ll use it to report their annual earnings on Form 1099 at year-end.
Pro Tip: To avoid having to chase people down for documents, you should require each independent contractor you work with to complete the W-9 Form before beginning any work.
There have been rare cases when independent contractors refused to provide their Social Security number or entered an incorrect Social Security number on their W-9. When that happens, the IRS will notify you to immediately begin withholding 24% of the contractor’s pay for backup withholding (taxes). In this case, you’d withhold—regardless of the contractor’s dismay, and remit to the tax agency as instructed.
If you opt to use payroll software or a service like Gusto, collecting the W-9 is simple. Once you add contractors to your account, it will email them a link they can use to start their online accounts. It’ll also prompt them to provide all the W-9 information before storing it within the application, saving you time and money. Learn more about it in our Gusto review.
Step 3: Set Up Contractors in Your Payroll System
Once you’ve collected the W-9 Form and have determined the best way to pay your contractors, you’re ready to set up contractors in your payroll system (which may consist of a notebook, Microsoft Excel, or payroll software).
However you choose to do payroll, you need to start by ensuring you’ve recorded all your contractors’ information; this will help prevent any hiccups on payday. Be absolutely certain your contractors are set up correctly so there are no taxes or benefit withholdings.
Step 4: Process Payments to Independent Contractors
After setup, you won’t have much to do until it’s time to make the first payment. If the agreement requires a deposit before beginning work, you’ll need to process it immediately after setup.
Select the Payment Method
There are many different ways to pay your team for their work. You can pay using cash (not recommended due to lack of paper trail), check, direct deposit, and even pay cards, which are reloadable prepaid debit cards employers use to deposit wages. Be mindful of processing times; direct deposit, for example, requires up to four days to process.
Direct deposits usually cost additional money if you’re not using a payroll service and go through your bank instead; however, if you only need to process a few payments, you can print checks online for free. Most of the best payroll software offers direct deposit at no additional charge, and some will guide you through printing your own checks using the system.
Pay cards are typically offered by the larger payroll providers, like Paychex, so while the pay card program is free, the payroll services you’re required to purchase before being approved for the program are usually more expensive.
Step 5: Send 1099-NEC Forms
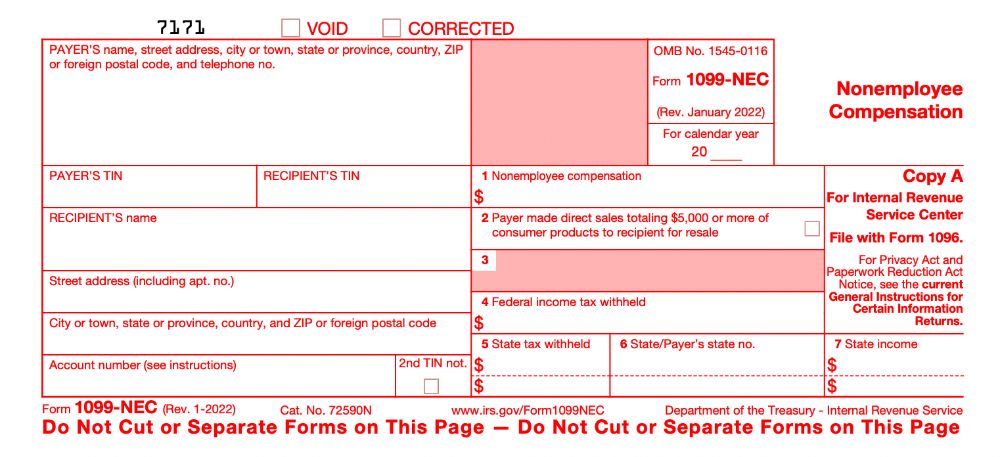
As the end of the year approaches, you should be ready to prepare 1099-NEC Forms for each contractor to whom you’ve paid more than $600 within the year. You’ll have to distribute a copy of the 1099 to each contractor along with the IRS and state tax agency (if there are state income taxes), and it must include the total amount you paid during the year.
Don’t forget to keep a copy for your records, and be mindful of the Jan. 31 deadline to report any payments made during the previous calendar year. You’ll use the W-9 forms you collected from contractors before they begin work; transfer information (such as name, address, and Social Security number or EIN) to the 1099-NEC to ensure the year-end reports you submit to the IRS are accurate.
The 1099-NEC Form helps independent contractors calculate how much they owe in taxes. It also helps the IRS track contractors from whom they should receive tax payments.
It’s important to note that this process will look very different if you’re processing payments for international contractors. You’ll often be dealing with international banks and exchange rates and handling different forms. International contracting companies are required to submit a W-8BEN-E to your business—or a W-8BEN if the contractor is operating as an individual—before getting paid.
Processing payments for international contractors can be confusing, but there are many payroll services that can help take the burden off you. If you’re interested in a payroll service that can help you, check out our guide to the best international payroll services.
Laws for Paying Independent Contractors
Learning how to pay independent contractors involves understanding the legalities surrounding it. One major error some companies make is confusing employees (W-2 workers) with independent contractors (1099 workers). Federal law is pretty strict in differentiating between 1099 vs W-2 workers; thus, misclassifying can result in thousands of dollars in fines and taxes owed.
Keep in mind that contractors control how they deliver the finished project and how often they work. The only factor you determine is how the final product should look.
There are numerous factors to consider when classifying independent contractors. The DOL has an opinion, as does the IRS and many states. Although there are no hard and fast rules, if you’re ever confused, complete and submit Form SS-8 to the IRS; the IRS will review and make an official classification determination, but it could take up to six months.
We’ve researched payroll providers that will help you pay contractors easily. If you’re interested in payroll software but need help deciding which is best for your business, check out our guide to choosing contractor payroll services.
Paying Independent Contractors Frequently Asked Questions (FAQs)
Establish clear payment terms within your independent contractor agreement. This includes rates and conditions of payment. Make sure your contractors provide you with an invoice prior to any payment. Detail the process for handling additional charges or unexpected work and ensure both parties sign the agreement acknowledging these terms.
Review the contract terms to clarify the dispute. Speak directly with the contractor to understand their concerns and the nature of the dispute. If you cannot resolve the dispute on your own, consider mediation and, as a last resort, legal action.
A termination clause should be part of your independent contractor agreement, outlining the conditions under which either party can end the agreement. Follow this clause to avoid any legal issues and make sure you pay for any work completed prior to termination.
Bottom Line
Determining how to pay independent contractors isn’t too complex if you set up an effective system to help you track contractor and payment information. You can use a notebook, Excel, or payroll software to help, and costs range from $0 to $6 a month for one contractor.
If you’re looking for payroll software that supports contractor payments, consider Gusto. It collects all the information needed to prepare 1099-NEC forms at year-end. It also makes it easy for contractors to review their payments and tax documents by prompting them to set up an online account. In addition to giving contractors control of their paperwork, you save money and time by not having to print and distribute tax documents. Sign up for Gusto’s contractor only plan now for a base price of $0/month for the first six months. Pay $6 per contractor monthly.

