

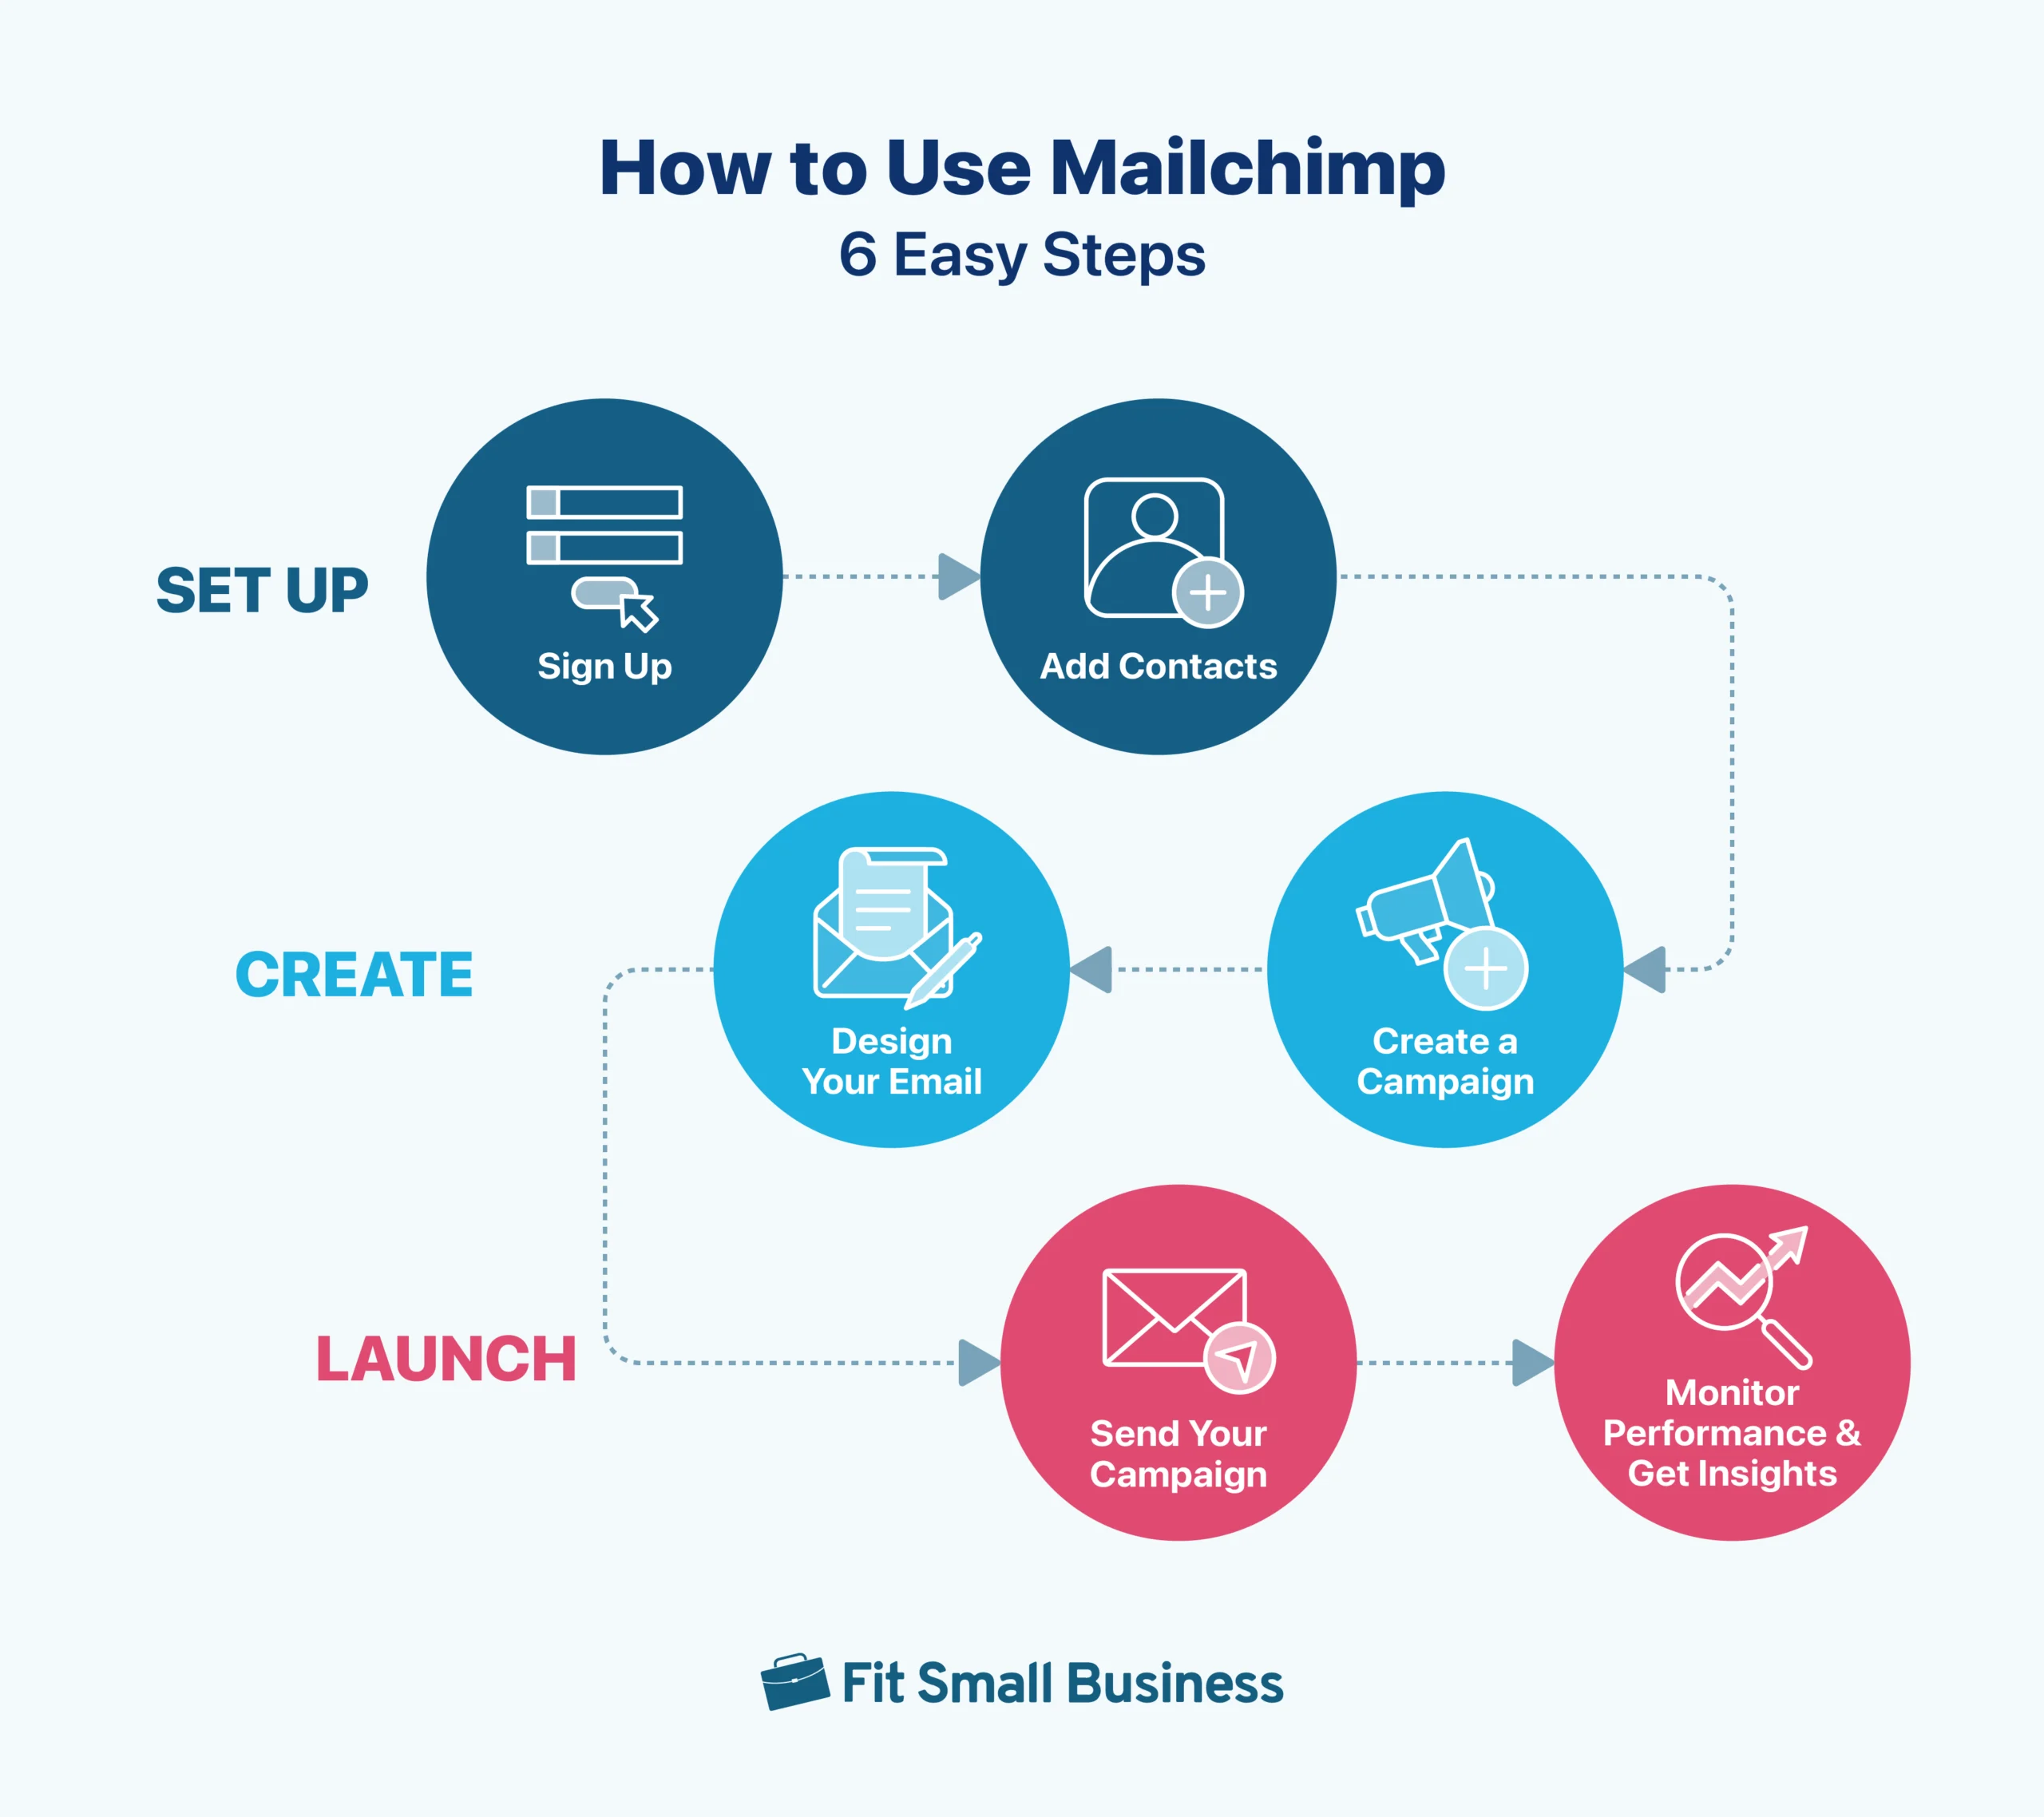
Learning how to use Mailchimp to create and deploy email marketing and sales campaigns is easy. Simply sign up for a free account, build an audience, then design and send your email marketing campaign. After you hit send, analyze performance data to make future email marketing campaigns more effective. Check out our Mailchimp video tutorials and follow the steps below to build your first campaign.
- Mailchimp Video Tutorial
- Step 1: Sign Up for an Account
- Step 2: Add Contacts to Create an Audience
- Step 3: Create an Email Campaign With Mailchimp
- Step 4: Design Your Email
- Step 5: Send Your Email Marketing Campaign
- Step 6: Monitor Campaign Performance & Get Insights
- Frequently Asked Questions (FAQs)
- Bottom Line
Mailchimp Video Tutorial
Our Mailchimp tutorial videos showcase each of the steps below in an easy-to-follow format. Watch each quick video tutorial for answers to questions around how does Mailchimp work, how to set up Mailchimp, and how to use it effectively.
Step 1: Sign Up for an Account
To start using Mailchimp for email marketing, go to Mailchimp’s home page and sign up for an account. If your contact list is under 500, you can use it for free. To sign up, provide an email address and create a username and password. Mailchimp will send a verification email, and account setup will be complete when you click to verify your account.
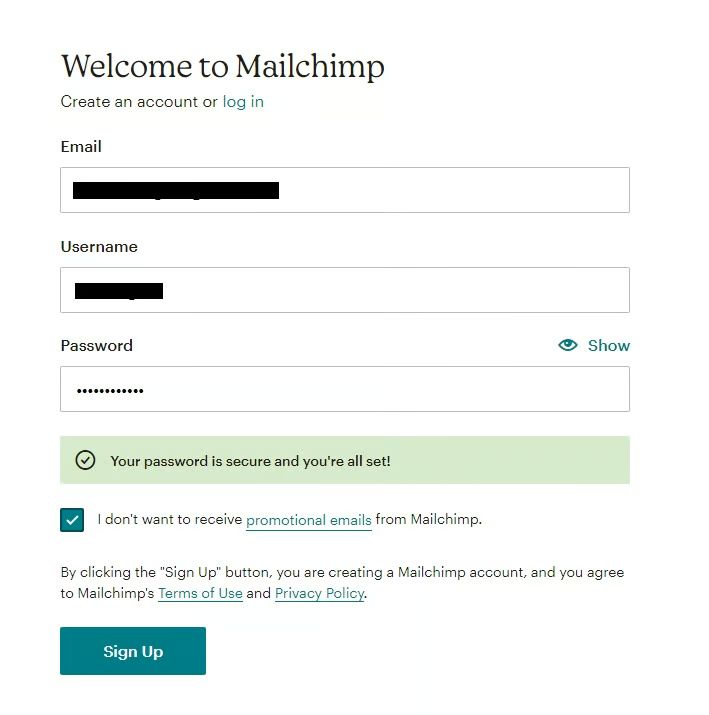
Create an account with Mailchimp to get started. (Source: Mailchimp)
With Mailchimp’s free plan, you can send up to 1,000 emails per month and create one audience (aka contact list) with up to 500 contacts. The free plan includes access to essential email marketing features, such as the following:
- Premade email layout templates
- An intuitive drag-and-drop email editor
- Signup and lead generation forms
- Landing pages
- Campaign analytics
However, for advanced features like A/B testing, email automation, and scheduling, you’ll need a paid plan.
Mailchimp Pricing Plans
Cost: Free
- Contacts: 500
- Email sends per month: 1,000
- Forms and landing pages
- Basic reporting and analytics
- 30 days of support by email
- Prebuilt email layout templates
- 300-plus integrations
After verifying your account, you’ll be asked to complete your profile by adding some personal details and your business website. Adding your website and phone number is optional, but all US-based businesses must add a street or post office (PO) box address to comply with the FTC’s CAN SPAM Act.
Mailchimp also asks a few questions about your business, such as how many contacts you have and what type of business you run. Finally, you can also opt-in to receive emails from Mailchimp that will help you learn more about the software.
Once you’ve answered all the prompts, you’ll be directed to Mailchimp’s dashboard. To get started and follow along, if you don’t have an account already, go to Mailchimp and sign up today.
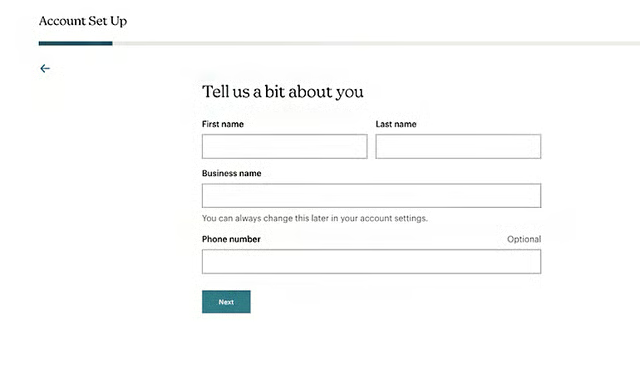
Enter your name, business, and phone. (Source: Mailchimp) 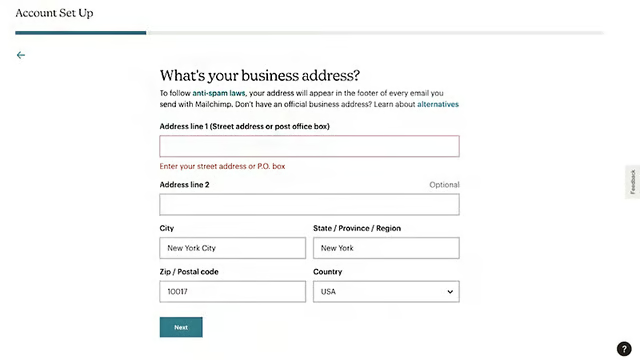
In the US, you’re required to supply a physical address or PO. (Source: Mailchimp) 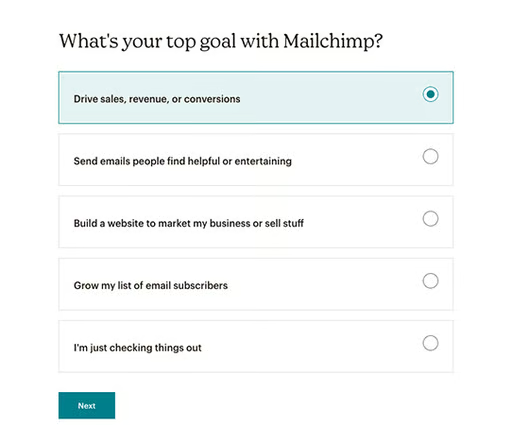
Enter your goal and hit “next” to finish the prompts. (Source: Mailchimp)


Step 2: Add Contacts to Create an Audience
Before learning how to use Mailchimp to send email blasts or drip campaigns, you’ll need to learn how to create an “Audience” (aka contact list). There are four basic ways to build an audience on Mailchimp:
- Importing a contact list as a CSV file from a spreadsheet program, customer relationship management (CRM) solution, or database
- Adding contacts manually
- Importing contacts via integration with a CRM or database
- Adding contacts automatically from online web forms
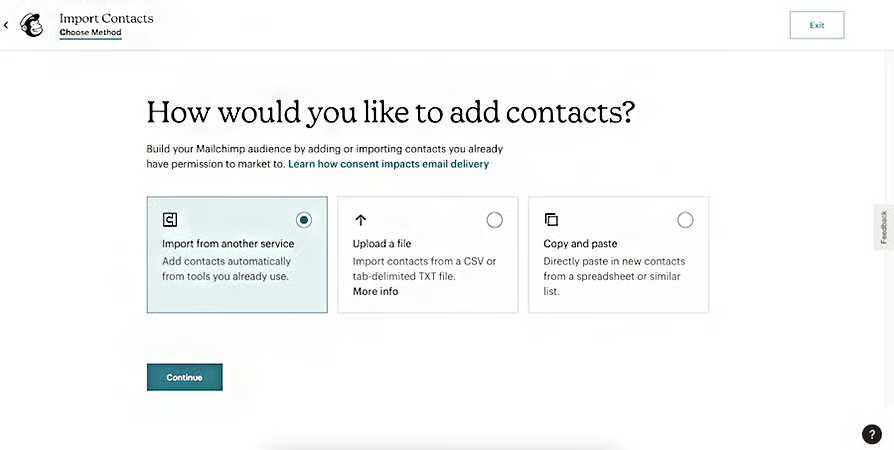
If you have a lot of contacts, you can use a comma-separated values (CSV) spreadsheet file to save time by importing your contacts into your Mailchimp audience. Our Mailchimp tutorial covers four different ways to create a list in Mailchimp. Select your preferred method from the options below:
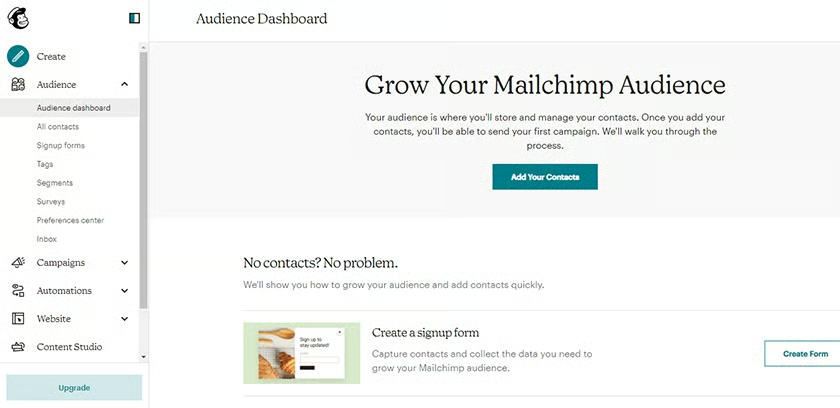
To import a contact list into Mailchimp, click on “Audience” in the left-hand menu to access the dropdowns, then choose “Audience Dashboard.” Next, click on the “Add Your Contacts” button, and on the next screen, click “Upload a file.”
If you haven’t already, export your list from a spreadsheet or database as a CSV file. Browse to the location on your device where your CSV file was saved and select it, then click on “Continue to Organize.”
Add your contacts to a Mailchimp Audience by importing a .csv file. (Source: Mailchimp) 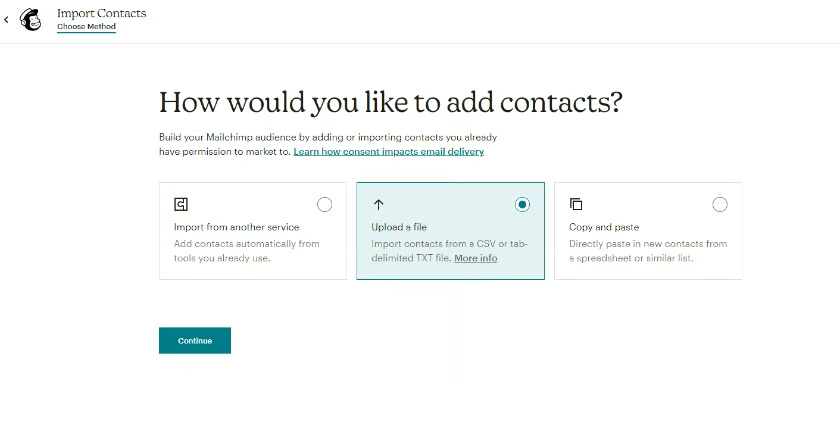
Mailchimp allows you to import contacts from another app, by uploading a file, or by manually copying and pasting contact details. (Source: Mailchimp)


As you navigate through the following screens, you can set the status for audience members (default is “Subscribed”) or add tags to further segment your audience for targeted emails. If your CSV file contains columns that don’t match the default audience list fields in Mailchimp, you can organize your audience fields or create new ones when importing your list.
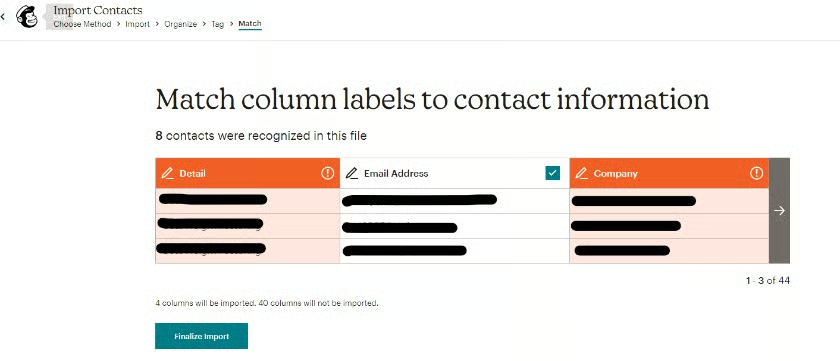
You can organize your contact list before finalizing your import. (Source: Mailchimp)
Complete the process by clicking “Finalize Import” and “Complete Import” on the next screen. Mailchimp will notify you when your list has been fully imported. Depending on the size of your list, this may take a few minutes.
To add contacts to Mailchimp manually, you can type them in one at a time or manually copy and paste data from a document with fields separated by commas. Follow this format when cutting and pasting contacts into Mailchimp: email address, first name, last name, address, and other information—separated by commas.
Ultimately, the only required element for any contact list entry is an email address, but additional information can help organize other campaign types or analyze customer demographics.
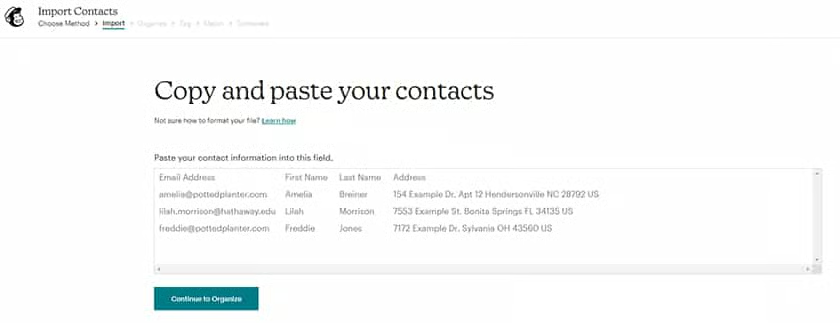
An example of what it looks like when you manually copy and paste contacts into Mailchimp (Source: Mailchimp)
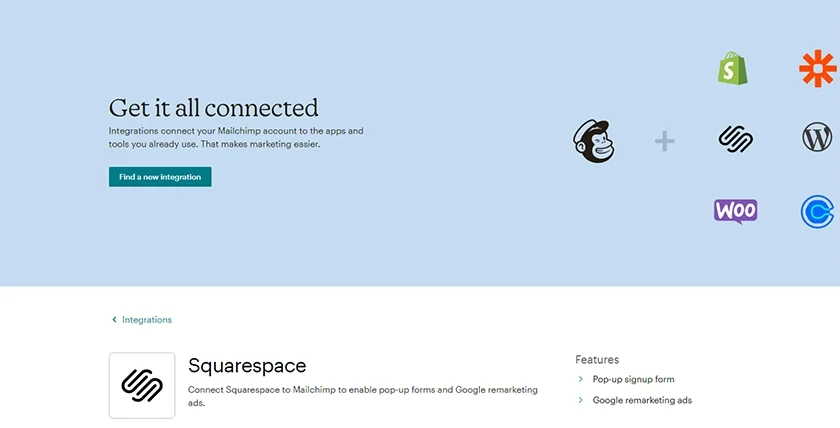
When customers buy something or sign up for special offers, integrations ensure they are automatically added to your Audience in Mailchimp. To import contacts from third-party apps, simply choose the “import from another service” option under “Import Contacts,” select the app you want to import from, and then follow the prompts.
Import existing contacts from another service into Mailchimp. (Source: Mailchimp)
Mailchimp has over 250 integrations, and some of them import and sync contacts with other software apps your business may use. Examples include some of the best CRMs for Mailchimp, third-party ecommerce platforms like Shopify, Stripe, and Square, social media, and operations-focused software for billing, accounting, and more.
Integrations make Mailchimp even more useful. You can sync customer, purchase, and financial data between Mailchimp and other programs you may already use. Mailchimp tutorials include instructions for connecting popular apps like QuickBooks, Shopify, WooCommerce, and Squarespace or adding them via Zapier.
One great example of using integrations to build your audience is Squarespace. If you use Squarespace to build a website and online store, integrating Mailchimp with Squarespace allows you to set up automatic emails confirming purchases. You can also use buy data for your email campaigns to segment your audience based on their purchase history.
Integrate with third-party apps to add contacts to your Mailchimp audience. (Source: Mailchimp)
To get started with Mailchimp forms, choose “signup forms” from the main menu (left side of the screen), which then displays a variety of signup form types, from contact forms to subscriber popups. You’ll also have the option to build a form yourself. Once you’ve chosen one that best fits your needs, fill in the following prompts if there are any, after which you’ll be directed to the drag-and-drop form builder.
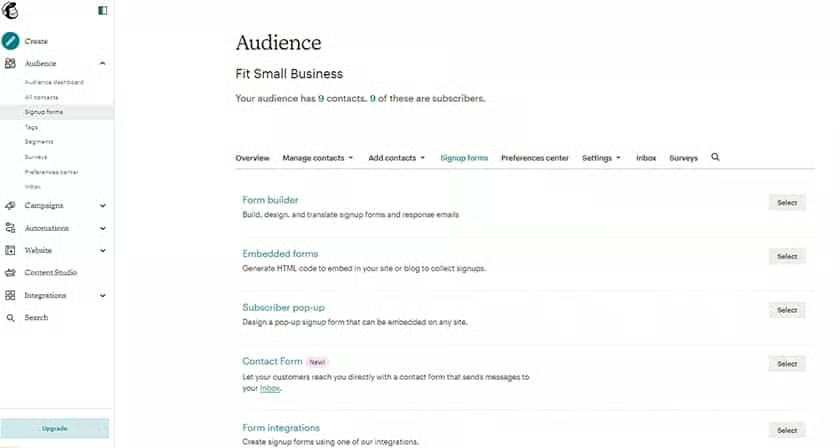
Various Mailchimp signup forms make it easy to grow your audience online. (Source: Mailchimp)
The form builder is easy to use and customize. Make changes by clicking on the section you want to edit and choosing your preferred font, font color, and more. You can also upload your own image or choose a different layout. Note that the form builder’s interface varies depending on the form you’re building; however, their editing functionalities are similar.
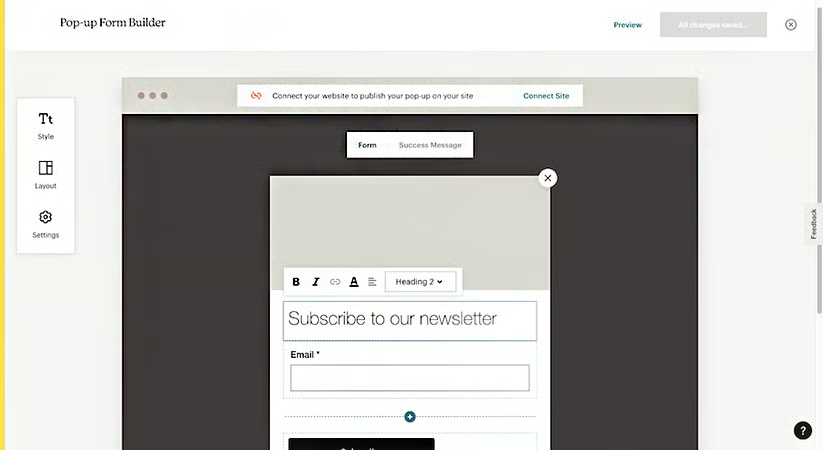
Customize the form builder according to your needs. (Source: Mailchimp)
Web forms are universally effective for lead generation, including adding contacts to your mailing list. You can create web forms in Mailchimp and embed them on your website or link to them from your website or social media accounts to grow your audience.
For example, you can add a simple sign-up form to the footer of your website or create a pop-up form and connect your site to have it automatically pop up for site visitors. When visitors complete a form, the data is automatically added to your Mailchimp Audience.
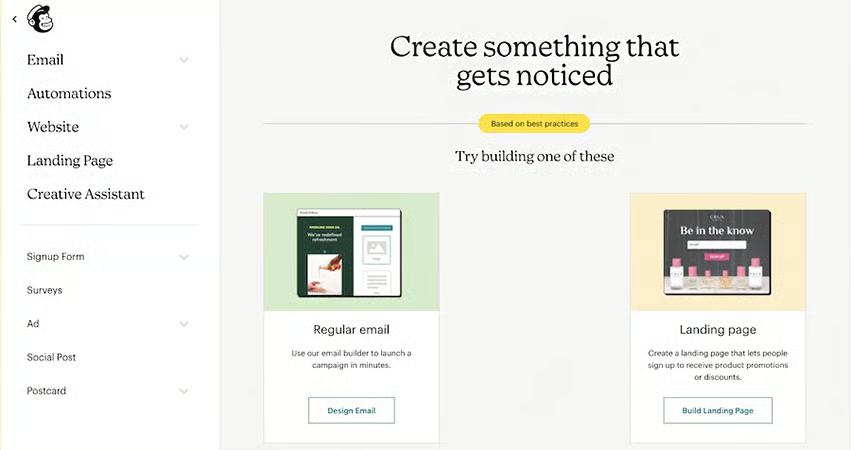
Step 3: Create an Email Campaign With Mailchimp
Now that you have contacts imported as an audience, you’re ready to create your first email marketing campaign with Mailchimp. On your dashboard, navigate to “Create” on the left-hand menu, then choose “Regular Email” to create a new email campaign.
Creating a new email campaign in Mailchimp (Source: Mailchimp)
Click on “Edit name” under the “Untitled” campaign name at the left-top of the next screen to name your campaign so you can easily find it again. You’re the only one who sees this name, so it can be anything you want.
Make it easy to identify campaigns to check results or replicate a past campaign by using a naming convention. Your naming convention might be date-based or by type of email, such as “monthly newsletter” or “new customer offer,” or by the product line—whatever works best for your business.
The “To” section is where you’ll input the audience you want to email—click the “Add Recipient” button and select your audience set. At this point, you can also decide whether to send your email with or without automated personalization.
Personalize your emails by checking the “Personalize the ‘To’ field” box. This automatically adds audience list fields such as your contacts’ first name, last name, both their first and last names or a custom option, like “Miami House Hunters,” to each email as they are sent. You can also use the segments or tags option to send your campaign to specific segments in your audience.
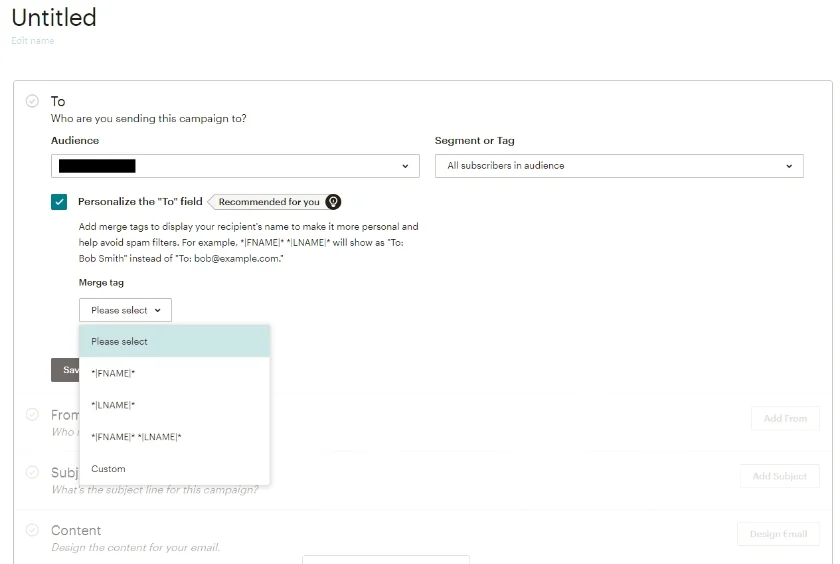
Choose and customize the audience of your email campaign in the “To” section. (Source: Mailchimp)
In the “From” section, add your name or business name and the business email address you want to use. Your subscribers will see these elements, letting them know who the email is from.
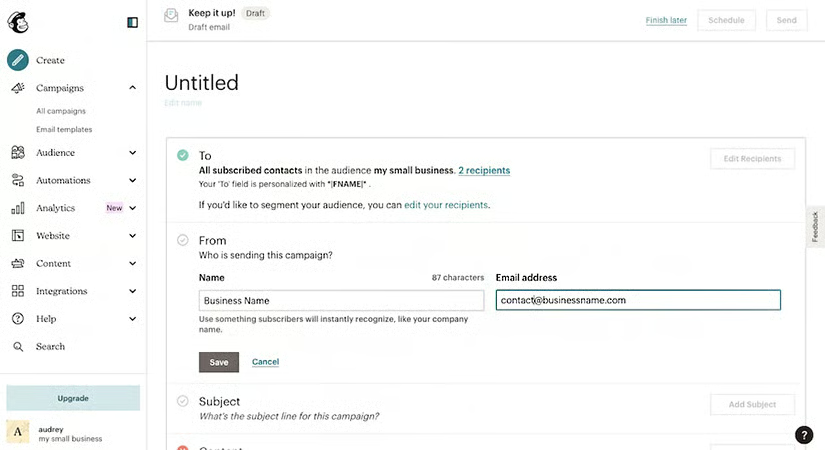
Input a professional name and email address to your campaign’s “from” section. (Source: Mailchimp)
Many businesses create an email alias address like “updates@mybusinessname.com” for the “from” field in email marketing sends rather than using an individual email address. This enables you to direct replies to a shared inbox or an email forwarded to someone responsible for monitoring any replies and responding accordingly.
Also, using a professional email address branded to your business offers more credibility when sending email marketing campaigns. For example, if a subscriber receives an email from a business that looks like “businessname@hotmail.com” or “businessname@gmail.com,” they may mark it as spam or worry it’s a phishing attempt.
Next, add a subject line that describes the content of the email in a few words. It should be enticing, so subscribers open your email. Mailchimp offers tips on subject line best practices, such as the best length, number of emojis to use, and ideal number of characters. Then add your preview text, which is the text that appears in a user’s inbox following a subject line or below it.
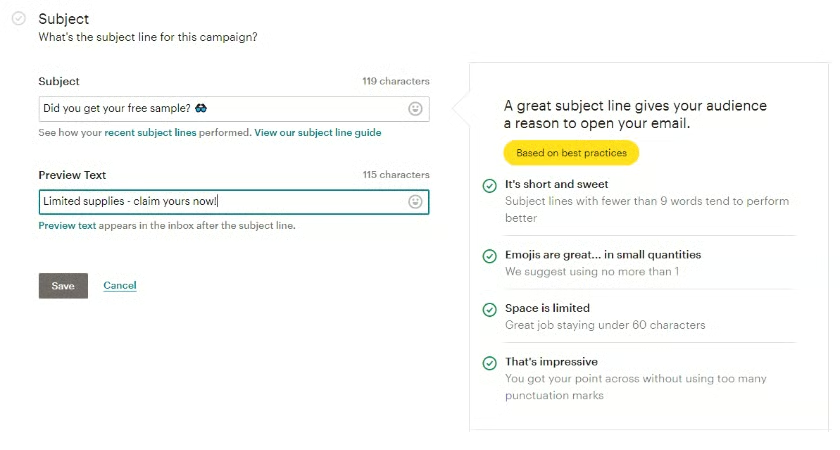
Add an enticing subject line. (Source: Mailchimp)
Step 4: Design Your Email
After setting up your campaign’s details, you’re ready to design your email and add content. Your email design should reflect the look-and-feel of your other marketing materials as this consistency reinforces your brand presence. Click the “Edit” button under the “Content” section to enter Mailchimp’s email campaign builder.
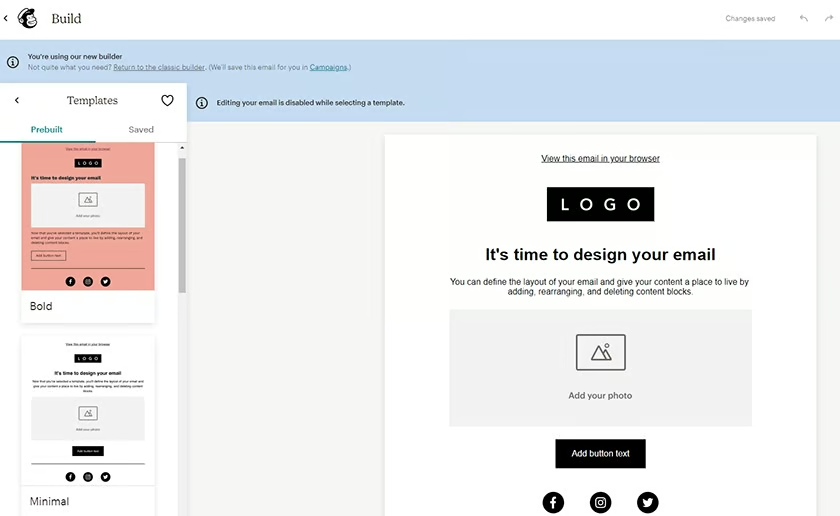
Mailchimp will automatically lead you to their new email builder. However, Mailchimp offers the option to use the classic builder by clicking the drop-down arrow on the top right of the screen and choosing “Switch to Classic Builder.” The differences between the new and classic builders are primarily in how you edit each element and the additional elements supported by the new builder.
| New Builder | Classic Builder |
|---|---|
|
|
The new editor lets you add a new element by clicking on the “Add” tab on the left, choosing the element you want to add, then dragging it to your email layout, where you can edit it directly. The classic builder lets you drag and drop blocks to the layout and then edit the content of blocks on the right-hand side of the page.
In Mailchimp’s New Builder email editor, you’ll be led directly to the email designer interface, with an email template ready for customizing. However, if you prefer a different email layout, you’ll be able to choose from a handful of email template layouts under the “Templates” tab on the left-side menu bar.
Note that not all templates are free. Some of the more complex templates, such as those for holiday campaigns or product spotlights, come with an added cost.
Mailchimp’s new email builder lets you choose from a handful of email templates. (Source: Mailchimp) 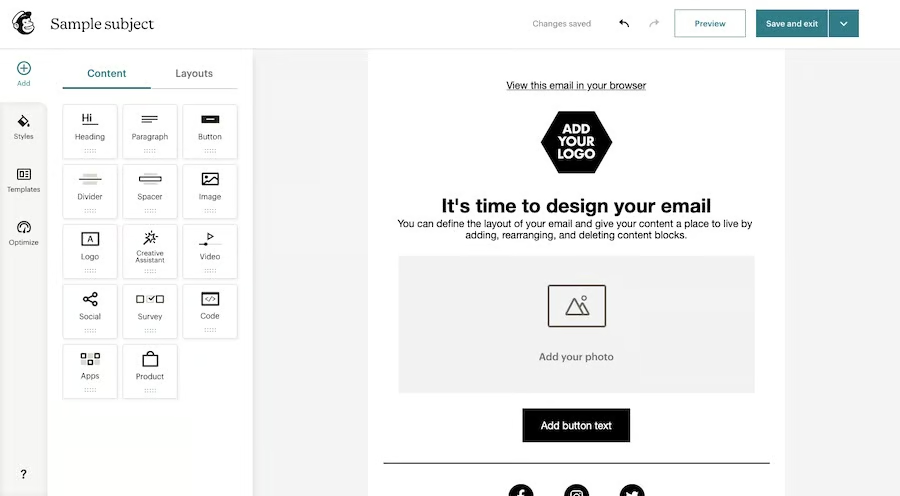
Add new elements by clicking the “Add +” tab on the left-hand menu. (Source: Mailchimp)


When designing your email, you can edit its sections by clicking and editing them directly on the screen. For example, you can directly edit the text in your email by clicking on the text element and typing in your preferred copy. To reorder sections, click on the compass icon accompanying each element and drag it to where you want it on the page.
To add a new photo, text block, or another design element, just click on the plus sign on the left-hand menu and drag it to where you want it placed on your email. Deleting an element is as easy as clicking on it and then clicking on the trash icon to its right.
You can also undo and redo actions using the left and right arrows at the top of your screen. Then, when you’re done, preview your design by clicking the “Preview” button on the same bar. From here, you can also send a test message to view and proofread your email before sending it out.
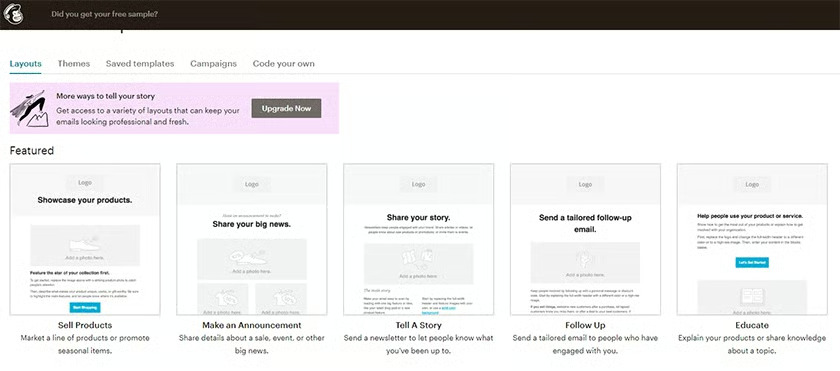
To design with the classic builder, select a basic Mailchimp email template or a theme you like on the “Themes” bar to get started. The premade templates and themes are especially helpful for organizing your email’s structure based on your campaign objective. For example, to learn how to create a newsletter in Mailchimp, go for the “Tell A Story” template, then fill in the images and text.
Once you’ve chosen your preferred template or theme, Mailchimp will lead you to its classic drag-and-drop email builder. To edit text or images, click the box to open an editable section to the right of your email.
Choose an email layout on the classic Mailchimp email builder. (Source: Mailchimp) 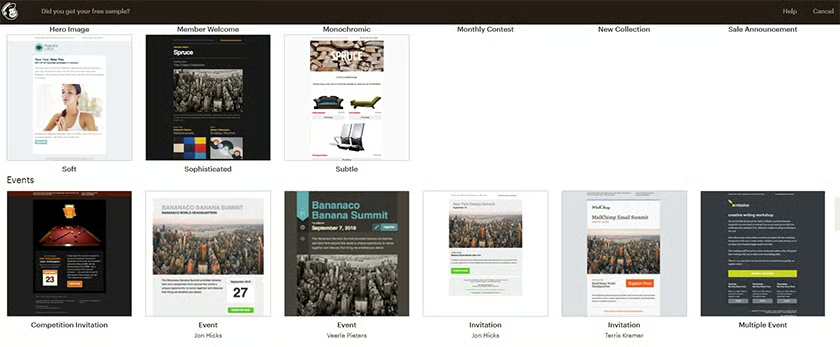
Premade templates with design elements are available in Mailchimp’s Classic Builder. (Source: Mailchimp) 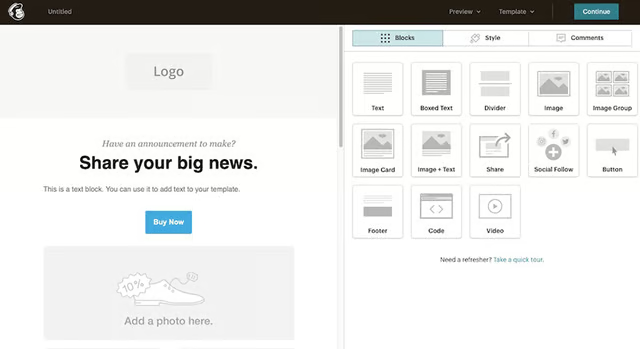
Add and edit elements on the right side of the editor with the Classic Builder. (Source: Mailchimp)


To add elements, choose the element type from the elements menu on the right side of your screen, then click and drag it to your email template on the left. Delete elements by clicking on them, and then clicking on the trash icon in the same block.
Regardless of which design editor you use, you’ll need to add your own images, logo, text, and other elements to your email campaign. There are several places where you can get free images to amp up your email campaigns using visual media. Our list of the best places to get free images for website design showcases more than a dozen sources.
If you need inspiration or a source for creating banner images or other marketing materials for your email, try Canva. There are hundreds of free, premade images and professional templates to choose from, and you can easily create your banner with images and text in its intuitive design editor.
Step 5: Send Your Email Marketing Campaign
Once you’re satisfied with your marketing campaign’s to and from fields, subject line, and email design, it’s time to send your email campaign. Preview your campaign and send a test email to proofread for spelling and grammar and ensure all the links in your email are working correctly.
Then, you can either send the email immediately or schedule your campaign launch. You will find the button to send at the top right of your email campaign in Mailchimp. You will need a paid plan to schedule emails in advance—with the free version, you’ll have to do this manually.
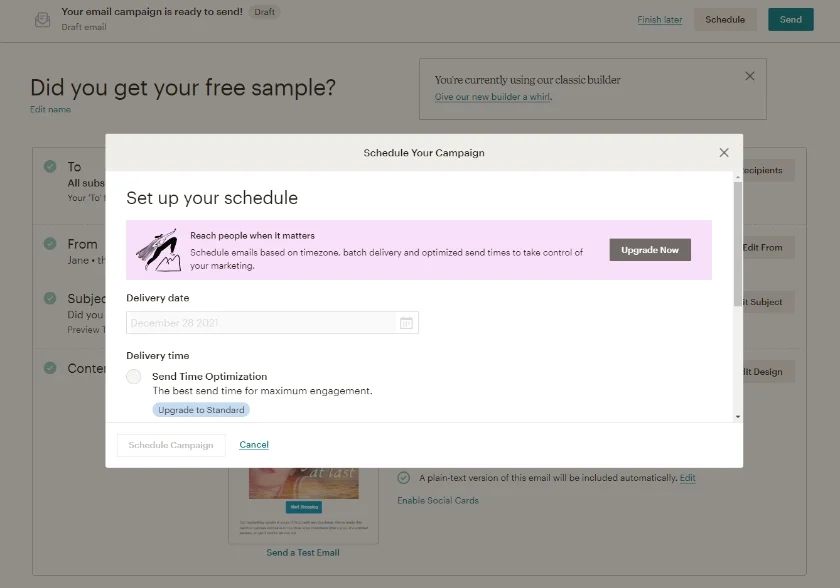
Mailchimp’s paid plan subscribers can schedule emails to be sent at a particular time and day. (Source: Mailchimp)
Choosing the best time to send an email comes down to knowing your audience. For example, if you’re emailing to inform your audience about a sale or promotion, email marketing statistics show that the hours between 9 a.m. and 3 p.m. generate the most engagement, especially during the first three days of the week.
It’s also important to note that marketing emails must provide a street address or US Postal Service PO box per the CAN SPAM Act of 2003 and Federal Trade Commission (FTC) requirements. They must be identified as ads and provide a straightforward way to unsubscribe. Mailchimp makes compliance easy by automatically including the required information in the footer of every email.
Step 6: Monitor Campaign Performance & Get Insights
While some features are locked behind higher tiers, all Mailchimp users get access to essential email marketing performance metrics like opens, views, clicks, bounces, and more. To access metrics for a campaign, from the campaign dashboard, click “View Report” on the right-hand side of the campaign.
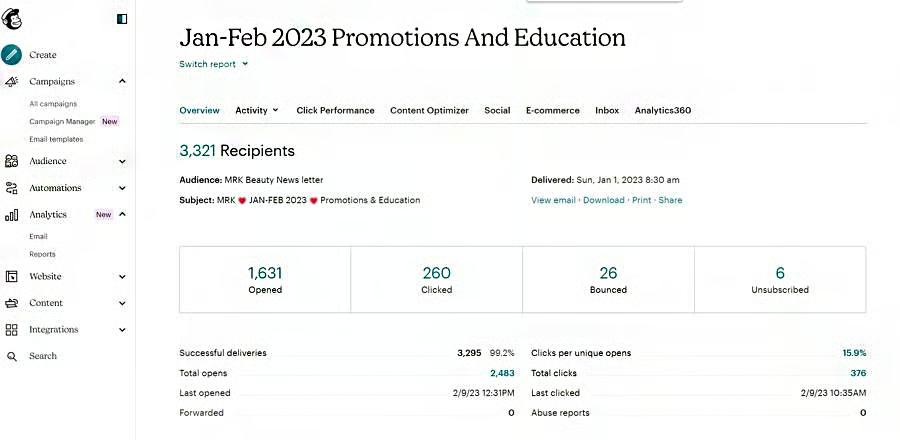
An example of Mailchimp email marketing campaign performance analytics (Source: Mailchimp)
You’ll be able to see how many times your email was opened, how many clicks there were (and who opened and clicked on a link). You’ll also know who unsubscribed and how many emails bounced (were undeliverable).
Track your campaigns over time to gain insights into the best times to send marketing emails and which types of campaigns get the best engagement. Also look for any potentially negative metrics, like emails that generate a lot of unsubscribers, as these could also be producing spam reports that damage your reputation and ability to build your campaigns effectively.
Frequently Asked Questions (FAQs)
You can use Mailchimp for free by signing up for an account. The plan stays free forever, provided you don’t exceed the limit of 500 contacts or 1,000 emails per month. It’s a good way to familiarize yourself with the dashboard and the basics of how to use Mailchimp before upgrading to a paid plan.
No, Mailchimp isn’t hard to learn, even for true email marketing beginners. There are free guides and Mailchimp tutorials on the platform to walk you through account setup, building an audience, and creating email marketing campaigns. The dashboard and email editor are also very intuitive, and there are tons of premade templates you can start with.
Mailchimp has retained its classic builder for a reason. Despite the overall improvements in customizability and new third-party app integrations with the new builder, the classic builder offers simplicity in design and better mobile responsiveness.
The best alternative to Mailchimp depends on factors like the size of your contact list and your business needs. SendX is the cheapest Mailchimp alternative, especially for large lists, and has similar tools, including landing pages, web forms, and A/B testing.
Also, HubSpot is the best Mailchimp alternative for sales team CRM integration or those wanting to automate ecommerce emails. Klaviyo is another great option to consider for ecommerce email automation including abandoned carts, nurture sequences, and other triggers.
Bottom Line
Mailchimp has long been the gold standard of email marketing tools and tops our list of the best email marketing software for small businesses. It’s free for up to 500 contacts and includes powerful features seldom found in free tools. Learning how to use Mailchimp for email marketing is simple, and you can set up your account, import contacts, create, design, and start an email campaign in a few easy steps. Sign up for a free account to get started today.