The HubSpot website builder allows you to create a website that integrates easily with its industry-leading marketing, sales, and customer support tools. Learning how to build a HubSpot website is easy: create a free account, choose a template, edit your website’s pages, and customize the theme for your brand. Lastly, connect your domain and publish your site. Follow the steps below and get examples to inspire your design.
Step 1: Make a HubSpot Account for Free
To follow along with the steps for how to build a website in HubSpot, create a free account. Click the button below and locate the “Get started free” button—it should be at the top-right corner of your screen, next to the “Get a demo” button. You’ll have four options: type in your email address directly, or connect your existing Google, Microsoft, or Apple account.
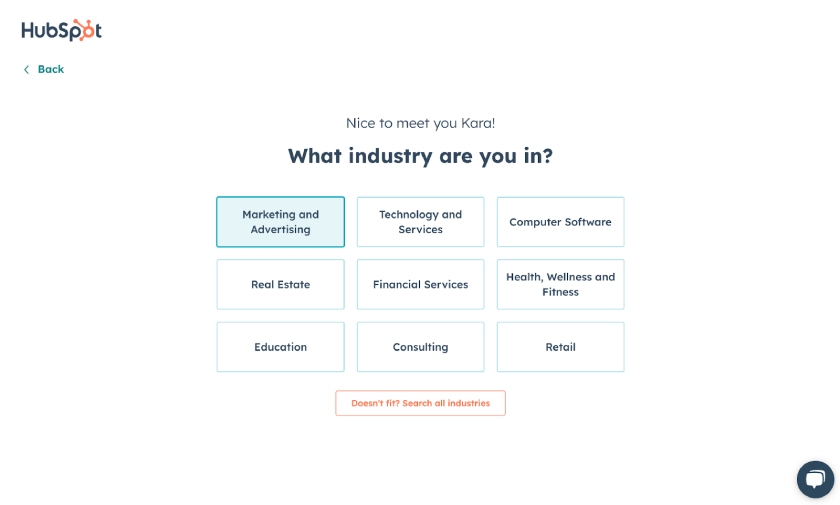
Once you’ve created your free HubSpot account, you’ll be directed through a simple, step-by-step onboarding process. First, you’ll enter your name, then select what industry you belong to and what role you play at your company. Next, provide your company name and number of employees.
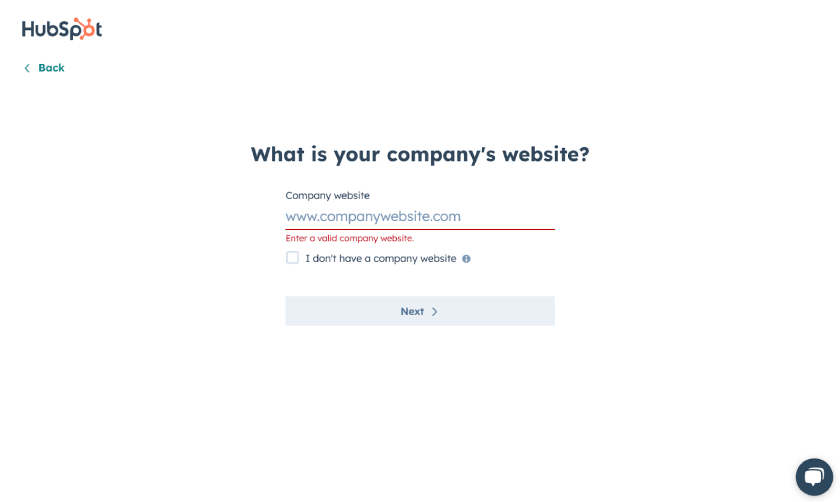
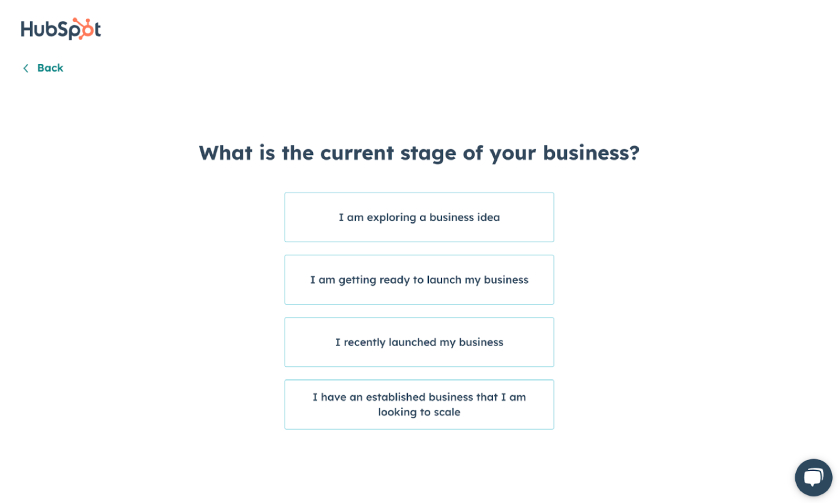
Then you’ll be prompted to enter your company’s website URL. If you don’t have one, check the “I don’t have a company website” option. Choose whether you are making a business or personal website on the next screen. If you select the business option, you’ll be asked what stage of maturity your business is at. Finally, choose where you want your website to be hosted (aka your server location), whether in the US or Europe.
After that, you’ll be taken to an optional AI website-building tool. If you don’t want to create a website with HubSpot’s AI assistance, click the “Exit” button in the top-left corner of this screen. If you choose to use the AI tools, the first screen will prompt you to describe your business, and the second will ask you to select your goals for the website.
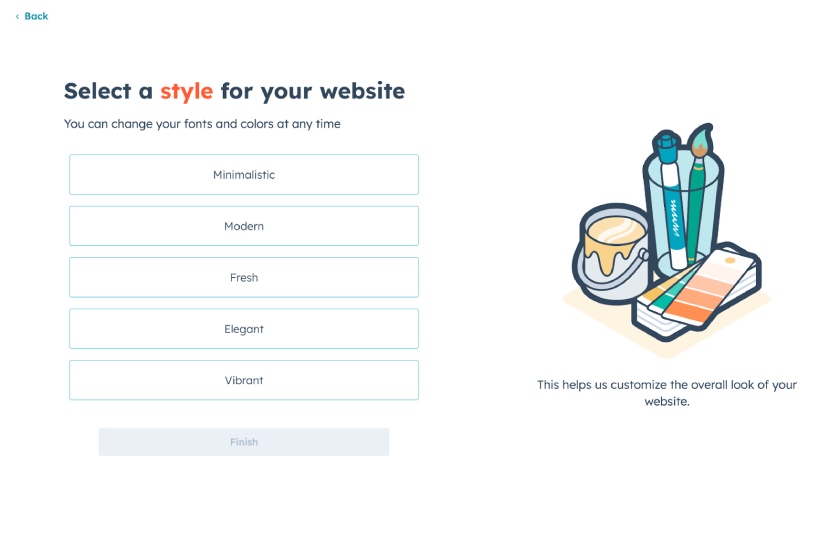
On the last screen, you’ll be asked to choose a style for the website. After selecting your website style, hit the “Finish” button at the bottom. This will generate a rough draft of your website, complete with autogenerated text and basic stock images, which you can customize further.
Step 2: Choose and Install a Theme for Your HubSpot Website
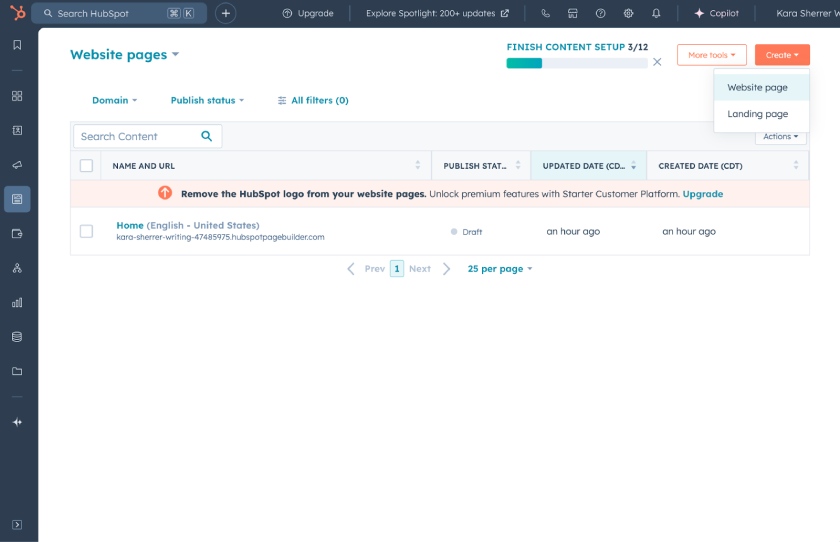
If you don’t like the website the AI tool generates for you or don’t want to use that feature, you can choose a theme instead. To do this, click the “Exit” button in the upper-left corner to leave this website and go to your Content Module. This is the main dashboard of your website and is where you’ll manage all its elements, access your CRM, and use HubSpot’s other tools.
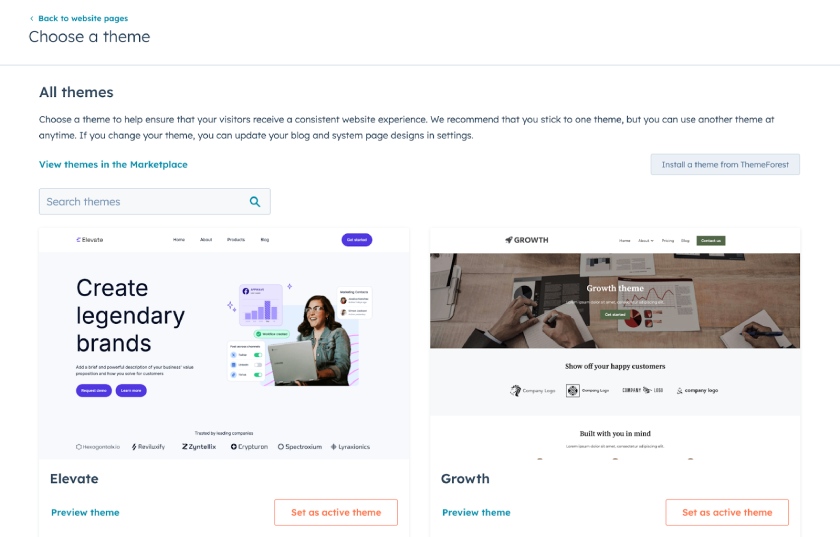
To start building your website using a template, hit the “Create page” button in the upper right corner of your Content Module. Choose whether you want to create a landing page or a website page, and you’ll be prompted to enter a page name and then directed to HubSpot’s theme selector.
HubSpot will suggest a few templates based on a theme determined by the questions you answered in step one. If you don’t like the suggested theme, you can view all of the HubSpot themes by clicking on the theme name (to the right of the “Search templates” search bar) and then selecting the “Change themes” option. This will take you to a new page where the themes are displayed and you can choose your preferred one.
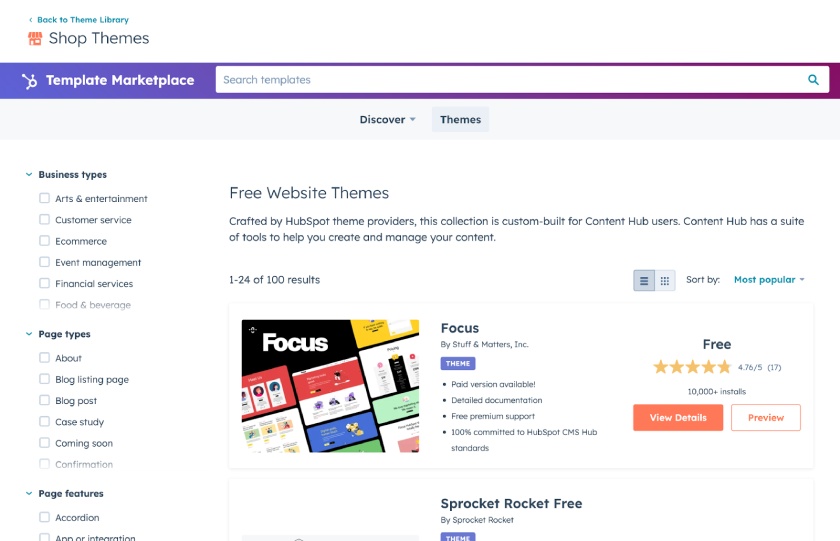
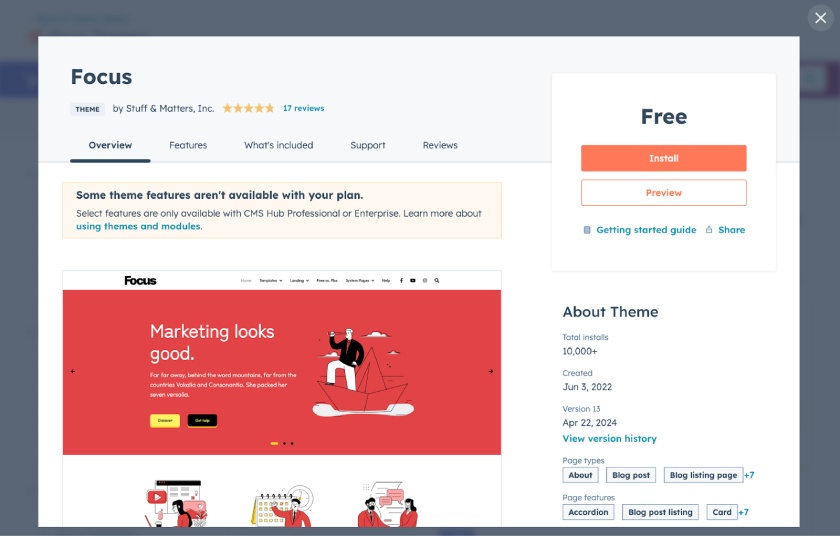
If you want even more theme options, click on the “View themes in the Marketplace” link, which will take you to HubSpot’s theme marketplace, where you can browse 100 free themes created by third parties. When you find a theme, hit the “View details,” which will open a pop-up window.
Hit the big “Install” button to open another pop-up window that asks you to agree to the terms and conditions. Check the box and hit the “Install for free” button again. Your chosen theme will automatically be applied to your website.
Step 3: Edit Your HubSpot Website’s Pages, Settings & Structure
After you’ve selected and installed your theme, you’ll be given a selection of web page templates. Select which page template you want to start with, and HubSpot will take you to a WYSIWYG (what you see is what you get) page editing interface. You can edit or remove the existing content, drag and drop modules to change the order of appearance, or add even more content to the page.
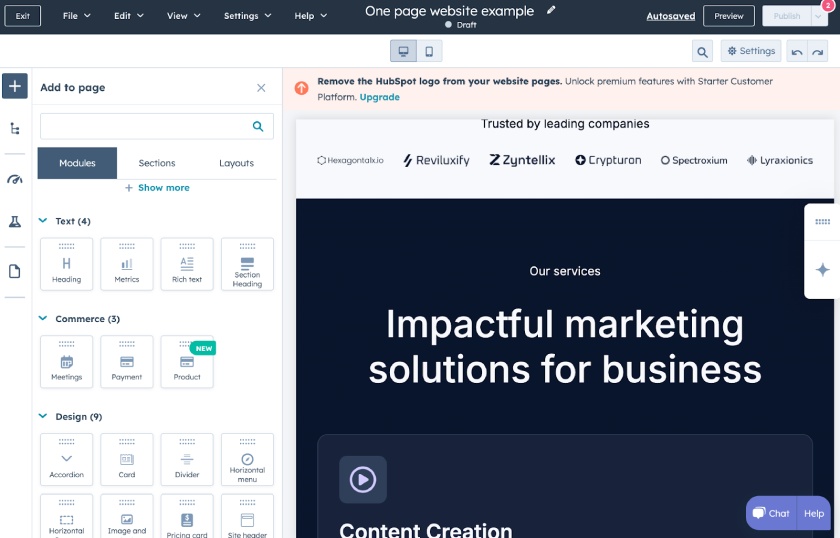
To add more sections to a page, click on the circular plus sign-in between a page’s sections. This will bring up a left sidebar with three tabs at the top: Modules, Sections, and Layouts.
- Modules: Modules are individual page elements like buttons, images, or text boxes. This gives you fine-grained control over the content and design of each section. You can add various modules like images, text boxes, buttons, and forms.
- Sections: With sections, you can save time by using prebuilt element groupings. For example, you can quickly add a section with a heading, image, and text, or an FAQ section with collapsible questions.
- Layouts: Use layouts to control the number of columns in a row within your section. This allows you to arrange content side by side.
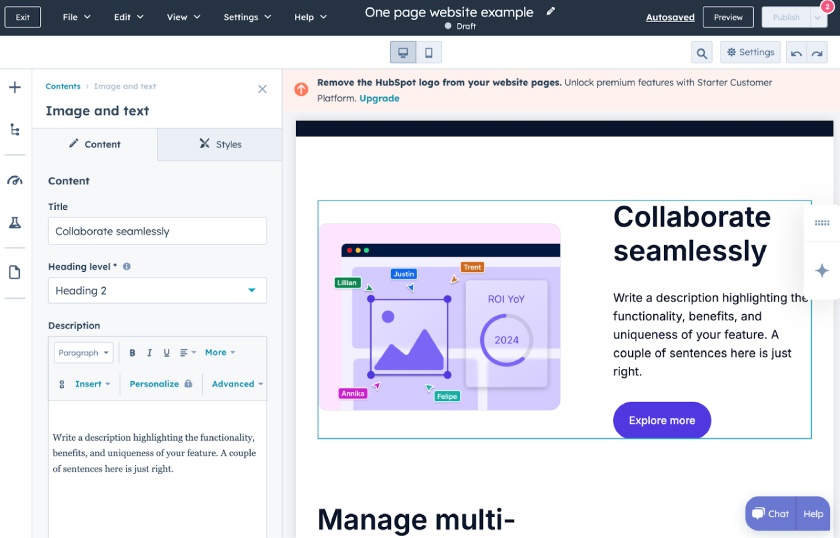
Drag the element you want from the sidebar menu to where you want it on the webpage. To delete a section (or module), hover over it and click on the trash icon on the side. To edit the content in each module, simply click on the module in question, which will bring up a sidebar on the left. You can use this sidebar to edit the text, replace the image, and make more extensive style edits (e.g., changing spacing and padding).
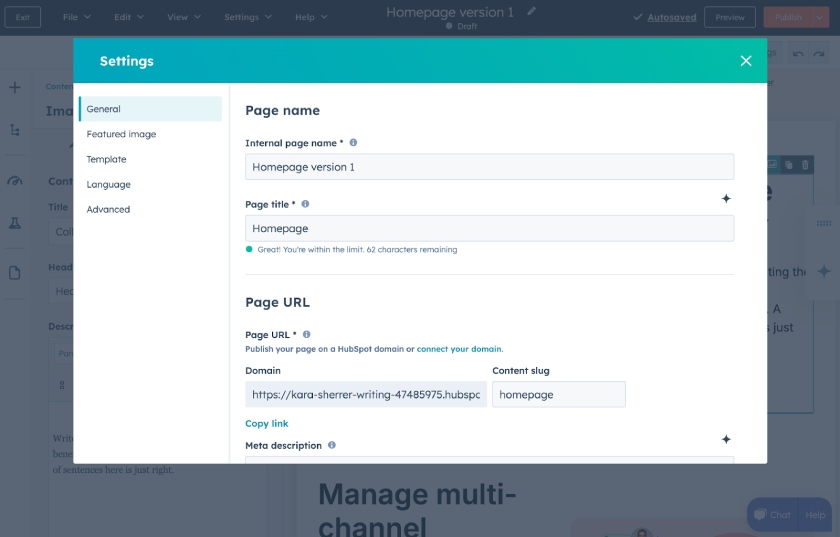
HubSpot makes search engine optimization (SEO) easy with built-in guidance and tools. Once you’re done editing a page’s content, access its settings by clicking on the “Settings” tab at the top of the screen. Here, you can edit elements that affect your site’s SEO, including your page title, language, slug, meta description, and featured image. You can even embed code at the page level in the Advanced options.
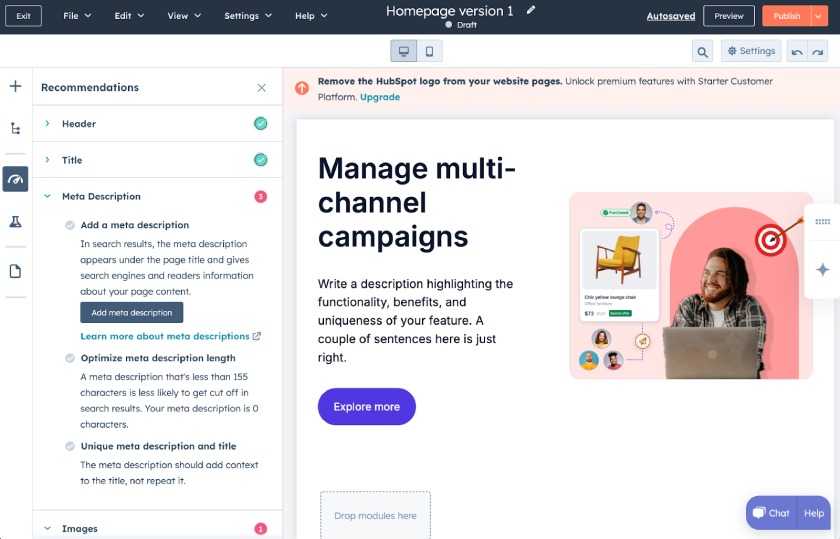
Next, click on the speedometer icon, which is the third option in the middle of the left sidebar. This will bring up the Optimize Recommendations section, which will display a checklist of anything you still need to optimize the page to improve its SEO. To give your page the best chance of ranking higher on Google, try to get a check beside every item before hitting the “Publish” button at the top right corner.
Create more website pages by clicking on File, then New, and then Page in the top left-hand corner of the page editing interface. Here are some of the pages commonly needed to make a small business website:
- Home page
- About
- Store
- Contact
- Products
- Services
- Pricing
- Blog
- An ad or special offer landing page
- Frequently asked questions (FAQ) page
When building a website with HubSpot CMS, website pages, landing pages, and blogs are accessed via separate tabs. To access them, return to the content module and click on the corresponding tab in the left sidebar to start the onboarding process of either a landing page or a blog. Then, you’ll enter a drag-and-drop editor where you can create and optimize your page. The steps are similar to creating a website page.
For example, before you can write a blog post or article, you must create your blog first. On the free plan, HubSpot allows you to have one blog with up to a hundred posts. By upgrading to the Starter plan, which costs $15 per month with annual billing, you can publish up to 10,000 blog posts, which is more than enough for most small businesses.
Step 4: Customize Your HubSpot Website Theme, Header & Footer
To keep your website on-brand, you can customize your theme’s design to reflect your brand’s colors and fonts. To do so, enter your page editor (by clicking on any page), then click on Edit then Theme in the top left-hand corner of the page editing interface. This will bring up the settings option in the left-hand sidebar. The settings you enter here control how your pages are displayed throughout your website.
For example, setting global colors instantly applies your choices to all headlines and text content, colored section backgrounds, and elements like buttons. However, you’ll also be able to further customize these options with other settings, such as choosing a font for headings and specifying the colors you want to be applied to your site’s navigational menus.
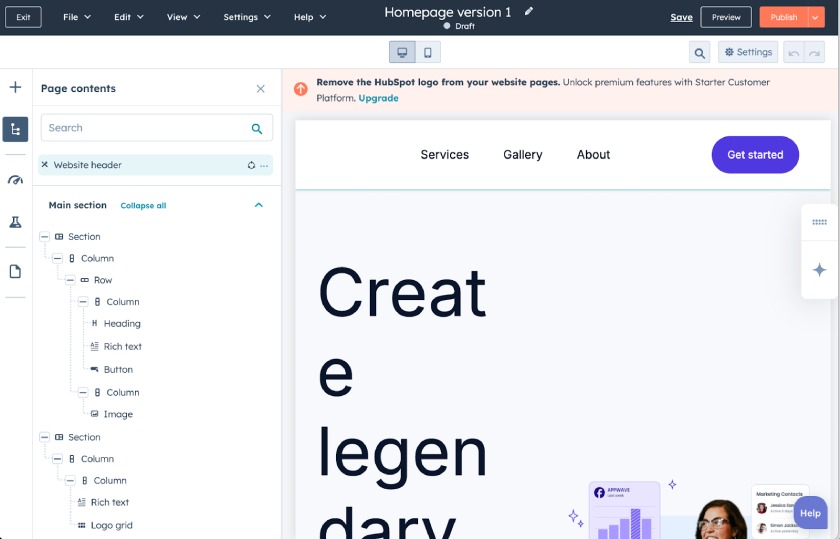
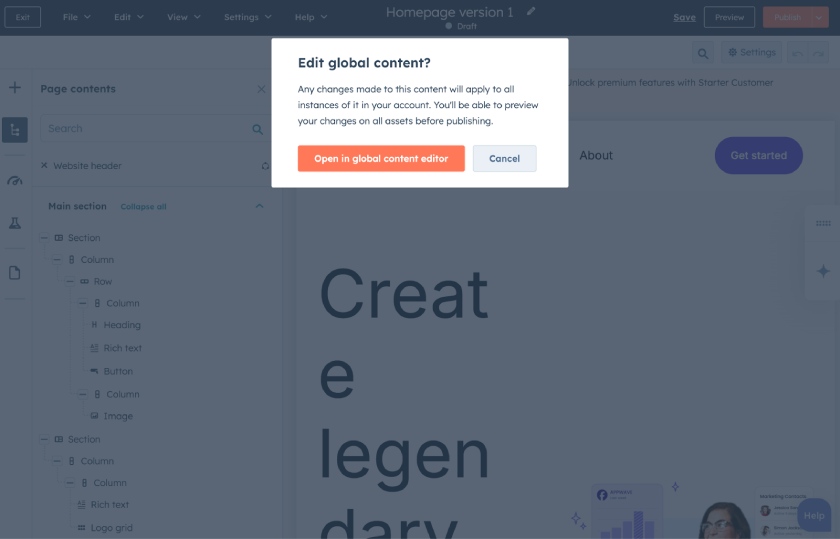
Part of learning how to build a website on HubSpot includes setting up your site’s header, which is the section that appears at the top of every page of your site. It’s usually where you’ll find a website’s navigation menu and logo. To edit your site header, select the Contents icon, which is the second option down in the left-hand sidebar. Select “Website Header” and then click on the button that says “Open in global content editor.”
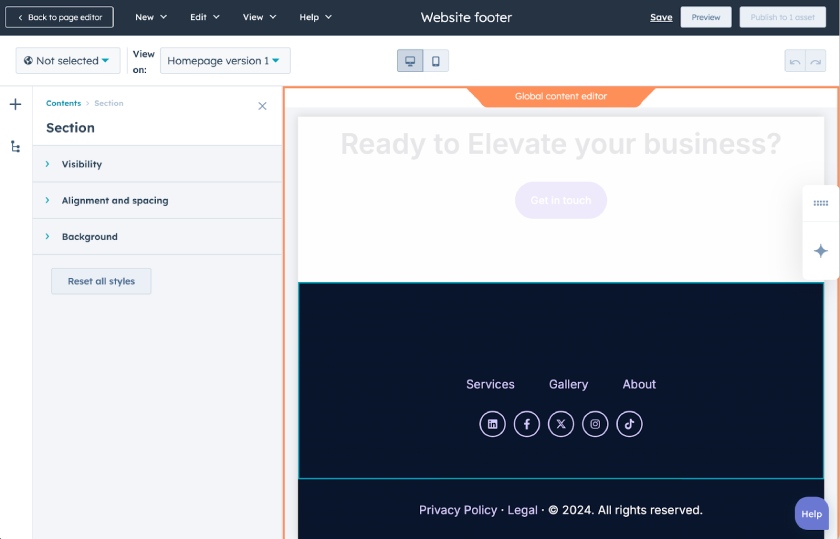
In the global content editor, upload your logo, add your navigation menu, create a search bar, and add call-to-action buttons (e.g., an invitation to apply, shop, or subscribe to email updates). Remember to click to apply changes after every edit. Once you’ve customized your header, click on “Publish to X asset/s” at the top right corner.
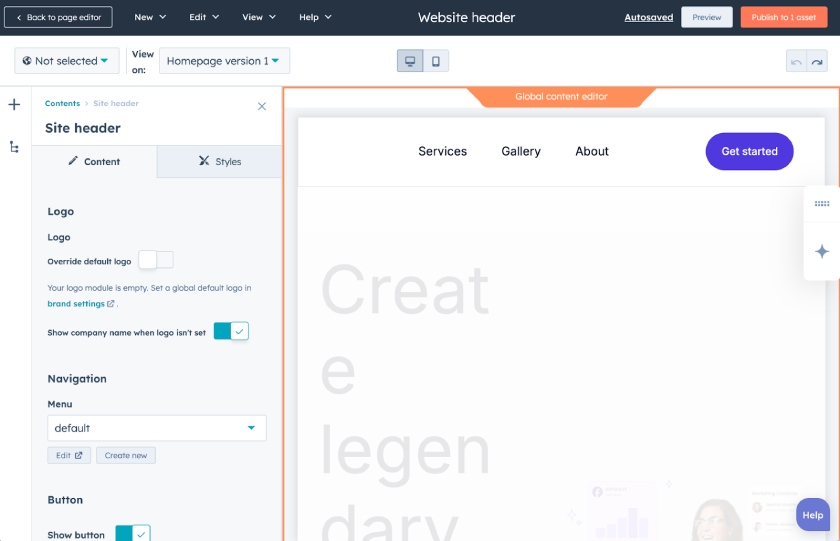
Once you’re in the global content editor, you can update your header or top nav, including its buttons and styles.
Step 5: Connect Your Domain to Finish Building a HubSpot Website
You can build a website on HubSpot for free and publish it on a HubSpot.com subdomain, but this isn’t recommended for businesses. Doing so detracts from the credibility of your brand and isn’t great for SEO, as HubSpot essentially benefits from any rankings your site receives instead of your own domain.
Custom domains can be purchased for as little as $10 to $12 per year through the best domain registrars, so there’s no reason to skip this step. If you don’t already have a domain, buy one to use with your HubSpot website.
- Access domain management
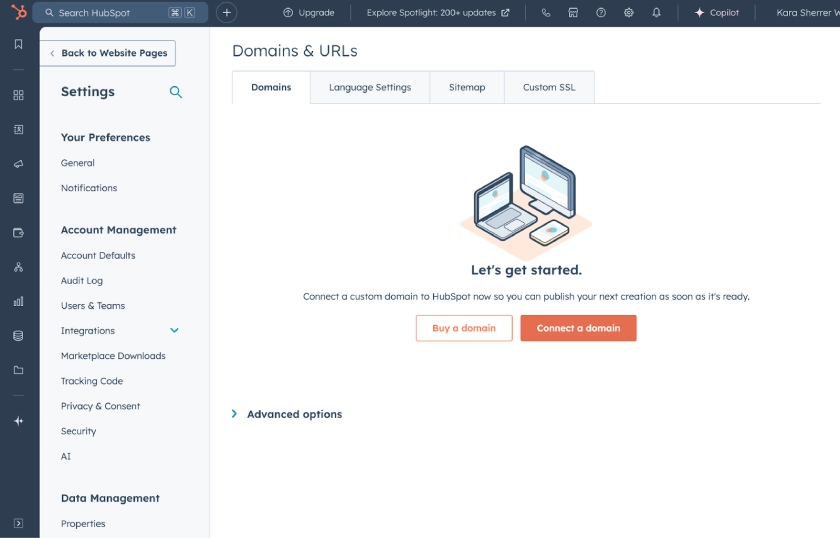
- Click the settings gear icon in the top right corner of your Content Module.
- In the window that appears, click the “Manage domains” button.
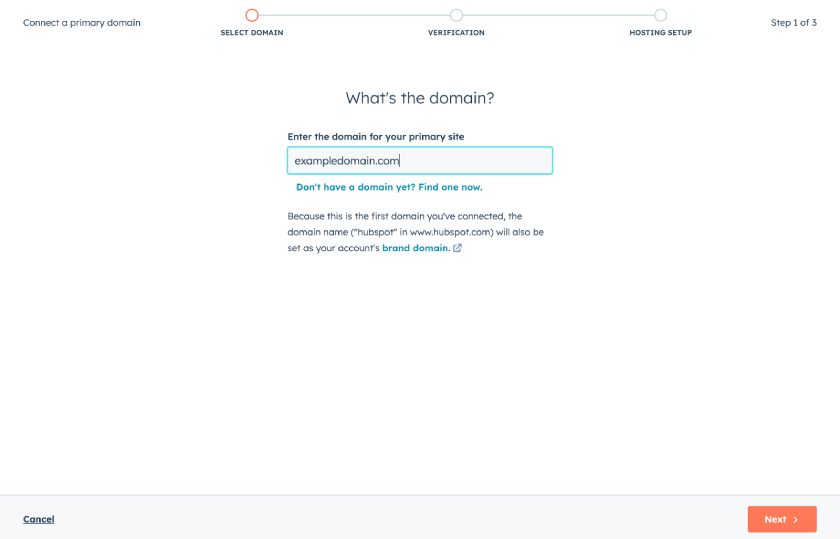
- On the next screen, click the “Connect a domain” button.
- Enter your domain name
- In the first step of the connection process, enter the name of your domain.
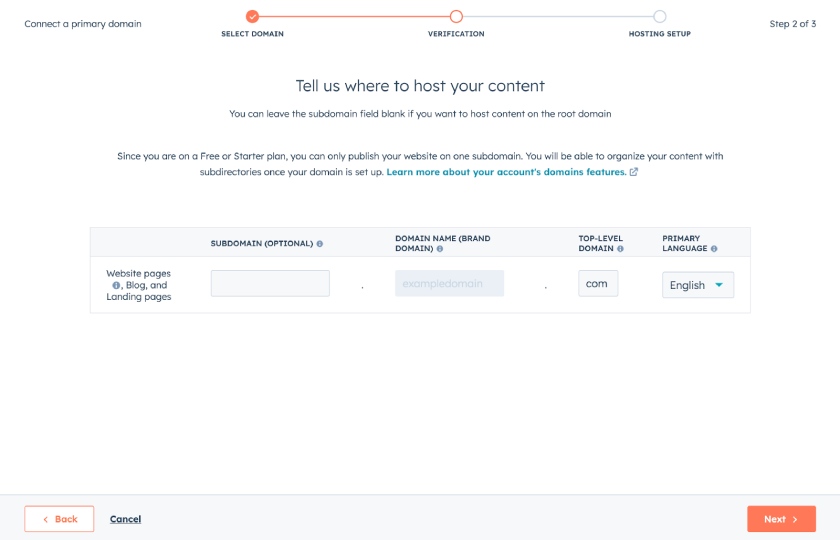
- Add verification information
- On the second screen, provide the required verification information. This may include adding a second subdomain if needed.
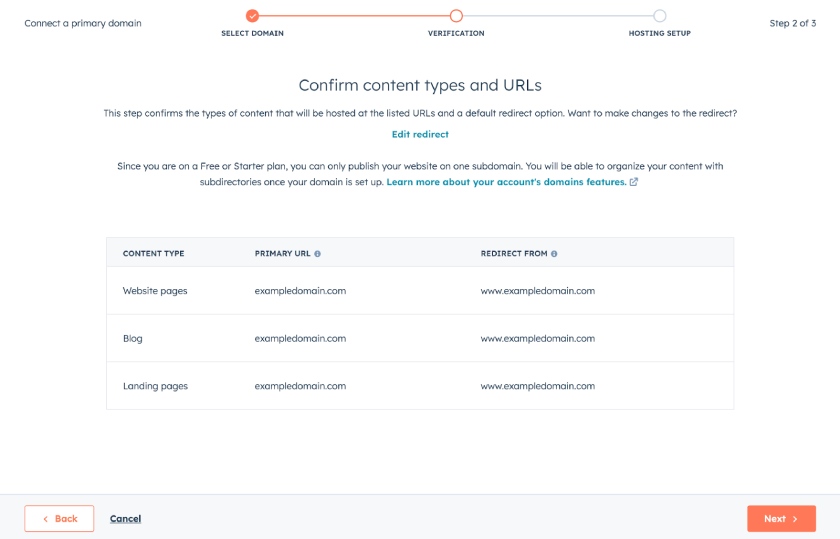
- Confirm the types of content you plan to publish on this domain.
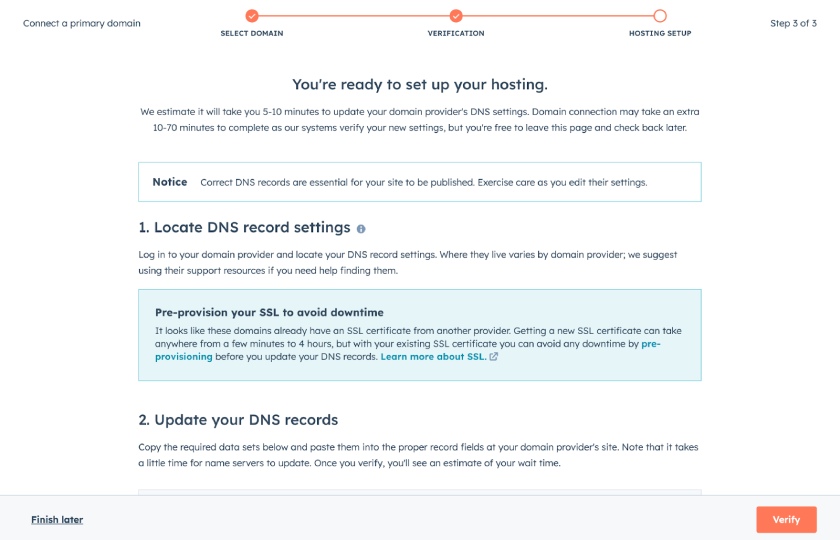
- Finally, connect your domain:
- In the final step, HubSpot will provide detailed instructions on how to connect your domain name to your HubSpot website. Follow these instructions carefully to complete the connection.
Step 6: Publish Your HubSpot Website
The most exciting part of learning how to build a HubSpot website might be the simple click of a button that makes your website live. To publish your site, click “Publish” in the top right corner of the editor, then click “Publish page now” in the pop-up to confirm your selection.
Next Steps: Add HubSpot Integrations
Now that you have learned how to make a website on HubSpot, add more functionalities by integrating some of the platform’s industry-leading tools for lead generation, nurturing, marketing, and customer care. HubSpot’s tools are robust, and since you can integrate them into your site easily, you can build a highly functional website, even on the free plan.
Adding integrations is easy: hover on the Data Management icon in the sidebar (it looks like a stack of discs) and select the “Integrations” options. Hit the big “Visit app marketplace” button and find the app you want to integrate. Click on the app and then click again on the “Install” button in the upper-right-hand corner.
One of the big advantages of building a website in HubSpot CMS is the easy integration with HubSpot’s other freemium apps, one of the many reasons it rated so well in our expert HubSpot CMS review.
Optional: Upgrade Your HubSpot Website With a Paid Plan
Because of the integrations and the ability to connect a custom domain, HubSpot is one of the best free website builders for small businesses we’ve seen. However, free websites will have HubSpot branding, which may not be professional enough for business use (it usually appears as a little “Powered by HubSpot” message on webpages). It detracts from your branding and your brand’s credibility.
To remove HubSpot branding, upgrade to at least the Starter Customer platform. At $15 a month, this is still affordable, even for small businesses, and has everything most small and midsize businesses need to grow a strong online brand presence.
Free Content Hub Tools | Content Hub Starter | Content Hub Professional | |
|---|---|---|---|
Cost per Month* | $0 (up to 2 users) | $15 per seat | $450 (includes 3 seats) |
Connect Your Domain | ✓ | ✓ | ✓ |
Drag-and-Drop Editor | ✓ | ✓ | ✓ |
Mobile Optimization | ✓ | ✓ | ✓ |
App Marketplace & Third-party Integrations | ✓ | ✓ | ✓ |
Free of HubSpot Branding | ✕ | ✓ | ✓ |
Landing Pages | 30 | 30 | 10,000 |
Blog Posts | 100 | 10,000 | 10,000 |
Blog Import | ✓ | ✓ | ✓ |
Chat Bots & Live Chat | ✓ | ✓ | ✓ |
Online Store (via App) | ✓ | ✓ | ✓ |
Payments for US Customers | ✕ | ✓ | ✓ |
Member-restricted Pages | ✕ | ✕ | ✓ |
*With annual billing; month-to-month contracts available for higher prices | |||
HubSpot Website Design Examples & Tips
HubSpot makes it easy to build a professional-looking website to establish and grow a strong online presence. The HubSpot website design examples below can inspire you to get the most out of the platform while building your site.
Example #1: Companion Pet Insurance Magazine by Nationwide
Are you a publisher or a small business using SEO content marketing to bring traffic to your website? Incorporate your blog onto your homepage, just like Nationwide’s Pet Companion Magazine. Galleries with blog articles entice your readers to browse and consume more content, adding visual content to an otherwise ordinary page.
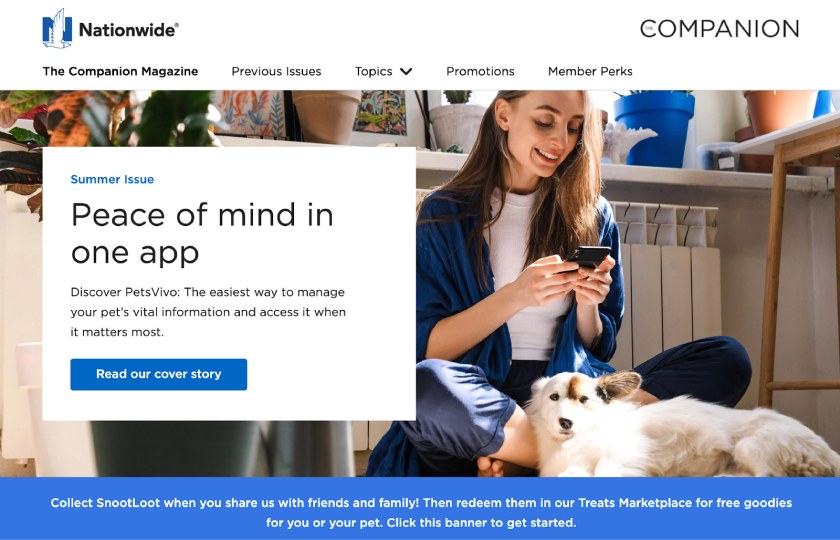
Nationwide’s Companion pet insurance website focuses on the storytelling side of pet ownership and insurance, pulling the reader’s attention to its call to action to read the online magazine’s cover story.
Example #2: Coca-Cola Beverages Northeast
When building a website on HubSpot, images are as crucial as their written content. Coca-Cola Northeast’s pages are filled with high-quality, engaging imagery that shows what they do and how they connect with the community. Coca-Cola also embeds an Instagram feed and social media widgets, furthering its message of being there for the community.
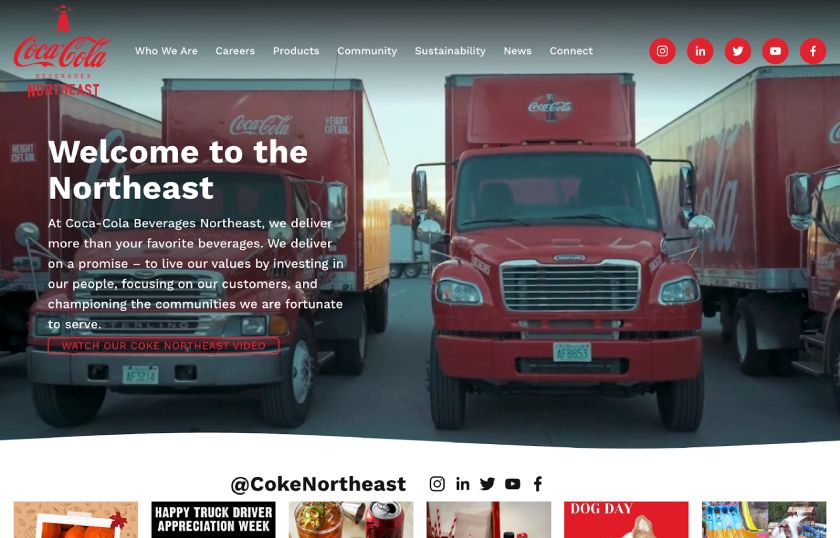
Coca-Cola Beverages Northeast takes a more traditional approach to its homepage, featuring a plain header followed by a short description—only its use of bright social media icons stands out.
Example #3: The Spicy Shark
This spicy condiment start-up takes advantage of HubSpot’s flexible website builder by placing “Buy now” CTA buttons on almost every page and the website header. The Spicy Shark website also accepts payments in multiple forms (a feature available on paid HubSpot plans), so customers can purchase directly from their website.

The Spicy Shark website uses a more animated style, making its brand—an illustration of a shark breathing fire and its affiliation with popular web show “Hot Ones”—the center of attention.
Example #4: Caithness Construction
An easy-to-navigate website design means visitors can quickly find information with minimal clicks. Caithness Construction, a customer home builder located in Florida, uses a homepage layout that packs a lot of information into a single page. Visitors can schedule a consultation, view a gallery of past homes, and learn more about the company’s credentials—all without having to click off the page.
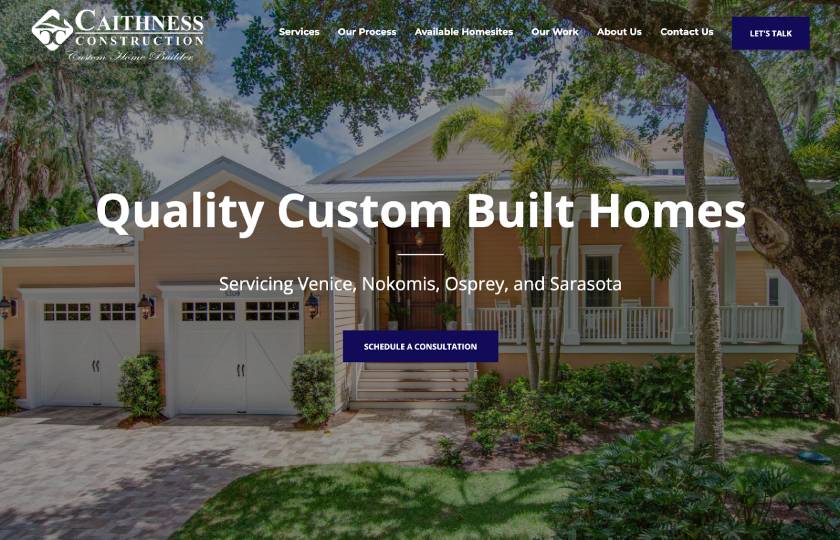
Caithness Construction prioritizes a simple home page design, featuring only a couple lines of text and an attention-getting call to action.
Frequently Asked Questions (FAQs)
The HubSpot website builder (aka HubSpot CMS) is extremely powerful yet easy to use, and learning how to build a website in HubSpot takes only a few steps. It has a ton of website themes and integrations for nearly any type of functionality a website needs, and it’s one of the best website builders for SEO.
HubSpot’s content management system (CMS) is an all-in-one website solution, so hosting is included. However, HubSpot doesn’t offer standalone web hosting. If you need a solution for website hosting services and don’t plan to use the HubSpot CMS, use DreamHost. Your hosting plan will have a free domain, SSL, email accounts, and WordPress website builder BlockGrid for $2.59 a month for the first year.
HubSpot has multiple tools for sales, marketing, and customer support. HubSpot CRM, its customer relationship management software, is a world-class, industry-leading platform for generating leads and managing customer relationships. Alternatively, the HubSpot content management system (CMS) we reviewed above is an all-in-one website builder and hosting solution.
Bottom Line
HubSpot’s website builder integrates seamlessly with the platform’s enterprise-grade solutions, but it’s still easy for beginners. It’s one of the best small business website builders overall. Its integrations with sales, marketing, and customer support tools make it an excellent option for sales and service-oriented businesses.
