Subdomains allow you to create separate websites on your domain for things like stores, blogs, technical support, employee intranets, and more. Using subdomains can be extremely helpful for business owners, creating a web presence with multiple business functions.
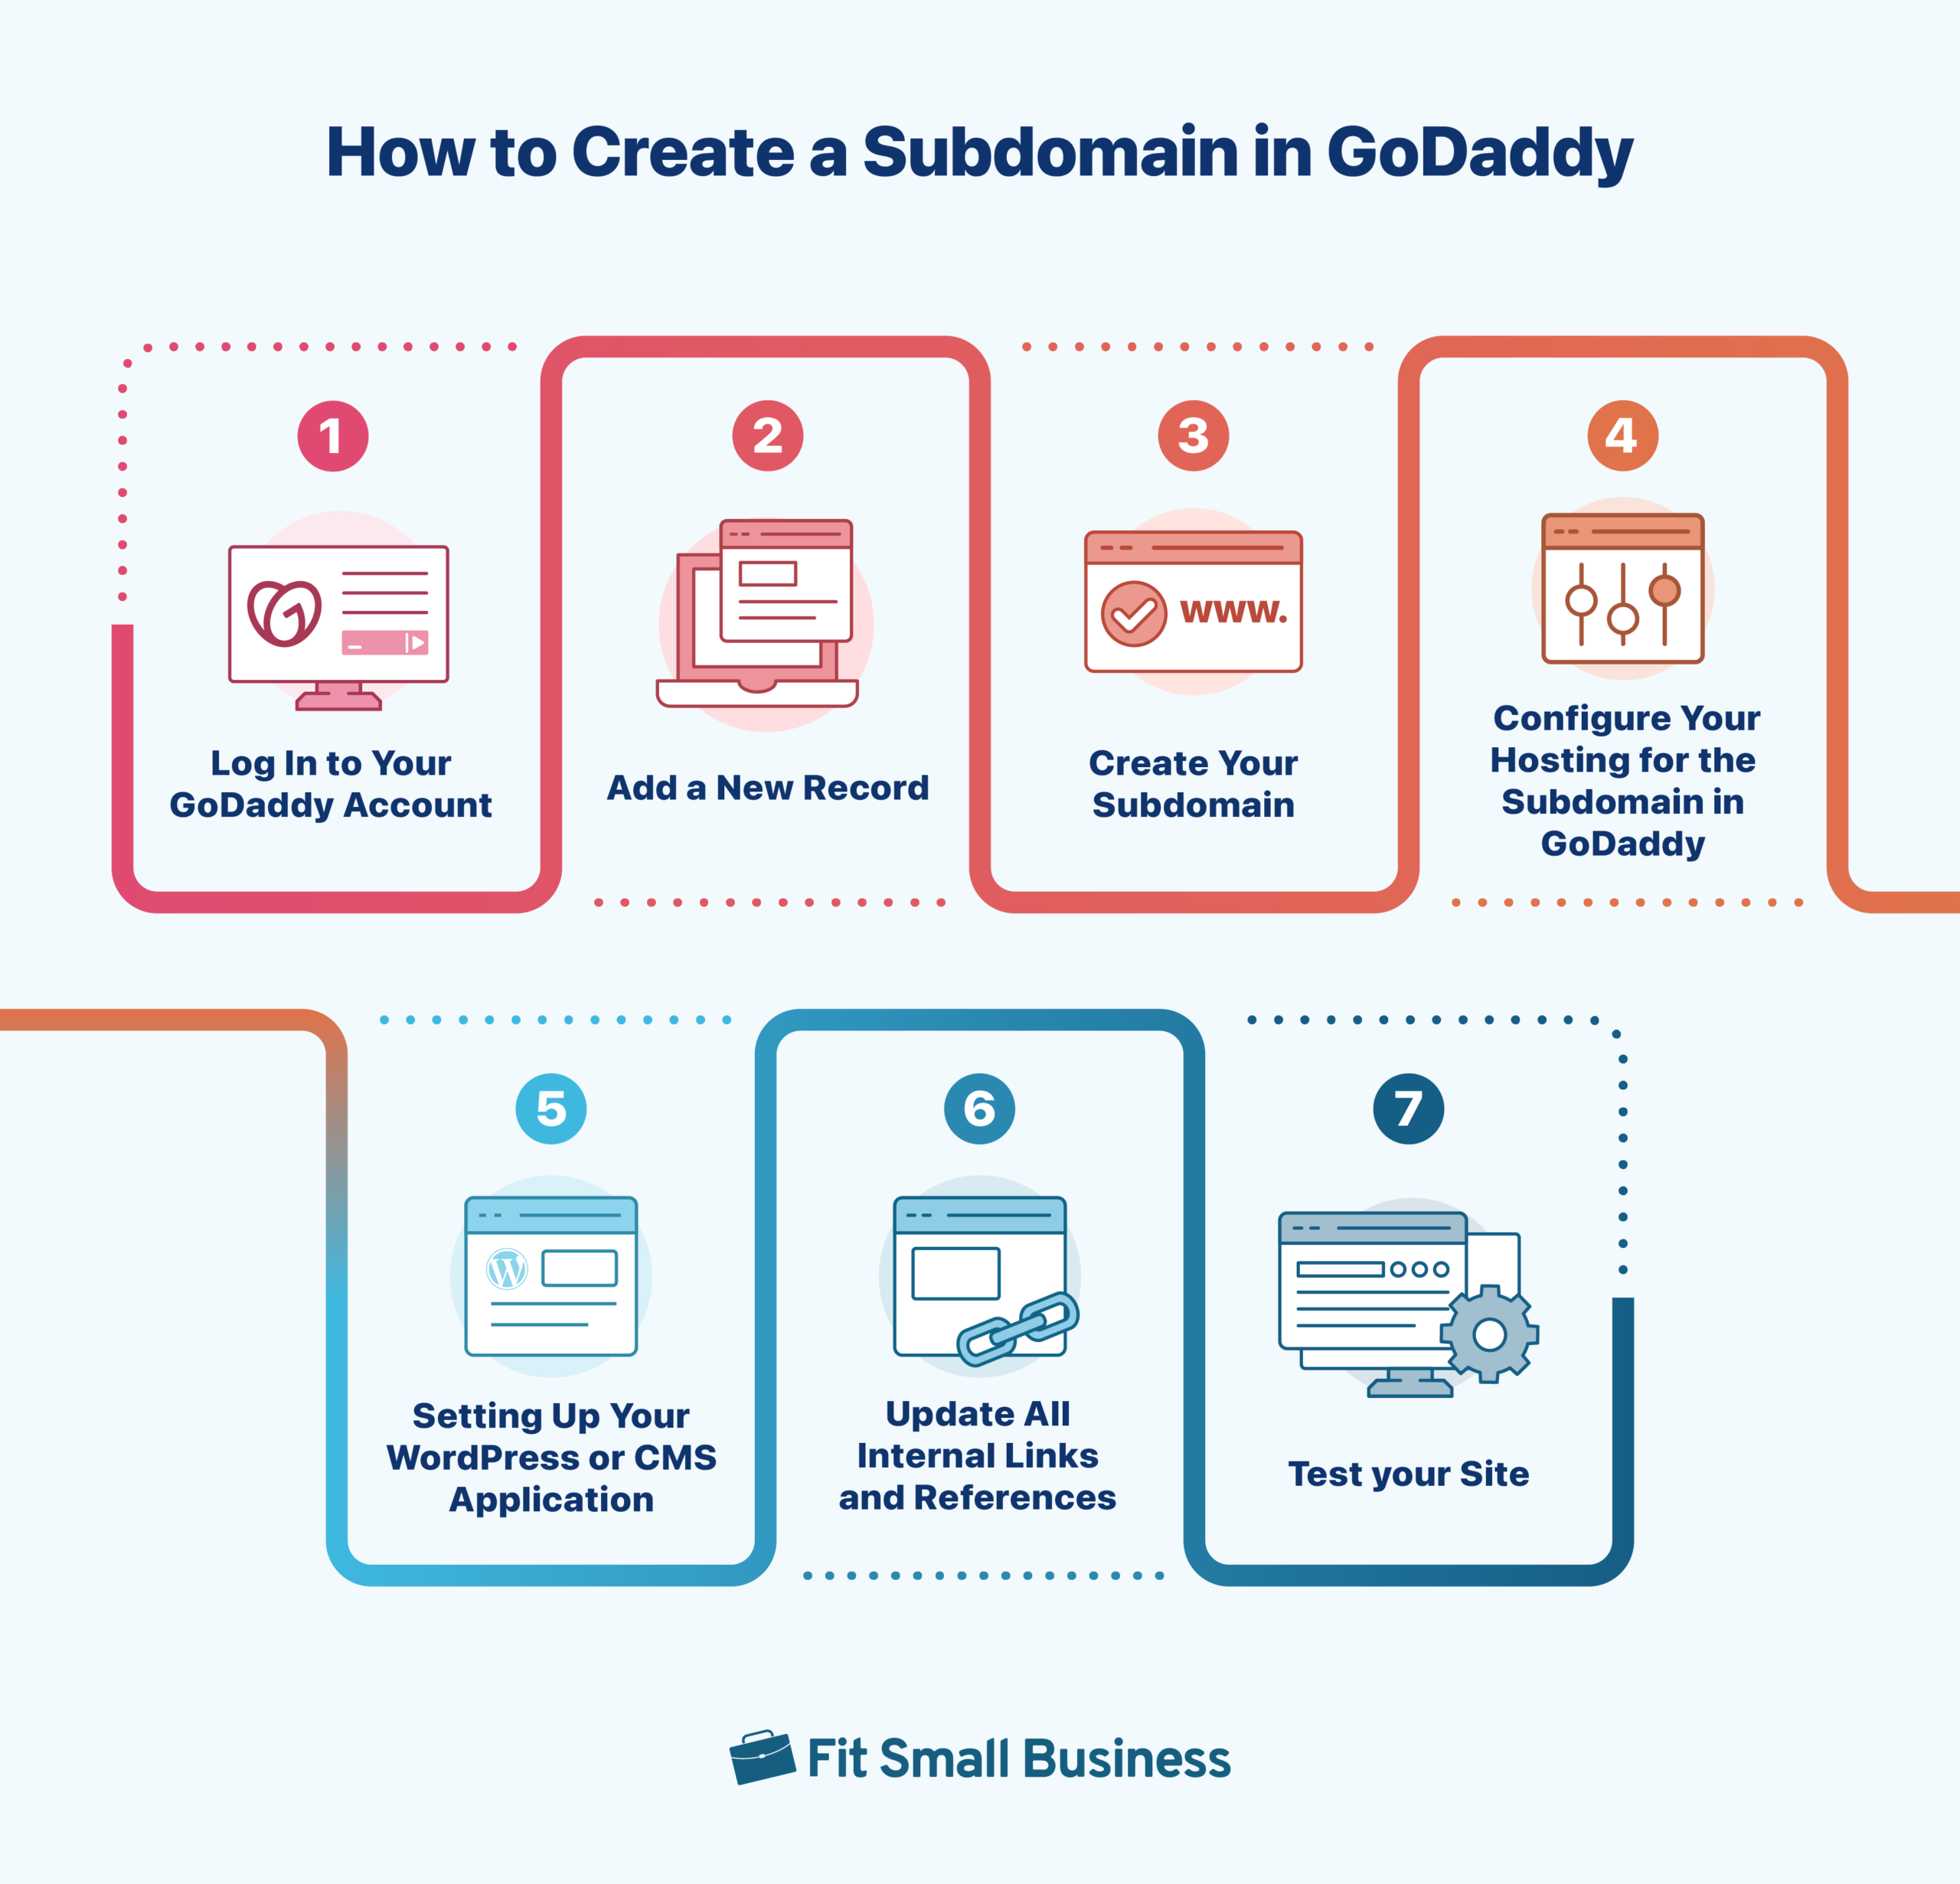
If you’re a GoDaddy web hosting customer, creating subdomains is easy. We’ll take you through the seven essential steps to set up one or more subdomains on your site in the GoDaddy DNS Management Panel and the Hosting cPanel.
Still not sure if creating a subdomain is the best option for your project? Subdomains are like miniwebsites inside your website. For example, Apple’s subdomain for its technical support is support.apple.com. Learn what a subdomain is and the best ways to use them.
Step 1: Log In to Your GoDaddy Account
Making GoDaddy subdomains will only take a few minutes. The first step is to log in to your GoDaddy web hosting account by clicking “Sign In” in the top right corner of the GoDaddy homepage. Enter your customer ID and password. Then, select the “Sign In” button.

GoDaddy’s homepage: Sign in on the top right. (Source: GoDaddy)
Remember that if you’re adding a subdomain in GoDaddy, your site needs to be hosted on GoDaddy. If your domain name is registered on GoDaddy but your website is hosted elsewhere (like Bluehost), you must create a subdomain with the hosting provider where your website domain resides instead.
2. Add a New Record
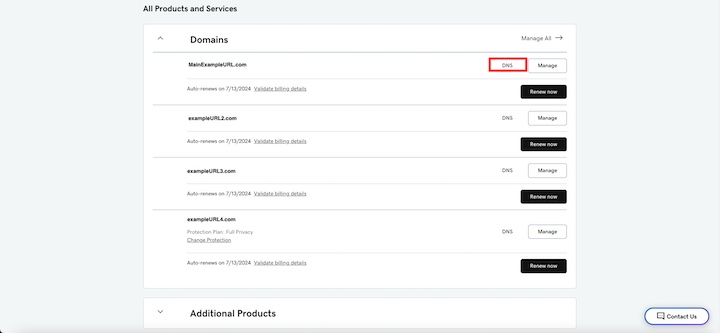
Once you log in, click your username in the upper right-hand corner, and select “My Products” in the drop-down menu. On the “All Products and Services” page, you’ll find a list of all the domains you own on GoDaddy. Locate the domain you want to create a subdomain for in the “Domains” section.
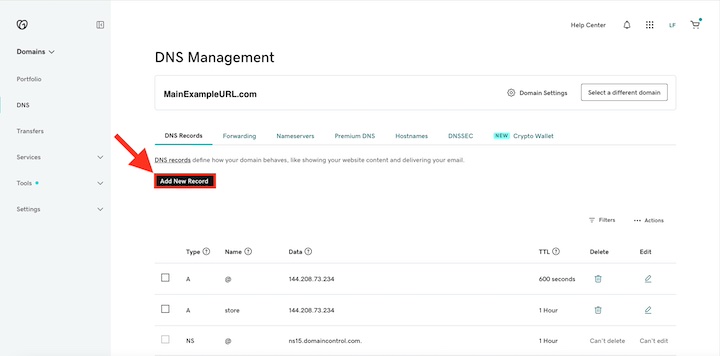
Next, click “DNS” beside the domain name to open the “DNS Management” where you will find the “Records” section. This is where you’ll manage all your subdomains. Click the “Add a New Record” button to start making your subdomain.
Step 3: Create Your GoDaddy Subdomain
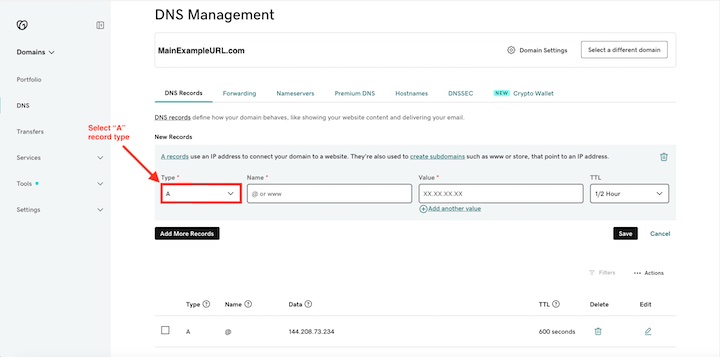
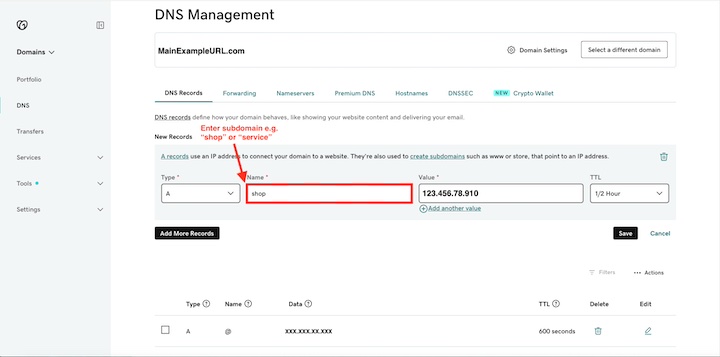
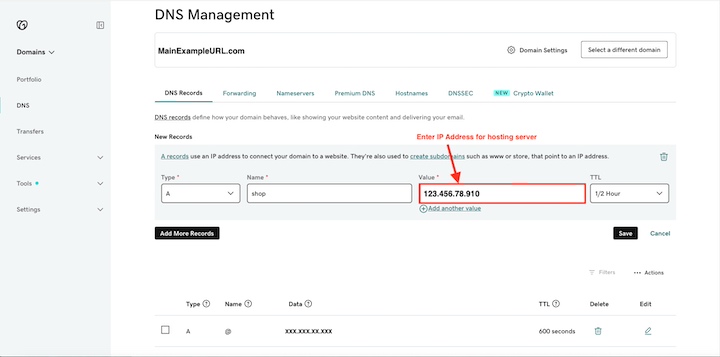
After clicking “Add New Record,” select “A” under the Type field, then enter the subdomain you want under “Host.” For example, if you’re setting up a web store on a subdomain, you can name it store to make the subdomain store.yourwebsite.com.
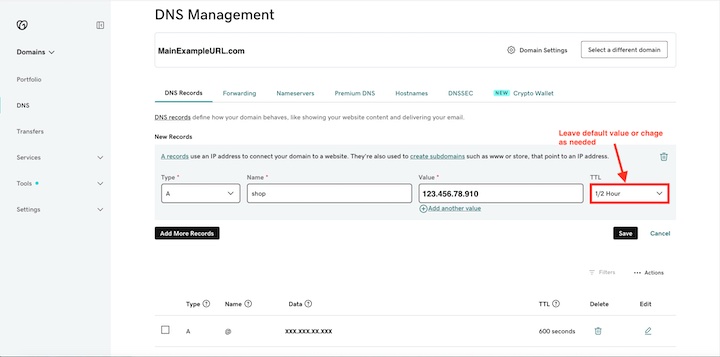
Finally, under “Value,” type in the numerical IP address of your hosting account. You’ll find your server’s IP address by clicking My Products > Servers > Manage > Details. Leave the default TTL value or customize it as needed.
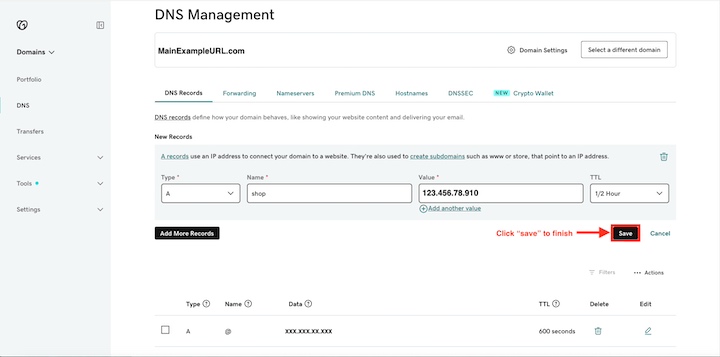
After entering the server IP address, press “Save” to save your new record, and you’re all done. Just keep in mind that it may take some time for this change to propagate, so check back every hour or so until you see the subdomain when you type its address in your web browser. Changes made to your Domain Name System (DNS) can take up to 48 hours to appear.
Now that you’ve set up the necessary DNS record, configure your hosting for your website so it can properly interpret the subdomain as part of your site structure.
Step 4: Configure Your Hosting for the Subdomain in GoDaddy
Once you’ve configured a subdomain by adding a Type A record in your DNS settings, you’ll now need to set up the subdomain on the hosting server to recognize your new subdomain, as well as the primary domain in the structure of your website, using the Control Panel (cPanel).
A. Access Your Hosting Account:
- Go to your “My Products” page.
- Under “Web Hosting,” find your hosting account and click “Manage.”
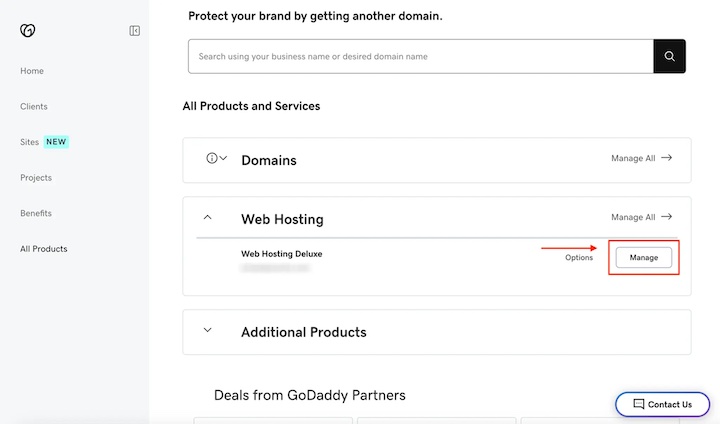
Log into your web hosting control panel. (Source: GoDaddy)
B. Add the Subdomain to Your Hosting:
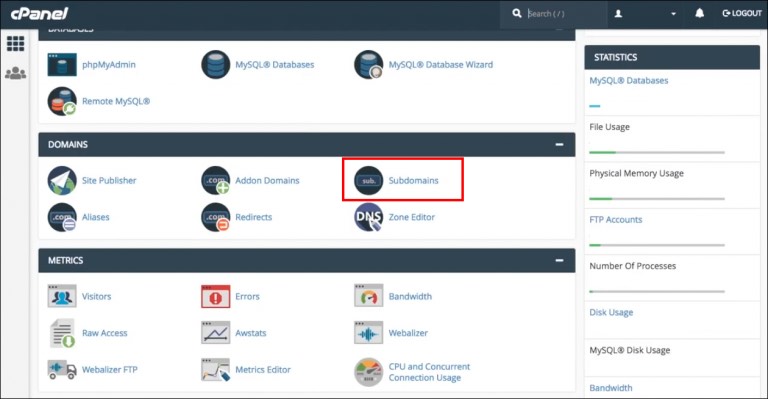
- In the hosting cPanel, look for the “Domains” section.
- Click “Subdomains.”
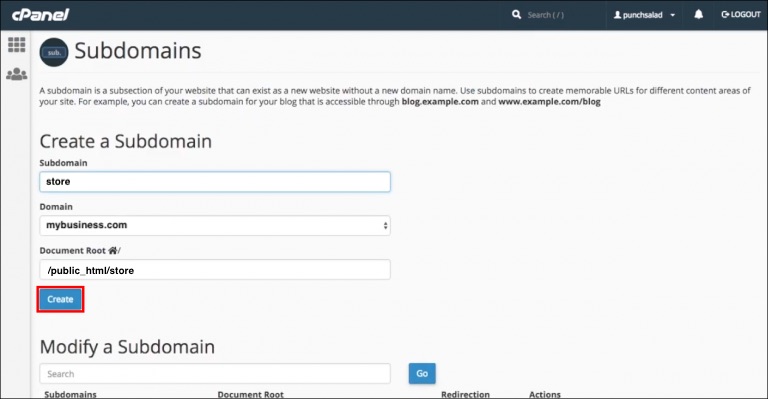
C. Create the Subdomain:
- Subdomain: Enter the subdomain name (e.g., store or blog).
- Domain: Select the primary domain name (e.g., mybusiness.com, from the drop-down menu.
- Document Root: This will be autofilled but you can customize it if needed (e.g., /public_html/store).
- Click “Create” and that’s it.
Step 5: Set Up Your WordPress or CMS Application for Subdomains
Depending on your website builder, you might need to configure your application to manage the subdomain properly. For common CMS platforms like WordPress, this often involves the following:
- Installing WordPress in the subdomain directory
- Configuring multisite networks in WordPress, if needed
Pro Tip: To learn more about how to install WordPress in a subdomain through the cPanel, GoDaddy has some useful resources. For more information on how to build a site in this popular website Content Management System (CMS), check out our guide on how to make a WordPress website.
Step 6: Update All Internal Links and References in Your GoDaddy Subdomain
If you’ve built out your site and you’re adding subdomains, make sure all internal links and references are updated to reflect the new subdomain structure.
If some of your old links within the site were created with the original domain name and a subdirectory, you’ll want to make sure that these links reflect the new page names under the new site. For example, all previous links to myonlinebusiness.com/shop are redirected to shop.myonlinebusiness.com.
Step 7: Test Your Site to Make Sure It’s Working Properly
Once you create subdomains in GoDaddy and you’ve changed over to the subdomain structure and republished your site, visit the new subdomain pages (e.g., shop.myonlinebusiness.com) in your browser. Make sure the correct content is being served in the browser and there are no broken links or resource loading issues.
Frequently Asked Questions (FAQs)
A subdomain is an extension of your domain name that precedes it. For example, in the URL blog.yourwebsite.com, blog is the subdomain, yourwebsite is the domain, and .com is the top-level domain (TLD) extension. A subdomain name should identify the part of your website they’re viewing, like a forum, customer support knowledge base, blog, or online store.
Subdomains aren’t required, but they do help with site organization and search engine optimization (SEO) and can increase your brand presence. Since search engines recognize subdomains and root domains as separate entities, you can use your subdomain to insert more keywords and backlinks to your main site. Additionally, subdomains organize large websites into easily digestible sections without an extensive and confusing sitemap.
Each GoDaddy domain can have up to 500 subdomains, but you don’t want to max that out. Subdomains can boost your SEO, but they can also impact it negatively, if overused. Since subdomains are counted as separate websites, having a lot of subdomains can spread your site’s traffic and web hosting resources too thin. For more details, read our guide explaining what web hosting is.
Bottom Line
After making a small business website, you might want to use subdomains to differentiate major sections as you grow. This is especially true if you’re building a sizable online store and expect (or hope) to build significant traffic. Subdomains can also improve search engine rankings and better organize your site without a cumbersome system of subdirectories.
Setting up a subdomain in GoDaddy only takes a few steps: logging in, adding a new record, filling out the required fields, configuring subdomains in your cPanel, and testing to make sure everything works the way it should. It may take a little bit of extra work, but for businesses that want a multifaceted web presence on GoDaddy, it’s definitely worth it.
