


WordPress is one of the world’s most popular content management systems (CMS). It’s not as user-friendly as site builders like Wix and Squarespace, but it is possible to learn how to make a WordPress website yourself. First, you’ll need to get hosting and a domain, choose a theme, customize your site’s branding, pages, and menus, and then launch your site. The steps below provide detailed guidance on how to build a website with WordPress.
- Step 1: Get Web Hosting
- Step 2: Purchase a Domain Name
- Step 3: Install WordPress
- Step 4: Choose & Install a WordPress Theme
- Step 5: Add Functionality to Your WordPress Website With Plugins
- Step 6: Add & Customize Pages on Your WordPress Website
- Step 7: Build Navigation & Menus for Your WordPress Site
- Step 8: Customize the Header & Footer of Your WordPress Site
- Step 9: Review & Launch Your WordPress Site
- Frequently Asked Questions (FAQs)
- Bottom Line
Step 1: Get Web Hosting
The first thing you need to create a WordPress website is web hosting. A web hosting service provides the server and storage you’ll need to install WordPress, build your site, and make your website accessible to people via the internet. Learn more about what web hosting is and how to choose a provider in our dedicated guide.
You can get hosting through WordPress.com or WordPress.org, but it’s very expensive compared with other alternatives. In fact, you can get a feature-rich hosting package from competitors for just a few bucks a month. Learn more in our guide to the best cheap WordPress hosting and find out why we chose them, along with their pros and cons.
If you don’t have web hosting yet, our list of top web hosting companies can help you find the perfect hosting plan for your website and business needs.
Step 2: Purchase a Domain Name
Domain names (aka URLs
Many hosting plans include a free domain name, so check if yours includes one before buying separately. If a domain is not included in your hosting plan, you can purchase one through a top domain name registrar—for instance, IONOS charges just $1 for the first year per URL.
If you purchase your domain through your hosting company (or get it free with your plan), you probably won’t need to do anything to connect it to your site. If you purchased it separately, follow the instructions provided by your hosting company for connecting your domain through DNS settings.
Not sure what domain name you want? Learn more about how to choose a domain name for your business website, along with the crucial do’s and don’ts.
Step 3: Install WordPress
Once you have selected a web hosting provider and a domain name, it’s time to install WordPress so you can use it to build your website. Most web hosting services provide one-click WordPress installation. This means you simply click Install WordPress within your hosting dashboard, and it’s automatically installed and connected to your domain. Some hosting plans, like those from Bluehost, automatically install WordPress for you and manage core updates over time.
Your hosting company will likely have a knowledge base and resources, and its customer support may even be able to assist with installing WordPress if you need extra help.
Up to this point, everything you’ve done hasn’t required you to work directly in WordPress—but that’s about to change. All of the following steps will be completed within your site’s WordPress dashboard. To access the dashboard, you need a username and password to log into WordPress. With most hosting platforms, you’ll be asked to set up an admin username and password as part of the WordPress installation process.
If this does not occur, contact your hosting provider for assistance. You can also try the following workaround:
Go to wordpress.com and hit the white Get started button. Connect your Google, Apple, or GitHub account, or use your email to create a password.
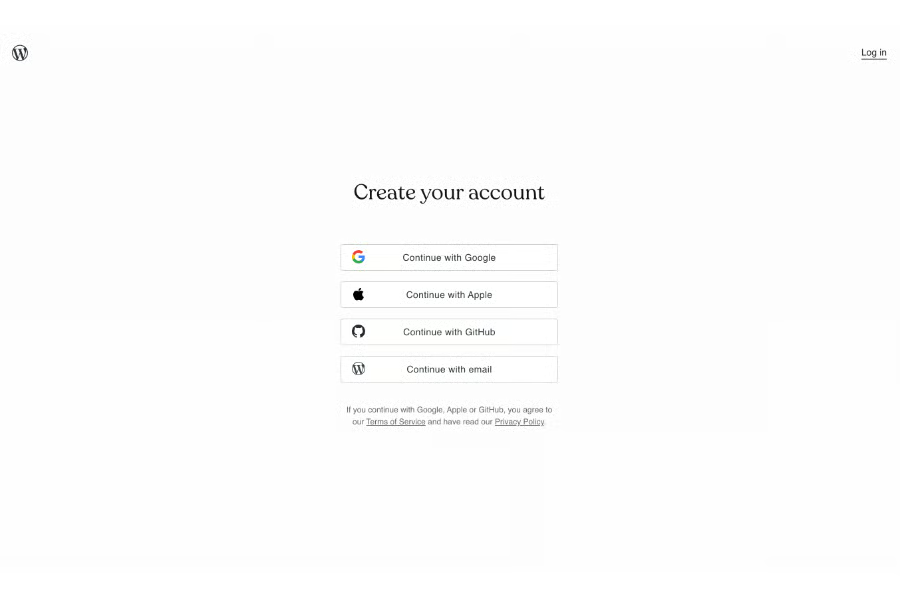
Visit WordPress, then click “Get started.”
Once you’re logged into WordPress, go to the site management page (wordpress.com/sites) and hit the purple Add new site button in the upper left-hand corner.
On the next screen, look for the Already own a domain? header in the right-hand column, then click the Use a domain I own link.
Enter your domain on the next screen, then hit Continue. On the following page, look for the second option, with the header that says Connect your domain, and click the white Select button.
On the next page, you can opt for a free WordPress plan or a paid one. You’ll need a paid plan to connect a custom domain, so pick one and then complete the checkout process.
[gallery: images unavailable]
Now, you’re finally ready to connect your domain. If your domain registrar supports the automatic setup of domain connections, you’ll be taken to a page with that option. Click the Start setup button to take you to your domain registrar dashboard, and log into that if necessary. You should be automatically redirected back to wordpress.com. If the connection is successful, the page will say, “We are verifying your connection now.”
For most small businesses, all-in-one website builders like Wix offer a far more user-friendly and affordable website-building experience. Check out our list of the best WordPress alternatives that could help you get online faster.
Step 4: Choose & Install a WordPress Theme
Now that you’ve connected your hosting and installed WordPress, it’s time to decide how your website will look by choosing a theme. WordPress themes are templates that apply site-wide color palettes and font settings. They usually have one or more premade pages you can customize for your site.
All WordPress websites require a theme, and the latest WordPress theme will be installed on your site by default. However, if you don’t like the default theme, there are tens of thousands of free and premium themes to choose from when building a WordPress website. To access these themes, click Appearance and then Themes in the left-hand dashboard.
You can browse themes by category or search by keyword if you have something more specific in mind. When you have found a theme you like, hit the button that says Activate this design, and then confirm your choice again in the pop-up window.
[gallery: images unavailable]
You’re not limited to the themes offered by WordPress. Third-party platforms, like ThemeForest, have thousands of ready-made WordPress themes, some of which come with page-building tools. You can purchase and install a WordPress website builder like Elementor that provides a no-code page-building tool along with a variety of themes.
You can also explore if your hosting provider (we recommend DreamHost) also offers themes and no-code page builders that reduce the learning curve and make it easier for you to get the design you envision for your site.
Themes purchased outside of WordPress will have their own instructions for installation, but they are generally added by going to Appearance, then Themes, and then uploading the theme’s ZIP file. Once installed, you’ll still need to activate it.
Free themes are often severely limited when it comes to customization. This usually is not ideal when making a small business website since you won’t be able to edit it to reflect your brand image and identity. This is why we think that paying for a premium theme or WordPress page builder is worth it since it allows you to fully customize your site’s branding.
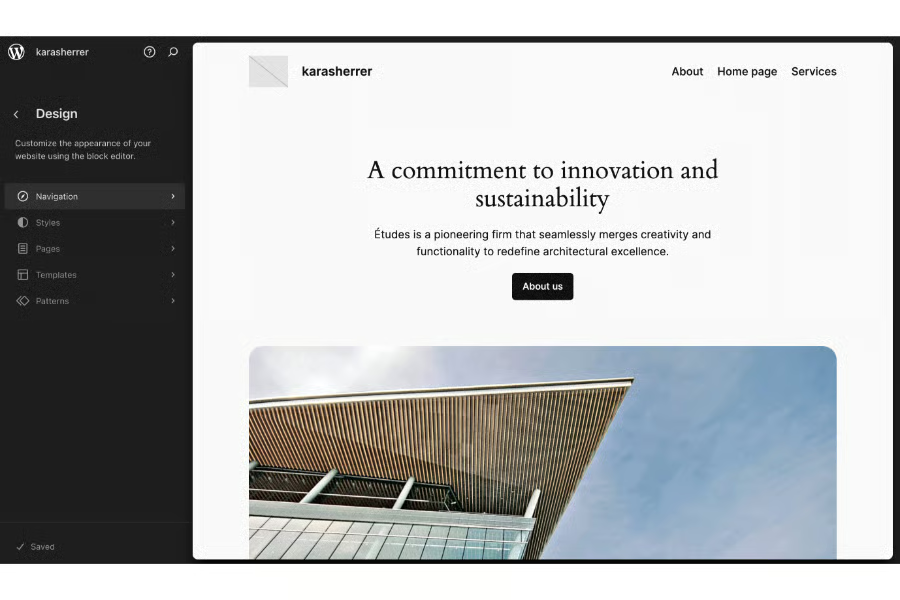
To see what customization options your theme offers, click Appearance and then Editor in the left-hand dashboard. On this page, you’ll be able to update your site-wide settings, such as placement for your logo and selection of global colors and fonts. If you’re using a premium theme, see its product documentation for additional details on how to change the theme’s global settings.
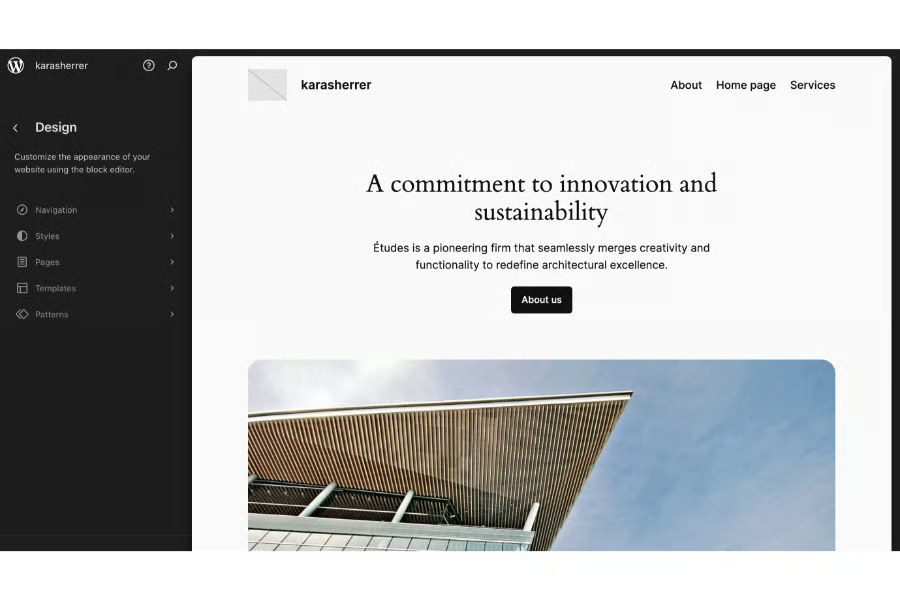
Once you have a WordPress theme, you can customize its design in the editor.
Step 5: Add Functionality to Your WordPress Website With Plugins
WordPress relies on plugins to add extra functionality to your website. This differentiates from all-in-one site builders like Squarespace and Wix, which already have these apps, widgets, and features built in. Not so with WordPress—individual plugins are needed for just about everything, including security, ecommerce, and form submissions. In fact, WordPress will automatically install the Jetpack plugin for you, so your site has basic security from the get-go (though you may want to consider upgrading it).
Depending on the features and functionality you want for your site, you may need to find, install, and manage just a few plugins or even dozens of them. Keep in mind that this entails more than just a set-it-and-forget-it approach and that WordPress plugins are all created and managed by third parties (not WordPress itself).
Most WordPress plugins are updated frequently by the company or individual that made them. This is a good thing as it means you’ll get upgraded features and issues like security and compatibility glitches will be remedied. However, with this comes a considerable amount of time that you will need to spend maintaining updates to plugins (as well as WordPress and your theme) every month.
To find a free plugin, select the Plugins option in the left sidebar of the site dashboard or go directly to the following URL: wordpress.com/plugins/browse/security. Enter a term into the search bar, or scroll the horizontal menu to browse by category. Once you find a plugin you like, hit the blue Install now button. Once it’s done installing, the button will change to say Activate. Click the activate button to enable the public.
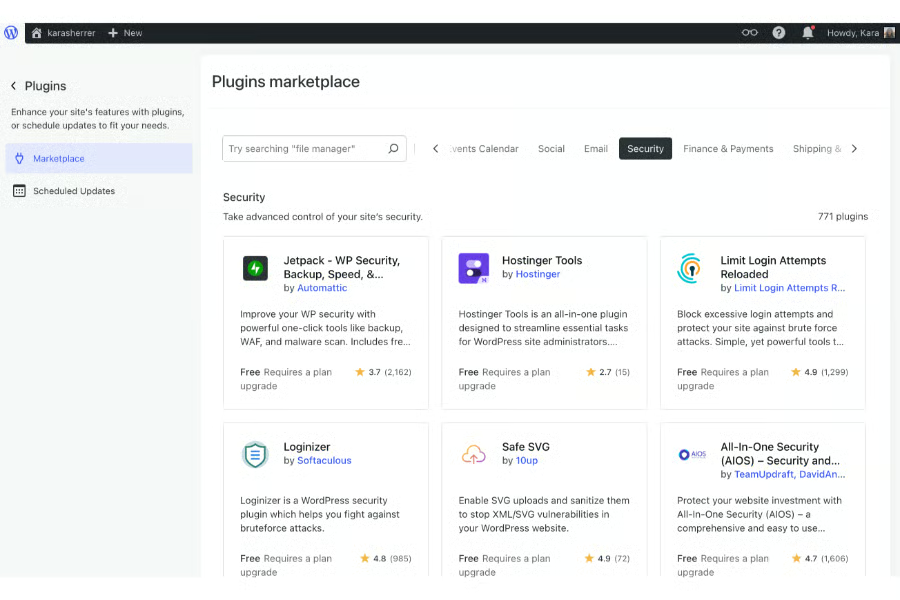
Plugins make up the main functions of your WordPress website. Find them in WordPress’ plugins marketplace.
Open the drop-down below to see a list of plugins you’ll need to make a website using WordPress, as well as specific recommendations:
Plugins do more than just provide visuals or effects—they can also help with search engine optimization (SEO) capabilities, security, and other functions like selling tickets or products. Here are some essential plugins you’ll need to have as you make a website with WordPress:
- Security plugin: Install a reputable, highly rated security plugin immediately after installing WordPress to protect your site from hackers, malware, ransomware, and so on. Many offer free versions, but we recommend you opt for a paid plan with extra support and security tools, as WordPress sites are highly susceptible to hackers. Elementor has an excellent article that can help you learn more about choosing a WordPress security plugin.
- Antispam plugin: Security plugins are great at protecting your site from intrusion, but most aren’t effective at blocking spam from your online forms, blog comments, and so on. CleanTalk is an excellent and affordable antispam plugin to further protect your website and prevent bots from filling out and submitting forms on your website.
- Backup plugin: Some hosting companies include free automatic backups of your site, so this is something to consider when choosing a hosting provider. If your plan doesn’t include extra backups, or you want redundancy, add a backup plugin to your site and schedule backups regularly. If your site doesn’t get new content frequently, backing up weekly could be enough, whereas if you’re updating your site often, you might want to back it up daily.
- WordPress page builder: As you can see from the instructions, making a WordPress website is not intuitive, even though WordPress comes with a section-based page builder. For most small businesses, installing a WordPress website builder like Elementor will save you a significant amount of time, especially if you’re a WordPress beginner.
- Caching and image compression plugins: Glitchy, slow-loading websites can make a visitor close your site within seconds. Caching stores a version of your website so that when a site visitor returns, their browser doesn’t have to reload all the elements. Image compression automatically reduces the file sizes of your images, as large images can significantly slow down page load time. Your theme may come with built-in caching and image compression features, but if not, add a plugin to ensure your site loads quickly and provides a good user experience (UX).
- Yoast SEO: The free Yoast SEO plugin is recommended for several reasons. It serves as a guide to optimization as you add pages or publish blog articles on your site, helping you rank higher. It also generates an XML sitemap that you can submit to Google for indexing, allowing you to connect your Google and Bing analytics accounts for more performance data.
- Forms: If you need to use forms on your website, such as contact forms, lead generation forms, sign-ups, etc., you’ll need a forms plugin, such as Gravity Forms. When researching form builders, take advantage of demo versions to ensure you can easily build forms with the fields you need and that it is reputable and secure for transmitting data.
- WooCommerce: There are other ecommerce plugins, but WooCommerce is a highly rated and recommended free ecommerce plugin specially for WordPress. You can connect PayPal and other payment processing software (like Square) or your banking institution to sell online. Keep in mind that special functionality (selling digital goods, calculating shipping, memberships, subscriptions, event tickets, etc.) will require purchasing paid WooCommerce add-on plugins.
As you can see, these are basic functions needed for any website. However, you may also want plugins for things like a website chat (bot or live), pricing tables, custom graphics like sliders and image galleries, ecommerce, calculators, and polls and surveys. To get a sense of other plugins you might find helpful, read our list of WordPress tips and tricks.
Wondering how much all this will cost? WordPress’ open source software is free, but building a WordPress website requires the purchase of hosting and may entail premium plugins, themes, images, and more. Get the full story in our article on the hidden costs of WordPress.
Step 6: Add & Customize Pages on Your WordPress Website
Most small business websites are made up of several individual web pages, such as a home page, products or services page, about us, contact us, blog, and so on. Alternatively, some businesses opt for one-page websites broken out into sections for the above categories.
By default, WordPress’ Gutenberg editor, which is a block or section-based editor, is installed with WordPress. It’s not very intuitive or easy to use, and unless you spend some time learning its ins and outs, you might struggle with creating the design you envision for your site.
To add a new page to your WordPress website using the Gutenberg editor, hover over Pages in the left-side menu and click Add Pages. Then, use the page editor to add content to your page.
For those wanting to know more, check out WordPress’ documentation on how to use the Gutenberg editor.
[gallery: images unavailable]
But to save yourself a lot of time and the headaches of learning to use the default editor, we recommend choosing a third-party page builder to make creating a WordPress website exponentially easier. For example, if you select DreamHost or a page builder like Elementor, you’ll be able to quickly build pages in a visual site editor. If you installed a premium theme, it might also come with additional page-building tools.
Just having a website isn’t enough to grow a solid, online brand presence, though: the design and content of your site are equally important. Read our guide on what makes a good website for more than a dozen tips on how you can ensure your website stands out. If you’re building a specific type of website, you can also learn more in the tutorials below:
- Online stores: How to set up WooCommerce to sell on WordPress
- Forum website: How to make a forum website like Reddit
Step 7: Build Navigation & Menus for Your WordPress Site
Navigation refers to how site visitors can access all the pages and articles on your website. It includes navigation menus (such as menus commonly seen in website headers and footers) as well as search bar functionality, breadcrumbs, and even internal links within the content of a page or blog post.
Once you’ve built all your website pages, it’s time to create and customize at least two navigation menus. The first one will be displayed in your website’s header section at the top of the page, and the second one will be added to the footer at the bottom of the page. The header and footer will appear on every page of your website (unless you specify otherwise), allowing site visitors to quickly find and click pages.
From the WordPress dashboard, hover over Appearance on the left-side menu and click Editor. Select Navigation, which should be the top result in the left-hand sidebar. This will show you a list of existing menus. If you haven’t created a menu yet, a main menu listing all published pages will automatically be generated. You can also rename this menu to coincide with how you will use it, such as “MainNAV” or “HeaderNAV.”
To edit your site’s navigation, click Appearance, Editor, and then Navigation from the menu.
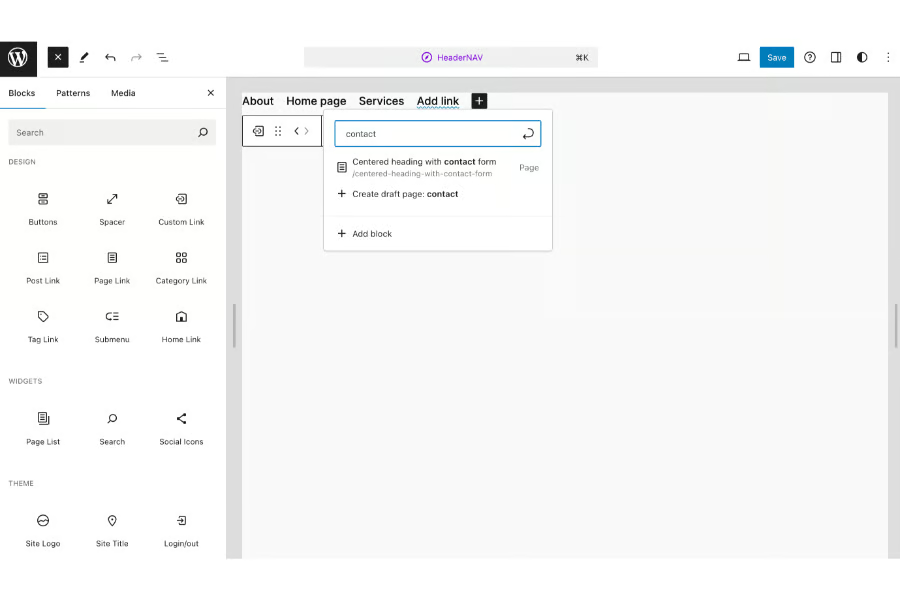
To add a menu to your website, go back to the main page of the Site Editor, then click Patterns, which should be the very last option in the left-hand sidebar. Select the location where you want the menu to appear, such as the header, footer, or sidebar. Click the blue + icon in the upper left-hand corner to display the block selector. Search for either “navigation” (horizontal menu) or “page list” (vertical menu), and click to add it to your page.
Under “Patterns,” you can customize the menus that’ll appear under your site’s header and footer.
To add a page to your menu, select the name of the menu. On the next screen, hover over the three dots to the right of the menu name, then click Edit; you’ll be taken to the block editor interface.
Click the “+” sign in the upper left-hand corner of the screen, then type in the name of the page you want to add to the menu. Click the page you want, and it will be added to the menu. When you’re satisfied with your menu, click the blue Save button in the top right-hand corner of your screen.
Add and manage pages on your menu by clicking the “+” button.
To delete a page from your menu, click the name of the page you want to delete. A toolbar will pop up, and you should click the three dots on the far right side, which will cause another menu to pop up. Scroll down to the bottom and hit Delete to remove the save from the menu, then click Save.
Step 8: Customize the Header & Footer of Your WordPress Site
Header and footer sections are site-wide sections of your website that appear at the top and bottom of every page. Headers are mainly used to provide site visitors with access to navigational tools (e.g., links, menus, search bars, and click-to-call phone numbers) that take them to the content they most want to see. Footers allow for more variety, such as a custom menu, email subscription form, social media feeds, blog feeds, and more.
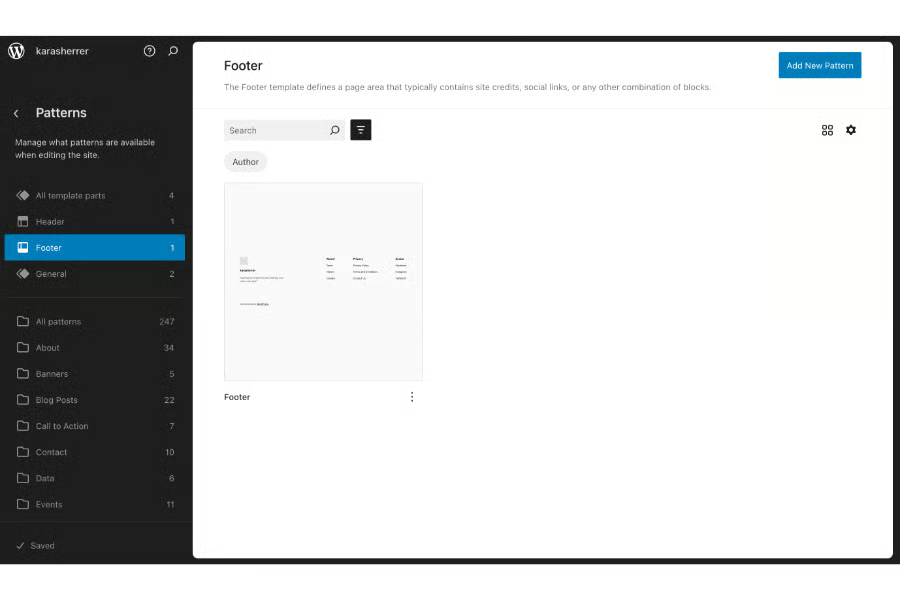
To customize your header or footer from the WordPress dashboard, hover over Appearance on the left-side menu and click Editor. Select Patterns, which should be the very last option in the left-hand sidebar. Click either the header or footer, whichever you want to edit, and you will be taken to the Site Editor interface.
Click the “+” sign in the upper left-hand corner of the screen to display the block selector. To add individual elements, scroll through the blocks or search for a specific term. To choose from the premade header and footer templates, select Patterns, which should be the middle tab on the left-hand sidebar. Select either Headers or Footers to display available options. When you find a block template that you like, click it to add it to your header or footer.
[gallery: images unavailable]
If you accidentally add multiple blocks to your header or footer, just select the one you wish to delete until it’s outlined in blue, then hit the Delete key to delete it. Once you’re happy with the appearance, click the blue Save button in the upper right-hand corner of the editor.
Alternatively, the theme you chose for your website may also have the option to customize the header of your website through Appearance, then Customize, or through menu items found in your theme section of the dashboard. Page builders like Elementor even allow you to edit your header and footer visually, which is far easier than using WordPress’ native tools.
Step 9: Review & Launch Your WordPress Site
Launching a website is exciting, especially after you’ve done all the work that goes into learning how to build a WordPress website. But you should confirm your site is ready for the world to see before you make it live.
Before you hit Publish, download our free website basics checklist and tick off each item to ensure your site is built for success. Lastly, before you publish your site, preview and proof each page following these steps:
- Proofread and check for grammatical errors.
- Test each link to see if something is missing or broken.
- Use Yoast SEO to ensure the page is optimized for the target keyword.
- Make sure images are displaying properly.
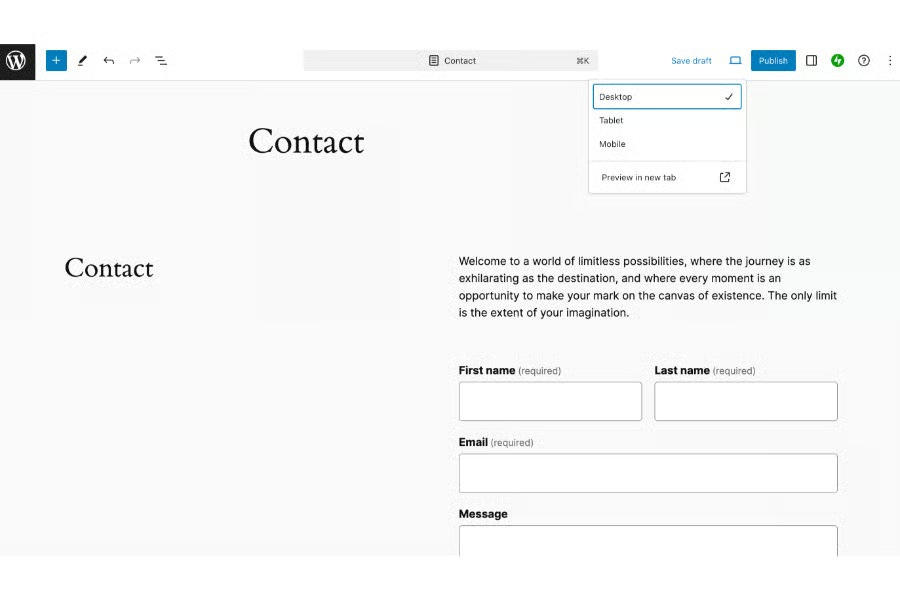
To preview an unpublished page, go to Pages and then Drafts, and select the page you want to view. The page will open in the site editor, defaulting to the desktop view. To see tablet and mobile views, hover over the laptop icon (to the left of the big Blue Publish button) and select which view you want to see. You can also click Preview in new tab if you want to preview what the entire page will look like, including the header and footer.
Once everything—from the design, user experience (UX), functions, elements, and content—is ready, it’s time to go live. To launch your site, click Publish for each of the pages you want to be live on the internet.
Next, check your website by typing in your domain name (aka website address or URL, such as “www.mybusinessname.com”). Review your site online and make sure everything is displaying and working correctly.
After building your website, preview it, then publish it on the upper right corner of your screen.
After launching your site, perform these next steps to promote it and ensure the success of your website as a marketing tool:
- Submit your site’s XML sitemap to the Google Search Console to be indexed.
- Create social media marketing profiles and add links to them in your website’s footer.
- Invite social followers to check out your new website.
- Send an email marketing newsletter to your contacts announcing your site’s launch.
- Implement a search engine optimization (SEO) content marketing plan to drive organic traffic to your website.
- Use Google advertising or paid social media ads to build awareness and drive traffic to your site.
Websites are not an “if you build it, they will come” proposition. Marketing your website is critical to getting web traffic, specifically to getting site visitors from among your target audience. Discover more than 20 tactics for website success in our list of website marketing strategies.
Your website is just one aspect of marketing that can help you build a strong brand presence, online and offline. Check out our list of over a dozen small business marketing materials you can use to build brand awareness and generate leads and sales.
Frequently Asked Questions (FAQs)
You can create a free site through WordPress.com, but it will be hosted on a subdomain (businessname.wordpress.com) as opposed to a website hosted on a custom domain branded to your business (businessname.com). You must select a WordPress paid plan if you want to use a custom domain without WordPress branding.
As the steps above show, you can learn how to create a WordPress website and build it yourself with some time and effort, even if you’ve never done it before. If you’re looking for an easier alternative to WordPress, check out other leading website builders like Wix, Squarespace, and Weebly, making DIY site building even faster.
For the majority of small businesses, Wix is better than WordPress because of its affordable pricing plans and ease of use. As one of the best site builders for SEO, Wix has customization capabilities while still being easy to learn.
However, WordPress offers more website customization options. It offers more templates to choose from and allows users more control over how they want their website design to look and function.
Bottom Line
If you’re willing to put in the time and effort, you can learn how to make a WordPress website for your small business. You’ll have more customization options and functionalities when it comes to designing your website.
Once you’re ready, we recommend starting with hosting provider DreamHost. Its hosting plans come with a free domain, SSL, and no-code WordPress website builder to lessen the learning curve and help you build a professional website more easily to represent your brand online. Plans start at $2.95 per month for the first year, so there’s little risk to trying it out.