With attention to detail and an accurate and reliable template, processing payroll in Excel can be great for small businesses just starting out. Learn how with our guide and free template.
How to Do Payroll in Excel: 7 Simple Steps (+ Video & Template)
This article is part of a larger series on How to Do Payroll.
For very small businesses that operate in states without complex labor and tax laws, knowing how to do payroll in Excel is a good way to pay 10 or fewer employees. Since it is a completely manual approach to payroll, it does take time compared to other methods but can definitely be cost-effective for small companies.
Using a template, such as the payroll Excel template below, can help because it contains pre-filled information like tax rates and overtime formulas. You only need to input your employee information, including their actual hours worked and deductible items, and then the template will automatically populate the applicable payroll data.

Thank you for downloading!
Quick Tip:
If payroll is taking too much time or if you’ve outgrown a spreadsheet, consider using a small business payroll software like Gusto.
It automatically calculates and files payroll taxes, generates year-end W-2s and 1099s, pays via direct deposit, and even helps employees choose and manage their benefits, all from one dashboard.
Follow the steps below to run payroll using our free Excel payroll template. If you want to see the process in action, you can also watch the below video tutorial on how to do payroll in Excel.
Featured Partner
Step 1: Review Payroll Excel Template & Edit for Your Business
Figuring out how to do payroll using an Excel template can take some time. First, download the above payroll spreadsheet, review the template, and evaluate whether it can meet your pay processing needs. A standardized Excel template for payroll should have tabs for each month with links to formulas or Excel functions that calculate employee taxes, deductions, and pay.
You also need a “Set Up Employee Data” tab from which your payroll calculations can pull standard information, such as pay rate and benefits enrolled. It’s important to keep this tab up-to-date so you can easily link to each payroll month tab. This helps with automation and prevents double work.
If you’re unsure what to include, here are some questions that can help you identify the information needed to finalize the payroll Excel template:
- How many employees do you have?
- What payroll taxes and wage deductions do you need to withhold from their paychecks?
- Are there additional payments that employees should receive, such as bonuses or allowances?
- Do you want to or are you required to include paid time off (PTO) calculations and transactions?
After you have identified what’s missing, you can add, revise, and delete columns so the template can meet your pay processing requirements. For example, if your business is located in a place that charges local income tax, such as New York City, you need to reflect that in the payroll Excel template. You can do this by adding the required information in the “Set Up Employee Data” tab. This is where you should always start when making changes because all of the remaining payroll tabs pull their source data from here.
To add a column, choose the column letter (e.g., G, H, or I) you want your new column to come before. Right-click your mouse and then select “Insert.” Enter a header title in row 3 of your new column (for example, “Local NYC Tax”) and input the rates for applicable employees in the succeeding rows. Go to all the month tabs (from “January Payroll” to “December Payroll”), including the “Year-to-Date Payroll” tab, and enter a new column between columns N and Q (the tax columns). Label this “Local NYC Tax.”
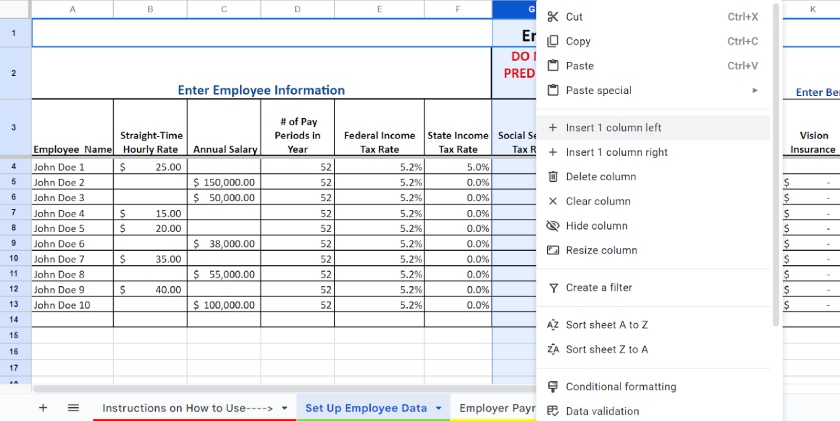
When adding a column, simply highlight the column you want a new one to be in front of and right-click and select Insert.
To delete columns, highlight the column you want to remove, right-click your mouse, and then select “Delete.” The rules are the same if you delete a column from the “Set Up Employee Data” tab. If you remove a column from one of the payroll tabs, including the “Year-to-Date Payroll” and the “Set Up Employee Data” tabs, then you must delete it from the others.
For example, if you delete the “State Income Tax Rate” in column F of the “Set Up Employee Data” tab, you need to remove the “State Income Tax Rate” column (column Q) in all of the payroll month tabs and the “Year-to-Date Payroll” tab. If not, you’ll receive error messages—and your formulas won’t work.
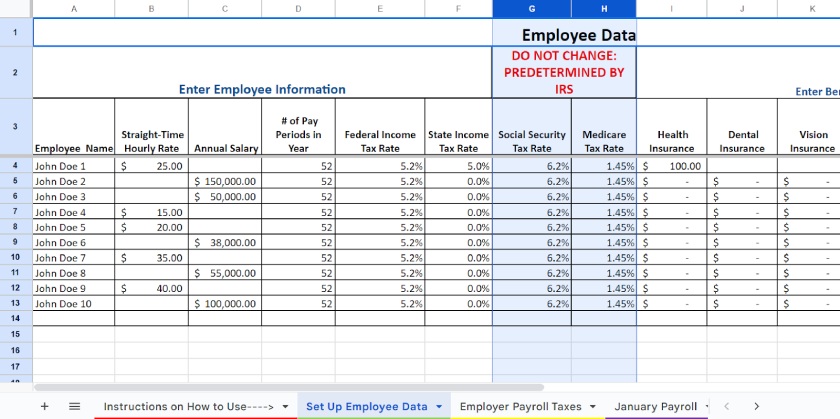
Don’t delete the Social Security and Medicare columns in the “Set Up Employee Data” tab—although, you can change the tax rates if the IRS amends these.
When adding and deleting columns, consider whether you can simply change some of the existing column labels in the Excel spreadsheet. Aside from cutting down on errors, this will save you time from having to change multiple tabs.
To help, I added two columns (columns N and O) in the “Set Up Employee Data” tab and labeled each “Other Deductions.” Just double-click on the description and overwrite it with a label that more appropriately reflects your needs.
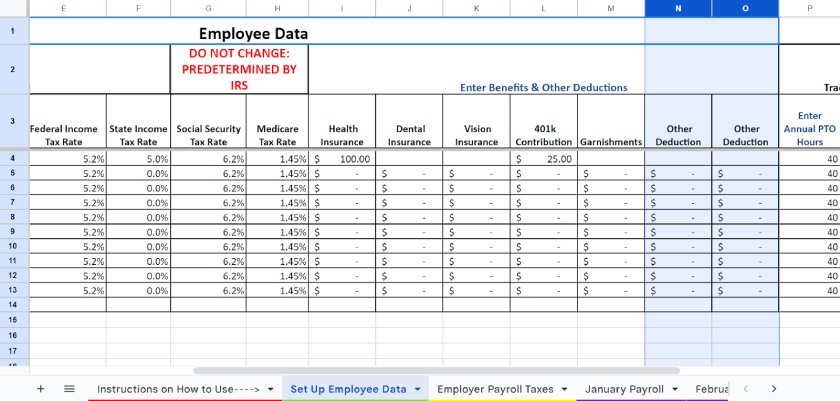
You can use the “Other Deductions” columns in the “Set Up” tab to input miscellaneous deductions specific to your company.
The “Other Deductions” columns can be easily personalized, so you don’t have to change any other tabs to match. Note that there’s only one “Other Deductions” column in the payroll month tabs, and the data that reflects there is the sum of columns N and O in the “Set Up Employee Data” tab. If you need to add more columns for deductions in the “Set Up” tab, follow the directions above for adding columns.
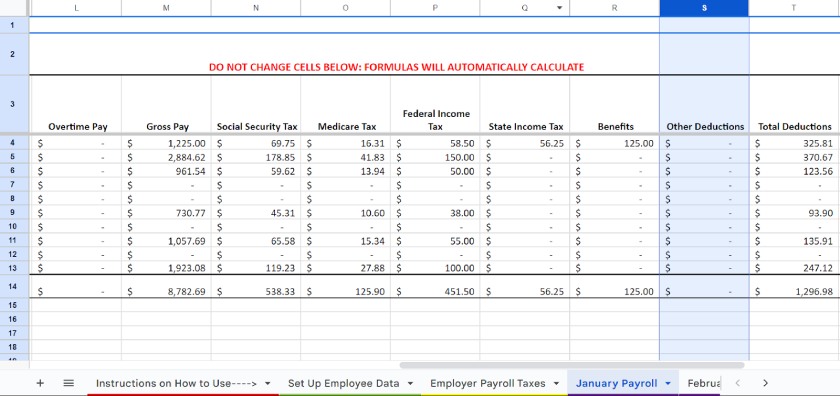
Although the “Set Up” tab has two “Other Deductions” columns, the monthly payroll tabs sum them up in one column.
Step 2: Set Up Payroll Information for Each Employee
Once you’re satisfied with the template layout, you can begin setting up your employee data. To complete the “Set Up Employee Data” tab, you need the following information.
Enter your employees’ full names under column A in the “Set Up Employee Data” tab. To do payroll in Excel, you need to re-enter their names on the payroll month tabs. When you do, ensure that it matches the name you entered in the “Set Up” tab. If there are differences in spelling and formatting, the monthly and annual payroll tabs will not be able to make automatic calculations.
When you have new hires, enter their details in the “Set Up Employee Data” tab after the existing employees; information will be auto-transferred to other tabs when you input their names.
In column B of the “Set Up Employee Data” tab, enter each hourly employee’s straight-time hourly rate (excluding overtime). Leave this cell blank for salaried employees.
In column C of the same tab, input each salaried employee’s annual salary. For example, if your staff earns $50,000 a year, enter “50,000.”
In column D, labeled “# of Pay Periods in Year,” enter the applicable pay period based on your payroll schedule or how often you pay employees.
- If weekly, input “52” (52 weeks in a year)
- If biweekly, input “26” (computed as: 52 weeks ÷ two weeks per pay period = 26)
- If monthly, input “12” (12 months in a year)
- If semimonthly, input “24” (computed as: 12 months ÷ two pay periods per month = 24)
Enter each employee’s federal and state income tax rates in columns E and F, respectively. To find the applicable rates, use the W-4 forms collected from employees when they joined your company. The tax rates depend on the number of allowances your employees entered (usually based on the number of dependents) and their filing status—like married, single, or head of household. Generally, the more allowances employees claim, the lower their tax rates.
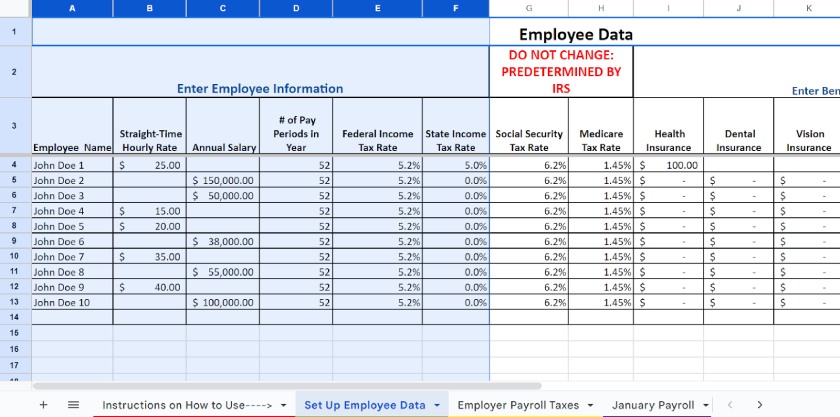
Columns A through F in the “Set Up Employee Data” tab don’t have any formulas in the cells. Use your payroll records to ensure you enter accurate information.
If your payroll process includes withholding local taxes, you should have already added a column for it. If yes, input the applicable local tax rates. If not, check Step 1 for instructions on how to add a new column. Don’t forget to do the same for each of the payroll month tabs and the “Year-to-Date Payroll” tab.
The template contains several columns for the different types of benefits you may offer employees, such as health, dental, vision, and 401(k) plans. For each benefit applicable to your business, enter the employees’ premium per pay period in columns I through L of the “Set Up Employee Data” tab.
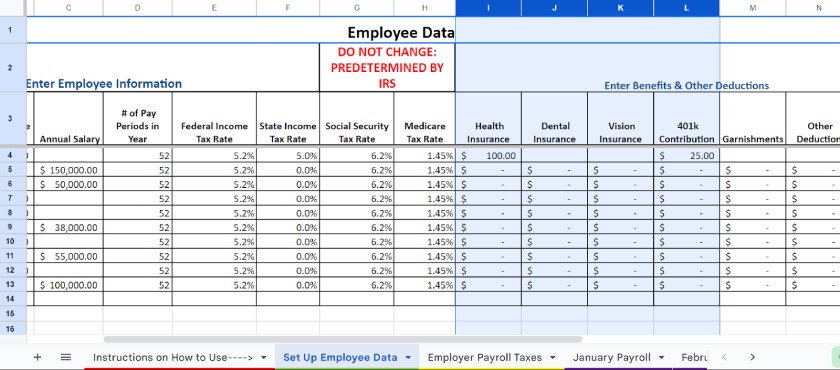
There are columns for you to withhold premium deductions for common insurance benefits.
You can also use columns M, N, and O for garnishments and other employee deductions. After entering the benefits and deduction details on the “Set Up Employee Data” tab, the template will automatically populate the appropriate fields when you input the employees’ names in column B of the monthly payroll tabs.
Relying on your employees to keep track of their PTO is not a good strategy. To help you monitor this, the payroll Excel template has an optional PTO calculation tool.
If you decide to use this, check the last three columns in the “Set Up Employee Data” tab that pertain to PTO. In column P (“Enter Annual PTO Hours”), input the total PTO hours employees are entitled to in a year.
You don’t need to fill column Q (“Auto Calculation-PTO Hours Taken”) since the template will automatically pull the total PTO hours each employee has used from the “Year-to-Date Payroll” tab. The same goes for column R (“Auto Calc-PTO Hours Remaining”) because it contains a formula that deducts the actual PTO taken from the employee’s annual entitlement.
Note that you have to separately track the actual PTO hours that each employee has taken for the applicable payroll period of every pay run. Input the data in column F (“PTO Hours Taken”) of the monthly payroll tabs and the “Year-to-Date Payroll” tab will sum up all PTO hours per employee.
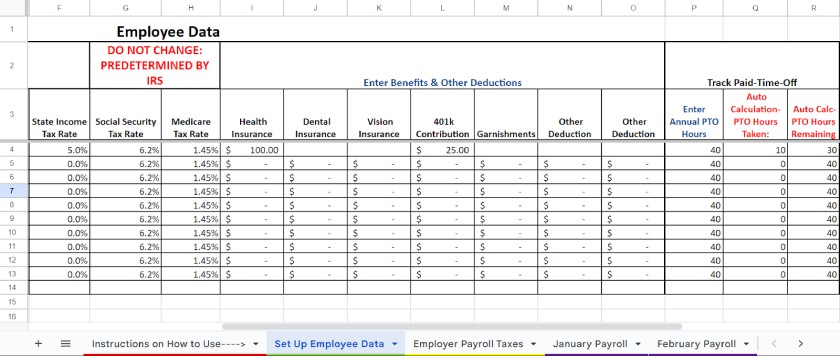
There’s a section for PTO tracking. It will update as you enter paycheck details each period.
Step 3: Set Up Employer Payroll Tax Information
In addition to tracking withholdings from employee paychecks, you’re responsible for paying your share of payroll taxes. The “Employer Payroll Taxes” tab has cells you can use to enter your federal and state unemployment tax rates. Note that the 6% federal unemployment tax is only charged on the first $7,000 each employee earns (most state unemployment taxes follow the same logic). Be sure to review the information in the payroll tabs each month to help you calculate the tax amount due for each employee and the company.
You will also likely be responsible for workers’ compensation insurance payments. The rates and amounts can vary, depending on the employees’ work, your claim history, and other factors. However, you should receive a monthly premium amount due from the insurance fund that creates your policy. Simply enter the monthly premium amounts in column G (“Enter Workers’ Comp Payable”).
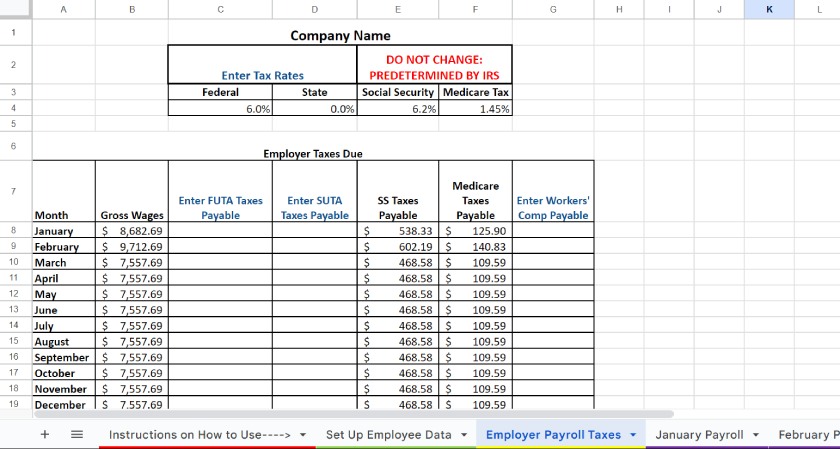
Use the “Employer Payroll Taxes” tab to help keep track of the taxes your business owes.
Step 4: Enter Hours Worked & Other Income Details
After entering all of your employee and employer data into the Excel payroll template, you’re ready to calculate employee payments. Go to the appropriate monthly payroll tab—so if it’s January, go to the “January Payroll” tab. Enter the pay date in column A and the full name of each employee you are paying for the period in column B.
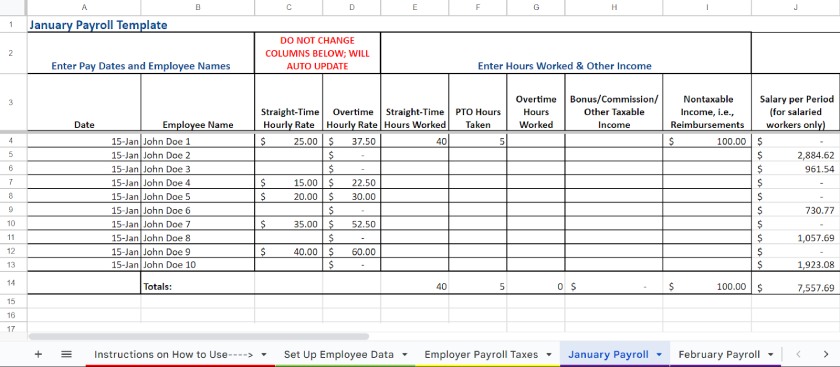
The monthly payroll tabs have specific columns to enter your employees’ names and actual hours worked.
Remember, the name must be the same as you entered in column A of the “Set Up Employee Data” tab. If it doesn’t match, the pay rates, tax rates, and deductions will not populate in the monthly payroll tabs. If you’re concerned you’re not entering them correctly, copy and paste the names in.
Then, input the actual regular hours worked, overtime hours, PTO hours taken, and other income details in the applicable columns. Below are instructions on how to populate some of these columns.
For accurate employee paychecks, enter the correct number of straight-time hours in column E and overtime hours in column G of the monthly payroll tabs. For straight-time hours, this is usually 40 hours or fewer. For overtime, the template calculates pay at a rate of 1.5 times your regular pay rate using the number of hours you specify. However, this can change depending on the labor laws of the state where your business operates.
Don’t edit the straight-time and overtime hourly rates listed in columns C (“Straight-Time Hourly Rate”) and D (“Overtime Hourly Rate”) of the monthly payroll tabs as these contain Excel payroll formulas and will update automatically. So, whenever you enter your employees’ names under column B of the monthly payroll tabs, the straight-time hourly rates automatically carry over from the “Set Up Employee Data” tab.
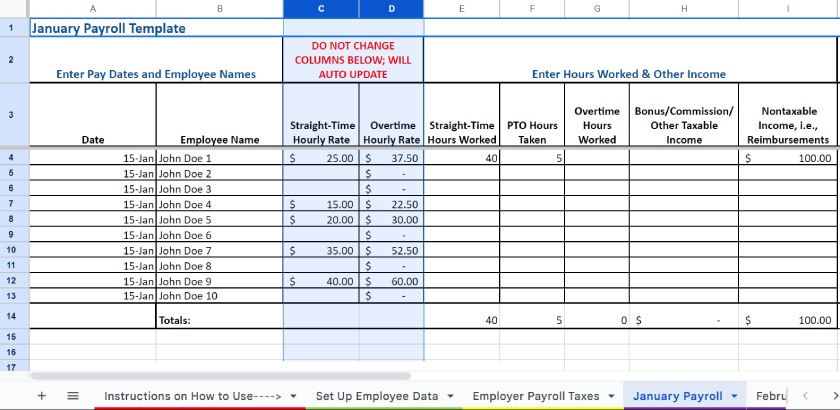
The overtime rate in column D is based on the straight-time hourly rate you enter in column C with a formula that simply multiplies it by 1.5 (time and a half).
When doing payroll in Excel, don’t forget to review your state laws on overtime rates. For state-specific guidelines most relevant to your business, check out our state payroll guides.
Federal law generally requires you to pay employees overtime for any hours worked over 40 in a consecutive seven-day period. However, if your business operates in California, you may need to make adjustments because of its rule that employees who work over 12 hours in one workday are entitled to double-time pay. So, any time worked between eight and 12 hours must be paid at a rate of 1.5 times and any hours over 12 must be paid at twice the straight-time rate.
In this case, you need to add new columns to all of the payroll month tabs and the “Year-to-Date Payroll” tab to capture the double overtime rate and the overtime hours that will apply to this rate. Check Step 1 for instructions on adding new columns. You also have to add the overtime formula and check if the other cells in all 13 tabs have the required Excel functions, are linked to applicable cells or tabs, and show the correct details. If you’re wondering what formula to input to the new double overtime rate column, use: C4*2.
If you decide to pay an employee bonus, you must withhold payroll taxes similar to the way you do with regular wages. In this payroll Excel template, just enter the bonus amount in column H, and it will be included in the taxable gross income.
For reimbursements of expenses that employees incurred during business travel, note that these transactions are generally not taxable. This is because you are simply reimbursing the money employees used to pay for business expenses; therefore, the employee didn’t actually receive any new income.
In this case, you don’t need to withhold payroll taxes. Instead, enter the amount you need to reimburse to the employee in column I of the applicable monthly payroll tab. There are formulas in place that will disregard this amount when calculating taxes to withhold and pay.
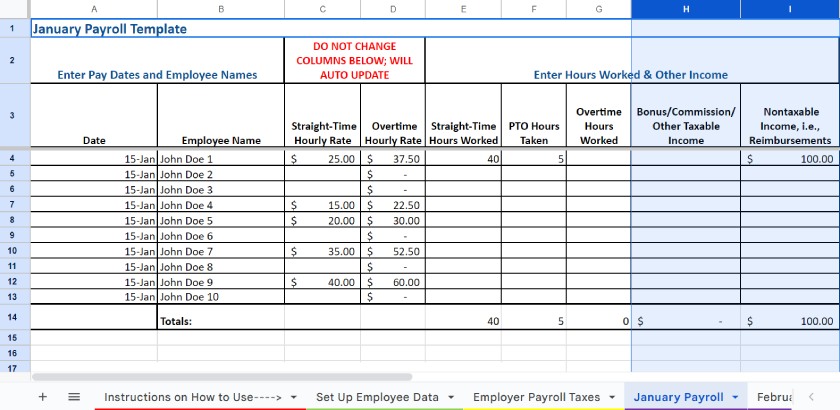
Bonuses and other non-taxable income should be entered in column H.
Step 5: Review Automatic Payroll Calculations
After completing your initial setup and entering employee work hours, all payroll calculations should be visible. You should review these calculations so you don’t have to void and reissue payments later.
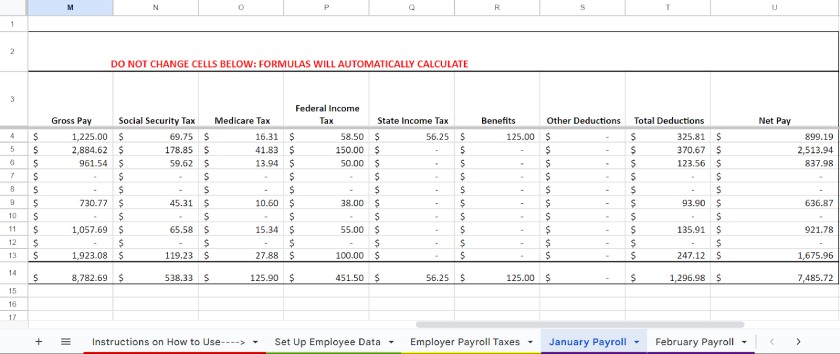
Cells with “-” in them will continue to reflect that until sufficient employee and/or paycheck details are entered for it to complete the calculation.
The accuracy of your payroll tax calculations also depends on how accurate your employee payroll information is. If you’re not careful, you can subject yourself to penalties. Here are the items you should review, including how the Excel payroll template computes each.
Salaries in column J of the monthly payroll tabs are automatically pulled from the “Set Up Employee Data” tab. Once the template has the employee’s annual salary and your total number of pay periods in the year, the column will automatically reflect the employee’s salary for the period. In calculating the per-period salary amount, note that the cells in column J have formulas that simply divide the annual salary by the number of annual pay periods you entered on the “Set Up Employee Data” tab.
Similar to column J, the “Straight-Time Pay” column (K) of the monthly payroll tabs also contains automated formulas. It has two parts: the number of straight-time hours worked multiplied by the straight-time hourly rate and the number of PTO hours taken multiplied by the straight-time hourly rate. This helps ensure that you’re paying employees all of the money they’re due, especially PTO hours.
Overtime pay is simple in that it’s calculated using the number of overtime hours you entered in column G and the hourly overtime rate in column D of the monthly payroll tabs. If you have overtime hours listed in column G, there should be a corresponding dollar amount in column L.
Gross pay (column M) is the total income an employee is due before deductions and taxes. In this payroll Excel template, it’s calculated by adding columns J through L, plus columns H and I, of the monthly payroll tabs. These columns contain the employees’ per period salary, straight-time pay, overtime pay, bonuses and commissions, nontaxable income, and reimbursements.
FICA taxes are labeled as “Social Security Tax” (column N) and “Medicare Tax” (column O) of the monthly payroll tabs. These columns are linked to the “Set Up Employee Data” tab, automatically pulling the applicable tax rates from there. The cells then multiply the rates by the employee’s gross pay minus any nontaxable income, such as reimbursements.
As an employer, you are responsible for withholding federal income taxes from your employees’ paychecks. You might also have to withhold additional amounts—depending on the state. In the monthly payroll tabs, columns P and Q (labeled “Federal Income Tax” and “State Income Tax,” respectively) calculate taxes based on the tax rate information you provided in the “Set Up Employee Data” tab.
Benefits are reflected in column R on each monthly payroll tab, which sums all premiums showing in columns I through L on the “Set Up Employee Data” tab. The amounts should be fixed from one pay period to the next, but you can update the amounts in the “Set Up Employee Data” tab if they ever change. If you do happen to change the benefit deductions for a particular employee, you need to overwrite the benefit deduction formulas for the prior months first and then overwrite it with the actual dollar amounts.
Other deductions should be handled the same way as benefits. Note that the “Other Deductions” column (column S) in the monthly payroll tabs consists of garnishments and other deductions detailed in the “Set Up Employee Data” tab. On the other hand, the “Total Deductions” (column T) is the sum of all taxes withheld, premiums collected for benefits, and other deductions.
The “Net Pay” column (column U) contains the amount you need to pay employees through check, direct deposit, or pay card. This amount is calculated automatically by subtracting the employee’s total deductions (column T) from their gross pay (column M).
Step 6: Pay Your Employees
After you have reviewed your payroll taxes, deductions, and wage calculations for the pay period, you’re ready to pay your employees. To do this, you can choose to either print checks online, deposit money to employee pay cards, or work with your bank to set up direct deposit payments for your workers.
If you only have a handful of employees and they prefer paychecks, read my guide on how to print payroll checks online for free. If you want to pay via pay cards, check out my list of the best payroll card providers for small businesses.
Step 7: Review Year-to-Date Payroll Information
The last tab, titled “Year-to-Date Payroll,” in the payroll Excel template lists all your employee payroll details for the year. It’s linked to the monthly payroll tabs, so all employee payroll expenses should be reflected. If you decide to provide pay stubs—some states require you to do so—this tab will give you the YTD information you need to fill them in.
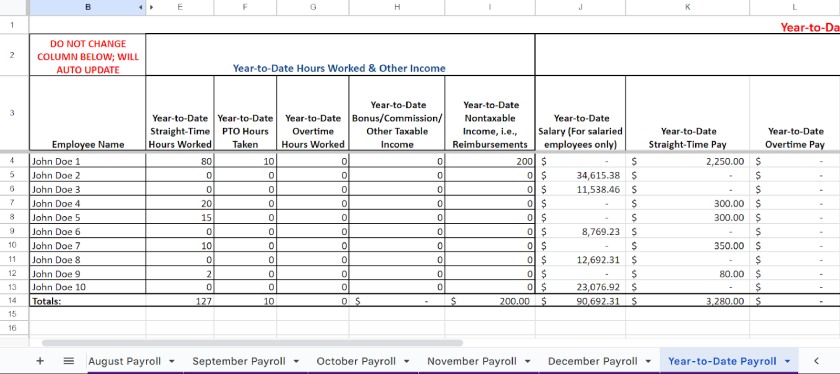
All data automatically populates within this tab, so you shouldn’t have to change any information in the cells.
Frequently Asked Questions (FAQs) About How to Do Payroll in Excel
Setting up a payroll spreadsheet in Excel beats having to use a calculator to manually compute the applicable salaries, taxes, and deductions. You can take advantage of Excel formulas and commands to automate some of the computations (such as Social Security and Medicare taxes) and customize how you want the data to be accessed or appear in Excel tabs or spreadsheets.
No, it doesn’t have a built-in payroll template. You have to create an Excel spreadsheet with
Excel payroll formulas to automate the calculations.
It can be a good option for some employers with a small workforce (up to 10 employees). However, while Excel provides ease in managing employee and payroll-related data, I only recommend it for very small businesses that have simple payroll and tax calculation needs.


Don’t change the Social Security and Medicare tax rates in columns G and H, respectively. These Federal Insurance Contributions Act (FICA) rates are predetermined by the IRS.
For Social Security, the tax rate is 6.2% of the employee’s gross salary. Keep in mind that Social Security maxes out if an employee earns $176,100 (in 2025 or $168,600 in 2024) in wages before the end of the year. If you have employees earning more than that, you need to stop withholding the 6.2% tax once their YTD earnings exceed that amount.
To help check your employees’ total earnings, look at column M (labeled “Year-to-Date Gross Pay”) in the “Year-to-Date Payroll” tab of the Excel payroll template. This column shows the employees’ YTD gross wages. Simply deduct all YTD nontaxable income (column I) from this amount to find the taxable gross income.
For Medicare, the tax rate is 1.45% on an employee’s first $200,000 in wages and an additional 0.9% if the earned wages exceed $200,000 in a calendar year. This increases the total Medicare tax to 2.35% for those individuals. If you have employees who reach this threshold, you need to change the formulas in the “Medicare Tax” column (column O) on all of the payroll month payroll tabs following the month the employee reached $200,000 in gross pay.
To further clarify, look at the screenshot below, specifically the formula field. Let’s say that the first employee on your list reached the threshold in March. To reflect the new tax rate, go to the “Medicare Tax” column of the April payroll tab. In the cell that applies to the employee, which in this example and in the below screenshot is the first one after the “Medicare Tax” title, delete the Vlookup function or the “((VLOOKUP(B4,’Set Up Employee Data’!A:O,8,FALSE)))” part of the formula. Replace it with “2.35%.”
This will overwrite the link to the employee’s Medicare tax rate (which is 1.45%) on the “Set Up Employee Data” tab. Don’t forget to go to the May to December payroll tabs and update the employee’s Medicare Tax rate formula.
If your employee reaches the $200,000 wage threshold for Medicare, check and revise the formula in the “Medicare Tax” column on applicable payroll month tabs.