


If you’re wondering how to use the Grasshopper phone system, it’s as easy as selecting your plan and number, downloading the app, and creating your greetings and extension. After these steps, you can start making and receiving calls and texts. Read on to learn how to use your new voice-over-internet-protocol (VoIP) platform and get some tips on maximizing the use of your Grasshopper phone system.
Step 1: Select a Plan & Phone Number
How does Grasshopper phone work? Using Grasshopper begins with the selection of a plan. Visit the Grasshopper sign-up page and choose a subscription plan. It differs from most VoIP services because it doesn’t charge per-user fees. Instead, Grasshopper offers a flat monthly fee. Plans have the same features regardless of the number of users, and packages vary in the number of phone numbers and extensions.
Grasshopper Plans & Pricing
Grasshopper is a popular business phone system offering monthly subscriptions that range from $34 to $92 per month and come with unlimited users. It has two billing options, monthly or annual, and opting for yearly billing saves you over 10%. Once you pick a plan, click “Buy Now.” You may choose from the following subscriptions:
- Solo: $34 per month for one phone number and three extensions
- Partner: $56 per month for three phone numbers and six extensions
- Small Business: $92 per month for five phone numbers and unlimited extensions

For more information on its plans, pricing, and features, check out our comprehensive Grasshopper review.
Grasshopper’s Virtual Phone Numbers
From there, you must select a phone number for your business. Grasshopper is one of the best virtual phone number providers—allowing users to choose from toll-free, vanity, or local numbers or port their existing phone number.
Based on your chosen type, Grasshopper generates phone number options. You either choose a recommended number or select one of the closest available matches provided. Once you’ve chosen, you will verify the number.
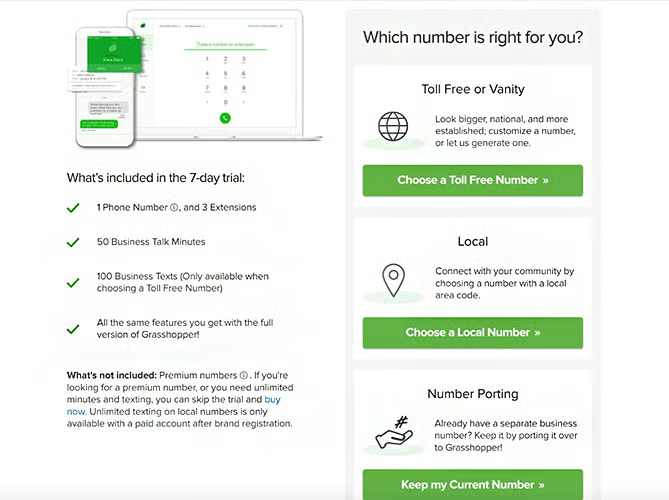
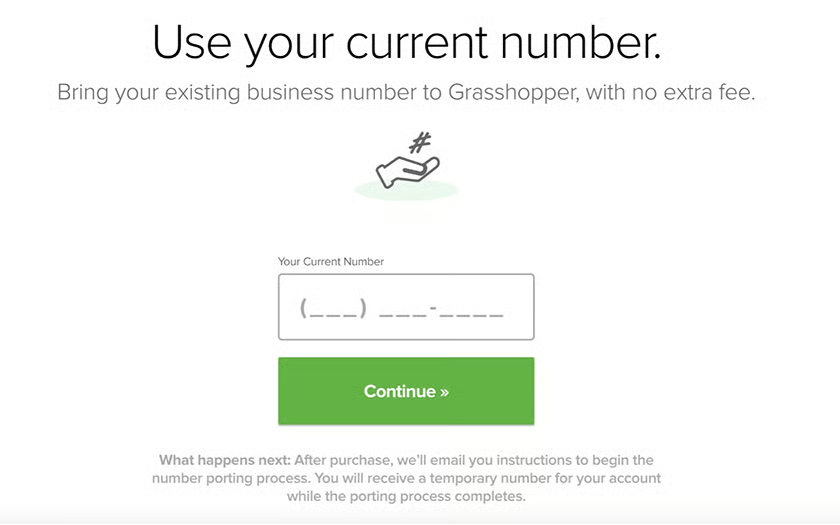
If you need to port your number, Grasshopper provides this service for free. Once you select number porting, click “Use your Current Number.” Enter your existing number, and after checking out, Grasshopper sends an email with instructions on how to start the porting process. You will receive and use a temporary telephone number until your request is processed.
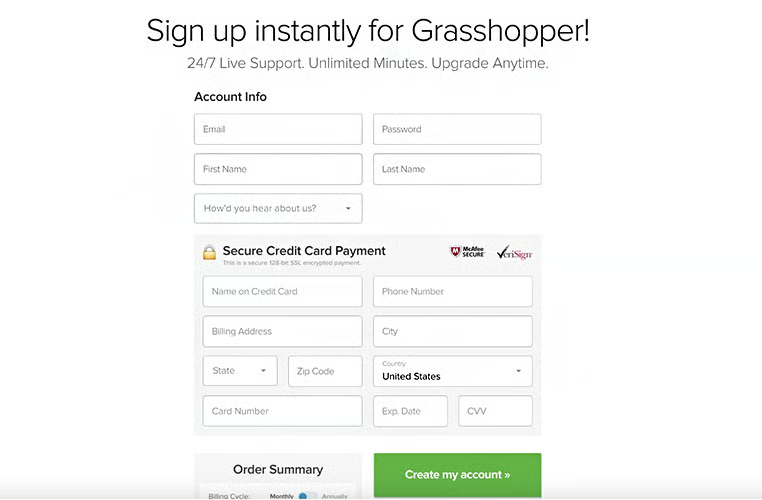
Once you’ve chosen a number, you will be directed to the “Order Summary” page. Select your preferred billing cycle, either monthly or annually, and review your subscription plan details. Fill out the account information, including your email, password, name, and payment details. Click “Create My Account.” Once you’ve subscribed, Grasshopper provides an account setup guide to walk you through the setup process.
Step 2: Download the Grasshopper App
After creating a new account, sign in using either the web portal, desktop, or mobile application. Grasshopper apps are available for desktop, iOS, and Android. The applications allow you to separate your calls and texts from business communications on one phone. It enables you to make and receive calls from anywhere and ensures your business number is on the recipient’s caller identification (ID).
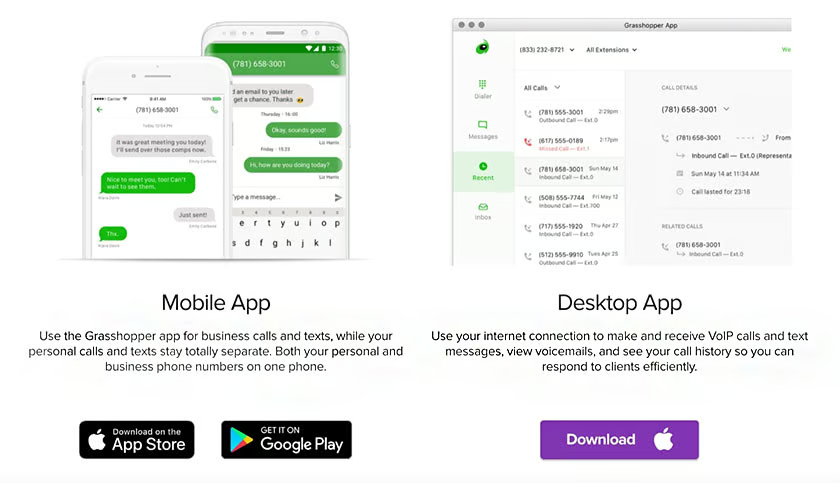
Grasshopper’s desktop apps for Mac or Windows computers are available for download on its website. For mobile applications, head to Google Play or Apple App Store to download iOS and Android applications. Note that you need an active user account and access to an extension before you can use Grasshopper’s applications. Also, it does not support tablets and iPads.
Once downloaded, sign in to your account using your Grasshopper username (registered email) and password. Grasshopper will ask if you want app notifications. Choose “Yes” to receive alerts about missed calls, texts, and voicemails. Notification settings can also be adjusted at a later time.
Lastly, pick an extension for your device. Extensions only appear in your call logs, so people on the other line won’t know if you’re on your cell phone or computer. Access to an extension lets users customize call forwarding, greetings, and voicemails and add their call forwarding number. You must have admin permissions to manage extensions. If you have not been given extension access, contact your system administrator.
Step 3: Select or Create a Unique Greeting
Recorded greetings guide your callers through your phone system. Grasshopper subscriptions come with a virtual receptionist called an auto-attendant. Its default main greeting configuration says, “Thank you for calling. To speak to a representative, please press zero.” You can continue to use this generic greeting or opt for a personalized message customized to your business. Your account has four customizable greetings:
- Main Greeting: This is the recorded message your callers hear on inbound calls to your virtual number.
- Transfer Greeting: This will play when a caller is transferred to an extension. The default greeting says, “Please hold while we connect your call to…”
- Individual Extension Greeting: This greeting is played with your transfer greeting and in the name directory. It says the name of the individual or department callers reached.
- Voicemail Greeting: The recording plays when someone is directed to voicemail.
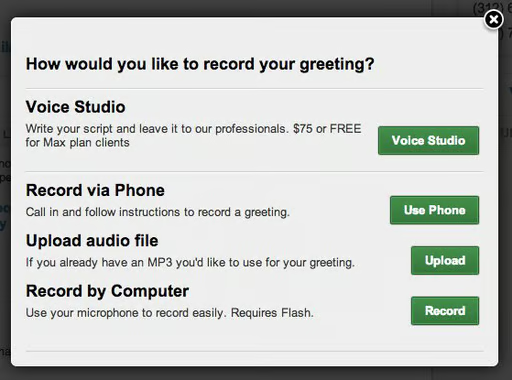
Grasshopper has four ways to record greetings. (Source: Grasshopper) 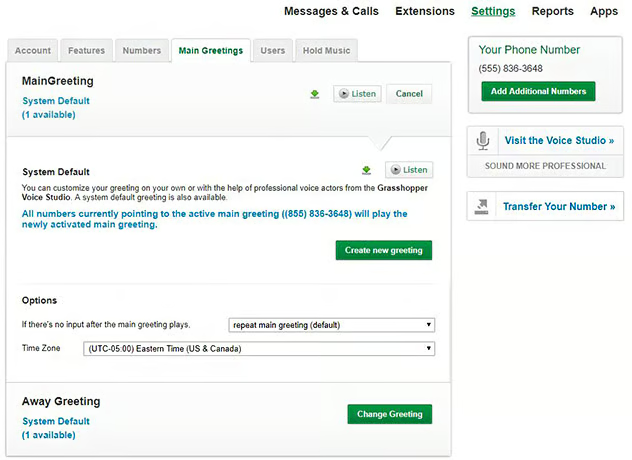
Create custom greetings to elevate your caller’s experience. (Source: Grasshopper)


Whether you record, upload, or use Grasshopper’s voice studio, all greetings are saved to your account. These recordings can be used in the future. For example, a recorded holiday greeting can be saved and used during that particular season.
To customize your greeting, log into your Grasshopper portal, click “Settings,” then “Greetings.” Select the tab of the greeting you will update and click “Change Greeting.” You have four ways to record your greeting:
- Record a greeting with your phone: Call your Grasshopper phone, enter your pin, and follow the instructions.
- Record a greeting with your computer: This option requires Flash and a clear microphone to record high-quality audio.
- Upload an MP3 file: Upload a prerecorded MP3 file for your greeting.
- Record a greeting using the Voice Studio: Write a script or leave it to Grasshopper’s professional artist to record your greeting. Each greeting costs $75 per order.
Step 4: Add Required Extensions
Extensions determine how incoming calls are routed to different persons or departments. Companies often use extensions for various offices that interact frequently with customers, such as sales, billing, and customer service divisions. Depending on your subscription, Grasshopper plans have three, six, or unlimited extensions.
Use Grasshopper’s online portal to add an extension. There are two types of extensions: departments like sales and billing, which have a single-digit extension, and individual employees, which have three-digit extensions. Click “Add Extension” by “Employee Extensions” or “Department Extensions.” Once added, the new extension appears at the bottom of your list.
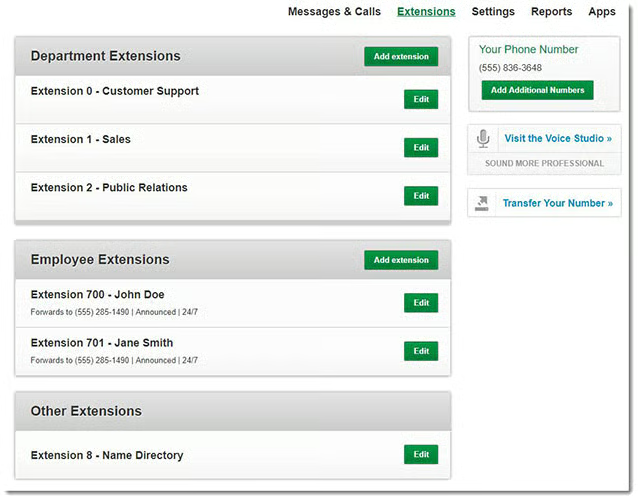
Next, edit the extension by clicking the green “Edit” button. The default account configuration has an “Extension 0” for users. You can either edit extension 0 or create a new extension. Each extension is customizable. You control how, when, and where calls are forwarded, edit the extension’s name, number, time zone, and user access, and set up greeting and vacation schedules.
To add a user to an extension, head to the “Extensions” tab and open the extension where the new user will be added. Click “User Access,” enter the user’s email address, and click “Invite.” Grasshopper will email the person, inviting them to set up their extension.
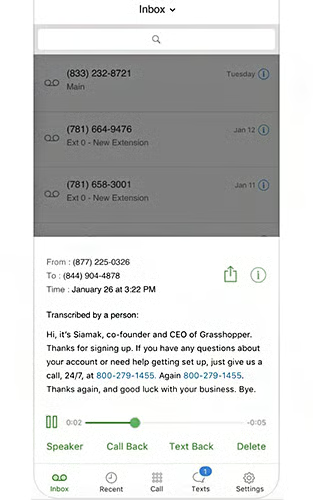
Step 5: Start Making Calls
After signing up, you can immediately start making and receiving voice calls and text messages. For those who opted to port their number, it may take one to two weeks to activate, but you can still communicate with colleagues and customers using the temporary number issued to you. Click on the mobile or desktop app and select the dialer from the navigation menu—key in the phone number or extension you wish to call and select the call button.
Now that you know how to use Grasshopper’s phone system, take a few minutes to navigate and explore the interface to manage your calls and phone system better. You may use this time to teach your team how Grasshopper works and about its support center and knowledge base.
Top Grasshopper Features
Grasshopper is one of the leading VoIP providers offering a range of communication tools, such as virtual fax and business texting, that improve a small company’s communication stack. It’s one of the best VoIP services for home offices and small businesses looking for a simple tool to make and receive calls. It’s best for companies looking to improve a small team’s phone system with business features, such as call forwarding and unmetered domestic calling.
Grasshopper’s main strength lies in its standard features available in all plans. Here are some of its top functionalities:
Activate this feature to automatically text new clients when you miss their call. This feature is excellent for ensuring your customers feel valued and allows them to respond with further details regarding their concerns. To use this feature, users must have an admin account and SMS text must be enabled. Each instant response message has a 160-character maximum.
This cloud-based fax delivery feature lets users receive faxes without using bulky fax machines and cables. When customers fax documents to your Grasshopper number, view the files online through the application or email. This is great for smaller companies not wanting to deal with physical hardware. Grasshopper virtual fax is for inbound faxing only.
Grasshopper works with Ruby Receptionists to provide customers with live, U.S.-based receptionists. Live agents answer calls and greet customers based on personalized instructions. This solution helps provide 24/7 call answering services to small teams who cannot afford in-house agents. Ruby Receptionists schedule appointments, collect caller information (such as name and contact details), and answer basic questions about your company.
Tips to Maximize Your Grasshopper Phone System
Grasshopper’s phone system offers basic features designed for solopreneurs and small teams thanks to its professional tools, like call reports, virtual fax, and call forwarding. It’s a no-fuss and budget-friendly communications solution that separates personal from business calls and messaging.
Use these tips to ensure callers and co-workers have an excellent experience.
A reliable internet connection is essential to the success of your VoIP phone system. The call quality is affected if your connection fluctuates or you don’t have enough bandwidth. As a general rule of thumb, you will need a minimum internet connection speed of 100 kbps for VoIP calls. That said, do a speed test to assess the strength of your office Wi-Fi and the internet connections of your remote employees.
If you have an existing phone number you’d like to use, Grasshopper offers free number porting. If you get a new number, decide between a random local, toll-free, or vanity number. Having the same number for texting and calling customers often increases customer response rates and helps with phone number recall.
Grasshopper offers unlimited users and doesn’t charge per-user fees; thus, it costs you nothing to include all colleagues who should have access to the account. Administrators simply add users using Grasshopper’s web portal. When inviting team members, include helpful information about how to use Grasshopper’s phone system, such as how to record greetings and use the platform’s knowledge base.
Having extensions and an employee directory is a great way to establish your company’s professional image. Grasshopper’s virtual phone extensions enable you to route callers to the specific department, employee, or information they seek. Virtual phone extensions are cloud-based, so calls to your business number can be routed to a mobile device or automated message.
Edit your extensions through the Grasshopper web portal. Department extensions are between zero and six, and employee extensions are between 700 and 799. Configure each extension by creating custom settings like vacation schedules, incoming call displays, and call forwarding rules.
Create a schedule that automatically directs and routes calls based on your preset business hours. Setting a custom schedule is a great way to inform customers of your hours and schedule and alternative ways to contact you. Users with administrator access can create an account-wide schedule or set a plan for each extension.
Once configured, calls will follow the preset rules for incoming callers. For extensions, you can add vacation schedules, and during this time, Grasshopper plays your away greeting. Incoming calls will not follow your extension call forwarding schedule. Enable the do not disturb setting if you do not want to receive any call notifications.
While VoIP phone systems offer professional business communication features like call reports and virtual voicemail, they depend on power and the internet. If there are power and internet fluctuations in your area, maximize your Grasshopper phone service by enabling your landline for Grasshopper calling. All Grasshopper extensions can forward incoming calls to your traditional line. Simply add the number when editing your extension.
Using your landline for business calls works with the calling card feature, disabled by default on all accounts. Contact Grasshopper’s customer support to request calling card activation. Ensure you have your account’s master personal identification number (PIN) on hand because you will need to provide this to facilitate the request. Once the calling card feature is activated, register each landline.
Frequently Asked Questions (FAQs)
Does Grasshopper work without the internet?
Yes. Grasshopper is a VoIP calling platform that uses the internet to make calls. However, it can be used offline as long as users have logged in once while connected to the internet. If there is a weak signal while on mobile, Grasshopper seamlessly routes the call over its regular calling network. Calls revert to Wi-Fi when your internet connection improves.
Why am I not receiving calls on Grasshopper?
One of the main reasons you don’t receive calls on your Grasshopper app is that you have not selected an extension in your settings or you have not been added to an extension. Check your settings gear at the top right of the application and review which extensions you’ve selected. Also, see if your do not disturb setting is on. Turn this off to get alerts and notifications.
Does Grasshopper record calls?
No, Grasshopper doesn’t offer call recording. Alternatively, you may use a third-party call recording tool to capture your phone conversation. It’s important to verify that you can use the application to record while using your desktop or mobile Grasshopper app to make or receive the call.
Bottom Line
Grasshopper VoIP phone system is a preferred service provider among solopreneurs and small companies because it gives teams a professional phone system at affordable prices. It focuses on simple softphone functionality, making it easy to set up and operate. Now that you know the answer to the question “How does Grasshopper’s phone work?” sign up for its seven-day free trial and explore the features and settings to determine if it fits your business.