

In this tutorial, I’ll show you how to set up a QuickBooks Online chart of accounts. I’ll cover how to navigate to the chart of accounts where you can add a new account and modify and delete existing ones if needed. You’ll also learn how to import a chart of accounts from an Excel spreadsheet or a CSV file.
- How To Add an Account to the Chart of Accounts List
- How To Edit an Account in the Chart of Accounts List
- How To Delete an Account in the Chart of Accounts List
- How To View & Print Your Chart of Accounts
- How To Import Accounts to the Chart of Accounts List
- How QuickBooks Creates & Classifies Accounts
- Tips for Organizing Your QuickBooks Online Chart of Accounts
- Frequently Asked Questions (FAQs)
- Wrap Up
How To Add an Account to the Chart of Accounts List
Step 1: Navigate to the Chart of Accounts
First, I clicked on the gear icon (⚙︎) on the upper right-hand side of my QuickBooks dashboard and then selected Chart of accounts from the pop-up window, as shown below.
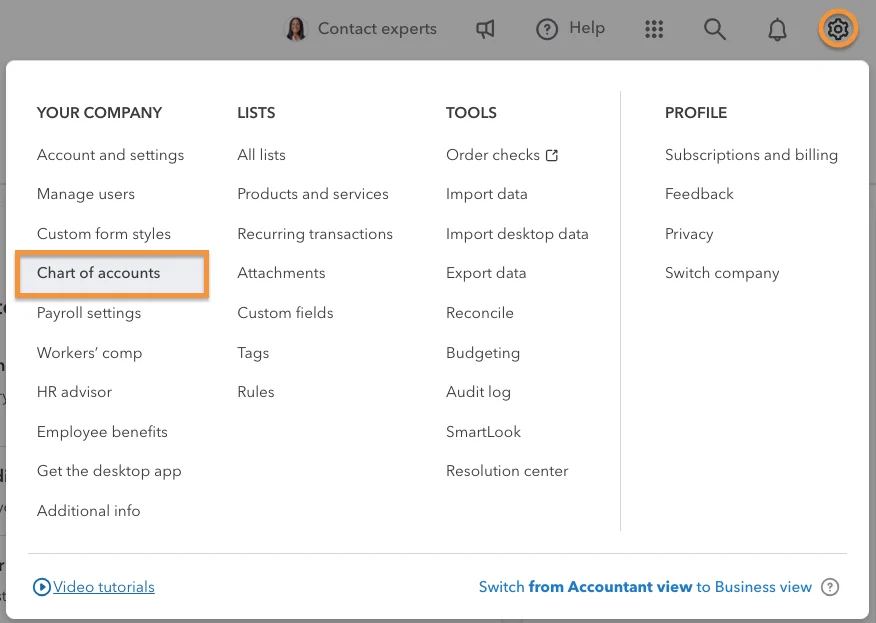
Navigate to the chart of accounts in QuickBooks Online
Step 2: Create a New Account
Next, on the Chart of accounts page, I clicked the green New button in the upper right corner to access the account setup window.
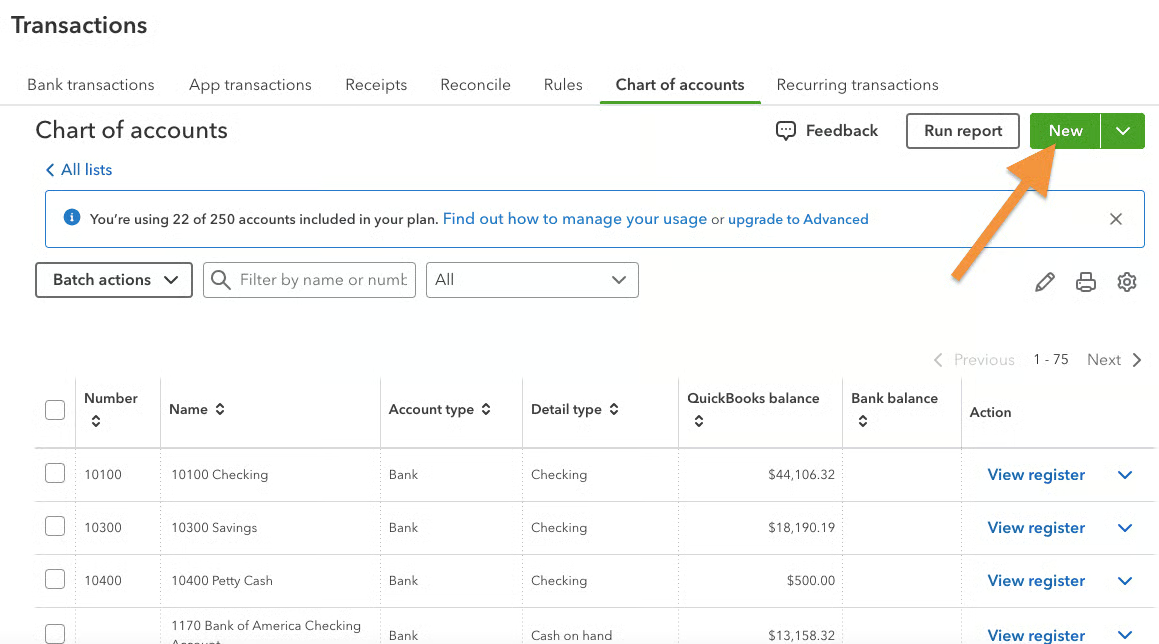
Click New to access the chart of accounts in QuickBooks Online
To complete the new account setup form, you need to provide the relevant details, including:
- Account name: Provide a name for your account that will make it easy for you to distinguish when choosing accounts to post transactions. For example, in the screenshot below, I named my new account “Digital Advertising Costs,” which will be used for expenses spent on online marketing activities for my business.
- Account number: Providing a number for your account is optional. If you wish to use account numbers, you must first enable them, as shown in my guide on how to set up advanced settings in QuickBooks Online.
- Account type: Choose the appropriate account type (e.g., assets, liabilities, equity income, and expenses).
- Detail type: This helps you specify the exact nature of your account. For example, under the Expenses type, I selected “Advertising/Promotional” as the detail type.
- Make this a subaccount: Checking this box allows you to create a subaccount under a parent account. For instance, if I have a parent account called “Marketing,” then I can create a subaccount called “Digital Advertising Costs.”
- Use for billable expenses. If you check this box, the expenses recorded in this account can be billed to your clients. This is useful if you incur costs on behalf of your clients and want to pass the expenses on to them.
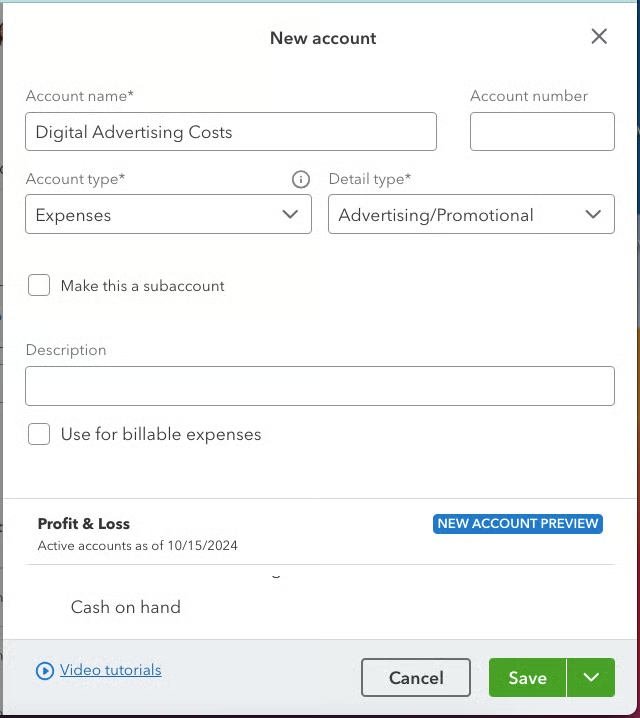
New account creation form in QuickBooks Online
When you scroll down the setup form, you will see where the account shows up in your report. In my GIF below, my new Digital Advertising Costs account shows up in my P&L reports and, if I scroll further, the account is now a subaccount of 6100 Advertising Expense.
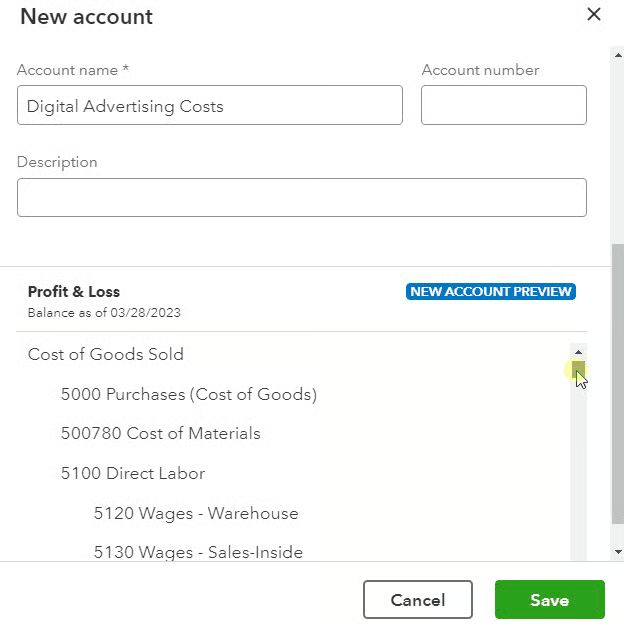
New Account Previous section in QuickBooks Online
Step 3: Save the New Account
Now that I have completed the account setup form, I click the green Save button to record the new account. If you need to add another account, simply click the drop-down arrow next to Save and then click Save and new.
How To Edit an Account in the Chart of Accounts List
To edit an existing account, find the account on the Chart of accounts screen and click the drop-down arrow next to Run report. Next, select Edit to open the account setup screen.
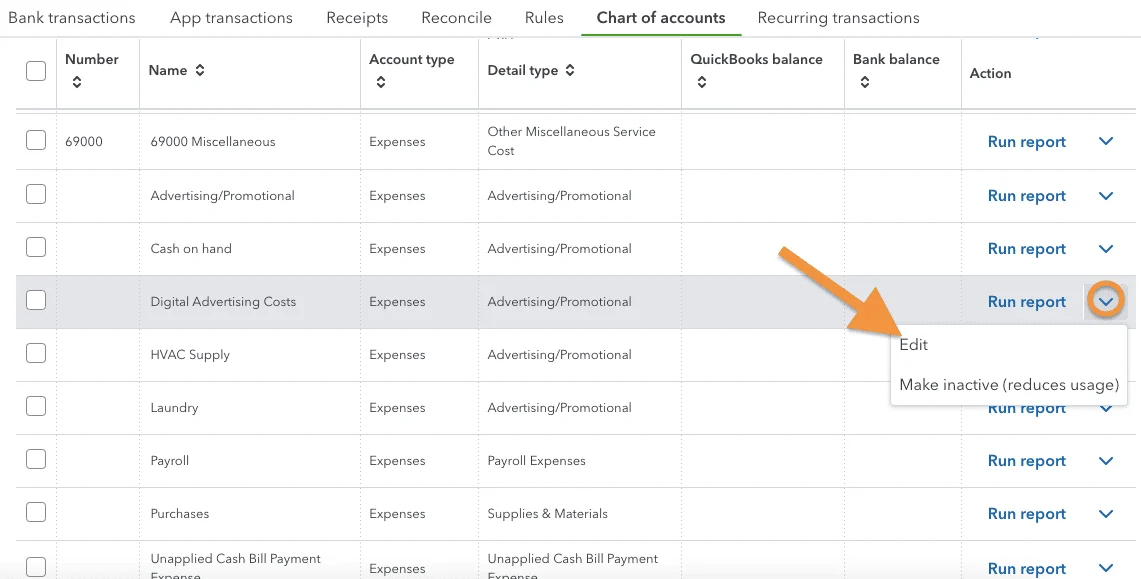
Edit an account in QuickBooks Online
The fields available in the account setup screen are the same as discussed in the previous section. Make the needed changes to the account, then click the green Save button.
How To Delete an Account in the Chart of Accounts List
Instead of deleting accounts in QuickBooks Online, you must mark them as inactive.
- If the account has never been used in a transaction, the account will no longer count toward your maximum number of accounts.
- If the account has been used in a transaction, the history of the account will be retained, and the account will continue to count toward your maximum.
From the Chart of accounts screen, I clicked the drop-down arrow next to Run report for the account I wanted to make inactive. Then, I selected Make inactive (reduces usage) from the drop-down list (shown in the screenshot above).
How To View & Print Your Chart of Accounts
From the Chart of accounts screen, I clicked the Run report button on the top right side of my screen to view a copy of my chart of accounts.
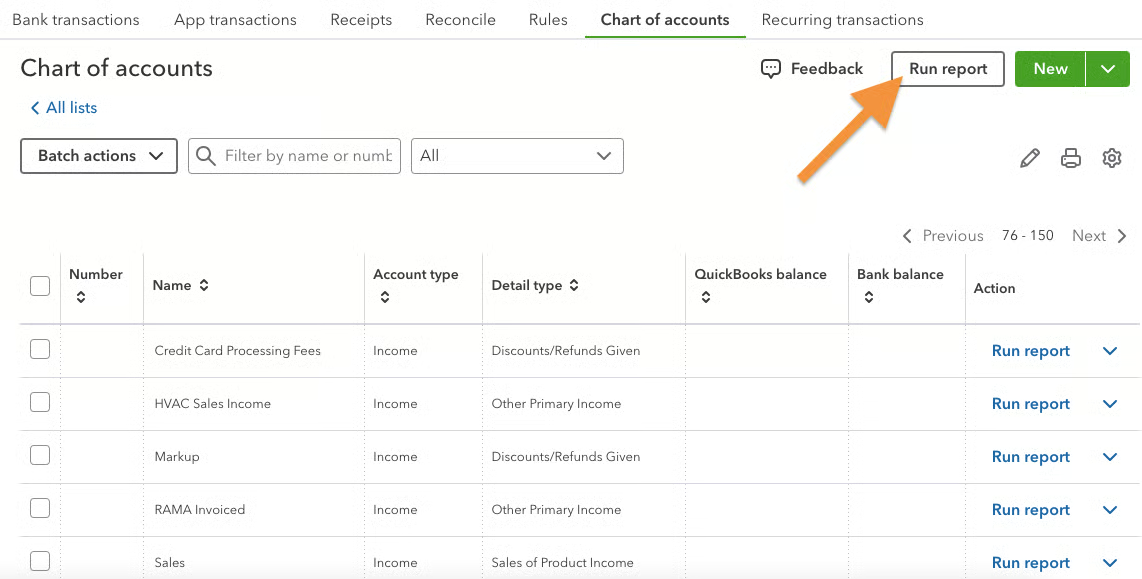
Creating a chart of accounts report in QuickBooks
After clicking Run report, a copy of my chart of accounts appeared. I can then export it to an Excel file, print it out, or email it if needed.
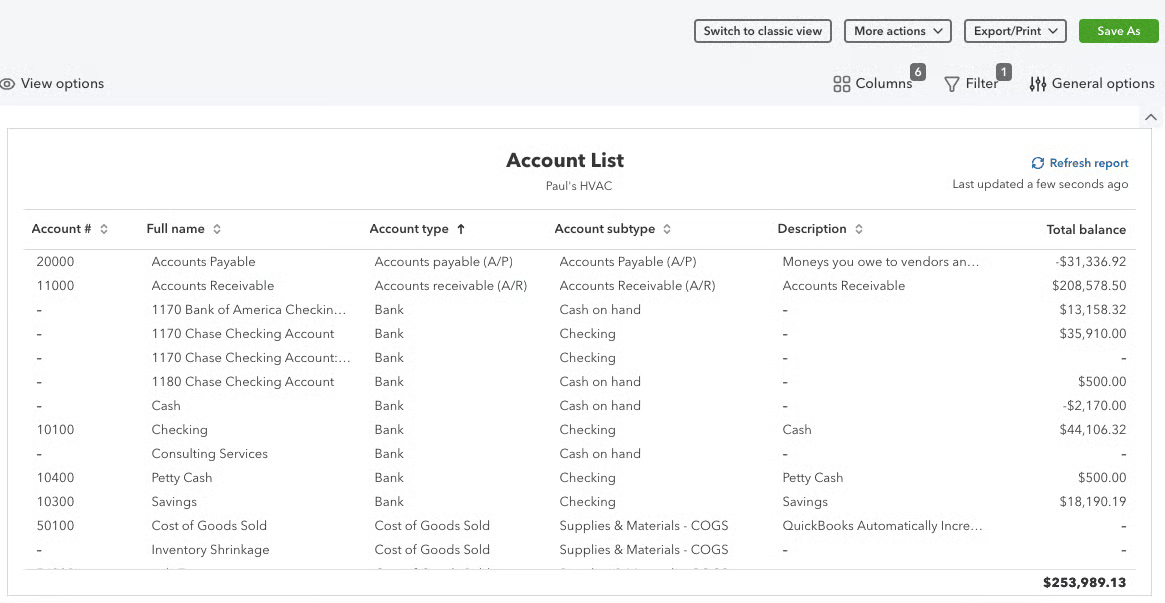
Sample copy of chart of accounts in QuickBooks Online
How To Import Accounts to the Chart of Accounts List
If you’re transferring books from another bookkeeping software, you might be able to export your chart of accounts from the prior software into an Excel spreadsheet or CSV file, which can then be imported into QuickBooks Online. Imported accounts will add to—not replace—your current chart of accounts.
Step 1: Prepare Your Spreadsheet
Your spreadsheet must contain columns for the account name, account type, and detail type. You can also include a column for the account number if you wish. The spreadsheet can contain other columns, but they won’t be imported into QuickBooks Online. The first line of the spreadsheet should contain a label for each column, which doesn’t necessarily have to match the field name in QuickBooks Online.
Here is an example spreadsheet ready for import:

Sample spreadsheet to import accounts into QuickBooks Online
Step 2. Import Your Spreadsheet
From the Chart of accounts screen, click the drop-down arrow next to the green New button and then select Import.

Import accounts into QuickBooks Online
Next, click the Browse button and select the spreadsheet you prepared for the import.
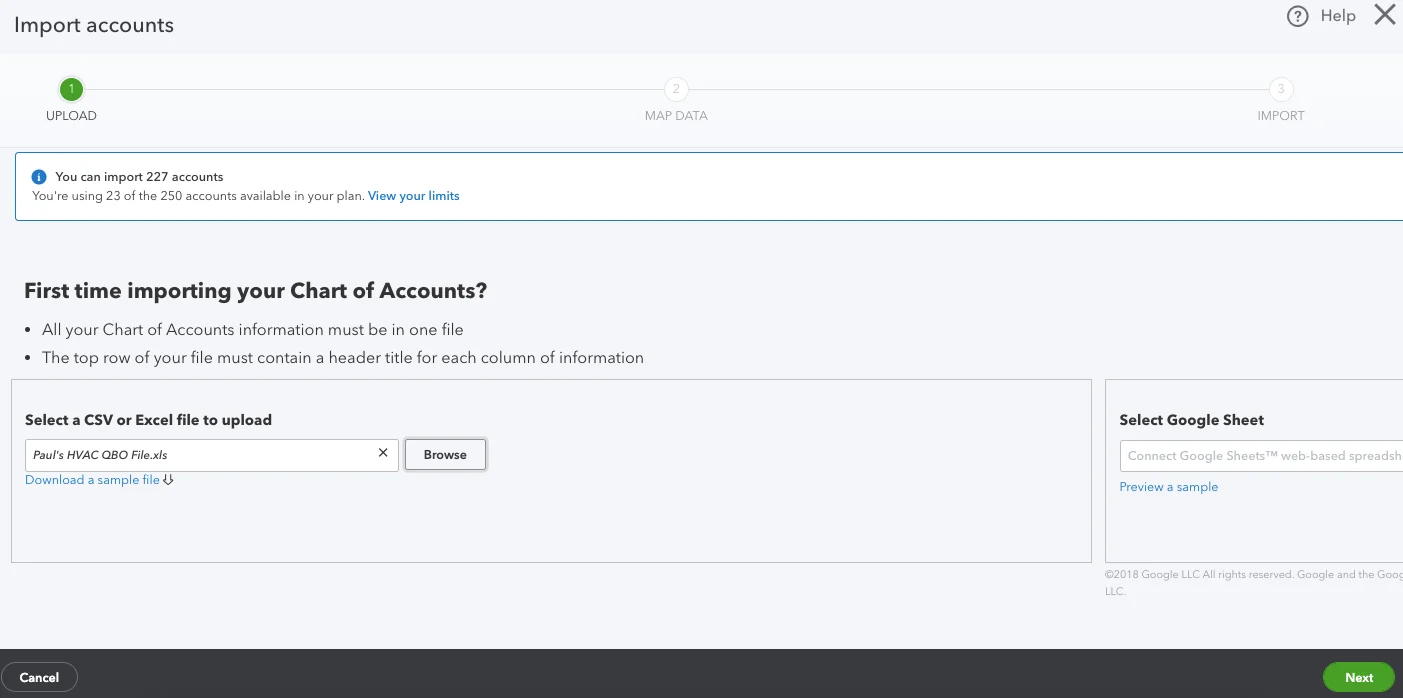
Upload your import file
After selecting the spreadsheet, click the green Next button in the bottom right corner of the screen (shown in the screenshot above).
Step 3: Map Your Spreadsheet for Importing into QuickBooks
The next screen requires you to map the data in your spreadsheet to the four fields imported by QuickBooks Online. For each QuickBooks Online Field, select the column in your spreadsheet that contains the data.
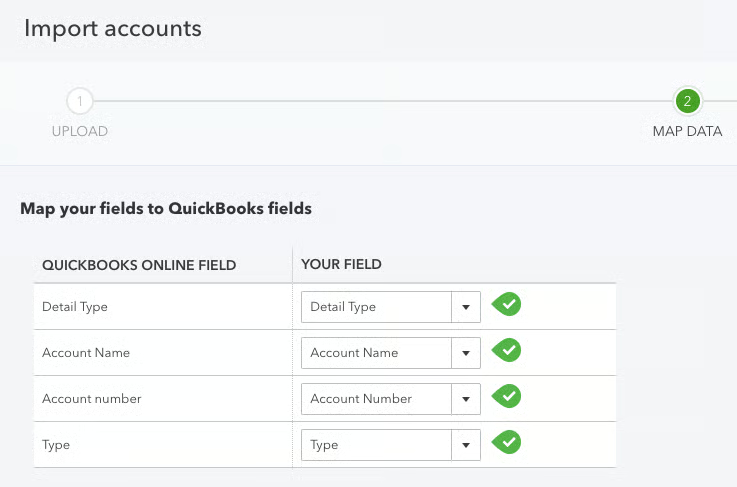
Mapping account data for importing into QuickBooks Online
Step 4: Verify and Import Your Data
Once you’re satisfied with the mapping, click the green Next button. The final screen before importing provides you the last opportunity to change any account information or deselect any accounts you don’t wish to import.
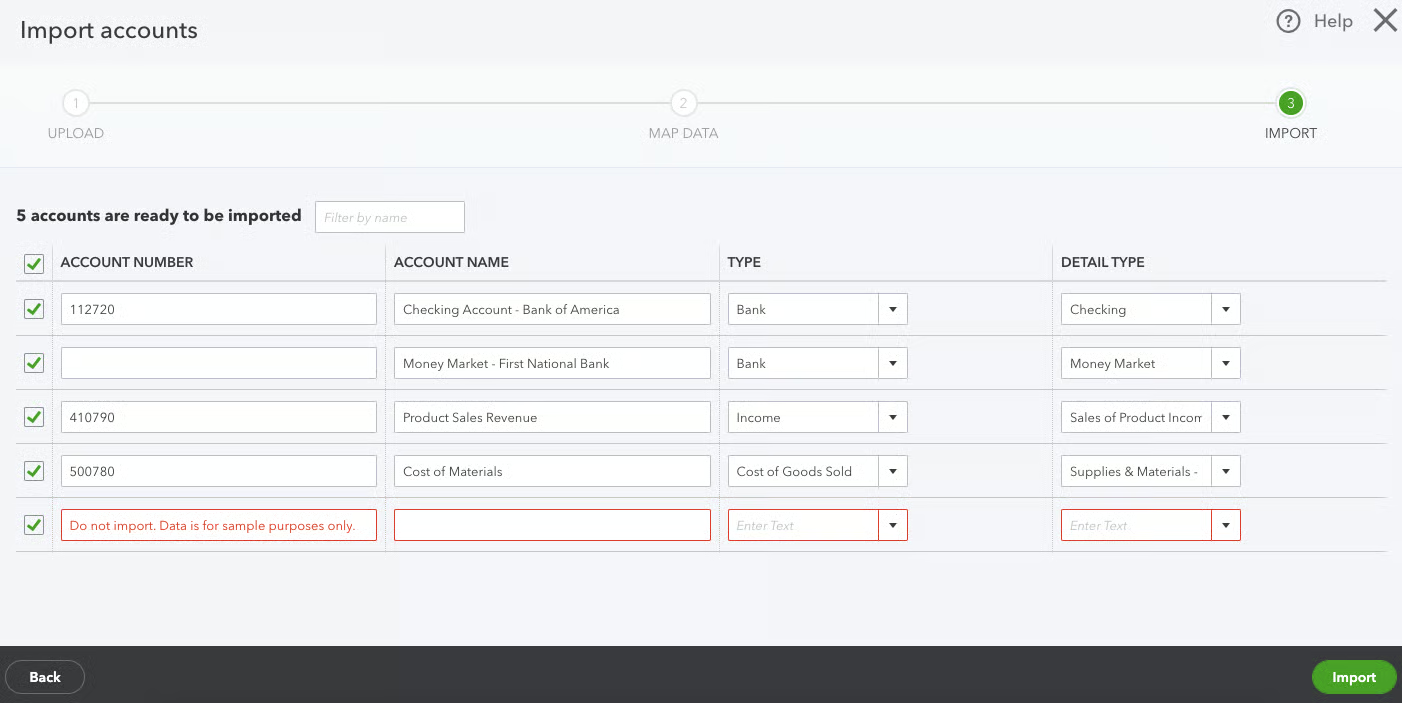
Verify account details before importing to QuickBooks Online
After verifying the information is correct, click the green Import button to complete the importing process. The new accounts should now be included in your chart of accounts.
How QuickBooks Creates & Classifies Accounts
QuickBooks Online creates a default chart of accounts list based on the industry you selected when you set up your QuickBooks company. I recommend reviewing this default chart of accounts to determine which accounts need to be added, edited, or deleted. While the default chart is a good place to start, most companies will want to adjust it to fit their needs.
The platform also requires detailed information for each account, including both an Account Type and Detail Type. It’s very important that you properly classify accounts so that QuickBooks Online can operate effectively.
For instance, I must list my Accounts Receivable account with the account type “Accounts Receivable.” Otherwise, QuickBooks Online won’t know to increase this account whenever I issue a new customer invoice. Similarly, my inventory account must have the detail type “Inventory” so that QuickBooks Online knows which account to increase when I purchase products.
Tips for Organizing Your QuickBooks Online Chart of Accounts
- Keep it simple. I recommend keeping your chart of accounts as simple as possible to avoid confusion. There is no need to create separate accounts for locations, divisions, or classes of products. Instead, use classes and locations in QuickBooks Online to separately report activity recorded to the same account.
- Use subaccounts: Using subaccounts can help you with more detailed reporting without complicating your chart of accounts with too many standalone accounts. For instance, if I want to track marketing expenses separately, I can create subaccounts under Marketing Expenses for categories like Digital Advertising, Event Marketing, and Print Advertising.
- Assign account numbers. As I mentioned earlier, you can use account numbers so that it’s easier for you to locate and identify specific accounts. This also comes in handy when running reports during the audit process as it helps you and your account easily identify accounts. I recommend using account numbers especially if you have a large volume of accounts.
- Review and update your chart of accounts regularly. As your business grows, you need to review and update your account regularly to ensure that the accounts are still relevant. Chances are certain accounts may no longer be necessary or others need to be updated to reflect new income sources, expenses, or business activities.
I recommend having at least the following accounts included in your chart of accounts.
| Account Type | Detail Type | Recommendation |
|---|---|---|
| Bank | Cash on hand | Create an account to track cash not intended for deposit into a bank account like petty cash |
| Bank | Checking | Create a separate account for each checking, savings, or money market account |
| Accounts Receivable (A/R) | A/R | At least one A/R account is required to issue invoices to customers |
| Other Current Assets | Inventory | You must have at least one inventory account if you buy and sell inventory |
| Other Current Assets | Undeposited funds | Every company should have one undeposited funds account to track cash and checks waiting for deposit |
| Fixed Assets | Varies | If the company owns fixed assets, it needs at least one account to track the cost of fixed assets |
| Fixed Assets | Accumulated depreciation | Companies with fixed assets need at least one account to track the amount of depreciation deducted |
| Accounts Payable (A/P) | A/P | You must have at least one A/P account to input and track unpaid bills from vendors |
| Credit Card | Credit card | Each credit card account the company possesses should have a separate account in the Chart of Accounts |
| Other Current Liabilities | Line of credit (LOC) | Create a LOC account if the company has a LOC with a bank |
| Other Current Liabilities | Payroll tax payable | Companies that pay employees must have at least one payroll tax payable account |
| Other Current Liabilities | Sales tax payable | Companies that collect sales tax from customers must have at least one sales tax payable account |
| Long Term Liabilities | Notes payable | Create a separate notes payable account for each loan the company must repay, including a mortgage |
| Equity | Retained earnings | Each company should have a retained earnings account |
| Income | Varies | You should have at least one income account for your primary sources of income |
| Other income | Interest earned | Create an interest earned account if the company receives interest like from a checking, savings, or money market account |
| Expenses | Varies | Create an expense account for each of your major categories of expenses |
| Other Expenses | Depreciation | If the company owns depreciable assets, you must have a depreciation expense account |
Frequently Asked Questions (FAQs)
Customizing your chart of accounts helps you categorize transactions in a way that makes sense for your business. It allows you to generate precise data about your income, expenses, assets, liabilities, and more.
You can customize your chart of accounts by adding the specific accounts that your business needs and removing those you don’t need. You can add, edit, delete, or import a chart of accounts from the Chart of Accounts page under Your Company—which you can access from the cog wheel icon on your QuickBooks dashboard.
No, but you can inactivate it. This will hide the account from your account list, but you will still find it in your historical transactions.
Wrap Up
Congratulations on learning how to set up the chart of accounts in QuickBooks Online. The next tutorial in our QuickBooks Online Training Course is on how to set up the products and services list. The list of product and service items in QuickBooks Online is extremely important and is central to how QuickBooks simplifies the bookkeeping process.