

Manually entering bank transactions into QuickBooks Online isn’t the recommended approach, and for good reason. The platform’s bank feed feature is faster, more accurate, and designed to keep your records in sync. However, there are times when manual entry is unavoidable, like when you’re catching up on past bookkeeping or need to record older transactions that never pulled in.
In this tutorial, I’ll teach you how to enter bank transactions in QuickBooks Online directly in its check register, make edits when needed, and avoid common pitfalls that could throw off your balances.
- Step 1: Access the chart of accounts.
- Step 2: Open the check register.
- Step 3: Review the check register.
- How to modify bank transactions in QuickBooks Online
- When to consider entering bank transactions directly in the check register
- Why you should not enter bank transactions directly in the check register
- Frequently asked questions (FAQs)
- Wrap up
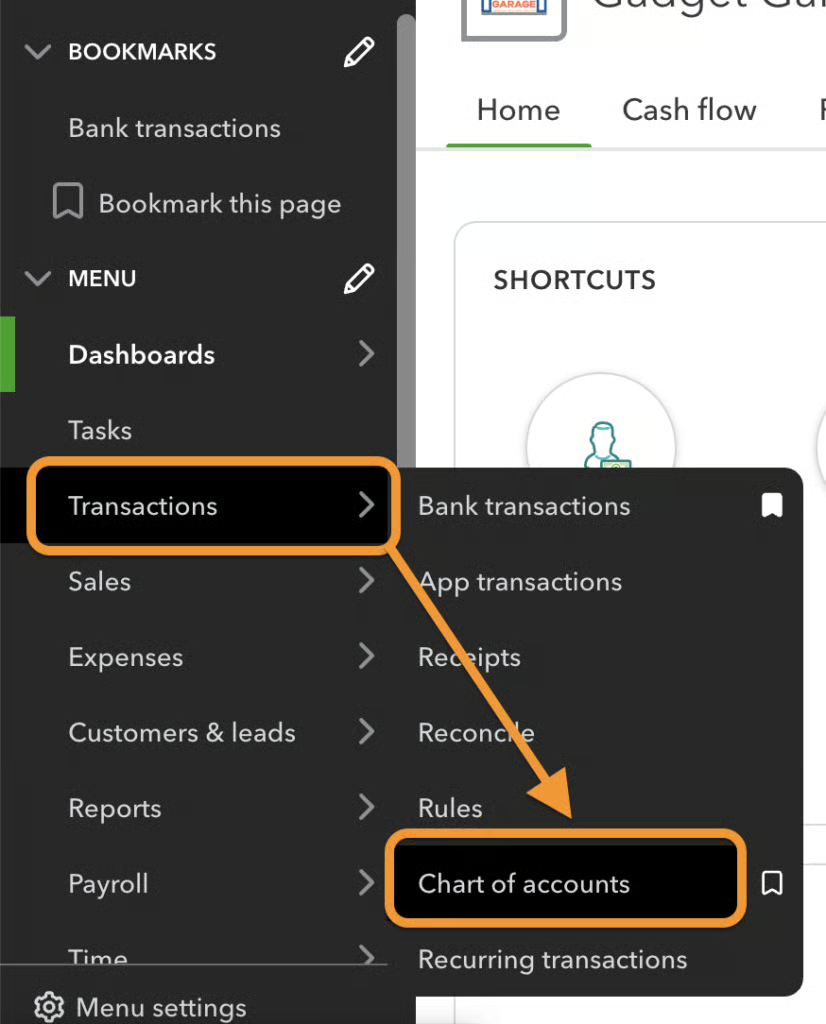
Step 1: Access the chart of accounts.
In the Transactions menu on your left side menu bar, click Chart of accounts. Notice the ribbon icon beside it. If you click on that, QuickBooks will bookmark it, so it’ll appear under Bookmarks. This is a useful feature if you want to access the chart of accounts in just one click.
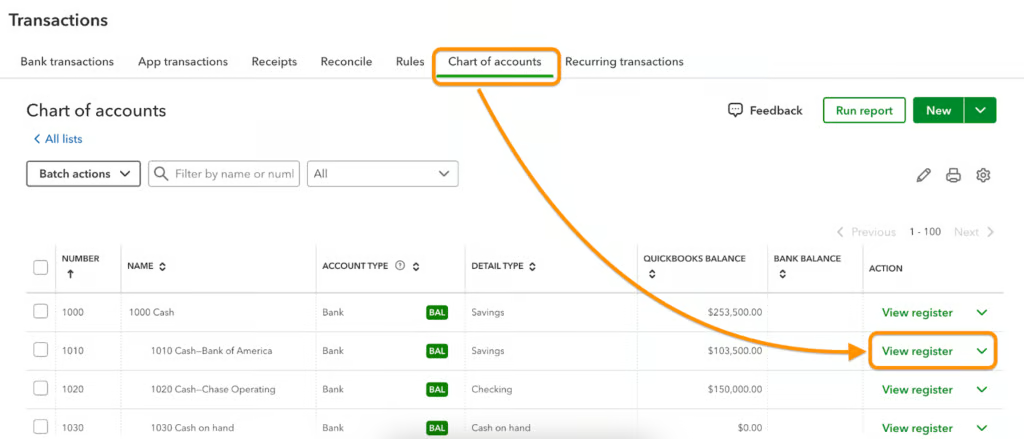
Step 2: Open the check register.
The register is a place where you can modify, edit, and delete transactions affecting your accounts. You should rarely access the register in day-to-day accounting because QuickBooks automatically records transactions in registers when you create an invoice or bill, receive payment, or create a sales receipt.
But just in case you need to add transactions manually, just click View register.
Step 3: Review the check register.
All transactions affecting your bank balance will be reflected in the check register, regardless of whether you entered the transactions directly in the register, entered them through the appropriate input screen, or accepted them from your list of imported bank transactions. I highly recommend that you complete all fields for each transaction, but the only fields required are Date, Amount, Type, and Account.
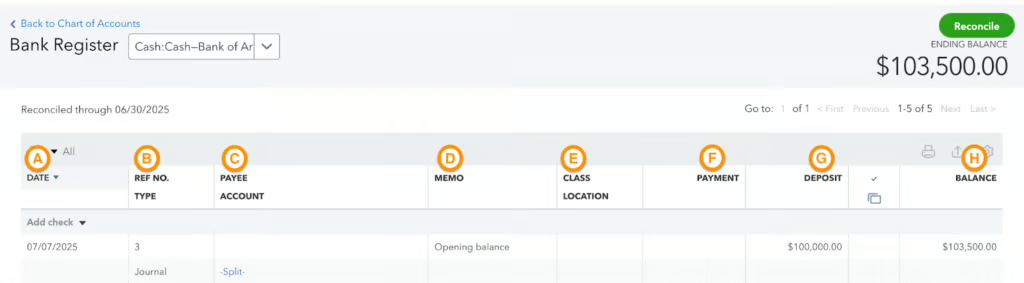
- Date: Indicate the date of the transaction when the transaction occurred, not the date you’re recording it.
- Ref no./type: Enter the transaction number, such as the check number, as the reference number. The transaction type is selected when you create a new transaction and will appear here.
- Payee/Account: For payments, select the vendor or employee for this field. For deposits, select the customer. If it’s related to the account, type the account name, and the drop-down menu will show you matches.
- Memo: Provide a brief description of the transactions. For example, “July rent check.” A memo is important because it helps in explaining what the transaction is all about.
- Class/Location: Assign the transaction to your user-defined classes and locations. If these fields don’t appear (and you want to track activity by class or location), you need to activate Track Classes and/or Locations, as shown in our guide on how to set up advanced settings in QuickBooks Online.
- Payment: Enter the amount of the check or leave it blank for a deposit.
- Deposit: Enter the amount of the deposit or leave it blank for a check.
- Balance: See the account balance after each transaction.
Now that I’ve discussed the fields, let’s enter a transaction.
Click on the drop-down menu immediately beneath the column headers in the check register, then select either Check or Deposit. Many other types of bank transactions will flow from input screens, but everything input directly in the check register can only be designated as either a check or a deposit.
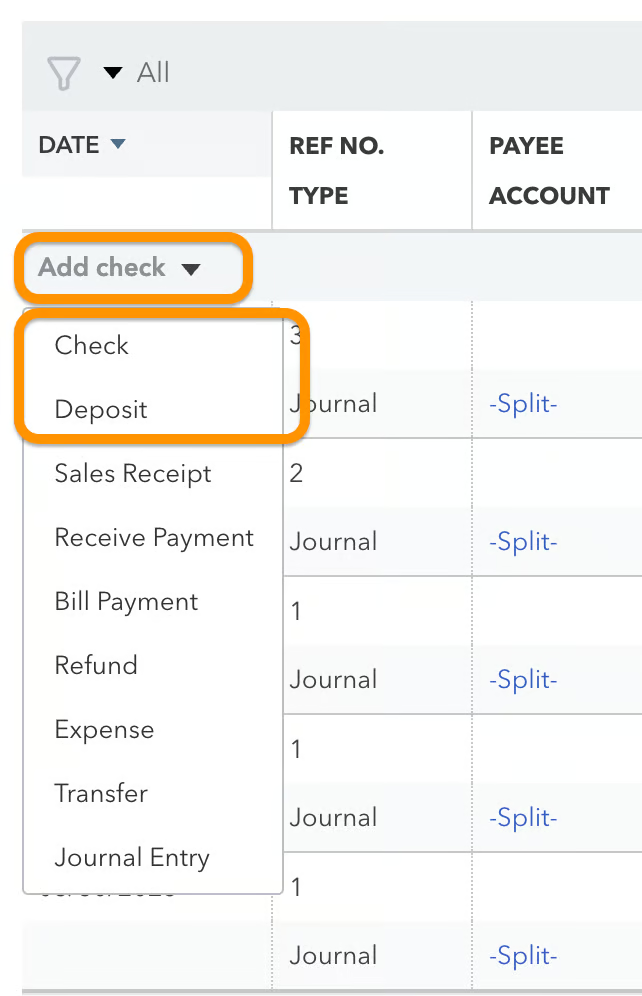
The register will now provide a line for you to input the fields as described above. Be sure to click the green Save button when you’re finished. The fields here are similar to those discussed in Step 3.

How to modify bank transactions in QuickBooks Online
You can simply select the transaction you want to modify by clicking Edit. You’ll see an interface similar to when creating a new transaction, so you won’t have a hard time.

When to consider entering bank transactions directly in the check register
Entering transactions in the check register is considerably faster than using the input screens. You might consider entering transactions directly in the register if you’re doing last year’s bookkeeping. For instance, if you’re doing year 2022’s bookkeeping in March 2023, it’ll be faster to enter all bank transactions as checks and deposits in the check register.
However, if you’re using QuickBooks to manage your company throughout the year, I highly recommend avoiding adding entries directly into your check register, as discussed next.
Why you should not enter bank transactions directly in the check register
Unless you are entering large batches of backdated data and only need high-level income and expense classifications, entering bank transactions directly into the check register isn’t ideal. QuickBooks Online, our top-recommended small business accounting software, offers purpose-built input screens designed to guide you through each type of transaction. Those forms include all the necessary fields to ensure transactions are categorized accurately and reflected in your reports.
In contrast, the check register is limited. It skips over key fields that help QuickBooks Online track important financial details. Take the following as examples:
- Items: You can’t assign transactions to products or services. The register only allows you to post amounts to general ledger accounts (called “categories” in QuickBooks), which prevents QuickBooks from tracking inventory quantity and cost, or breaking down revenue by service. Learn how to set up products and services in QuickBooks Online.
- Multiple accounts: The check register supports just one account per transaction. Input screens let you split transactions across multiple accounts or line items.
- Customer/project: You can’t link register entries to specific customers or projects, which limits the accuracy of job costing and project-level reporting.
- Billable expenses or markups: Expenses entered in the register can’t be marked as billable or include a markup.
Beyond that, manually entered checks can’t be applied to open vendor bills, and customer payments entered through the register can’t be matched to invoices. That breaks the connection between income, expenses, and accounts receivable/payable.
The good news? Any transaction entered through the proper form will still appear in the check register. And if you’ve already recorded something directly in the register, you can click Edit to reopen it in the correct input screen.
To help you get it right the first time, we’ve created a set of tutorials showing the best way to enter each type of bank transaction using QuickBooks Online’s built-in forms.
| Transaction | Tutorial |
|---|---|
| Enter a check or EFT to pay a bill | How To Pay Bills in QuickBooks Online |
| Enter a check or EFT when a bill hasn't been entered | How To Write & Print Checks in QuickBooks Online |
| Receive a payment on a customer invoice | How To Receive Payments in QuickBooks Online |
| Receive a payment when an invoice hasn't been entered | How To Create and Send QuickBooks Online Sales Receipts |
| Record other bank deposits | How To Record Bank Deposits in QuickBooks Online |
| Transfer funds between accounts | How To Transfer Funds Between Bank Accounts in QuickBooks Online |
Frequently asked questions (FAQs)
Can I edit a bank transaction after I've entered it in QuickBooks?
Yes, you can. Simply locate the transaction in the register, click the Edit button to make the necessary changes, and then save the transaction.
Can I import bank transactions into QuickBooks Online instead of manually entering them?
Yes, you can import bank transactions into QuickBooks Online using a .csv or .qbo file.
Wrap up
You’ve learned why it’s not recommended to enter bank transactions directly into the check register, but also how to do so if the need arises. The next course in our QuickBooks Online tutorial series is how to manage QuickBooks Online bank feeds. That will teach you how to accept imported bank transactions, as well as how to match them to existing transactions, within QuickBooks Online.