

We’ll teach you how to manage QuickBooks Online bank feeds—a feature that allows you to automatically import bank and credit card transactions directly into QuickBooks Online.
Once your transactions are imported, we’ll cover how to add them to the check register as a new transaction or match them to an existing transaction. We’ll also show you how to set up bank rules so that you can reduce the time it takes to classify transactions in the Banking Center.
To open the QuickBooks Online Banking Center, hover over Banking from the left menu bar, and then click the Banking dropdown, as shown below.
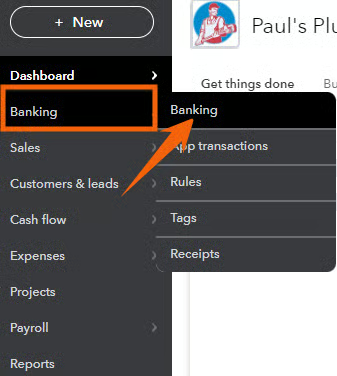
Navigate to the QuickBooks Online Banking Center
The QuickBooks Online Banking Center includes a tile across the top for each bank and credit card account that’s connected to QuickBooks. Each tile includes the name of the financial institution, the current bank balance, and the current account balance in QuickBooks.
If your bank isn’t shown in a tile at the top of the screen, it isn’t yet connected to your QuickBooks Online account. See our tutorial on how to import bank transactions into QuickBooks to connect your bank account.
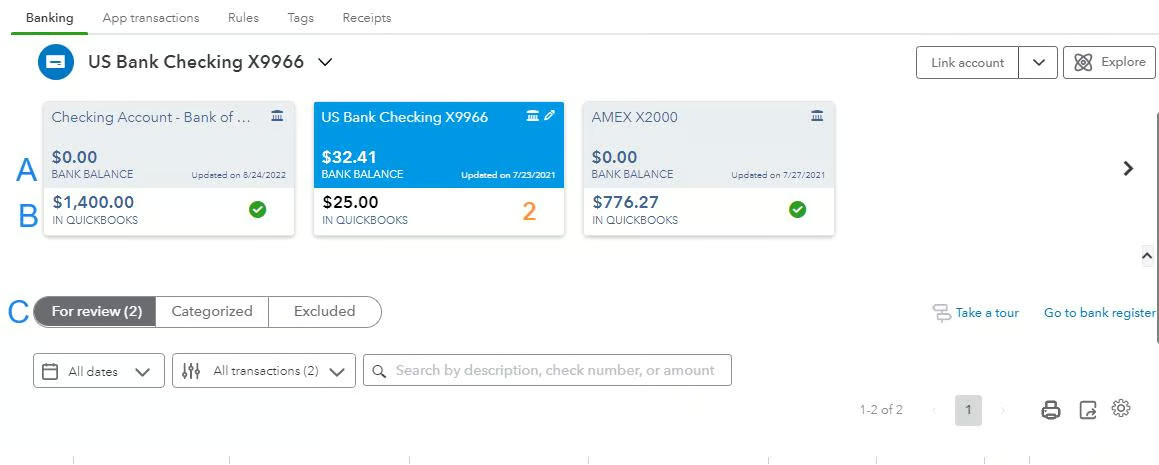
QuickBooks Online Banking Center
A. Bank balance: This is the actual balance in your bank account as of the last time QuickBooks imported your banking transactions.
B. QuickBooks balance: This will be different from the bank balance as a result of bank transactions that haven’t been added to the check register, or transactions in the check register that haven’t been processed by the bank, such as checks recently issued.
C. Bank feed transactions: Transactions imported through your bank feed are organized into three tabs:
- For Review: Imported transactions initially appear in the For Review tab where you must add, match, or exclude them.
- Categorized: After adding and matching the transactions in the For Review tab, they’re displayed in the Categorized tab, which means they’re already recorded in the check register.
- Excluded: The Excluded tab lists imported transactions that you have chosen to not transfer to your QuickBooks check register. Excluding should be extremely rare and likely only used when correcting for a previous error. All bank transactions―even if personal―must be entered into the QuickBooks check register.
All newly imported banking transactions will initially appear in the For Review tab at the bottom of the Banking Center screen. This is where you can review, categorize, and match your transactions before adding them to your accounting records.
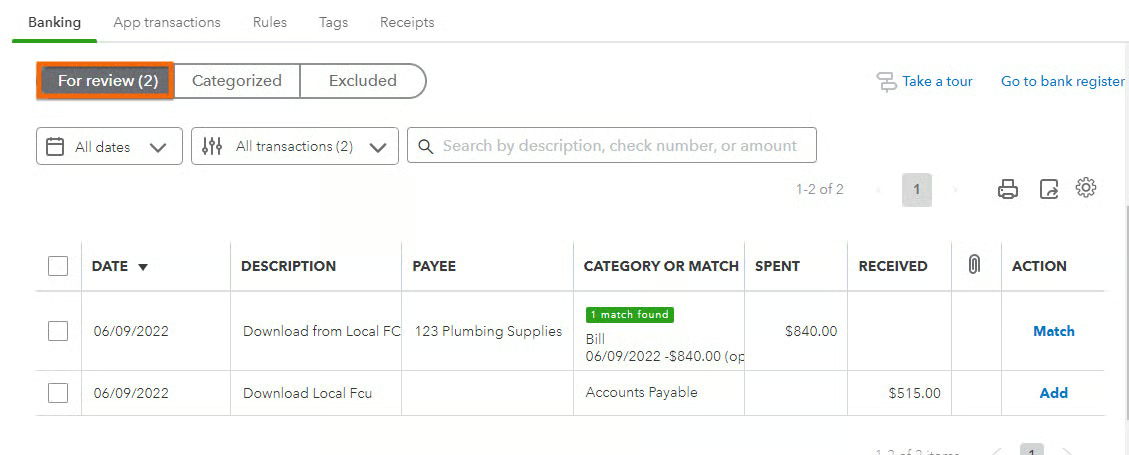
Newly imported transactions are shown in the For Review tab of the Banking Center
Each transaction in the For Review tab must be added to the check register, matched to an existing transaction already in QuickBooks, or excluded from QuickBooks.
It’s critical that imported transactions are matched to any existing transactions instead of being added as new transactions. If you add transactions that already exist, the check register will include them twice, and your bank account and financial statements will be wrong. Some examples of imported bank transactions that will already exist in QuickBooks include:
- Checks printed from QuickBooks
- Deposits of customer payments already recorded as a collection of an invoice amount
QuickBooks Online suggests a match between the payment and the bill, and you can review and confirm the match before completing the transaction. When you match a payment to an outstanding bill, QuickBooks will create a bill payment transaction and record it in the check register.
To review the details of the match, click anywhere on the transaction. When you are certain that the match is correct, click on the green Match button, as shown in the screenshot below.
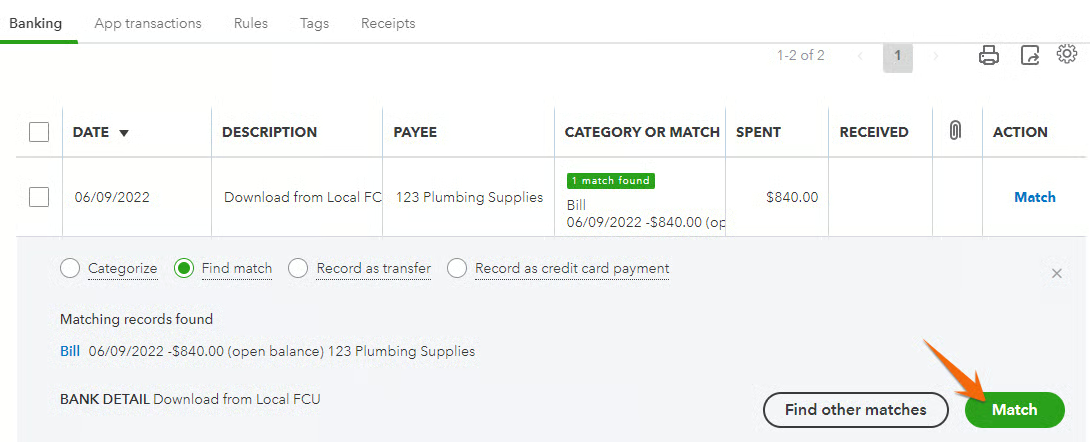
Match imported bank transactions in QuickBooks Online
The matched transaction will move from the For Review tab to the Categorized tab. This indicates that the transaction has been successfully reconciled and accounted for in your books.
You can undo the match by clicking on the Reviewed tab, locating the transaction, and clicking Undo. The transaction will then move back to the For Review, where you can categorize or match it again if needed.
Imported transactions that have not been entered into QuickBooks can be added as new transactions to the check register. An example might be an electronic payment of an expense where the bill was not recorded in QuickBooks. To add a transaction, click anywhere on the transaction, and then tap the Add button.
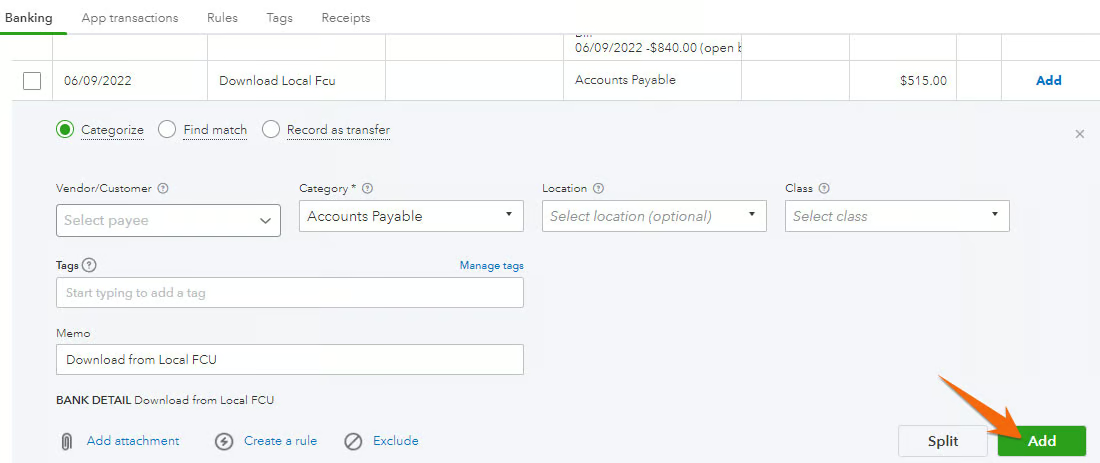
Add imported bank transactions to check register in QuickBooks Online
The only requirement to add a new transaction is to provide a category, or account, from your chart of accounts. However, we highly recommend that you also provide the vendor, customer/project, class, and location so that QuickBooks has all the available information to run useful management reports. If class and location do not appear on your screen, you need to enable class and location tracking, as illustrated in our lesson on how to set up advanced options in QuickBooks Online.
How To Create Bank Rules to Streamline QuickBooks Online Bank Feeds
Click on the Rules tab at the top of the banking center, then click the green New rule button, as shown below.
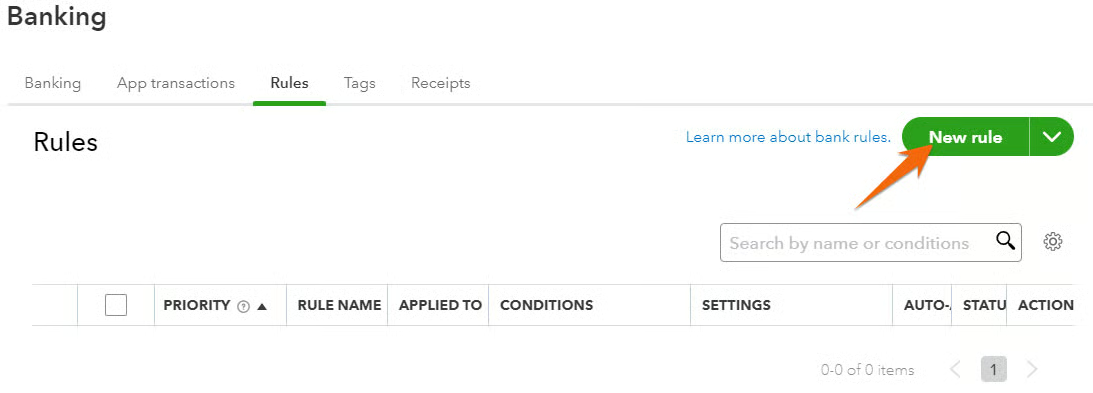
Create a new banking rule in QuickBooks Online
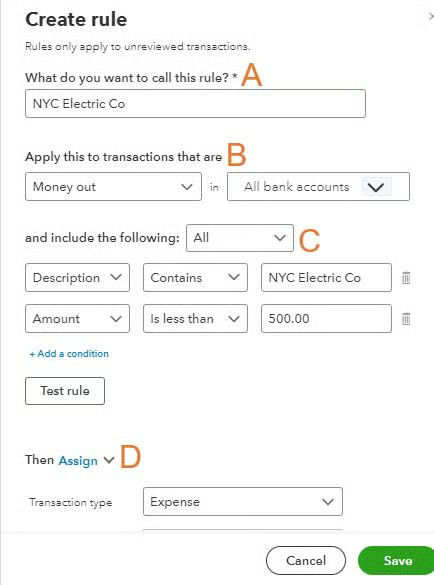
On the Create rule form, you can specify criteria such as the transaction amount, payee, or memo. You can also indicate the category that you want the transaction to be assigned to, as well as any tags or classes that you want to apply. Once you’ve set up the rule, QuickBooks will automatically categorize any transactions that meet the specified criteria.
In the example below, we’ll apply bank rules for NYC Electric Co with the following condition: any money-out transaction that includes an “NYC Electric Co” text and an amount less than $500 is categorized automatically as utility expense.
Sample application of a banking rule in QuickBooks Online
A. Name: Provide a name for the rule that will make it easy to identify later.
B. Transactions: Indicate whether you want the rule to apply to transactions that are Money out or Money into either all bank accounts or specific bank accounts.
C. Conditions: Specify one or more conditions that the transaction should meet to be classified under your new rule. If you specify multiple conditions, you can choose whether the transaction must meet all the conditions or at least one of the conditions.
Conditions can reference the transaction’s description, bank text, or amount. If the condition is based on the transaction’s description or bank text, you can specify that it must contain, doesn’t contain, or exactly matches the text you enter. Conditions that reference the amount of the transaction can specify the amount must be equal to, not equal to, greater than, or less than the value you specify.
Here are some examples of conditions you could specify to make a rule:
| Field | Comparative Statement | Text or Amount |
|---|---|---|
| Amount | Equals | 22.17 |
| Amount | Is less than | 500.00 |
| Description | Contains | telephone |
| Bank Text | Contains | Verizon |
D. Assign transaction: In the final section, you tell QuickBooks Online how to assign the transaction. You can specify the following fields for each transaction that meets the conditions you set. By expanding the Assign link, you can specify other fields, such as payee, customer, tags, class, location, and memo.
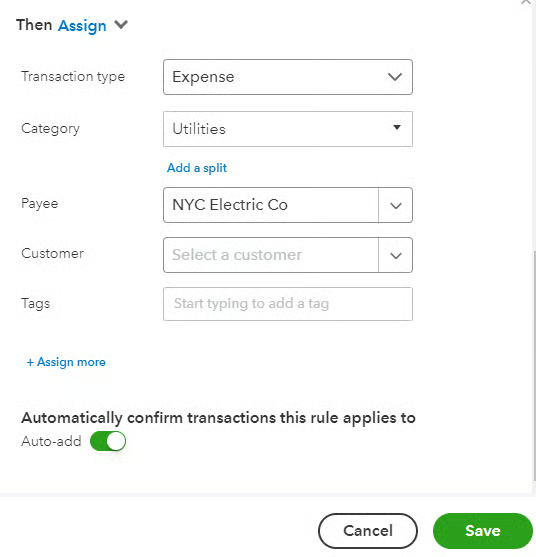
Field boxes in the Assign transaction section when setting up bank rules
Be sure to click the green Save button when you are done creating your rule.
Why QuickBooks Online Bank Feeds Are Important
As our best small business accounting software, QuickBooks Online helps you reduce data entry and stay on top of your financials using bank feeds. By automatically importing transactions from your bank and credit card accounts, QuickBooks’ bank feeds can reduce the amount of time needed to record and categorize your bank accounts and make it easy to reconcile your accounts, with the ability to match transactions in QuickBooks to those in your bank statement.
Additionally, by managing your bank feeds, you can identify any discrepancies or errors in your financial data and take immediate action to rectify them, helping you minimize the risk of errors, inaccuracies, and fraud.
Frequently Asked Questions (FAQs)
A bank feed in QuickBooks is a feature that allows you to connect your bank accounts and credit card accounts to QuickBooks. It also enables you to automatically import transactions from your bank accounts and categorize them within the platform.
Yes, you can use bank feeds for multiple bank accounts in QuickBooks. However, note that you need to add each account separately.
Wrap Up
Congratulations on completing our tutorial on how to manage QuickBooks Online bank feeds. You’ve learned how to classify transactions imported from your connected bank accounts and to create rules that will classify transactions in QuickBooks Online automatically. Our next tutorial is how to record bank deposits in QuickBooks Online, and it’ll look at how to record the deposit of individual checks and groups of checks using the undeposited funds account.