



.jpg?w=288)
.jpg?w=288)


In this tutorial, we’re going to cover how to import bank transactions into QuickBooks Online. You’ll learn to connect your bank account to the system, which is necessary for automatically importing transactions into QuickBooks, and to import transactions manually, which is recommended if your bank isn’t supported by QuickBooks or you aren’t comfortable connecting your bank account.
How To Import Bank Transactions Automatically
Step 1: Add Your Checking Account to the Chart of Accounts
First, you need to set up your checking account in the chart of accounts. This will be used as a corresponding account to record the imported transactions and categorize them appropriately in QuickBooks Online.
To set up a new account, go to the Accounting menu in the left menu bar and then select Chart of Accounts, as shown below.
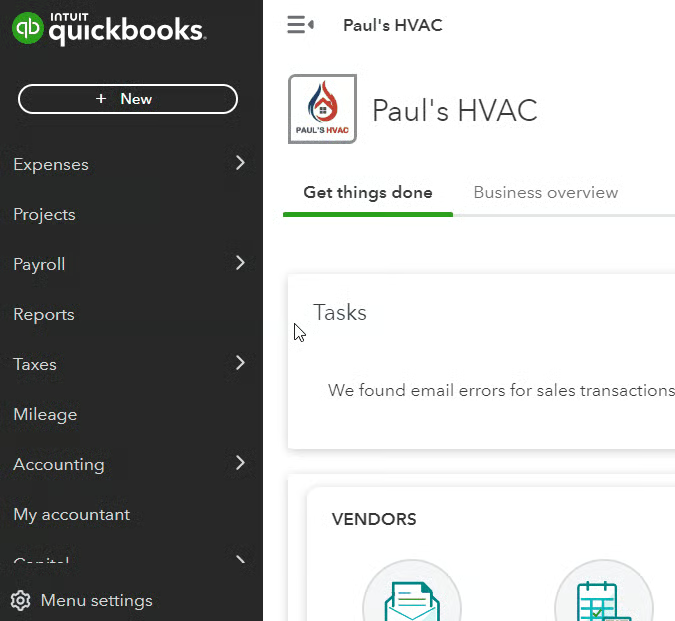
Seeing a different left-side navigation menu?
1. Check User View
QuickBooks has two user views: Business View and Accountant View. Your left-side navigation menu may look different depending on the user view you are in.
If your sidebar menu is not what is shown in our tutorial, it means that you are on Business View. We prefer and recommend using the Accountant View because it shows a full range of business accounting features and tools that you can use in QuickBooks.
To verify whether you’re using the Business View, click on the cog wheel at the top right-hand corner of your QuickBooks dashboard, and check whether the button on the lower right-hand says Switch to Accountant view, as shown below. If so, then it means you are on Business View.
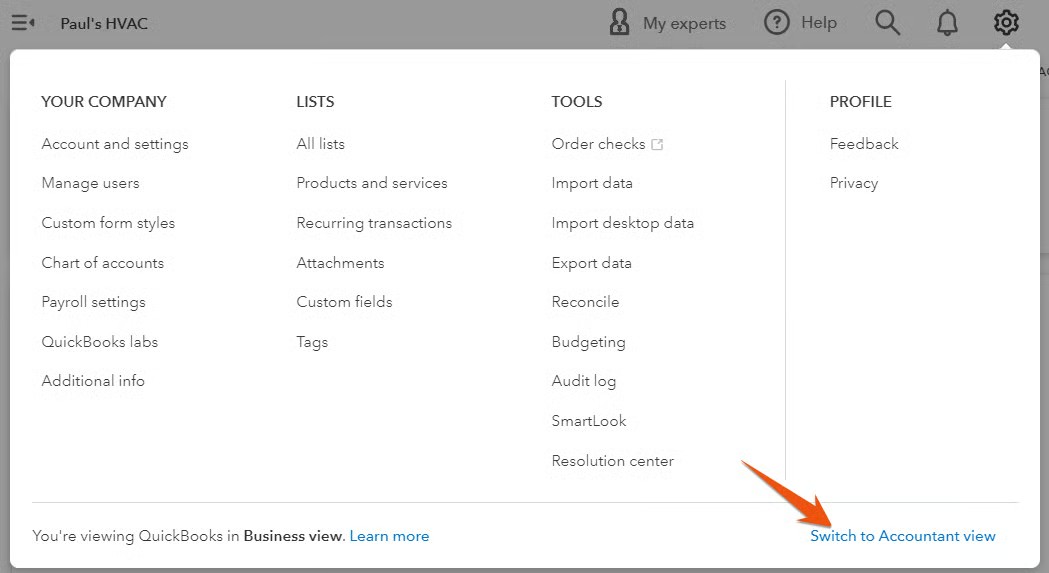
2. Switch to Accountant view
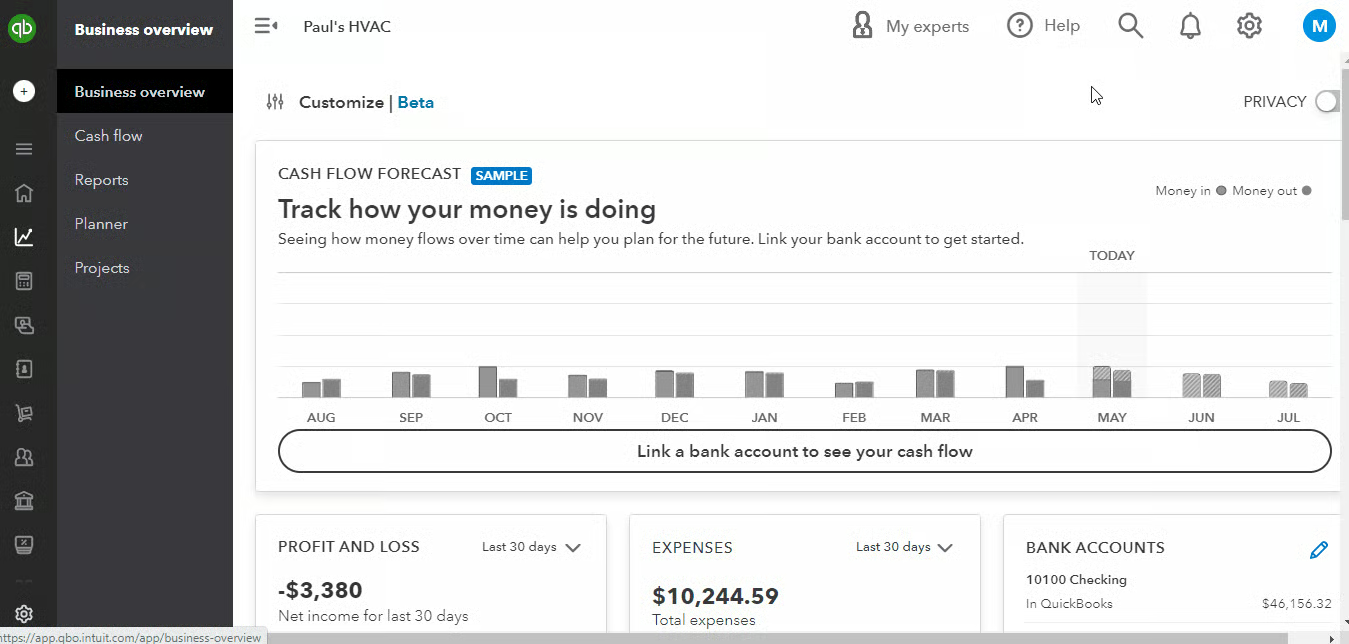
Once you verify that you are on Business View, click on Switch to Accountant view to update the appearance of your sidebar menu. In a few seconds, you should see the same left-side menu bar illustrated in this tutorial.
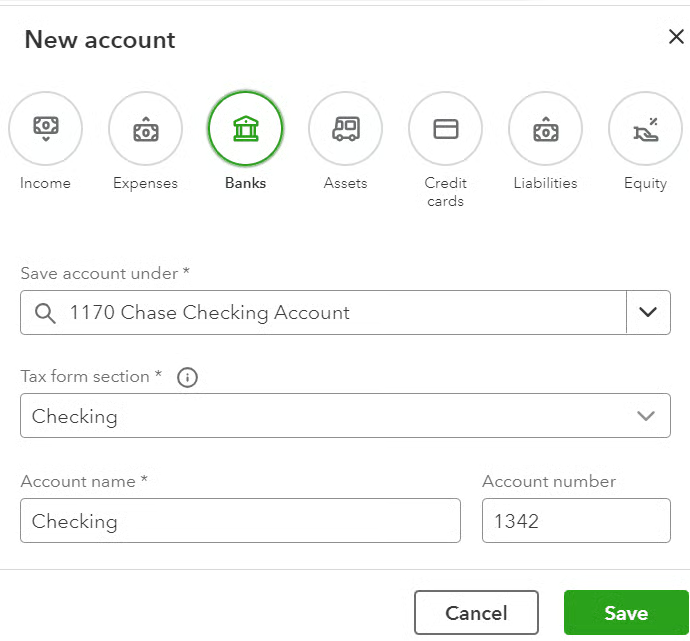
Complete the new account setup form with the required information. The account type must be “bank,” and the detail type must be “checking.” You must name the account, and we recommend the name of the bank plus “Checking Account.” If you have more than one checking account with the same bank, you might also include the last four digits of the account number.
When you have entered all the information, click the green Save button, and you’ll be returned to the prior screen with the new account selected.
Step 2: Locate Your Bank Account
To allow QuickBooks Online to import your bank transactions automatically, you need to connect your bank to the software. To do this, select Banking from the left menu bar, and then choose the Banking drop-down menu as shown below.
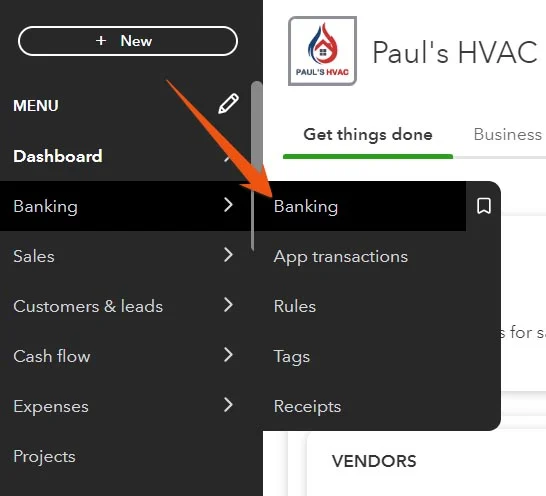
If your bank account is already connected to QuickBooks, there is no need to reconnect the bank account to import transactions. Once the bank account is connected, QuickBooks Online will download your transactions daily automatically.
However, if you want a specific transaction to appear or suspect that some transactions are missing, you may need to update the connection. You can do so by clicking on Update next to Link account, as shown in the image below, and if you need to add a new bank account, click the Link account button, also shown below.
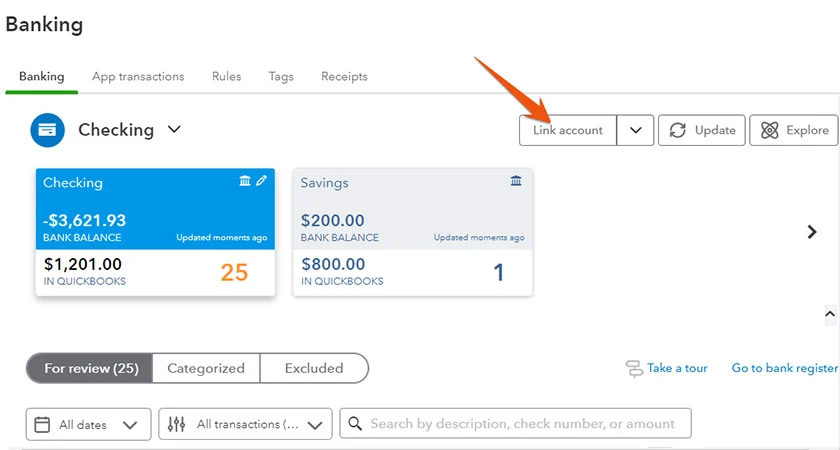
QuickBooks will display a list of popular banks. Search for your bank by entering either the bank name or the bank’s website URL. Alternatively, you may click on the logo of your bank if it’s displayed on the screen. In the screenshot below, we selected Chase Bank for our fictitious company, Paul’s HVAC.
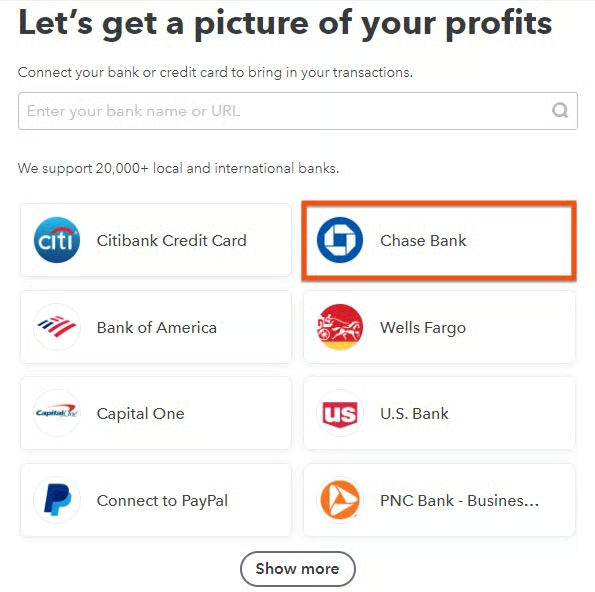
After selecting your bank, click the green Continue button to be taken to your bank’s sign-in page automatically.
Step 3: Log Into Your Bank Account
QuickBooks Online will open a new browser window, displaying the login page for your bank. This separate window ensures the security of your login credentials.
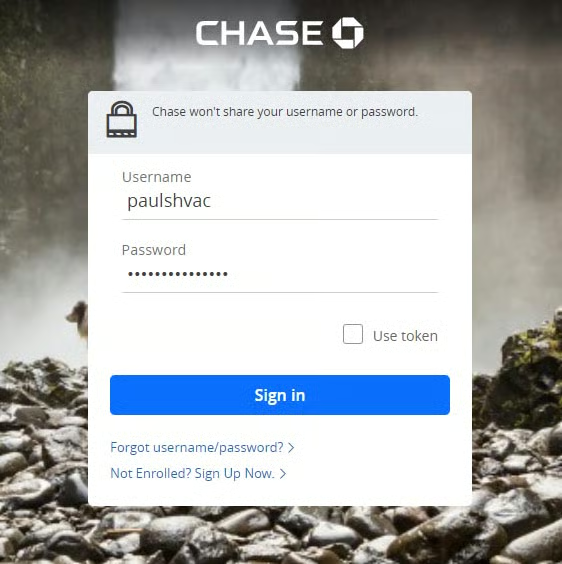
Follow the on-screen instructions to authorize QuickBooks Online to access your bank account. This may involve additional steps, such as answering security questions or entering a verification code sent by your bank.
Step 4: Select an Account to Record the Transactions
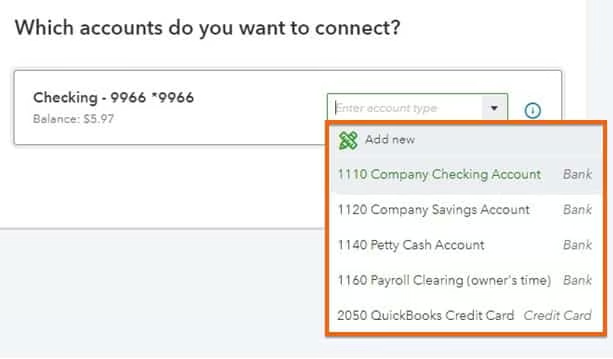
A drop-down box will appear listing the bank accounts included in your chart of accounts.
In step 1, you have set up a checking account in the chart of accounts. Select that account from the drop-down list. If you forgot to add your account to your chart of accounts, you can add it on the fly by selecting Add new at the top of the drop-down menu.
Step 5: Select the Right Date Range
After assigning your bank account to an account from your Chart of Accounts, you must decide how far back QuickBooks should go to pull transactions. Note that your bank may have limitations to how far back you can import transactions into QuickBooks Online.
The default start date to pull transactions is the beginning of the year, and you should try to pull transactions back to the date you wish to start using QuickBooks Online. If your bank or QuickBooks doesn’t allow you to go that far, you’ll have to transfer the older transactions using a QuickBooks Online or CSV file.
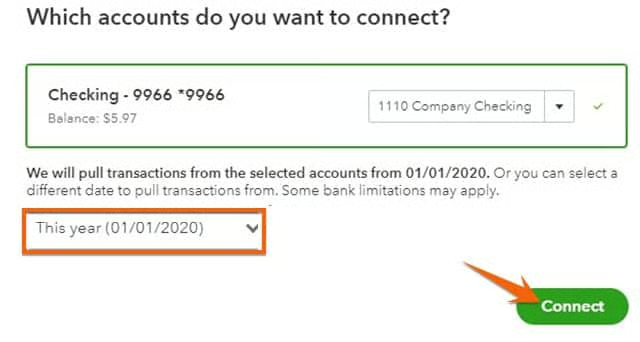
Click the green Connect button when you’re done. It may take a few minutes for QuickBooks to connect your bank account.
Step 6: Review Downloaded Transactions in the Banking Center
QuickBooks Online will take you to the Banking Center after connecting your bank account. You can review the downloaded transactions and make sure everything is accurate in the Categorized or Reviewed tab.
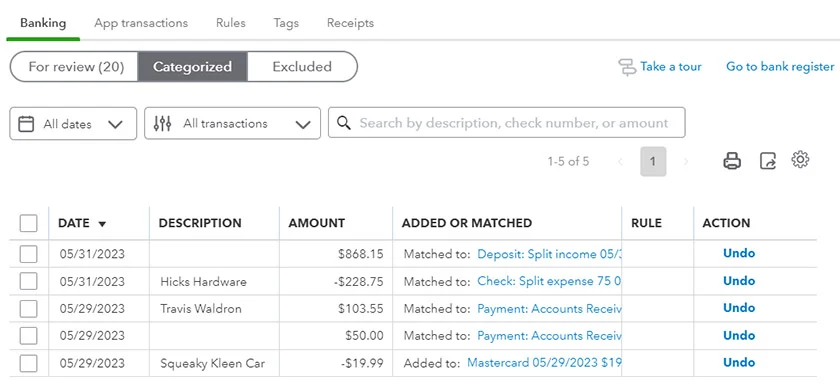
Now that your bank is connected, new transactions will be imported automatically into QuickBooks Online daily. You can visit the banking center anytime by clicking the Banking drop-down menu under the Banking menu from the left menu bar, as you did at the beginning of this tutorial.
How To Import Transactions Into QuickBooks Online Manually With a CSV or Similar File
Step 1: Download a Transfer File From Your Bank
QuickBooks Online can import bank transactions from the following file types:
- Comma-separated values (CSV): These files are commonly used to export data for a multitude of purposes. An advantage of using CSV files is they can be opened and edited with Excel.
- QuickBooks Online: QuickBooks Online files are QuickBooks WebConnect files designed specifically for exporting information from bank accounts to QuickBooks.
- QFX: QFX files are financial exchange files created for exporting information to Quicken but will also work with QuickBooks Online.
- OFX: An OFX file is a text file specifically designed for exporting financial data.
- TXT: Text files can be imported but might require some editing first. You might want to open the TXT file with Excel and convert it to a CSV file for a smoother transfer.
To obtain a transfer file, log in to your bank account, and find the option that allows you to download your account transactions. You’ll likely have to select a file format to download your transactions.
Choose the QuickBooks Online or QFX format if available since these file types are designed specifically for QuickBooks and will require less work. The next best option is an OFX file, but if that is unavailable, a CSV or TXT file will suffice. Save the transfer file to a location on your computer that you can remember to import the file automatically.
Step 2: Select the Transfer File to Upload in QuickBooks
From the banking center, open the drop-down menu next to Link account in the upper right corner, and then select Upload from file as shown below.
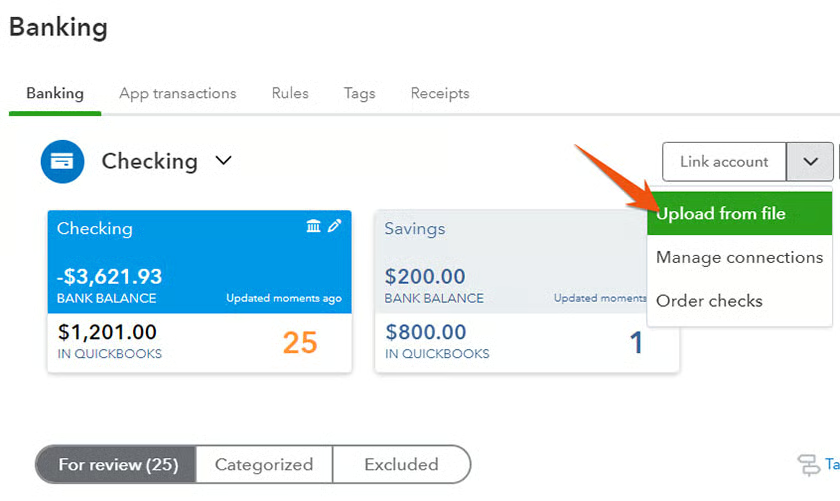
Drag and drop your file of transactions or click on the Select file button to locate the file you want to upload. Also, QuickBooks recommends the automatic import option as an alternative to uploading your transactions manually.
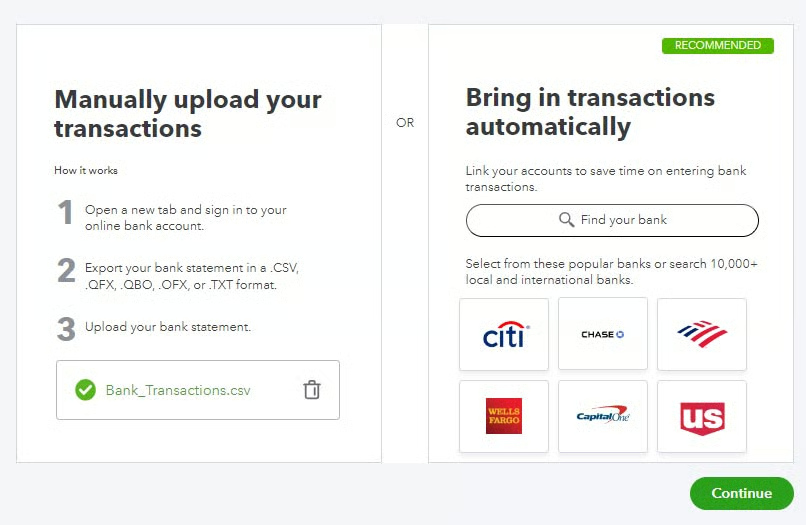
When you have selected your transfer file, click the green Continue button in the bottom right corner of the screen. If needed, you can click Add new to set up a new checking account as demonstrated earlier.
Step 3: Select the Originating Account
Next, you must select an account where the transactions come from. Select the account from the drop-down options.
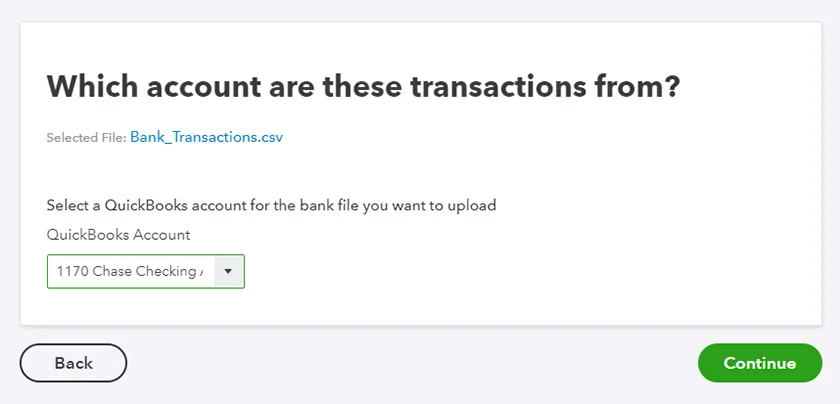
If your transfer file is in a QuickBooks Online, QBX, or OFX format, you can directly import it without mapping the fields because these file types are compatible with QuickBooks Online. Click the Continue button, and QuickBooks will prompt you to select which transactions to import as illustrated in Step 5.
However, if your transfer file is a CSV or TXT file, you will need to map the fields in your file to those in QuickBooks.
Step 4: Map Columns to QuickBooks Fields (CSV & TXT Files Only)
Open your CSV or TXT file in Excel to determine exactly what information your bank exported and how it’s formatted. Paul’s HVAC exported the following CSV file from their local credit union account:
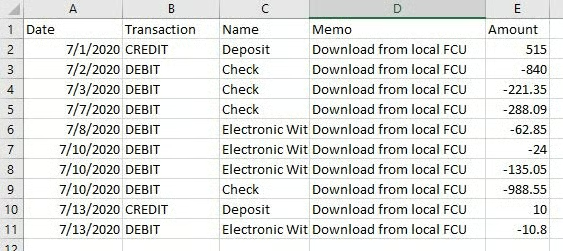
Next, set up your transaction file by customizing the rows and columns and mapping the fields in your file to those in QuickBooks Online. To map the fields, select the appropriate column from your file that corresponds to the specified QuickBooks fields.
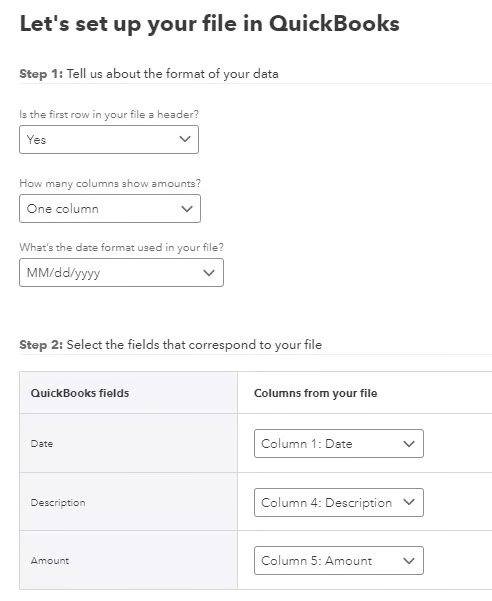
Step 5: Select Transactions for Import (CSV & TXT Files Only)
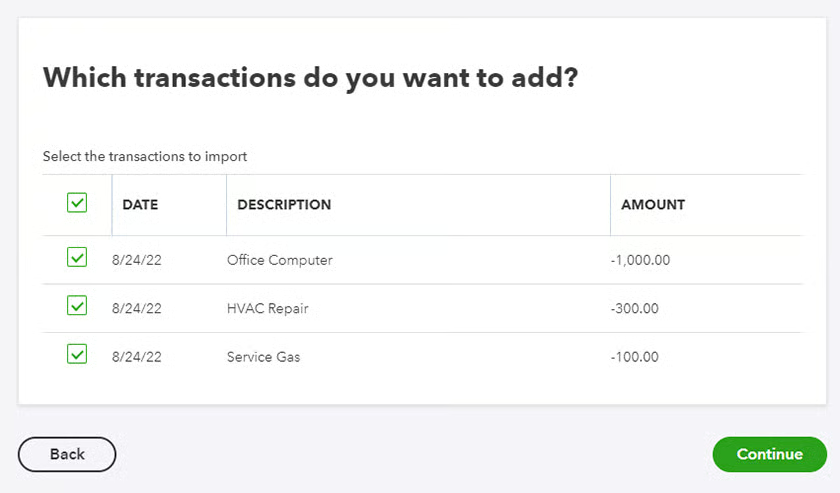
Once you’re satisfied with your file setup and mapping, click Continue. QuickBooks will then ask you to select what transactions you want to import. Make sure all transactions are selected, and then click the green Continue button in the bottom right corner of the screen to complete the import of your transactions.
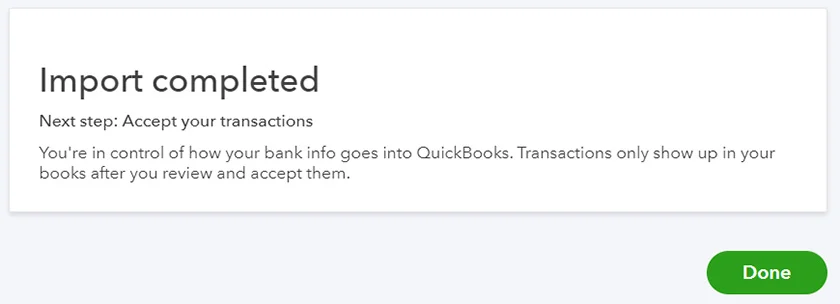
Finally, QuickBooks will display a message indicating that the transactions are successfully imported to QuickBooks Online.
The next step is to review the newly imported banking transactions, which is covered in our lesson on how to manage QuickBooks Online bank feeds. QuickBooks Online also allows you to match the uploaded transactions with the corresponding entries in your accounting records and create detailed reconciliation reports. This excellent banking feature is one reason this provider is our overall best small business accounting software.
Frequently Asked Questions (FAQs)
How do I import transactions into QuickBooks Online?
You can choose either automatic or manual import. Automatic import involves connecting your bank account to QuickBooks and allowing the software to import your transactions on a daily basis. Manual import requires downloading your bank statement and importing it into QuickBooks using supported file formats, such as CSV, OFX, and TNT.
Why is it important to connect your bank account to QuickBooks?
Connecting your bank account to QuickBooks enables the program’s automatic import feature. This means QuickBooks Online retrieves your bank transactions directly from your bank and imports them into your QuickBooks account automatically.
Can I connect multiple banks to QuickBooks Online?
Yes, you can connect as many banks as needed to import and manage your bank transactions.
Can I reconcile my bank accounts after importing my transactions to QuickBooks?
Yes, you can. QuickBooks Online provides you with comprehensive reconciliation tools and reporting features to manage your downloaded transactions effectively.
Wrap Up
You’ve learned the process of importing transactions into QuickBooks Online using the automatic and manual import methods. The next tutorial in our library is how to import credit card transactions into QuickBooks Online, which covers both how to connect a credit card account to update transactions automatically and how to import transactions from a CSV file.