


Etsy is an ecommerce marketplace focused on handmade goods, vintage finds, and craft supplies. This article walks you through an easy step-by-step guide on how to sell on Etsy—from creating your Etsy seller account to setting up product listings, configuring payment methods, and designing your shop’s landing page. I also explain how Etsy fees work so you can price your products correctly and competitively.
Step 1: Create an Etsy Account
Creating an Etsy account is easy. I recommend that you check if you are eligible to be an Etsy seller first before creating an account.
Check Your Seller Eligibility
Check if you are eligible to open an Etsy shop first before creating a seller account. While there are few restrictions for Etsy sellers, there are some items that you should check before continuing with your account setup.
- Etsy Payments: Ensure you are located in a country where Etsy Payments is available (which includes all of North America, most of Europe, and most of Asia).
- Etsy’s seller policy: This outlines what you can and can’t sell on Etsy, payment policies, and how your information is used.
- Age restriction: Shop policies on Etsy state all account owners must be 18 years old and above. Minors who want to sell on Etsy must open their accounts under their parents’ or legal guardians’ information.
- Product restrictions: Etsy limits what can be sold on its marketplace to handmade goods
- Prohibited items: If you are not sure about your eligibility, Etsy also provides an extensive list of prohibited items.
If you do not meet seller eligibility requirements, consider these Etsy alternatives for your online store.
Open an Etsy Account
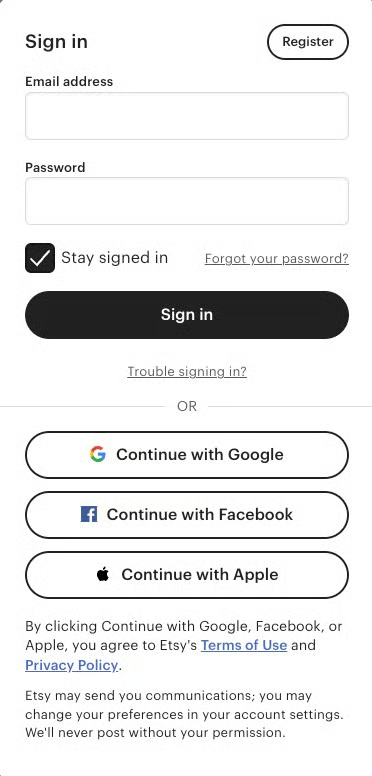
To get started, the first thing you must do is create your Etsy account. Simply click the “Sign in” button on Etsy’s website and then select “Register” on the sign-in window.
Note: You must use a desktop web browser to complete the first step of opening your shop. Once your shop is open, you can manage your shop on the Sell on Etsy app.
Step 2: Register Your Etsy Store
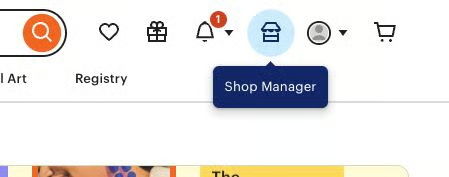
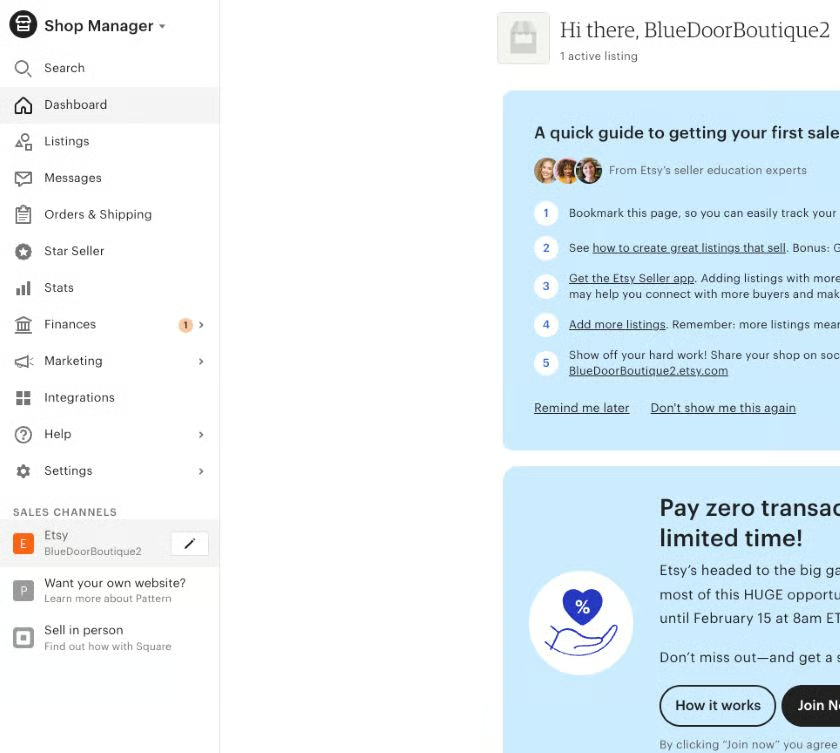
The next step is to register your store. Next to your buyer profile icon, you’ll notice another option: a small storefront icon called your Shop Manager. This is where your seller account lives and where you can manage your Etsy store, but first you must register it. Simply click on the Shop Manager to get started.
Etsy will then direct you to a series of questions that will help register and create the initial configuration of your store. You can skip the questions or answer them. Etsy will then prompt you to start your store by clicking Start your shop.
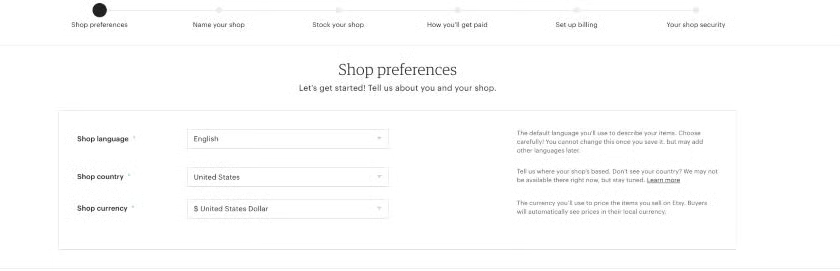
Set Your Shop Preferences
Etsy breaks down the store setup process into six sections, starting with your Shop Preferences. This includes setting your store language, country, and currency. Once you have input the required fields, hit Save and Continue.
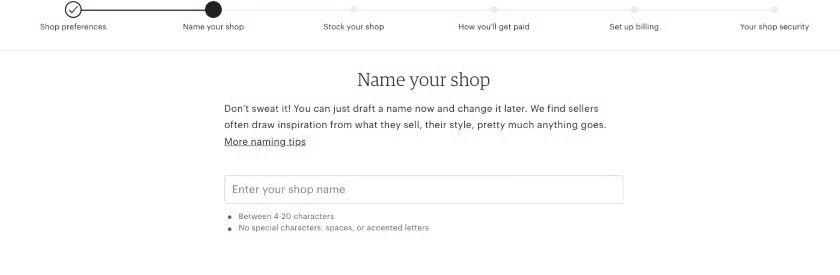
Name Your Etsy Store
The next step is to give your Etsy store its name. Ensure your shop’s name is easy for customers to remember and reflects your brand identity. Additionally, it should fall within Etsy’s criteria—no spaces, no special characters, between four to 20 letters, and no use of shop names that already exist on the marketplace.
Once you have selected your store name, simply enter it in the provided field and hit Save and Continue.
Step 3: Create Product Listings
The next step in the store set-up process is to create your product listings or Stock your shop, as Etsy calls this step.
All you need to do is fill in the provided fields, including images, a product description, videos, price, return terms, inventory information, shipping preferences, and more. Then, you can click Preview to see how the listing will look to customers and then Save and Continue to move on to the next step.
Use this detailed breakdown of the product listing sections to ensure you fill everything out correctly and to its potential.
To upload photos, click Add a Photo to add files from your computer. You can add multiple photos at once and change the order of your images—click on a photo and drag it to the left or right.
Etsy recommends using at least five photos per item (maximum of ten images) so that customers can see your product from various angles. Image sizes should be at least 1,000 pixels square. Learn about Etsy’s guidelines and best practices for item images.
Want to learn how to take good product photos yourself? Read our DIY guide to high-quality photography.
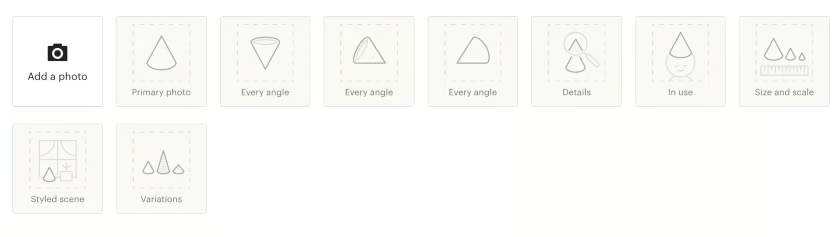
Additionally, you have the option to add variation photos (like colors or sizing) and a listing video to your post.
Buyers love video listings, and Etsy suggests creating videos that address common questions, show your products in use, and highlight the creative details. Learn how to make videos that sell to upscale your selling strategy.
Your thumbnail is your product’s headshot—it is the first image of your product that your customers see in your shop, via search, and elsewhere on Etsy.
When you upload images, the first photo on a listing becomes the thumbnail. If you want another photo in the listing to be the thumbnail, simply drag the photo you want to the first photo slot. Learn how to adjust your thumbnail image.
The listing details influence how your product listing will be categorized and how it can be found in an Etsy search. Shoppers can get to your listing faster based on the details you add.
Here are the details you must add:
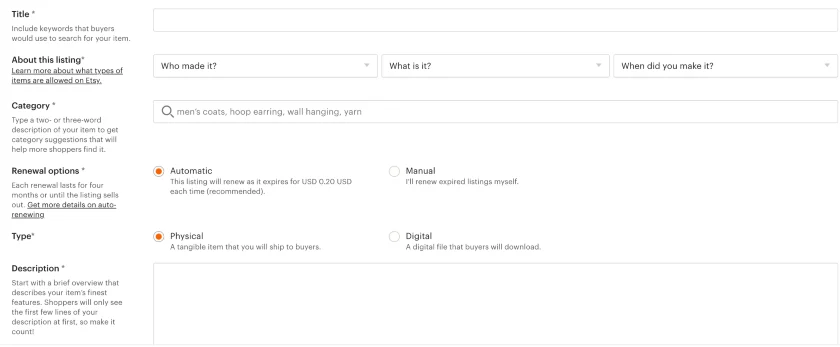
- Title: Give your item a title that describes the product in as much detail as possible, considering the 140-character limit.
- About this listing: This field involves three questions in a dropdown. Choose the appropriate answer under who made it, what is it, and when did you make it.
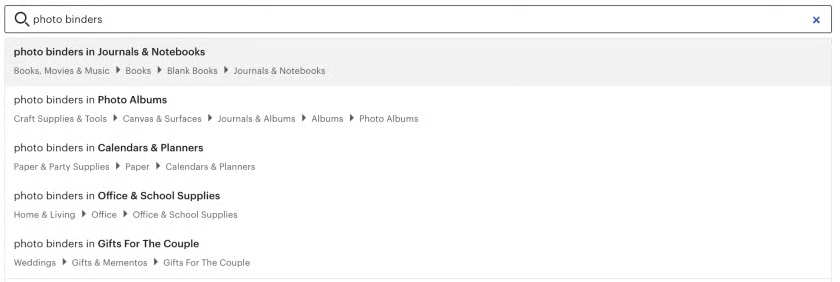
- Category: Think of this field as a blanket keyword for your product that customers will use to search. Keep up with Etsy updates as it regularly rolls outs, removes, and updates listing categories based on feedback and research. Refer to the full Etsy category tree.
- Renewal options: By default, listings automatically renew after four months, and you will be automatically charged the applicable listing fee. We will discuss this further when explaining Etsy fees below. If you’d rather renew expired listings yourself, or alternatively, delete them, you can select “manual” here.
- Description: Provide an in-depth description or a bulleted overview of the product. In the description field, you can preview your listing for a Google search result so that you can optimize for ecommerce SEO. Learn how to write product descriptions that sell.
- Tags: Take advantage of all 13 tags available per item. Shoppers find your item by searching for keywords in the search bar—those keywords are what your tags should be.
Enter your product’s price, sales tax (if applicable), quantity, SKU (if you have one), and variations. You can add variations (such as sizes, materials, and colors) and link respective photos to the variations.
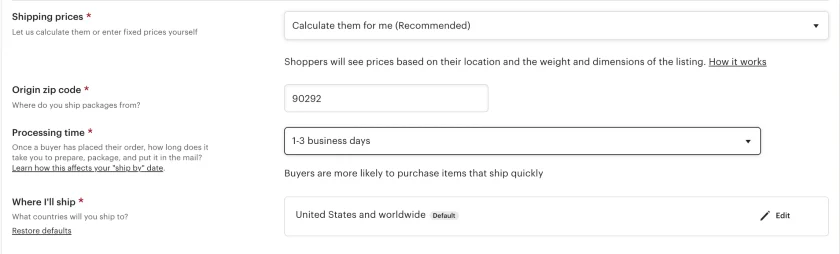
Include all the necessary shipping details: shipping services you will use, fees, country of origin, processing time, and your item’s weight and size.
You can also let Etsy calculate your shipping prices for you (which it recommends).
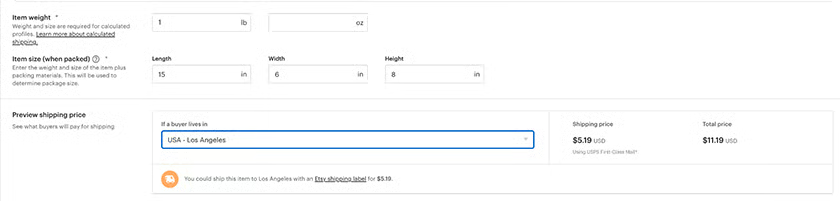
To make things easier, you have the option of setting shipping profiles after you have opened your Etsy shop so you can quickly update items with the same shipping costs.
Your listing won’t be saved until you click Save as Draft or Publish.
- Save as Draft: To save as a draft, enter at least one photo, a category, a price, quantity, shipping rates, and a title. You can always enter temporary info and then replace it before you publish. You can find your draft listing on your Listings page under Drafts. Drafts never expire, and there is no limit on the number of drafts you may have. You also aren’t charged the listing fee until the listing is published in your shop.
- Publish: If you are ready to sell, click Publish to post your listing. The 20-cent listing fee will be added to your Payment account. It may take up to 24 hours for listings to appear in Etsy search results and categories. If you want to create similar listings, then create one listing and copy it to save time.
Step 4: Set Up Etsy Payments
Once you’ve added your first product listings, the next step is to set up your Etsy Payments
First, Etsy will prompt you to fill in the country where you will be getting paid to set your deposit currency. In my case, I set the location to the United States, so I will get paid in $USD. Then, fill in your business type, stating whether you are an individual or a business so that Etsy sends you the right tax paperwork. And then you will continue to your personal information and connect your bank account.
Sellers with US bank accounts are now required to verify their bank account with Plaid while opening a shop or any time they update their bank details.
Once you input your information, Etsy will ask you how you want to get paid, with options to get paid daily, weekly, biweekly, or monthly. Select the option that works best for you, no additional fees apply.
Add Billing Information
The next step in the Etsy store setup process is to add your billing information so that Etsy knows where to send your bills, including selling fees and your subscription payment if you have one. The information you will be required to input at this step will depend on your country.
In certain countries, Etsy will require that you provide a credit card for identity validation and authorization purposes. If you are based in the US, however, you have the option to enroll in autobilling, and Etsy will automatically charge your credit card on file for the selling fees you incur. Simply input the required information in the fields provided, and hit Save and Continue.
At this stage, Etsy also requires you to set up two-factor authentication (2FA) as a security measure.
You’ll be prompted to provide the code when:
- You sign in using a different browser or on a new device
- Every 30 days by default
You can receive this verification code through an authenticator app on your Android or iOS device (recommended), a SMS text message, or through a phone call. Simply select the option that is best for you. Etsy will also provide you with a series of 9-digit codes that you should save in case you cannot access your 2FA device.
Once you have saved your spare security codes to a safe place, click Open Your Shop to roll your store out to the public.
Step 5: Customize Your Store
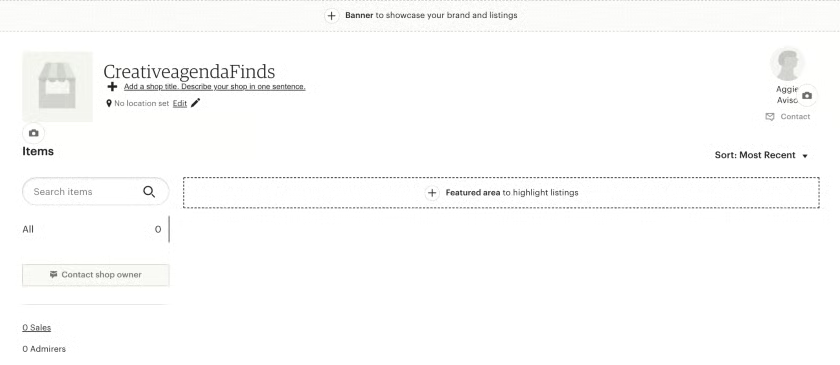
Even though your store is live and all the technical pieces are in place, you aren’t done yet. Now it’s time to design the front end of your store. Your Etsy shop has its own landing page—where customers can view your products, learn more about you and your company, and read your store policies and updates.
Navigate to your store manager, and select the edit icon next to the sales channel you want to customize. This will take you to your store customizations page, full of fields that you can fill out to add more color and life to your store appearance.
Here are a few of the key areas that you can customize for your shop.
Store Banner & Shop Announcement
The store banner spans the top of your homepage and will stand out when shoppers visit, so ensure your design speaks to your brand. Share a welcome message as a shop announcement with shoppers.
About Section & Shop Members
Your About section is the main way an Etsy buyer gets to know you, the person behind the creative works. A well-developed About section should give the customer a window into who you are, not just what you produce.
This area also allows you to add the Members, Story, and Manufacturers sections. You can also access the About Your Shop tab from the Your Shop menu.
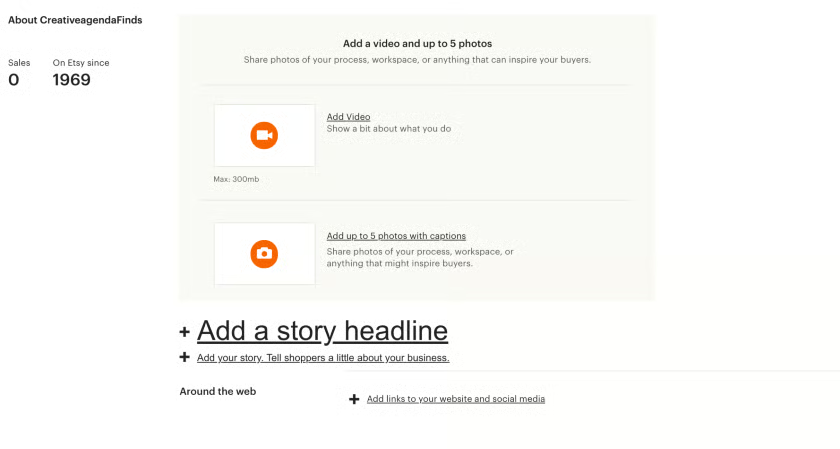
- Story: You have 5,000 characters to tell customers your business’s origin story. Include information about why you started your Etsy store and what you love about the creations you make or sell on the site.
- Manufacturers: If you use any outside manufacturers to create your products, you can list them here with explanations of how each provider helps you.
- Members: Add this section link to your user profile on Etsy and any Etsy profiles who work in or are connected to your shop.
You can also provide photos or videos of your studio space or creative process and add links to your store’s social media profiles. This is a great way to let your customers get to know you better.
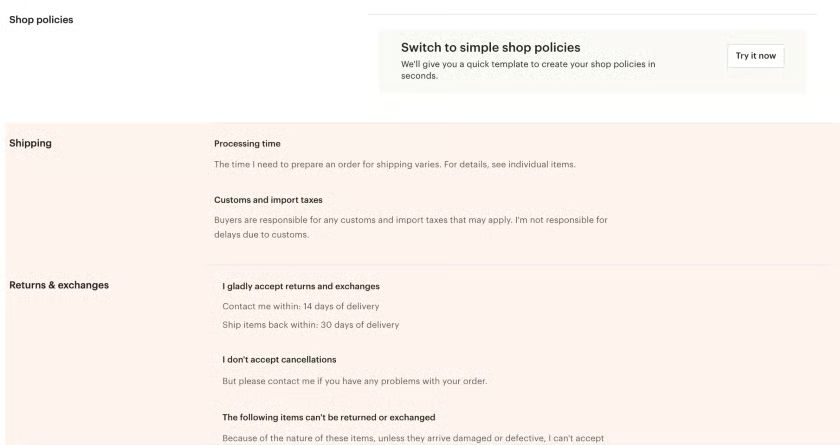
Shop Policies
In this section, you answer any questions your customers may have about your item production, order processing, shipping, and payment processes.
Managing Your Etsy Store
With your store up and running, the only thing you must do is continue to manage it. Etsy has a number of tools to help you keep your store running smoothly.
There is, of course, the Shop Manager, which you can access from your Etsy account on any browser to manage orders, update your settings, and oversee your billing and payments.
There are also several additional tools that you can use to manage your Etsy store for success, like the following:
- Manage your Etsy store on the go through the Etsy Seller app.
- Follow customer service best practices so you’re qualified for Etsy’s Seller Protection Policy.
- Sign up for Etsy’s seller email lists, so you don’t miss out on tips and information.
- Read about Etsy’s Review system and how to get 5-star reviews.
- Become a Star Seller.
- Etsy regularly releases marketplace insights to its sellers with the latest product trends and seller insights
Etsy Fees & Subscription Options
While there is no fee to sign up for an Etsy account, Etsy charges fees for listing and selling products, as with any other marketplace. Additionally, there is an option to upgrade your Etsy store to a paid Etsy seller subscription. Here, we will break down Etsy’s fees as well as your subscription options.
Etsy Seller Fees
Etsy charges fees for listing and selling products. As mentioned earlier, you must set up your payment preferences and billing information because these will be directly related to the fees you’ll incur.
Etsy Payments will automatically deduct these fees from your sales funds. If you still owe additional fees at the end of the month, you’ll be responsible for paying them. If you’re based in the US, Etsy will automatically charge the credit card you have on file.
Etsy charges three main types of seller fees: a listing fee, a transaction fee, and a payment processing fee. A one-time set-up fee is now also imposed on new sellers as of February 2024.
| Type of Seller Fee | Cost | What It Is For |
|---|---|---|
| Set-up Fee | $15 | A one-time payment fee for new sellers to support the enhanced identity check process |
| Transaction Fee | 6.5% from each sale (item price + shipping fee) | Etsy’s sales cut
|
| Payment Processing Fee (for those who use Etsy Payments) | 3% plus 25 cents each sale (US) | Payment processing fees are charged on each transaction that uses Etsy Payments and vary per country. They are in addition to Etsy's transaction fees. |
For an in-depth look at Etsy’s fees, read our guide to Etsy Seller Fees.
How to View Your Etsy Fees & Taxes
You can view your Etsy fees and taxes in your Payment account:
- Sign in to Etsy.com and go to Shop Manager.
- Go to Finances and then Payment account.
- You can see fees and taxes owed under Recent activities and Fees & Taxes.
On the Sell on Etsy app, you can pay your statement and manage your Payment account under Finances.
Etsy Subscription Options
Etsy offers two subscriptions for sellers, Etsy Standard and Etsy Plus. The Standard plan is free and comes included in all Etsy accounts by default, while the Plus plan requires you to sign up and costs $10 monthly. The main differences between the two plans are a few premium perks, such as discounts on certain features and advanced shop customization options.
| Etsy Subscription | Monthly Pricing | Features |
|---|---|---|
| Etsy Standard | Free |
|
| Etsy Plus | $10 |
|
To sign up for a Plus plan, simply head over to Etsy, enter your Shop Manager, and select Settings from the sidebar. From there, select the Your Subscription option from the Settings menu, and then select Upgrade under the Etsy Plus icon. You also have the option to downgrade your plan to Standard at any time.
Frequently Asked Questions (FAQs)
Click through the tabs below to get answers about the most often-asked questions about how to sell things on Etsy.
How much does it cost to sell with Etsy?
Selling things on Etsy involves these main fees—a $15 one-time set-up fee, a 20 cents listing fee per product, transaction fees (6.5% from each sale (item price + shipping fee), and the Etsy Payments processing fee (3% plus 25 cents each sale).
Do you need a business license to sell on Etsy?
No, Etsy doesn’t require you to have a business license to start selling on the platform unless you want to sell as a business, then Etsy will ask for your business documents.
What are the top things to sell on Etsy?
Based on our research, the best things to sell on Etsy are stickers, jewelry, pins, home goods, pet products, digital downloads, decals, arts, party supplies, and craft supplies.
What other platform can I sell products on like Etsy?
Marketplaces that are like Etsy include Bonanza and Amazon Handmade.
How do beginners sell on Etsy?
It is easy for beginners to learn how to sell something on Etsy. Simply check if you are eligible to become a seller, create an account, and set up your store by adding your shop details and product listings.
Is selling on Etsy worth it?
Yes, online selling with Etsy as your platform exposes your products to 96.5 million active buyers in its marketplace. This alone saves you the leverage you need in promoting your products.
Bottom Line
Etsy is arguably the best place in the world for artisans to sell their goods. The platform has a huge audience so your products can reach more people and is specifically designed to lift up craftsmanship and unique goods.
As you saw in this guide, creating an Etsy account is easy, and setting up your store and selling your goods on the marketplace is as simple as five steps. If you are an artisan and are ready to take your business to the next level, there is no better place to start than an Etsy store.