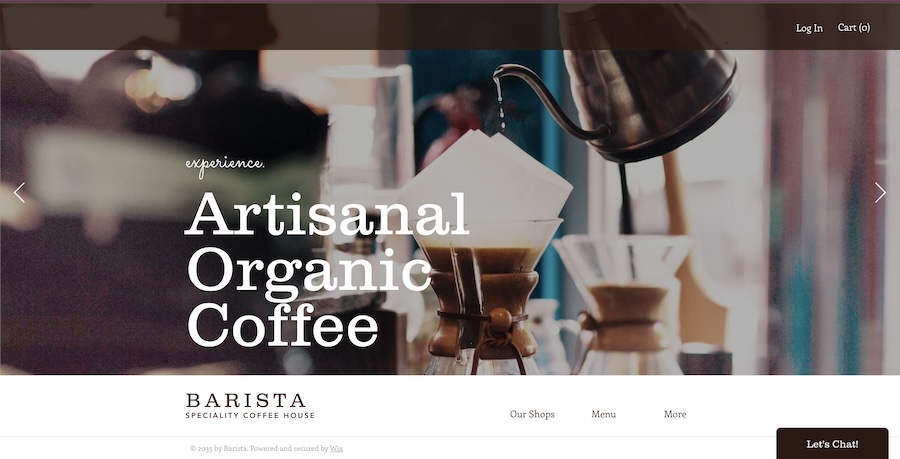
Wix is one of the top website builders I always recommend to small businesses. It’s simple, free to start, and has hundreds of templates you can easily customize. It also lets you build an online store and, on the marketing side, boasts some of the best SEO capabilities. Below, we’ll go through how to build a Wix website for your business, including how to set up your online store and customize it with your branding.
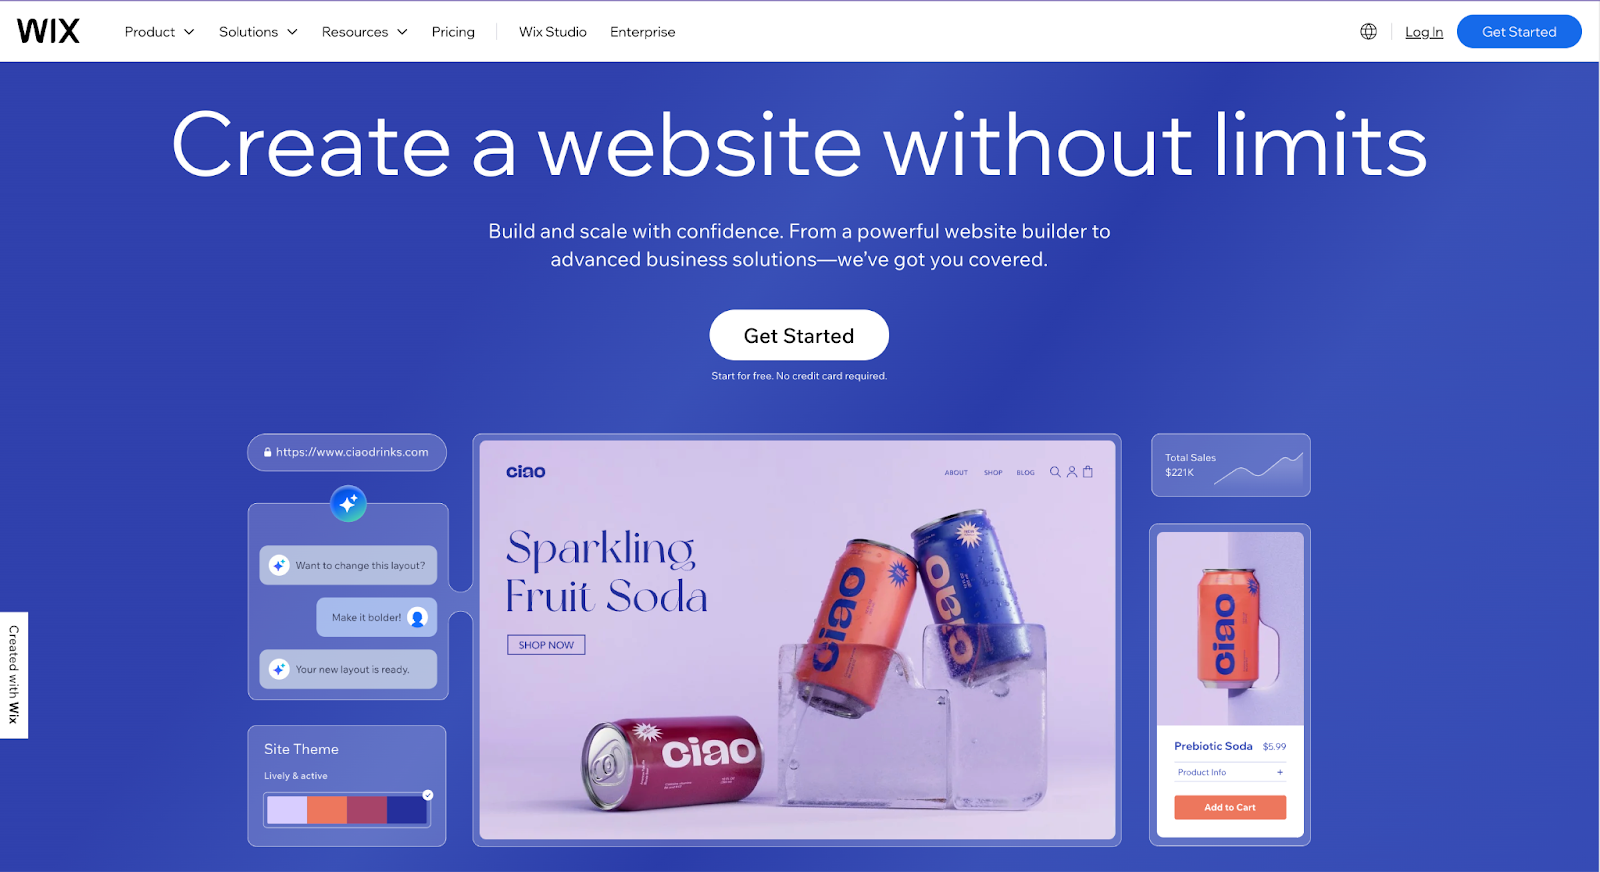
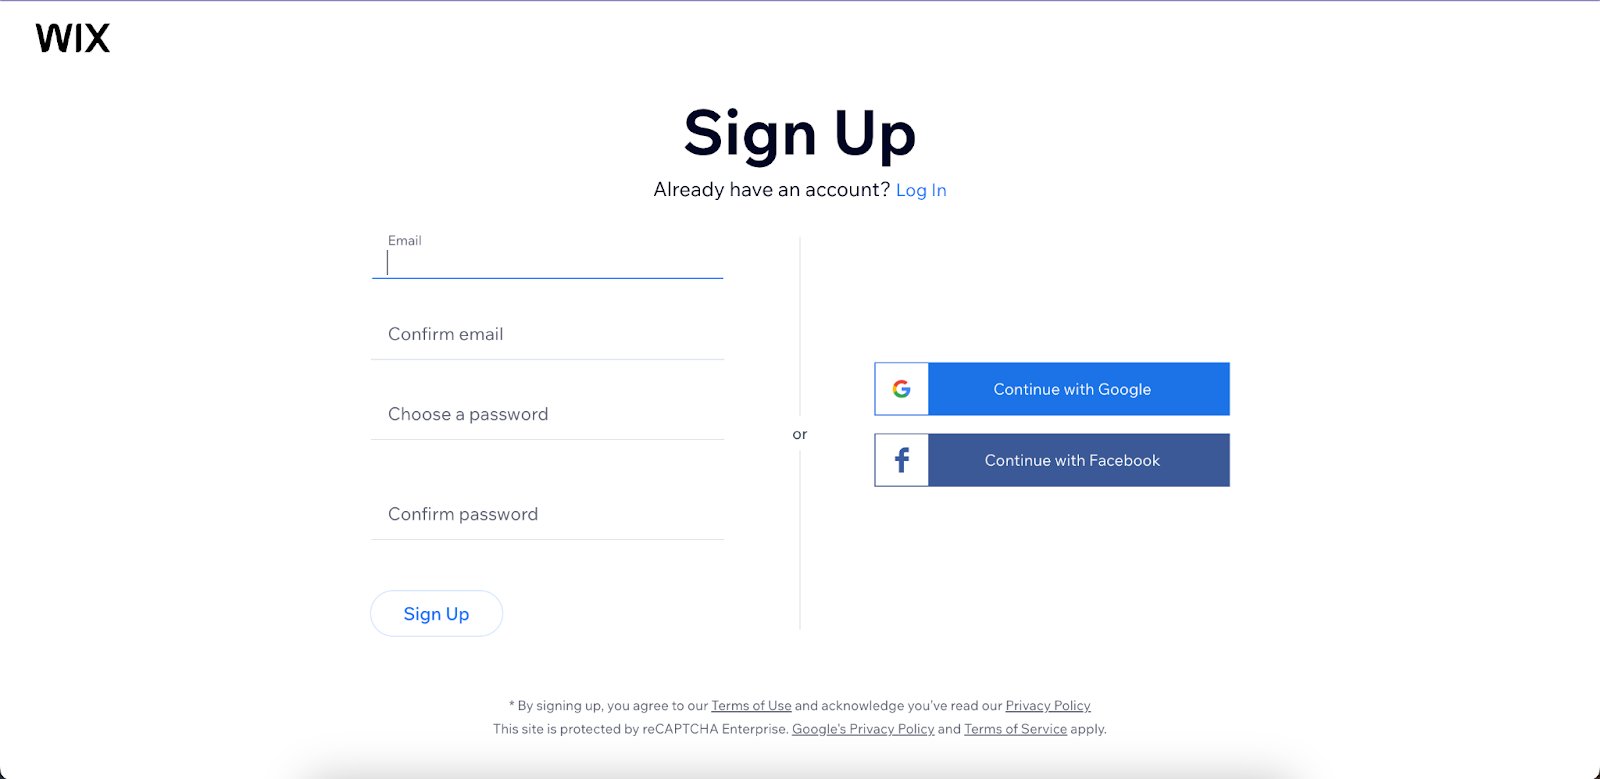
Before going into the steps to create a Wix website, you’ll first need a Wix account. Head on over to the Wix website, click the “Get Started” button and follow the prompts to set up your account.
1. Outline the Elements & Pages of Your Website
The first step in creating a Wix website—or any website—is to plan its overall direction. Every business website is different, and before building yours, you first need to decide how it’ll be structured. How many pages will it have? What should visitors see when they first enter your home page? Your answers to these questions will depend on your website’s main objective, whether it’s to increase sales, generate leads, or just grow your online presence.
When planning your website, think of the journey you want users to take from the moment they enter your website until they click on your final call to action. Then, outline the pages and website elements you need from there.
For example, if your main goal is to get visitors to sign up for your newsletter, you might have your sign-up form right on your home page. Or if it’s to lead them to your online store, feature your products first and foremost.
Some of the most common website pages are:
- A home page with basic information about your business and the main call to action
- An “About” page with some background information about your brand, including your brand story and mission and vision
- An online store where you can sell products
- A blog to publish stories about your business and industry (and to do content marketing)
- A “Contact” page where users can contact you for more information
2. Sign Up for a Wix Account
3. Choose Your Website Builder
Once you have a Wix account, the next step is to start building your website. After creating your account, you’ll enter a screen with a prompt to start creating your website. Click on the “Create New Site” button to get started.
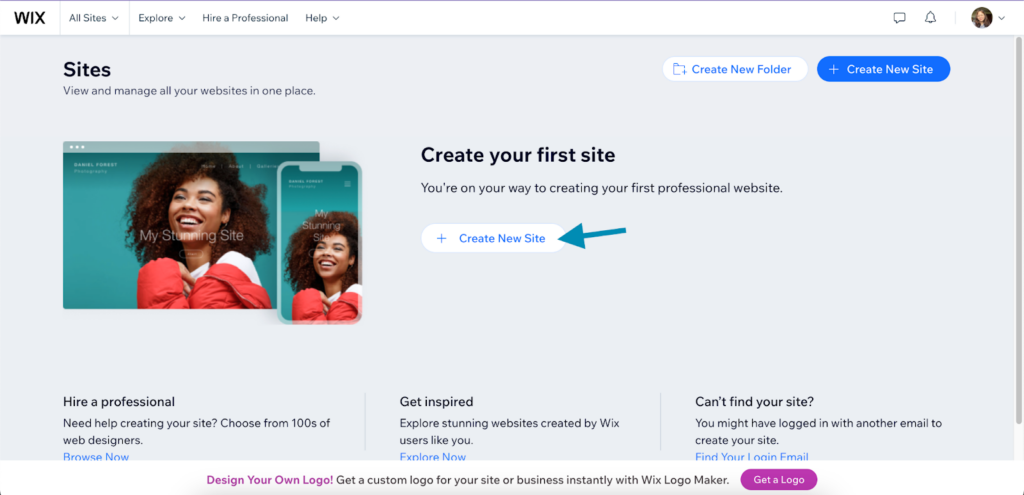
Click “Create New Site” to start your site setup.
Then, Wix will prompt you to choose the kind of website builder you want to use. Wix has an AI-powered site generator that can build a site based on your preferences and the classic website builder that lets you choose the individual elements you need.
If you prefer the AI site builder, click on the “Start Chat” button, which will lead you to its AI chatbot. If you prefer the classic, DIY one, choose “Setup without chat”, which will lead you to its setup screens.
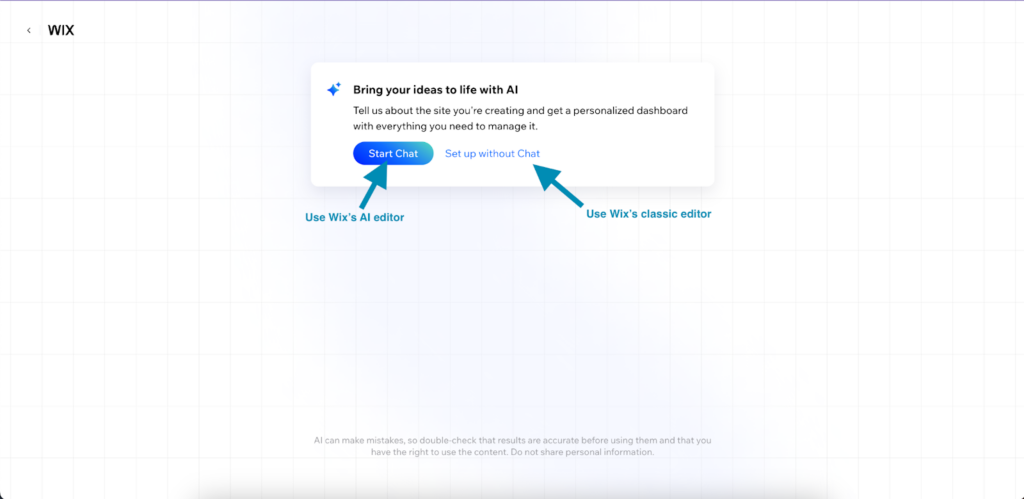
Choose between Wix’s AI-powered or classic website builder.
4. Set Up Your Website
The process to create a Wix website varies slightly depending on which editor you choose. As I’ve mentioned, the AI site builder only needs a few answers from you on the kind of site you need, while the classic editor goes through the process step-by-step. We’ll go through each option in more detail below.
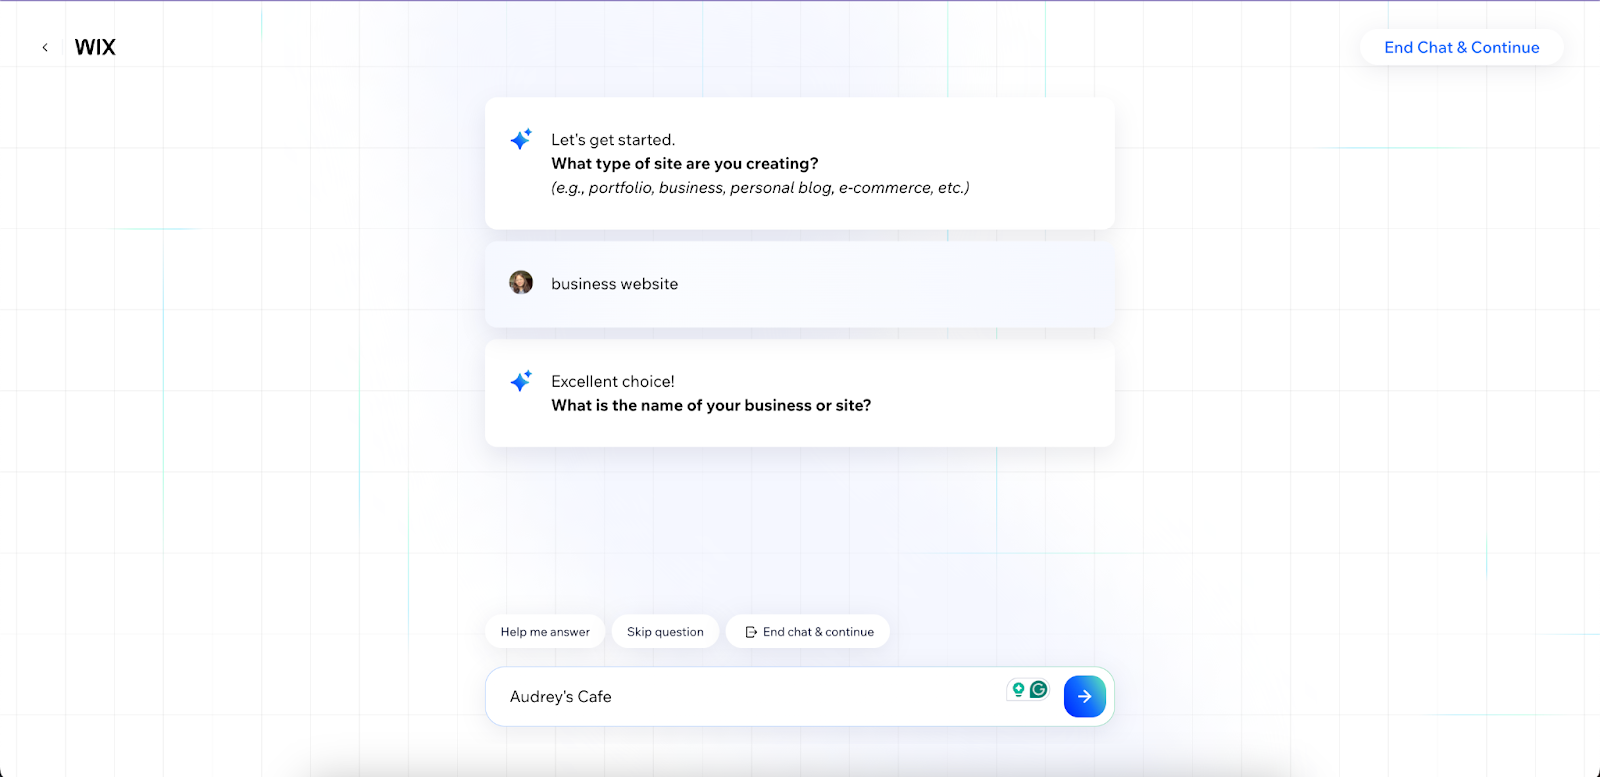
If you click on the “Start Chat” option, you’ll immediately access Wix’s AI site generator. There, you’ll be prompted with a series of questions about your site, like the type of site you’re building, its name, and the products and services you offer. It’s that simple.
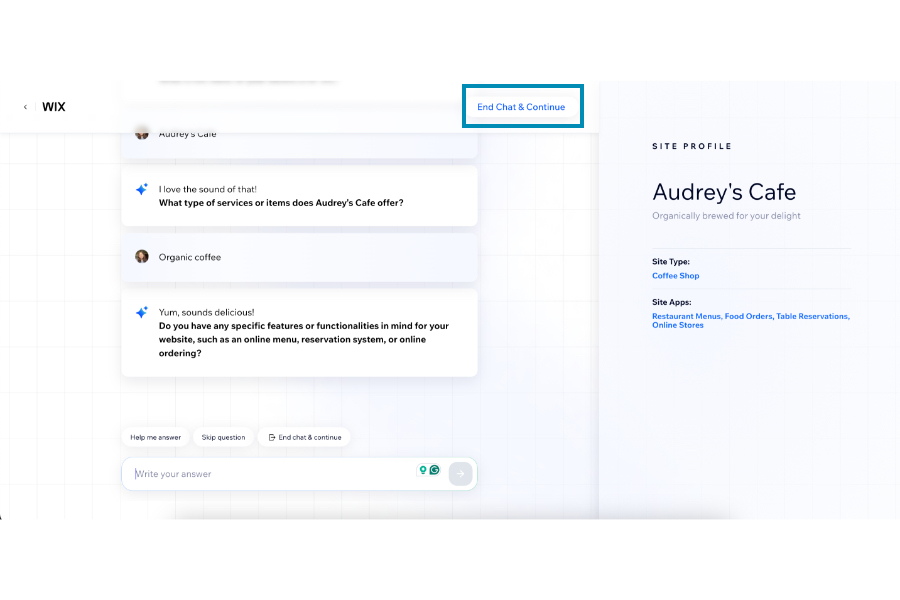
You can answer all of its questions (which I recommend for a more detailed and custom site), or skip some. Then, when you’re done, click on the “End Chat & Continue” button to continue to the next step.
After clicking “End Chat & Continue,” you’ll then enter your website’s main dashboard, which is where you’ll manage all the aspects of your site, from its design to its SEO and online store.
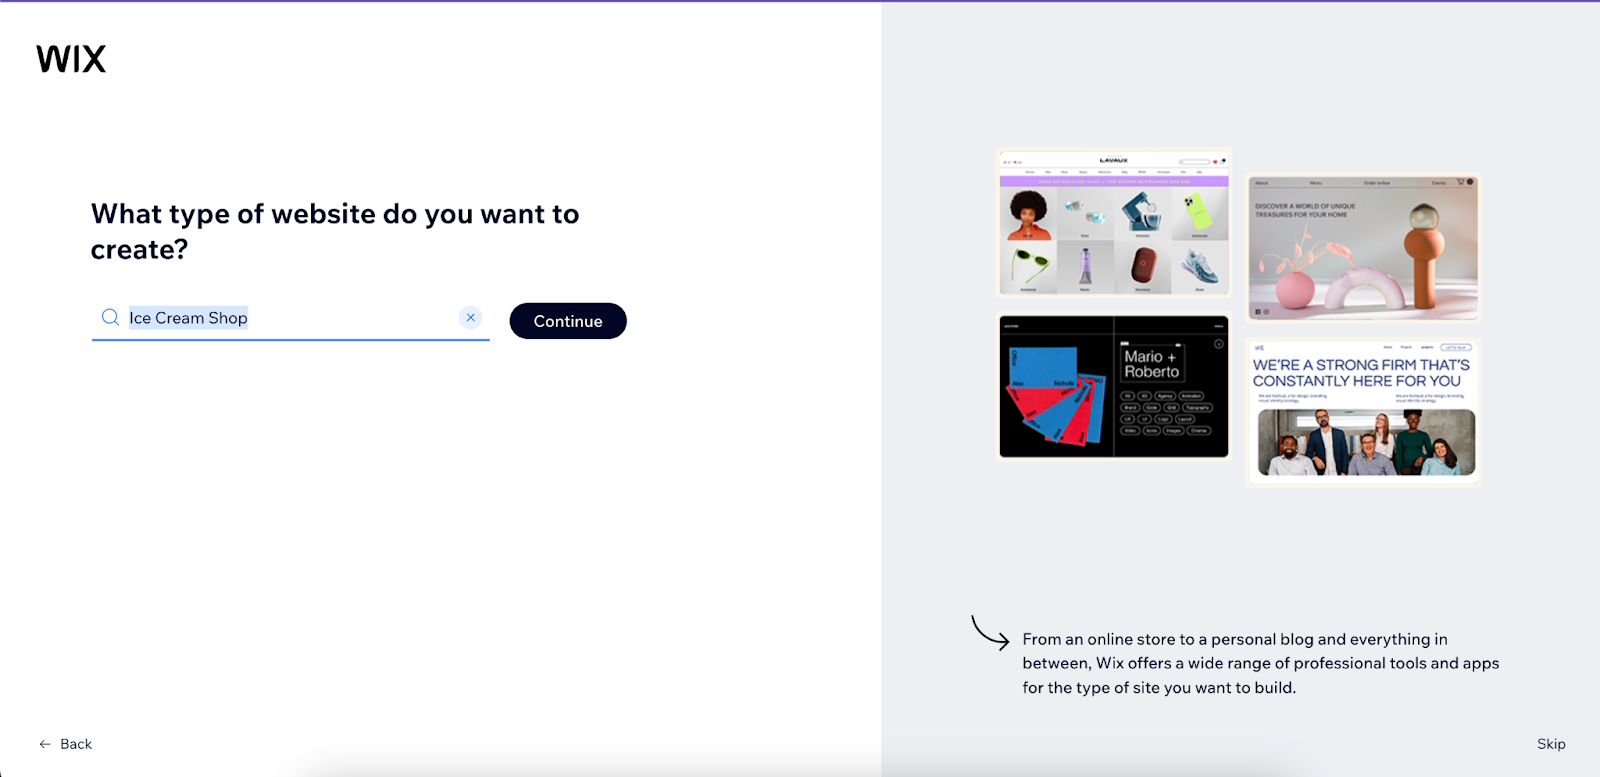
Meanwhile, if you use Wix’s classic editor (i.e., you clicked “Continue without Chat”), you’ll first need to select the type of website you’re building, whether it’s for a cafe, an ice cream parlor, a car wash service, and so on.
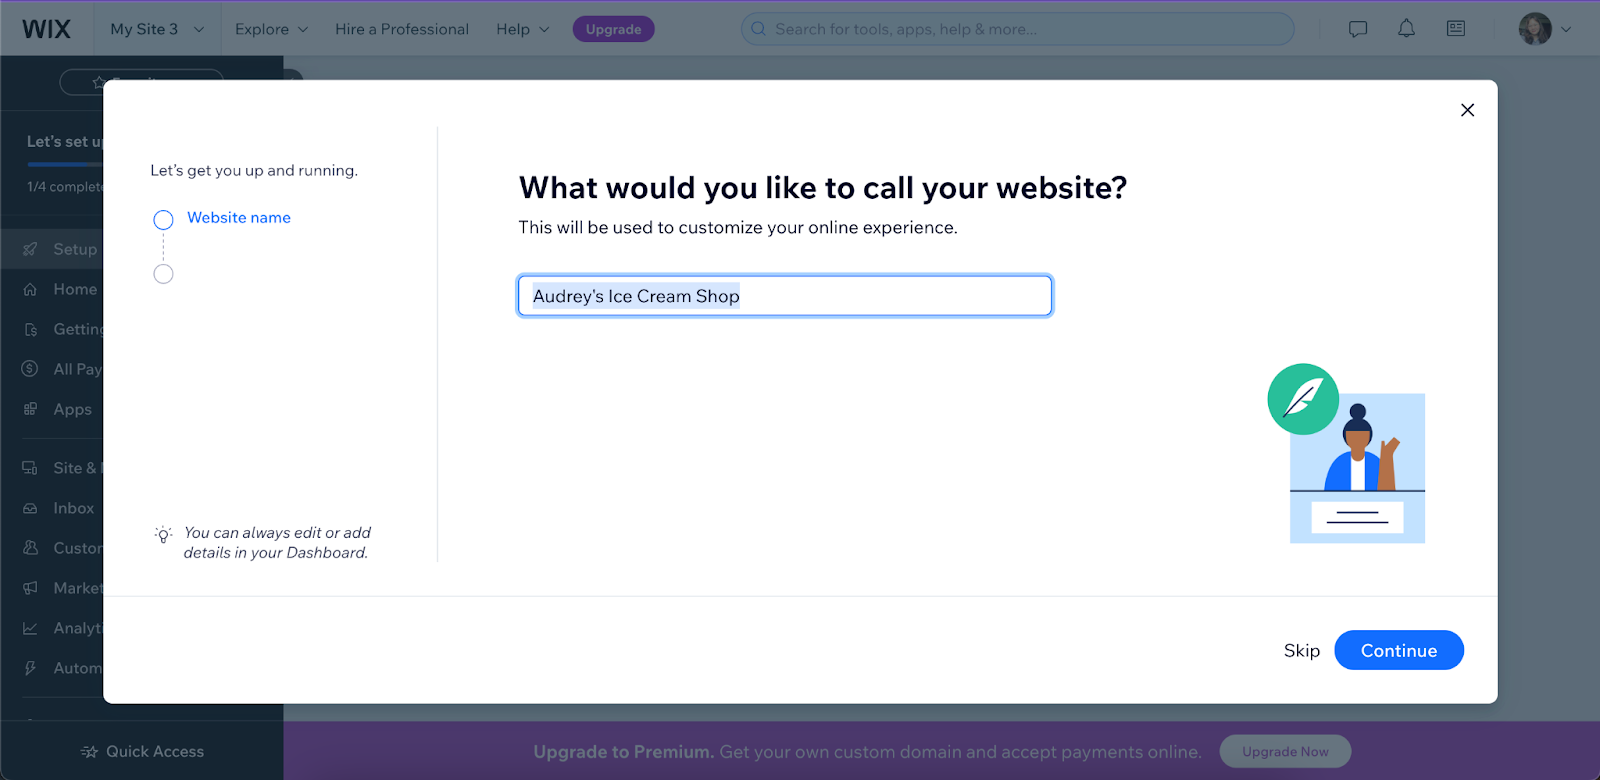
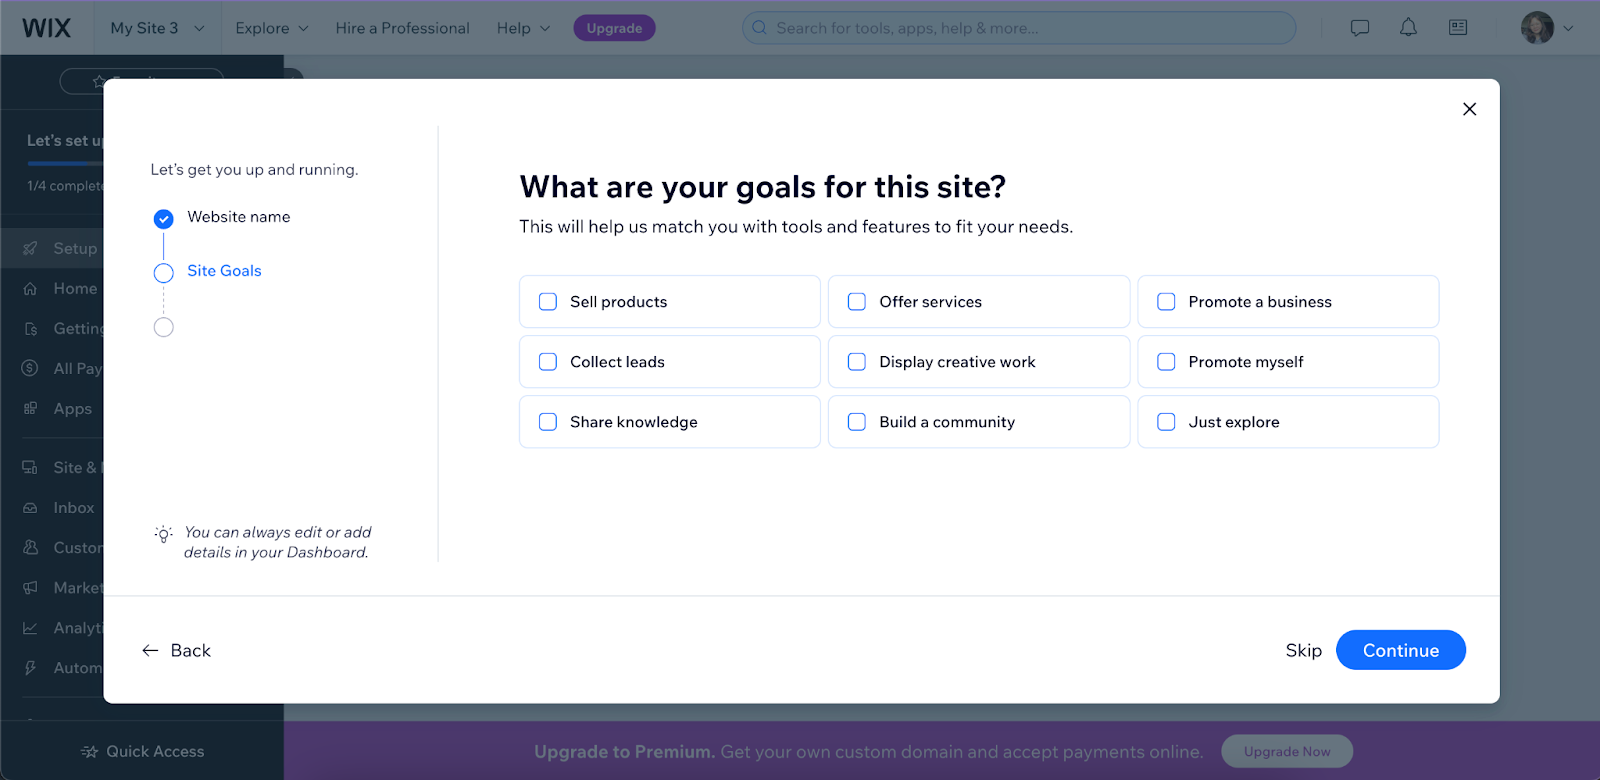
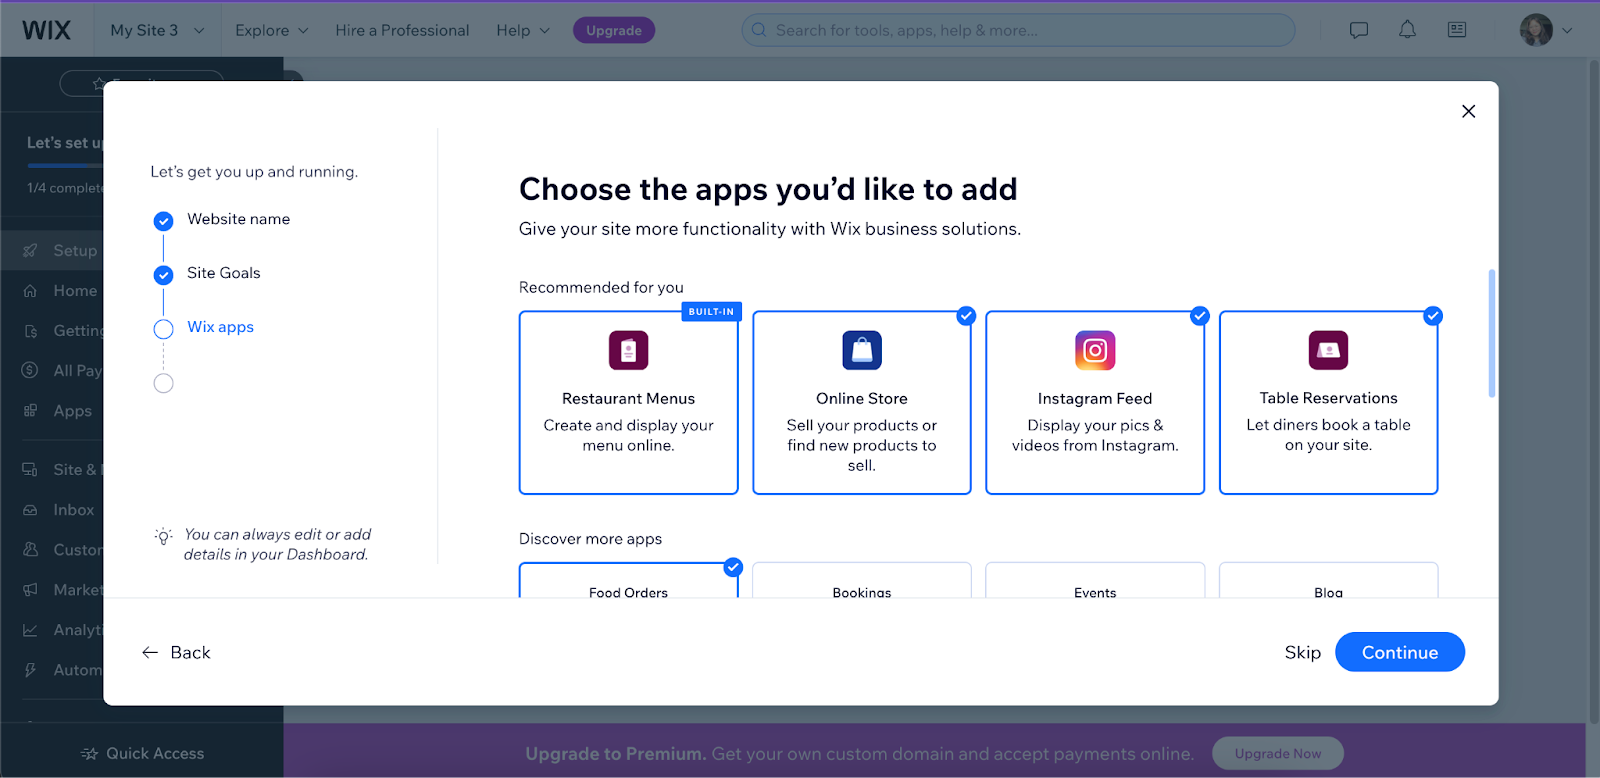
Then, add your site’s name, its main objectives, and the third-party apps you want to add, although you can also set these up later on in your dashboard.
After setting up those details, you’ll also enter your main website dashboard, which is the main area where you’ll manage all the aspects of your website.
5. Design Your Website
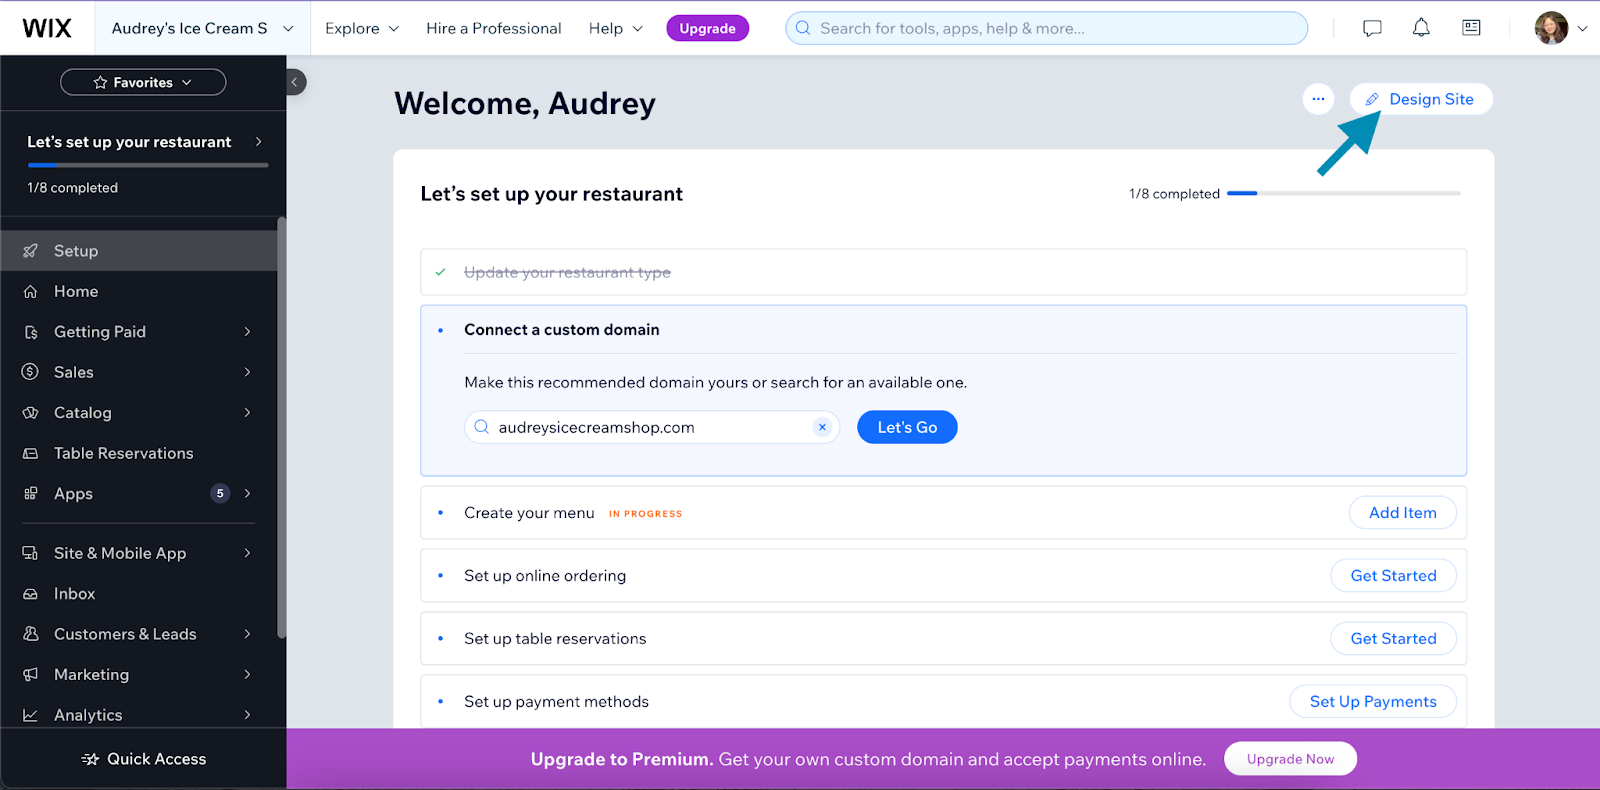
Now that you’ve entered your dashboard—whether you use Wix’s classic or AI editor—you’ll find prompts to set up different parts of your website, like your domain, SEO, or your online store. However, before all these, I recommend designing your website first and then coming back to those elements later.
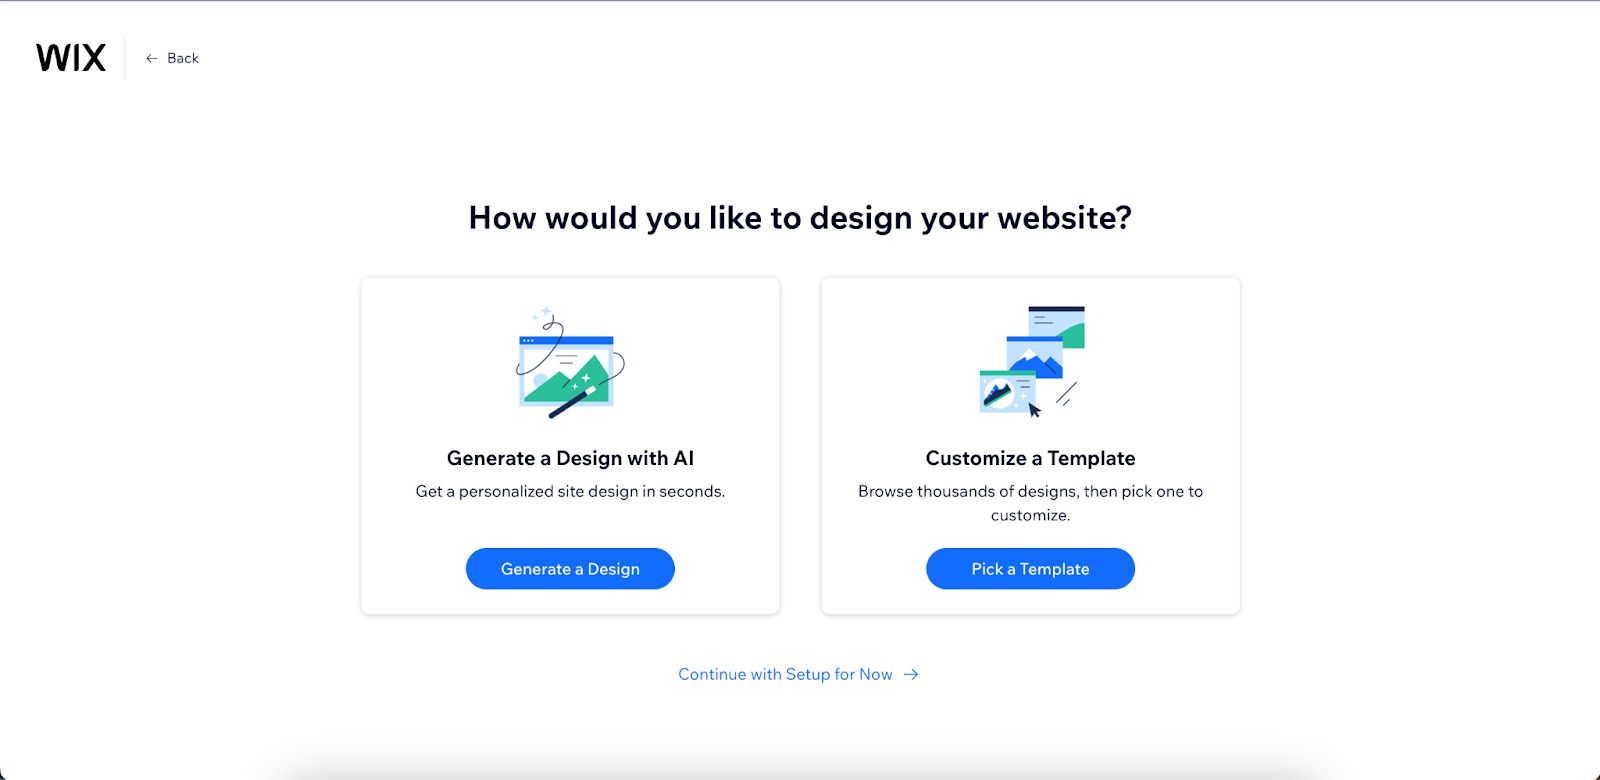
To design your website, click on the “Design Site” button in the upper right corner. Again, you’ll be presented with two options: to design your site using AI or to customize one of Wix’s 900-plus templates. Again, I recommend the AI editor if you’re not comfortable designing your own website but want something custom-made. On the other hand, if you want more control over your design, start with a template.
If you choose Wix’s AI designer, Wix will immediately generate a website for you after you click on “Generate a Design.” It’ll base its design on all the details it knows about your site from your answers to earlier prompts.
If you’re happy with the design Wix generated, go ahead and click on the “Continue with this Design” button, which will take you to the drag-and-drop editor for further customization. But if you aren’t 100% satisfied, you can click on “Make it a little different” to generate a new design.
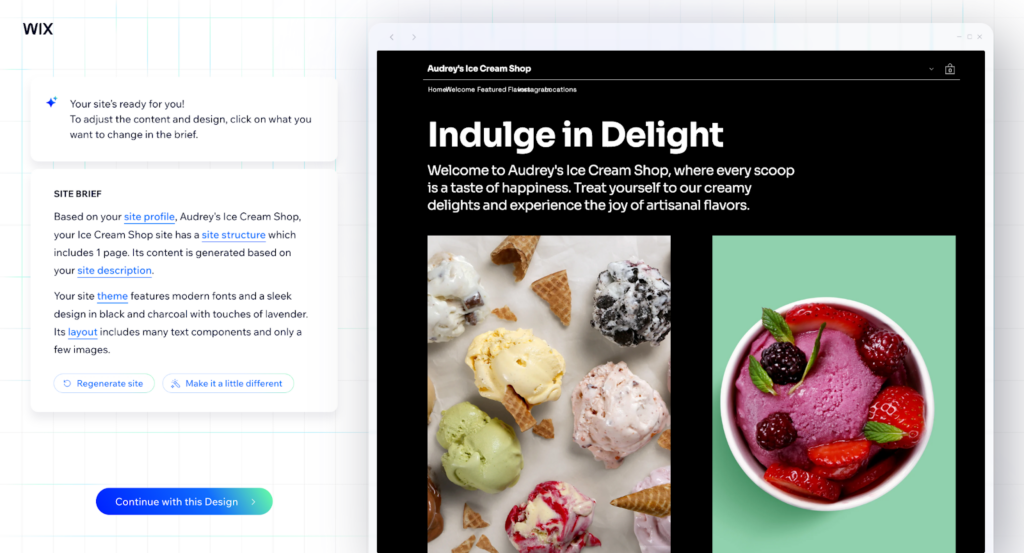
Wix’s AI-generated website design for an ice cream shop based on my answers to its prompts.
Meanwhile, if you choose to start with a template, you’ll enter Wix’s template selection page. Wix has over 900 templates for nearly any type of business and website. Preview, then choose the best template that fits your website’s needs.
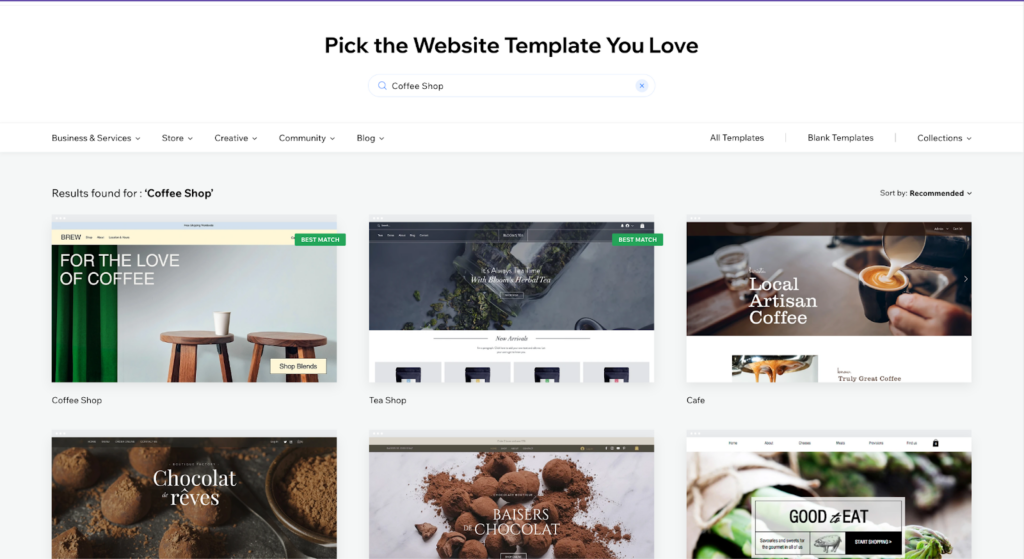
Choose from Wix’s 900-plus templates.
6. Customize Your Website’s Content in the Drag-and-Drop Editor
Once you have your basic website, whether by choosing a template or using the AI website generator, you’ll next enter Wix’s drag-and-drop editor. This is where you can customize all the other details of your site, like your website pages, images, and copies, and add your own branding. For example, I chose a coffee shop website template for the fictional organic cafe I’m setting up.
Since the editor is a drag-and-drop platform, editing your website is mostly a simple matter of dragging and dropping elements around. You’ll also find all the tools you need on the left-hand menu bar, like adding pages and elements and changing site colors.
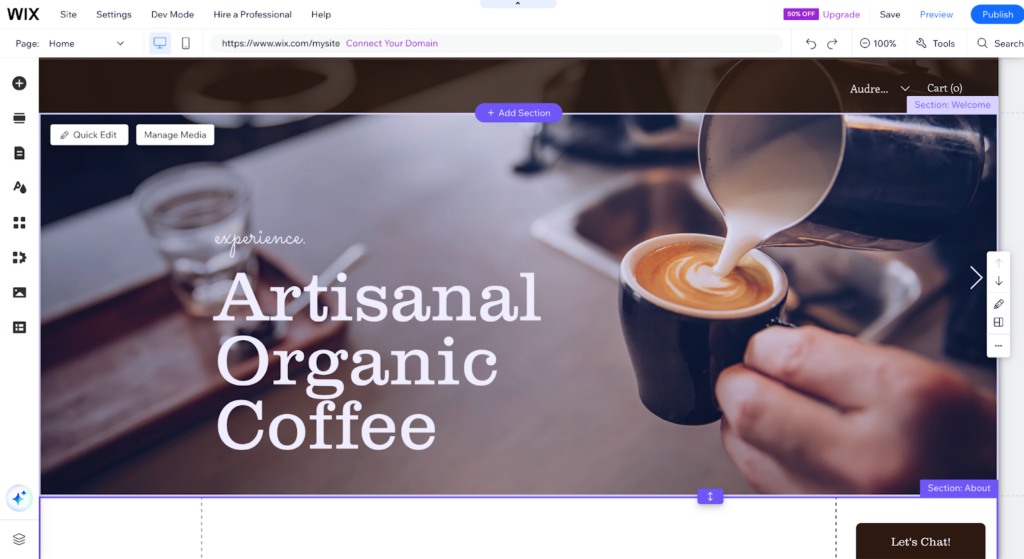
The drag-and-drop editor is where you’ll further customize your website’s pages, sections, text, images, and more.
- To add elements like texts, images, and buttons: Click on the “+” button on the left-hand menu, then choose and customize the element you want to add. You can also add image galleries, videos, blogs, and appointment-booking tools from this menu.
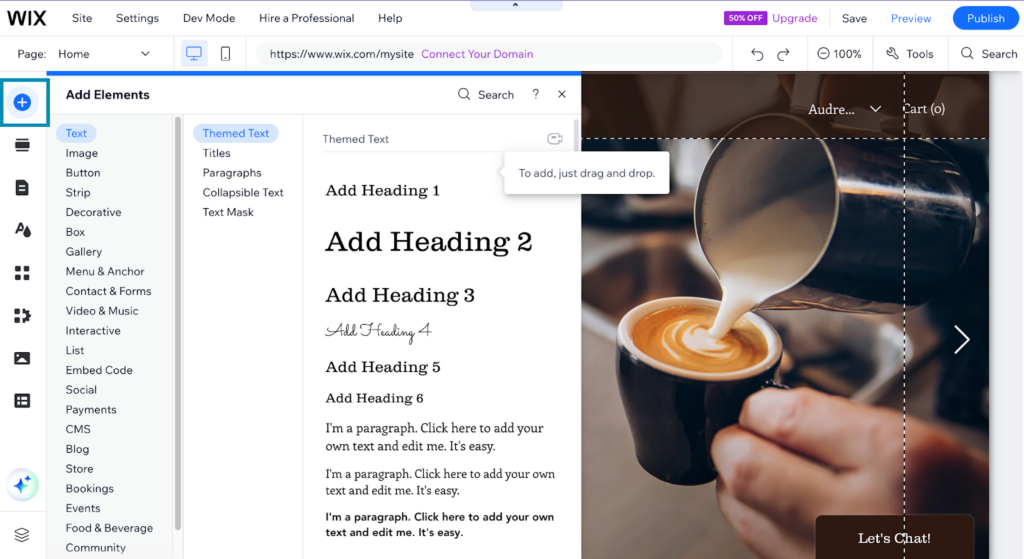
Add elements to your site using the “+” button on the menu bar.
- To add a section to your page: Click on the section icon on the menu, then choose the section you need. There are About, Contact, Services, and Store sections, among others. Then, choose the format of your section, and drag it over to your website.
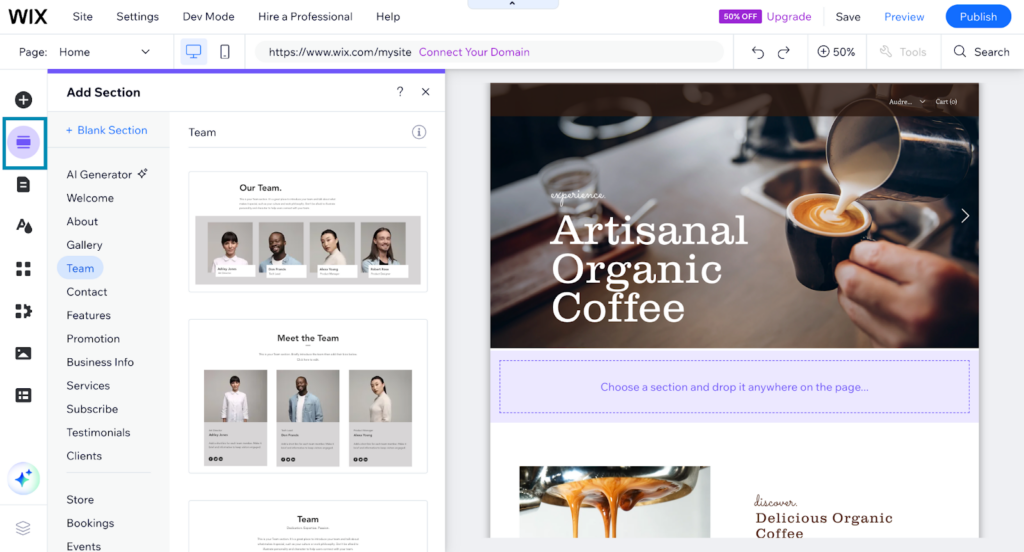
Add a section to your site and choose its layout.
- To add a page to your website: Click on the page icon on the menu, then choose “Add Page.” Select the page you need in the following window and choose from the different page formats. There are preset formats for home pages, online stores, menus and reservations, and others. You can also rearrange, rename, and delete your pages in this menu.
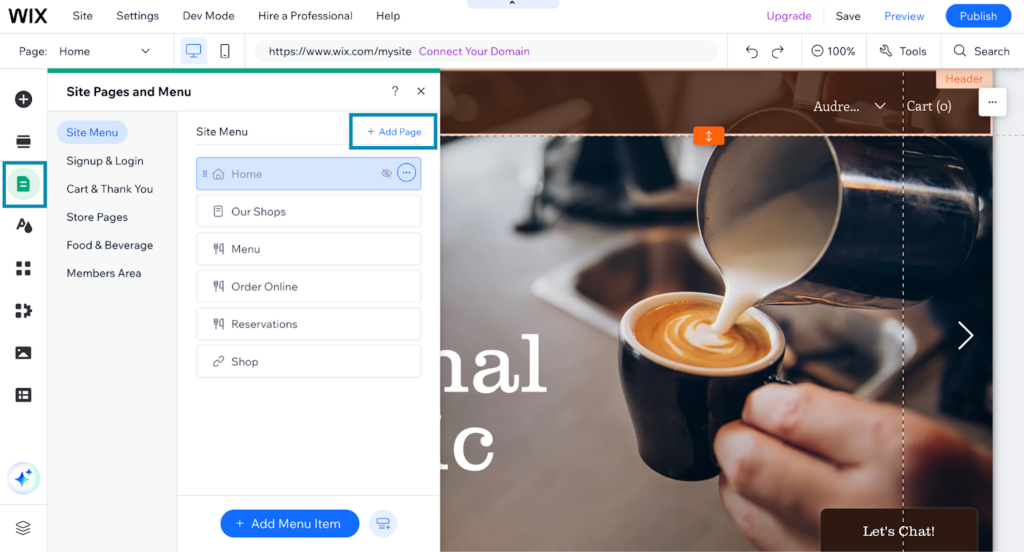
Add and manage your site pages in the Pages menu.
- To change your site colors and fonts: Click on the colors icon to open the Site Design menu. From there, you’ll find options to change your site’s themes, colors, and font styles. You can also add page transitions, background images, and colors.
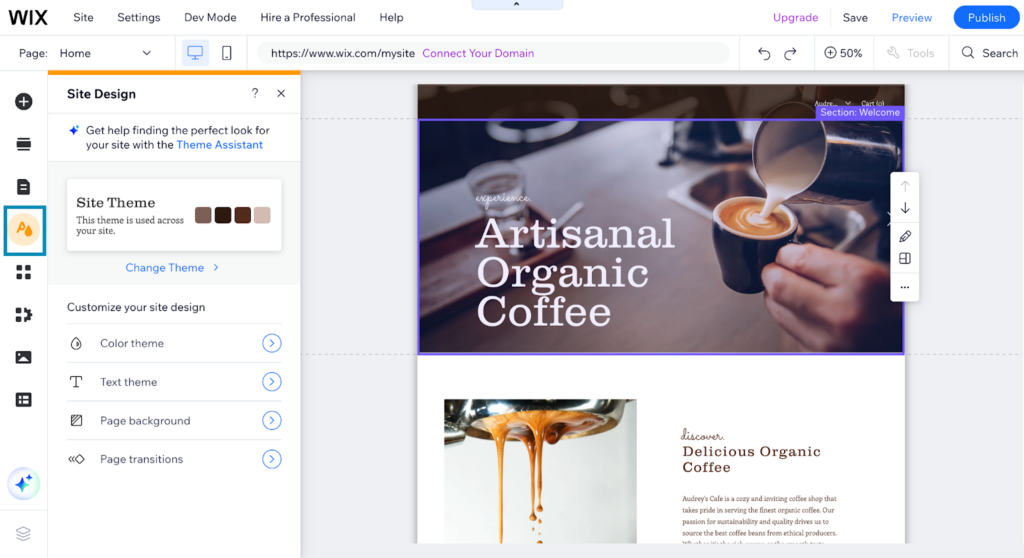
Customize your site’s themes, colors, and fonts.
- To edit your site copies: Simply click on any text element on your site and type in your copies. Wix also has an AI text generator that can draft copies for your site.
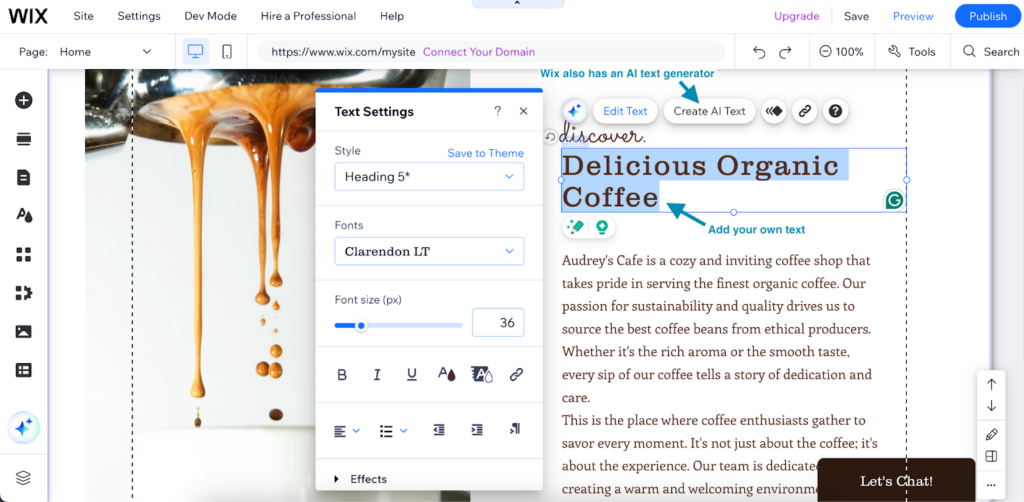
Directly edit your website copies, or use Wix’s text generator.
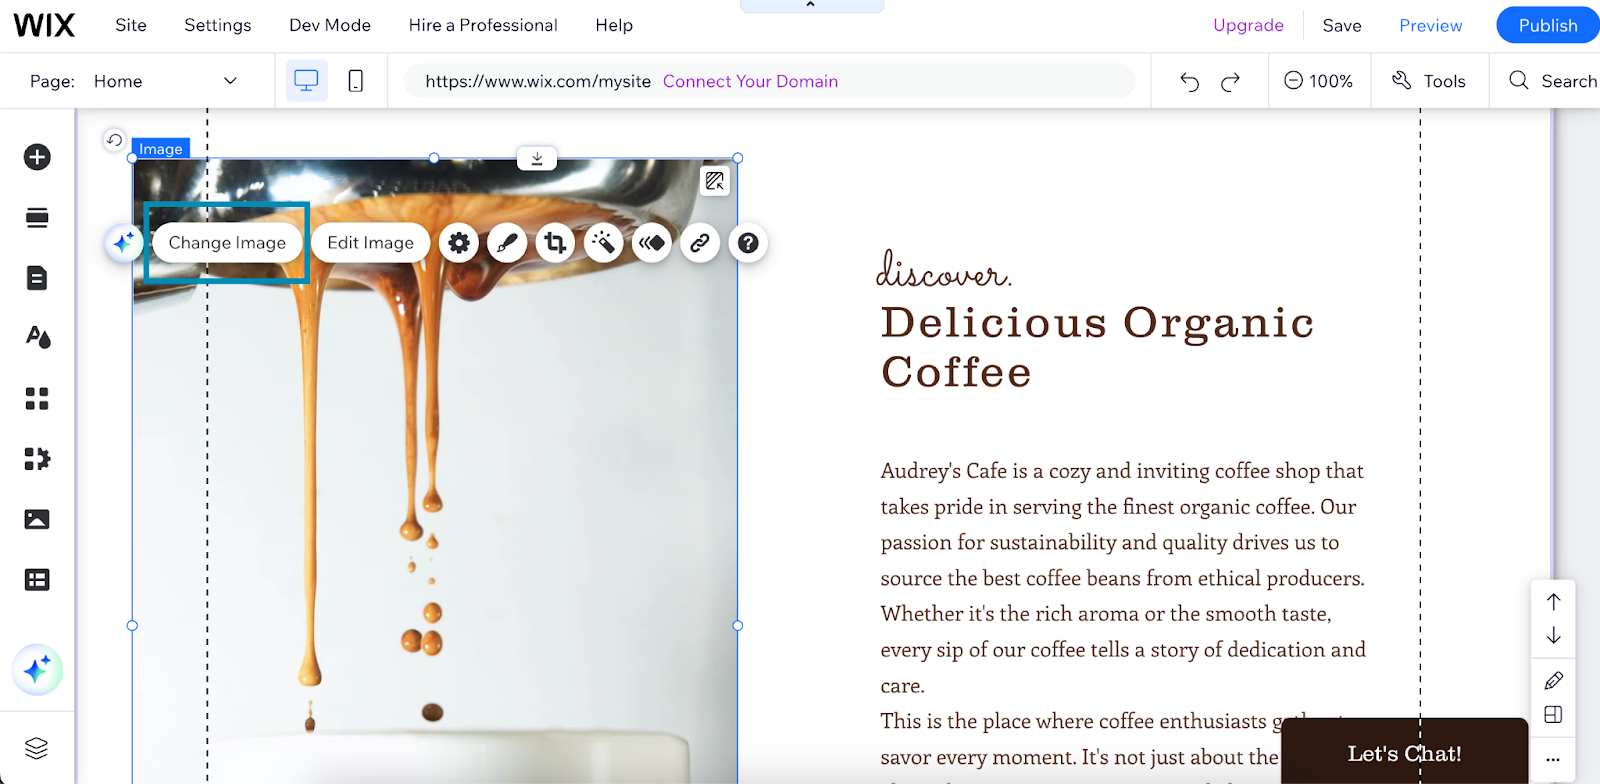
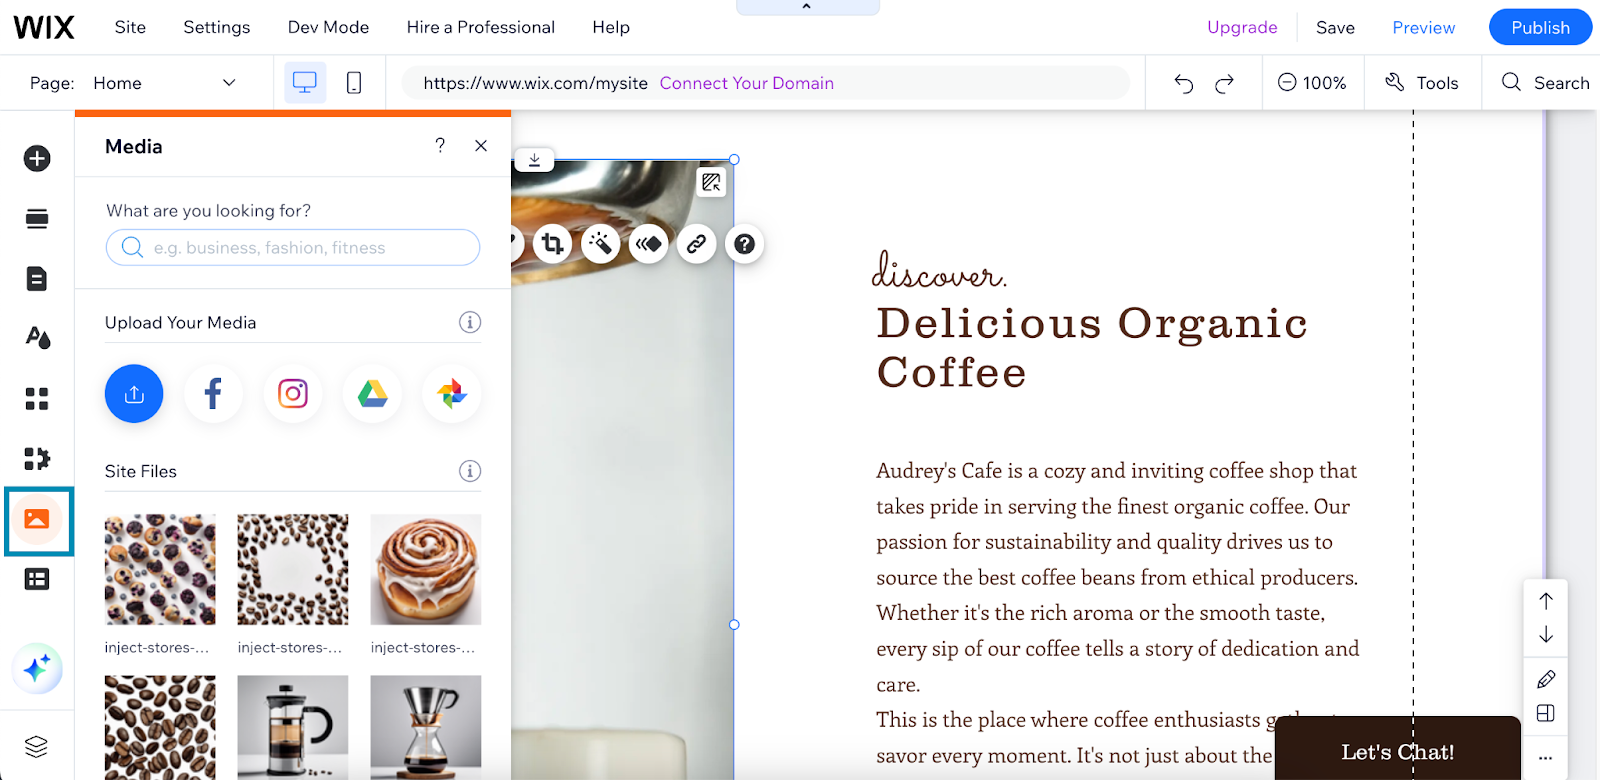
- To add or edit images: Click on any image on your site, then choose “Change Image” and upload your images. Wix also has an image library with free images you can use. Another way is to click on the image icon on the left-hand menu bar to add new images.
7. Set Up Your Online Store (or Menu)
Now that your main website is all set, the next step is to add your online store. One of the best things about Wix is how easy it is to build fully equipped websites with online stores. Unfortunately, when you create a website with Wix on the free plan, you won’t be able to accept orders or payments—you’ll need a paid plan for those. With the free plan, the most you can do is showcase your store’s products or your restaurant’s menu.
Setting Up Your Online Store
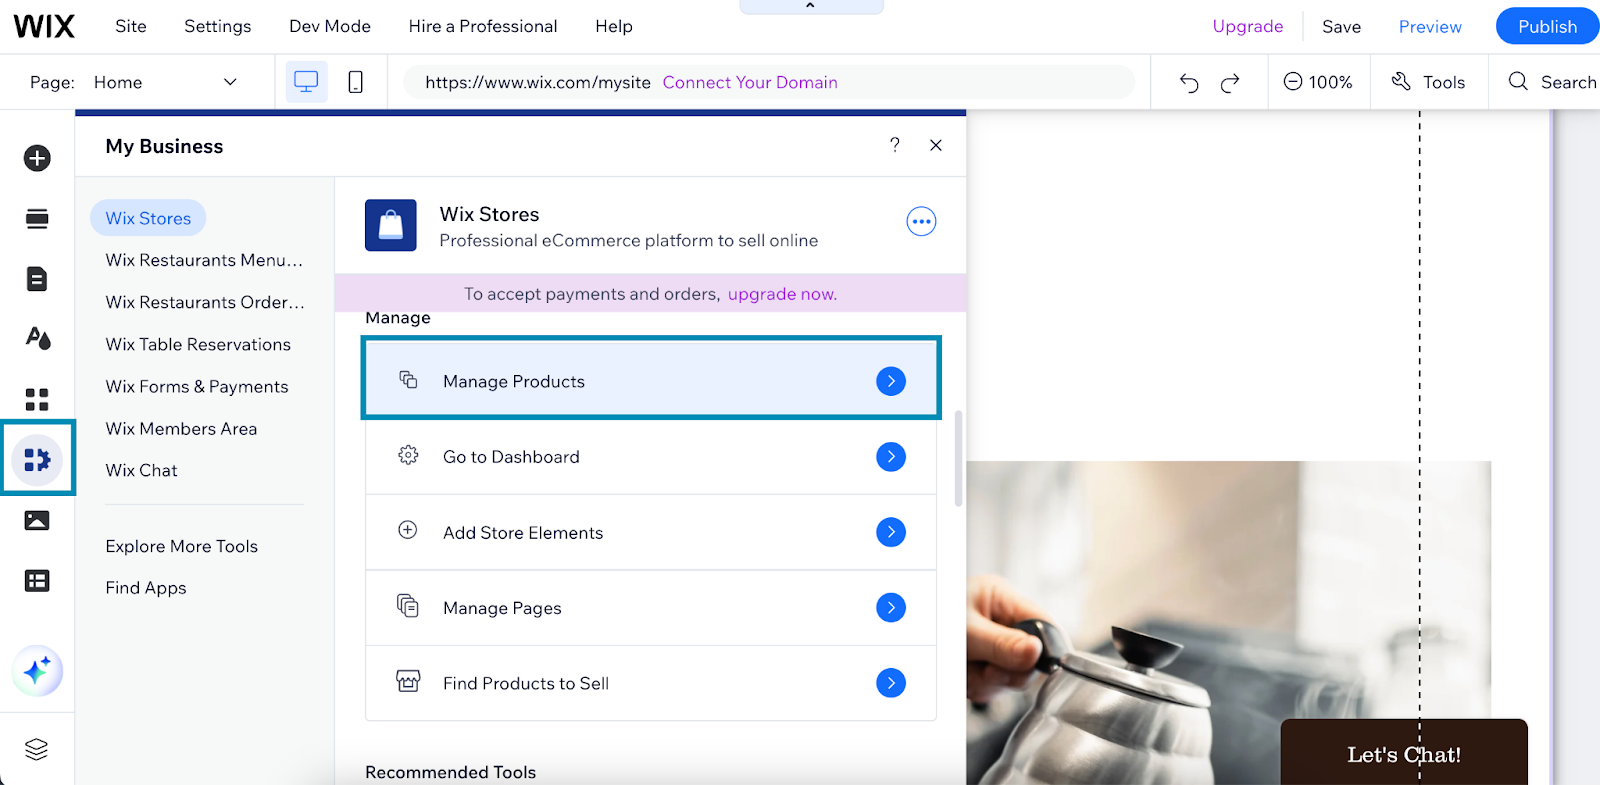
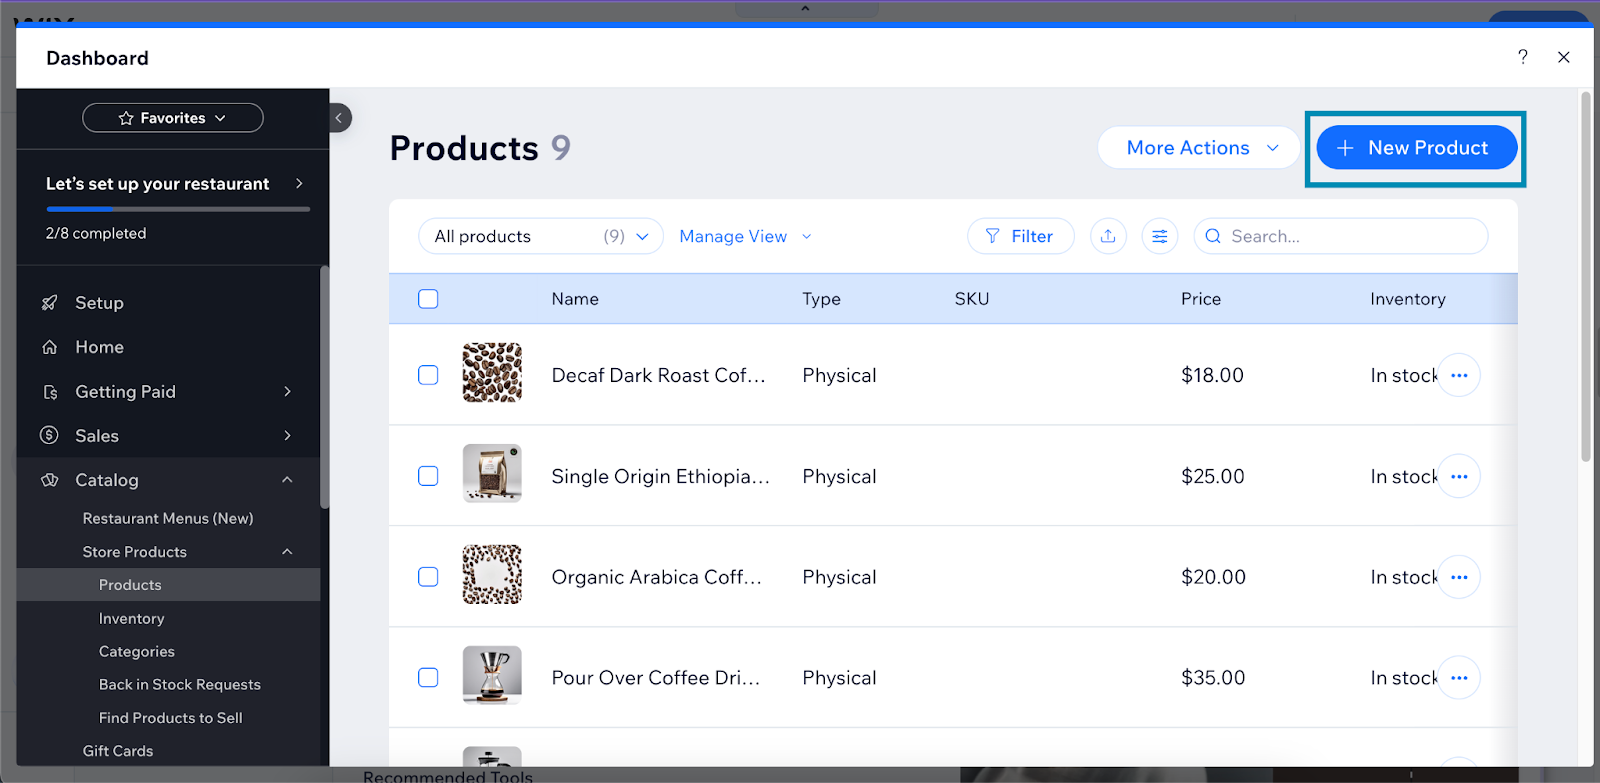
Now that that’s settled, setting up your online store is simple. First, open the “My Business” menu from the navigation bar (it’s the icon with two squares and a gear), then click on “Manage Products.” This will open a window where you can manage your products. You’ll also find some sample products already listed.
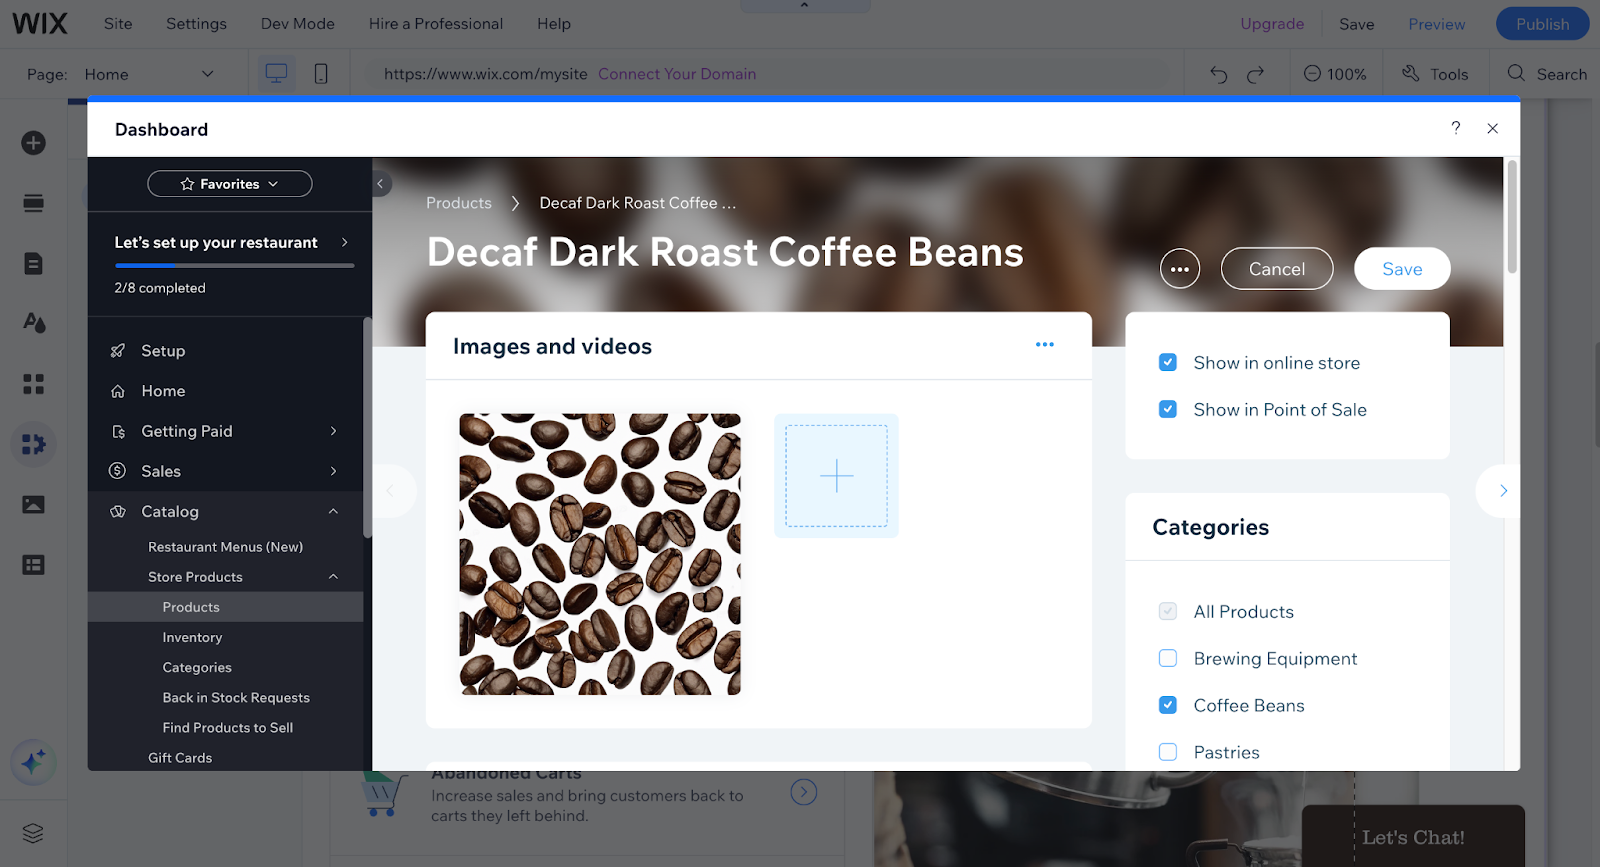
Simply edit the names, prices, and images of those sample products or add new ones by clicking on the “New Product” button. After adding each product, click “Save.” They’ll automatically be saved to your online store.
Setting Up Your Menu
Meanwhile, if you own a food establishment, you can also set up your menu in the same dashboard. This is a new feature with Wix and is very useful if you want to accept orders through your website. However, as with making transactions, you can only receive orders once you upgrade to a paid plan. On the free plan, the most you can do is showcase your menu items.
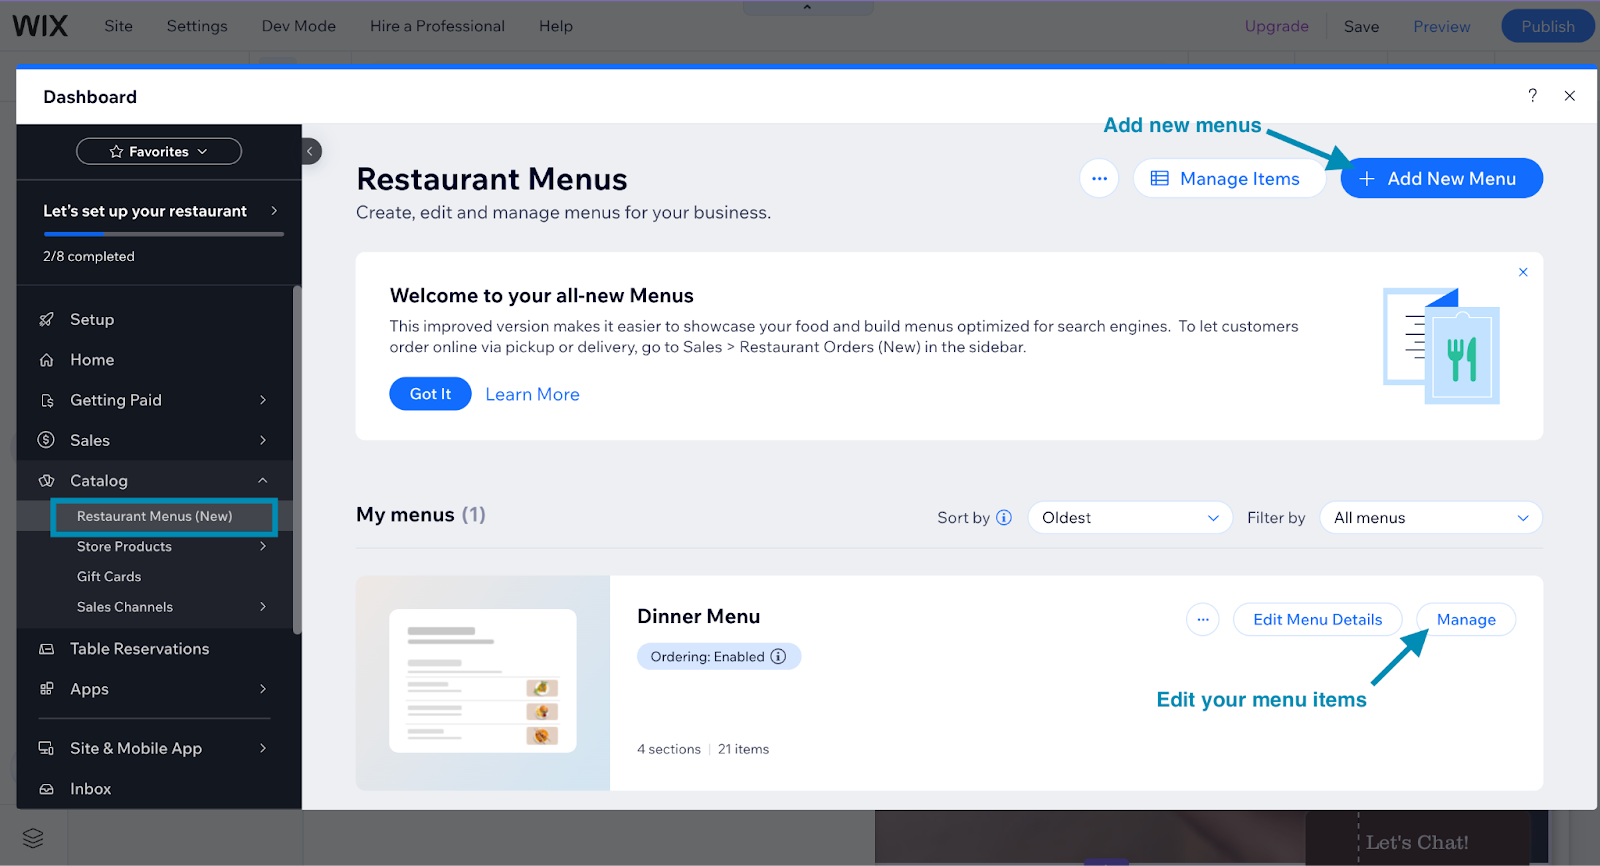
On the same dashboard, click on Catalog > Restaurant Menus. You’ll find a sample menu you can edit, or you can add new ones (for example, if you have breakfast, lunch, and dinner menus) by clicking on the “Add New Menu” button. Then, click on “Manage” to add your menu items.
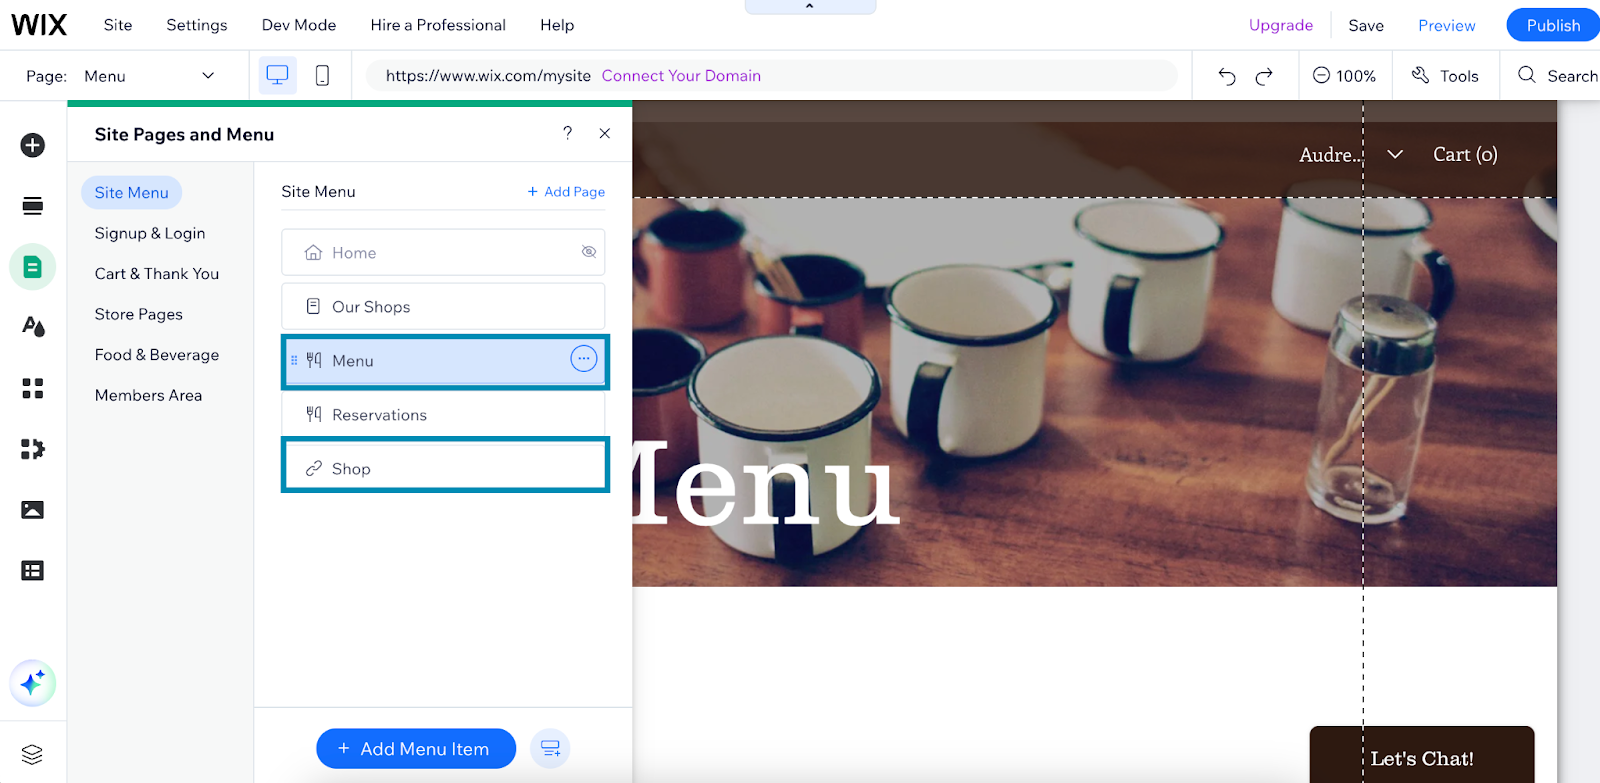
When you’re done setting up your store or menu, click on the “X” button in the upper right corner to exit the dashboard. You’ll automatically find your store or menu where you placed them on your website. For example, I chose to place my menu and online store as separate pages on my website.
8. Set Up Your SEO
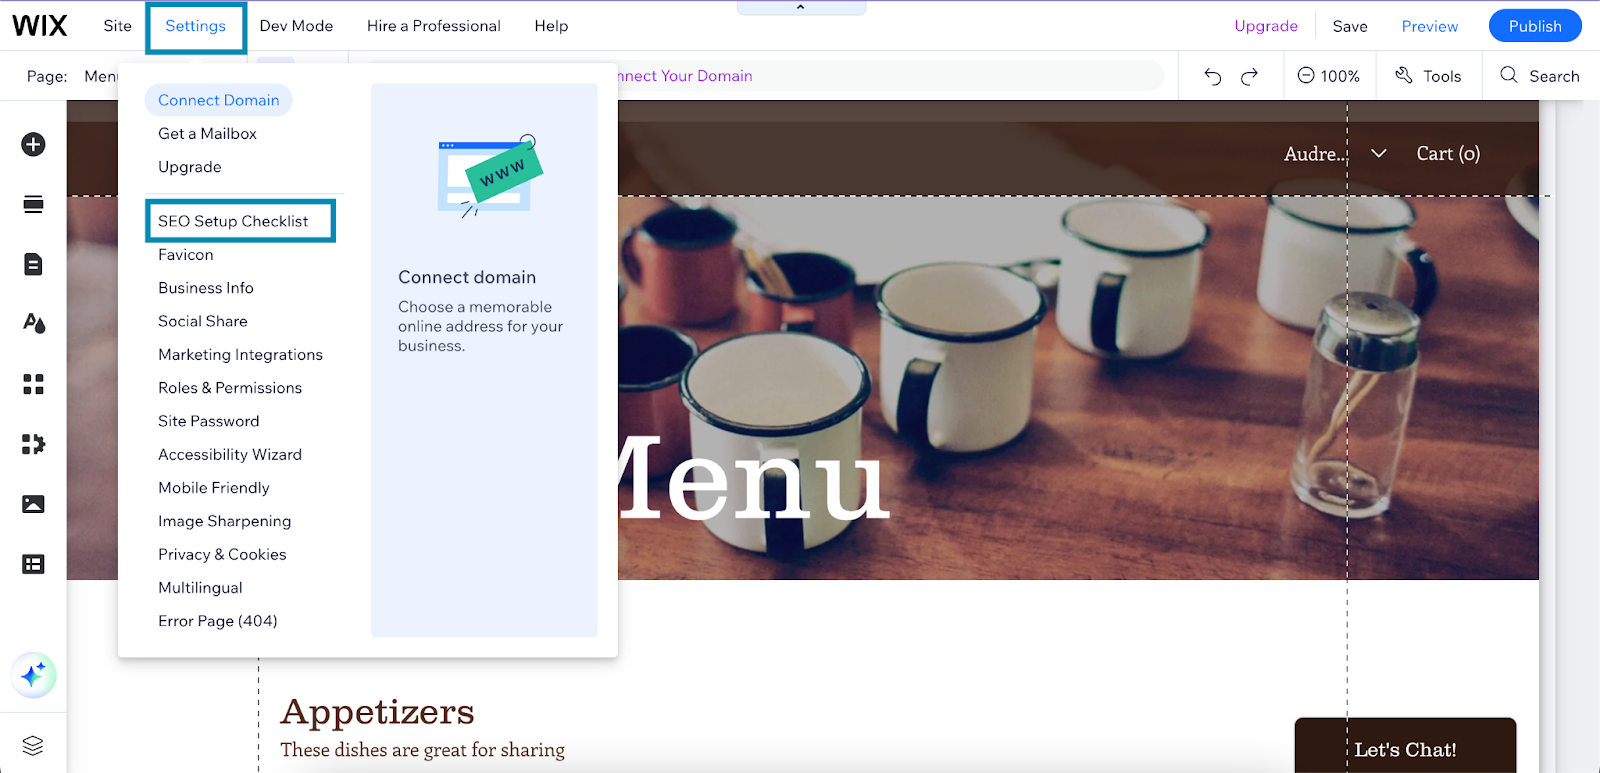
The next step is setting up your site’s SEO. As mentioned, one of the best benefits of creating a website with Wix is it has a built-in SEO checklist that you only need to complete. To access it, click on “Settings” on the upper part of your website and then choose “SEO Setup Checklist.”
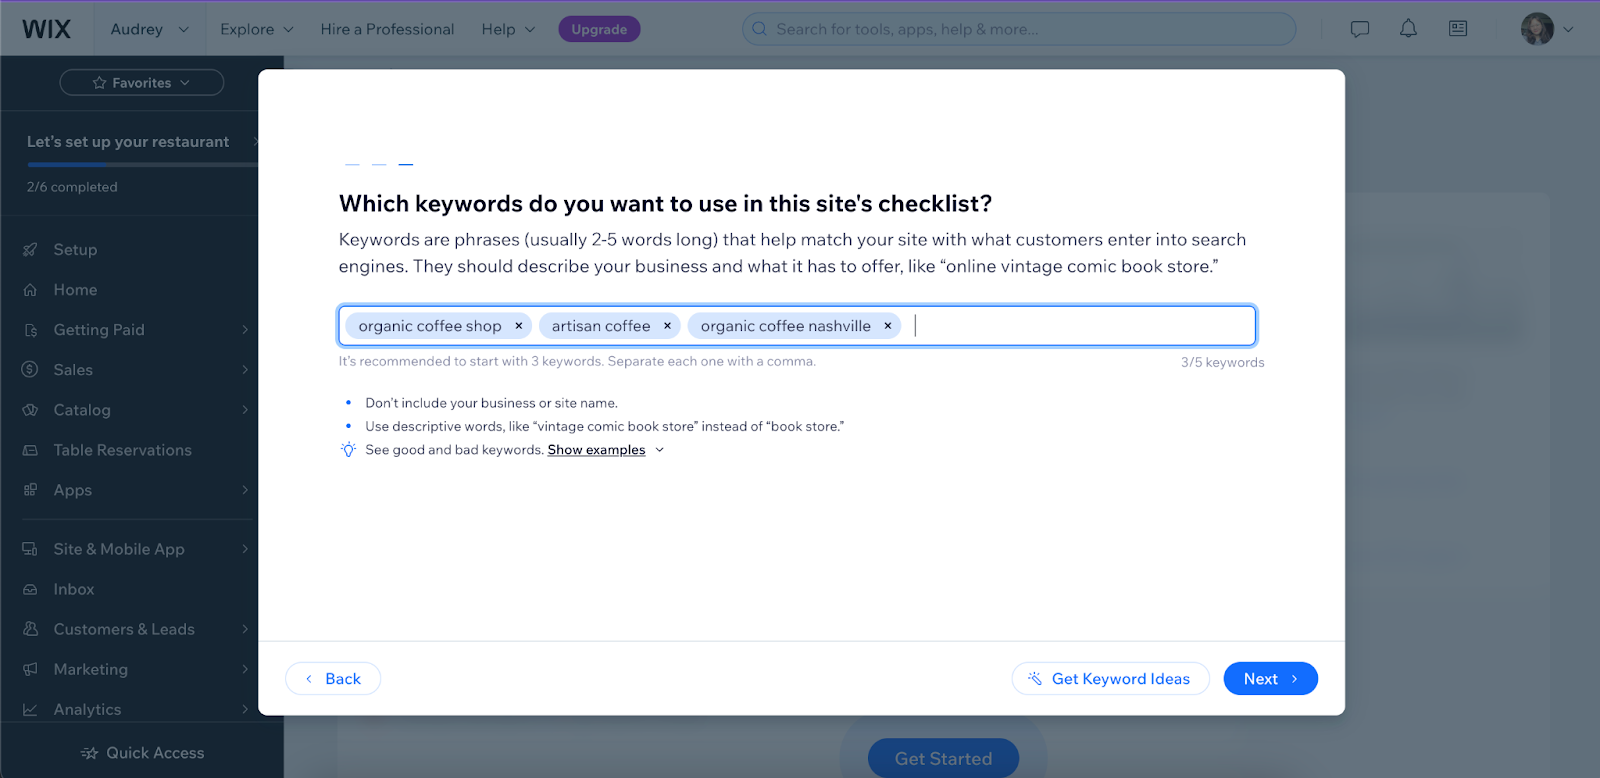
This will take you to your SEO dashboard, where, as I’ve mentioned, you only need to follow Wix’s prompts to set up your site’s SEO. These will include setting up your site’s name and primary keywords.
After your SEO basics are done, you can (and should) also set up your home page’s title and description, enable indexing to let your site be discovered by search engines, and connect to Google Console. Also, test all your links to ensure they work properly and add alt text to all your images.
These are all essential parts of search engine marketing and will help your site be more easily discovered on search engines, eventually building your brand presence. You can do all these inside the SEO Setup Checklist.
Pro Tip: Use descriptive keywords for your website. For example, I used “organic coffee shop” instead of just “cafe.” If you have a physical location, also include it in your keywords (for example, “organic coffee Nashville”).
Keywords like these make your site more easily discovered by the right people searching for them. If you need help finding the right keywords, use keyword research tools like Semrush and Ahrefs, which are free.
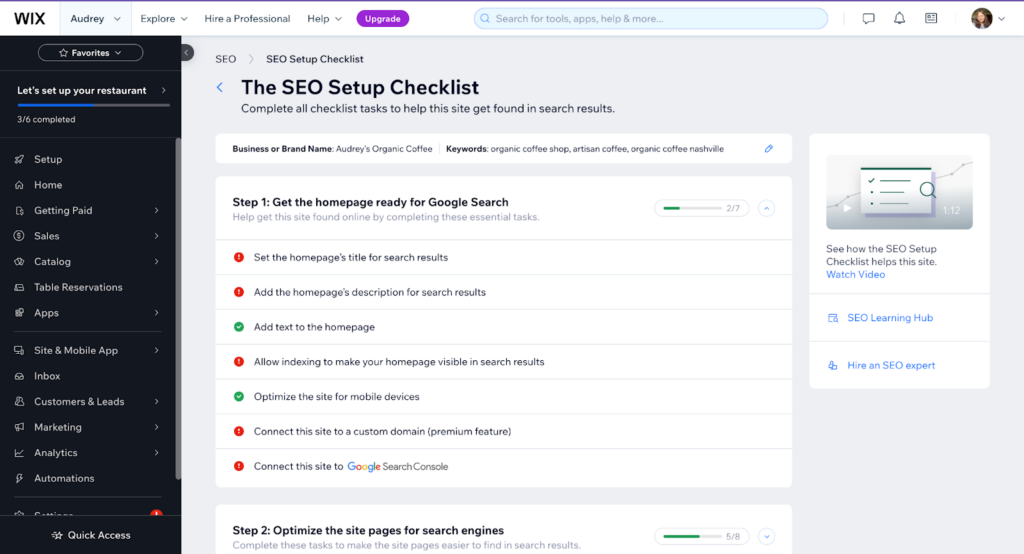
Your SEO setup checklist—complete them all to build a website that’s search engine-ready.
9. Add Other Elements to Your Site
After setting up your SEO, you’re nearly at the end of the website-building process. But first, there are a few more elements you need to add and review to make sure your site is the best it can be. The steps above will help you make a Wix website, but if you want to stand out among the hundreds of others, I recommend adding a few extra details, like customizing your header and footer and adding forms to capture leads.
- A header and footer: These go at the top and bottom of your site. When designing websites, I usually place the website menu, login bar, shopping cart (if necessary), and brand logo on the header. Meanwhile, social media links, addresses, and basic contact details often go in the footer.
- Lead capture forms: This is especially important if your main objective is to generate leads. But even if it isn’t, lead capture forms are a good way to keep people engaged with your brand. Use them to get people to sign up for a newsletter, a free trial, a product demo, or any other experience that requires their email address.
- Your other brand identity elements: If you look at Apple.com’s website, you immediately know it’s Apple. Aside from just uploading your logo to your header, your site should also reflect the other elements of your brand identity, like your brand colors, design motifs, and fonts. Your website is one of the main avenues to promote your brand, so use it well.
- Other Wix apps: The features above aren’t the only ones available on Wix. There are dozens of apps in Wix’s app marketplace for everything from managing reviews to generating QR codes. For example, I find its Social Media Feed app helpful for integrating businesses’ social media feeds into their sites. Aside from those mentioned, Wix also has apps for loyalty programs, countdown clocks, audio streaming, and many others.
- A favicon: Your favicon is a small icon (usually your brand logo) representing your site on search engine tabs. It’s a small detail that significantly affects your site’s credibility and makes you look all the more professional. You can upload your favicon under the Settings menu.
10. Review & Publish Your Site
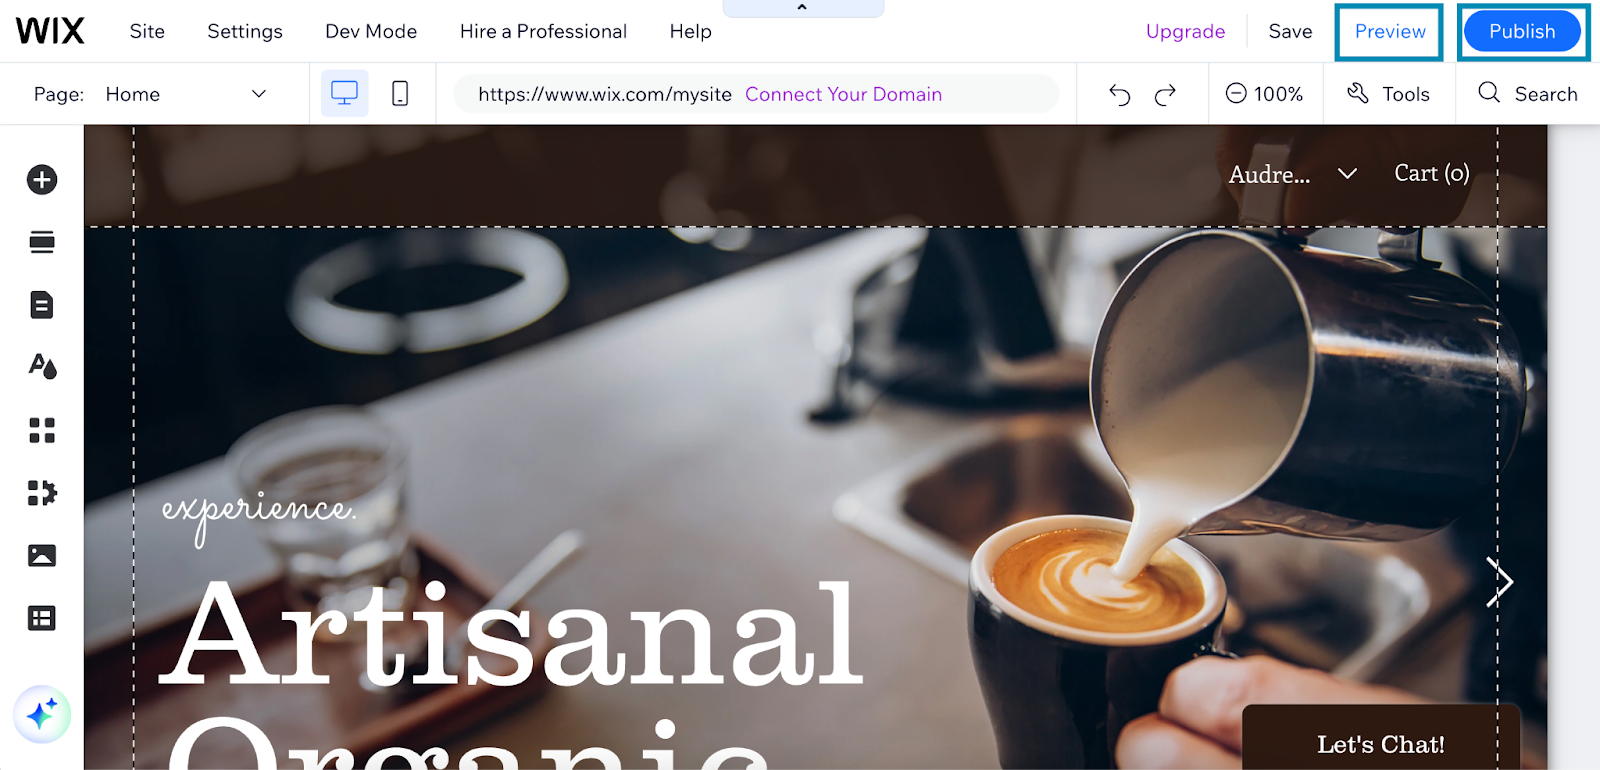
When you’re done adding these extra features, do one final check of your website to ensure everything is functioning well. You can also click on the “Preview” button on the upper right corner of the drag-and-drop editor to preview how your looks on desktop and mobile. Then, when everything looks and functions to your liking, go ahead and click “Publish” to let your site go live. It’ll automatically be published and ready for people to visit.
Optional: Upgrade Your Site for More Features
Learning how to create a free website with Wix is easy, but there are a few limitations. The biggest of them is the lack of a custom website domain, as your free site will be on a Wix subdomain (for example, yoursite.wix.com).
This makes you look less professional and is detrimental to your overall online presence in the long term. Another major drawback is you won’t be able to make transactions via your site if you have a store or restaurant. What you’ll have is a very basic site with limited functionality.
Therefore, my best recommendation is to upgrade your Wix site to a paid plan if you want your website to be taken seriously. A paid version gets you a custom domain (free for one year), transaction and ordering capabilities, and more marketing features. It also allows you to monitor your site analytics, such as how many people are visiting your site each month and what buttons and links they’re clicking on most.
Wix Website Plans
Free | Light | Core | Business | Business Elite | |
|---|---|---|---|---|---|
Cost | $0 | $17/month | $29/month | $36/month | $159/month |
Online Transactions | X | X | ✓ | ✓ | ✓ |
Online Ordering | X | X | ✓ | ✓ | ✓ |
Custom Domain | X | ✓ | ✓ | ✓ | ✓ |
Users | 1 | 2 | 5 | 10 | 15 |
Storage | 500MB | 2GB | 50GB | 100GB | Unlimited |
You can upgrade your plan by clicking on the “Upgrade” button in the upper-right corner of the drag-and-drop editor (next to the “Preview” and “Publish” buttons. Plans are on a monthly basis, and you can cancel anytime. However, I always advise small businesses to look at their website as an investment, especially in the digital age.
It’s simply a non-negotiable if you want to stay competitive. If you want a more in-depth look at its features, visit the Wix website or read our Wix review for our feature breakdown.
Wix has long been one of our best small business website builders here at Fit Small Business. However, if you’re still deciding on the best platform for your site, some of Wix’s best alternatives include GoDaddy, IONOS, and WordPress.
- When it comes to content management systems, Wix’s greatest rival is the long-standing WordPress. An industry leader in content management, WordPress boasts hundreds of plugins and apps and virtually every function you need from a website. Evaluate WordPress vs Wix.
- Meanwhile, GoDaddy has leverage over Wix in terms of appointment booking, although its SEO isn’t as advanced. Compare Wix vs GoDaddy.
- Finally, if you have an ecommerce-first business, your best option might be Shopify, which is an online store platform. We go into the pros and cons of each platform in our Shopify vs. Wix comparison.
Frequently Asked Questions
Yes. Simply log in or sign up for a Wix account, then follow the prompts to create your website. You can use Wix’s AI site builder or one of its 900-plus templates, both of which are free. On your free website, you can create a blog and list your store products or menu. However, you won’t be able to make online transactions or accept orders—you’ll need to upgrade to a paid plan, which also gets you a custom domain so your site isn’t hosted on Wix’s subdomain (i.e., yoursite.wix.com).
Setting up a website with Wix is completely free. However, to enable online transactions and ordering and to get a custom domain, you’ll need a paid plan. There are four plans to choose from: the Light plan costs $17 a month (but doesn’t support ecommerce transactions), the Core plan ($29 a month), the Business plan ($36 a month), and the Business Elite plan ($159 a month).
Higher plans have more storage space and advanced features, but all come with a free custom domain for one year and a 14-day money-back guarantee.
Wix is one of the easiest platforms to build a website, suitable even for beginners. Knowing how to build a Wix website only takes signing up for an account and then answering some questions about your website. You can use Wix’s AI website generator, which builds a site based on your answers to its prompts, or start from scratch using a template (Wix has over 900).
Either way, you’ll also be able to customize your site easily in Wix’s drag-and-drop editor, which also has sections for building an online store, restaurant menu, and blog. When you’re done, you can immediately publish your website.
Bottom Line
I’ve built many websites on many platforms, and Wix is one of the simplest and most user-friendly. It’s still my go-to recommendation for any small business or freelancer looking for an all-around website builder that’s simple, reliable, free to start—and has all the essential features needed to grow an online presence.
Wix offers an online store, orders and reservations, blogging, and some of the best SEO tools. It’s also versatile: Whether you have a fully online business or just a simple portfolio, Wix has the tools to help.
