Selling on Facebook is easy using the Shops feature included with every free Facebook Business Page.
Selling on Facebook Shops & Facebook Marketplace in 2025
This article is part of a larger series on Retail Management.
Facebook still leads the pack as the preferred social commerce platform in the US, with 20.6%1 of online shoppers using it for shopping. Its popularity spans age groups—34%2 of Gen Z use the platform for shopping on Facebook Marketplace, which resonates with their values of sustainability and affordability.
It is a clear advantage for retailers to learn how to sell on Facebook on top of having an online store. Selling on Facebook involves having a dedicated Facebook page for the business (not a personal page) and either connecting an ecommerce platform to Facebook or manually building a Facebook Shop.
You can also sell through Facebook Marketplace, the platform’s answer to competitors like eBay and Craigslist. Think of it as the classified ads section of Facebook. Selling on Facebook Marketplace can particularly help individuals and businesses sell items locally.
I recommend the following:
- Sell on Shops if you want to leverage selling items on Facebook while maintaining an online store. Shops also helps you set up a single online store for your customers to access on both Facebook and Instagram and sell through the chat features of WhatsApp, Messenger, and Instagram.
- Sell on Facebook Marketplace if your primary goal is to sell and reach your local market. It is also great for selling gently used, surplus, and limited (or one-off) products, making it great for recommerce. If you have a Facebook Business Page and a Shop with checkout, you can sell as a business on Marketplace (currently limited to US merchants).
I show you how to sell products on Facebook and tackle how to sell on Facebook Marketplace, too, in this step-by-step guide.
How to Sell on Facebook Shops
Since Our Last Update: Since our last update on June 2023, Facebook made the following changes:
- In July 2023, Meta started charging processing fees for sales made using payments available in the platform, except for Shopify merchants, where sales are subjected to the same transaction fees as their online website.
- In December 2023, support for web-based Shops features on Facebook is no longer available and viewable (both from a computer on facebook.com or from mobile web on m.facebook.com). Facebook Shops are exclusive to the Facebook mobile app.
- In April 2024, Facebook mandated that all Shops must use checkout On Facebook and Instagram.
All changes are reflected in the step-by-step instructions I outline below.
This section shows you how to sell products on Facebook through Shops in five steps. But before learning how to sell on Facebook as a business, you must check for compliance and set up a Facebook business page.
Before you begin setting up your Facebook Shop, ensure the following:
- Your business sells physical goods that comply with Facebook’s merchant agreement and commerce policies.
- You are a Business Manager admin.
- You consider setting up a business account on Instagram that is connected to a Facebook Page you manage. The apps work well together to sell to customers, so you may need this to help sell items. Learn how to set up a business account on Instagram.
- Your Facebook Page and Instagram business account (if you set one up) are connected to the same Business Manager account. If you haven’t already, create a free Facebook Page for your business. You can’t create a Facebook Shop from a personal Facebook account because it’s available only on Pages.
- You have managing permissions for your Facebook Page.
Step 1: Create a Facebook Business Page
To set up a Facebook Shop, you must create a free Facebook Page for your business. You can’t create a Facebook Shop from a personal Facebook account because it’s available only on Pages.
A separate Business Page is required to create a Facebook Shop. A Page offers many marketing advantages over personal accounts, including the following:
- Providing a way for your customers to find your business and follow your professional posts
- Giving you a huge array of free marketing opportunities
- Offering a wide variety of budget-friendly advertising tools
- Letting you sell your products directly to a huge audience of more than 2.96 monthly billion Facebook users right from your Facebook page
Step 2: Add a Shops Section through the Commerce Manager
Whether you have an existing online store on a different platform or plan to use Facebook Shops exclusively, you must set up your Commerce Manager. This is where you will initially set up your Facebook Shops or connect your ecommerce platform.
Note: If you are new to selling on Facebook, you’ll likely be managing your business from the Meta Business Suite. For those that have had experience with launching ads on Facebook, you might be more familiar with the Facebook Business Manager. Don’t fret—the two are basically the same.
Facebook routinely transitions users to its new platforms automatically. If you prefer to work with the more familiar Facebook Business Manager, follow the guide to switch from Meta Business Suite to Business Manager.
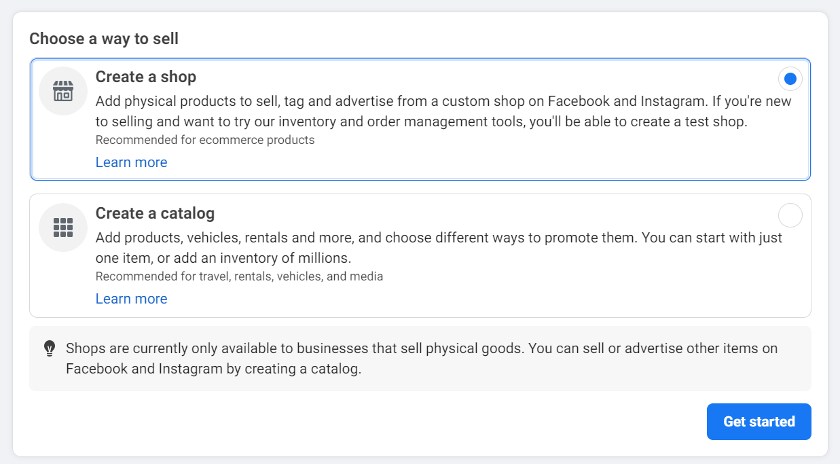
To add a Shops section, log in to the Commerce Manager. Select Create a shop to sell physical goods or select Create a catalog to sell or advertise other items (like travel, rentals, and media). Then click Get Started.
Step 3: Enable Checkout On Facebook & Instagram
For US-based businesses, you must select checkout On Facebook and Instagram or your shop will not be supported. You need a US bank account and business address to enable checkout. In addition, you are required to present the following information to set up checkout on Facebook or Instagram:
- Business category and type
- Business address in the US
- US Bank account details for collecting payouts
- State Tax Registration Number for every state where the business operates, for tax purposes
- Federal Tax Identification Number that matches the business representative’s name for financial reporting
- Business representative’s personal or business identity information to verify the authenticity of the business
- Shipping options, return policy, and a customer service email to set up customer service
Checkout On Facebook and Instagram comes with the following benefits:
- Payment information is stored once a customer checks out on Facebook, so they don’t need to reenter it each time. Customers also don’t need to create any new accounts to complete a purchase.
- Payment information is stored securely. Customers can purchase without needing to log in to a different website.
- Sellers can do the following:
- View payouts, manage finances, fulfill orders, and process returns
- Offer Purchase Protection to customers
- Use Inbox to respond to customer messages
- Review your delivery and customer service performance
Selling Fees on Facebook Shops
For sellers that created their Shops via the Commerce Manager, Meta will deduct the following fees from payouts automatically:
- Card transactions: 2.9%
- PayPal branded checkout: 3.49%
- Shop Pay: 2.9%
Meta’s processing fee includes the payment processing fee, applies to all checkout transactions on Facebook Shops, and is subject to applicable fees and taxes.
For chargebacks, Meta applies a $20 chargeback fee on top of the transaction amount if the card issuer decides a chargeback in the customer’s favor.
NOTE: If you plan to connect a Shopify account to Facebook, your processing fees will be handled by Shopify directly for sales on Facebook and Instagram.
Step 4: Evaluate Your Options for Selling On Facebook
Now that you’ve created your shop and enabled a payment method, you must evaluate your options for selling on Facebook. You can choose between two methods: selling via the fully integrated Facebook Shop or by connecting your existing online store to Facebook and syncing your products.
Using Facebook Shop Exclusively
You can enter products for sale directly to your Facebook Shop for free. Facebook has clear instructions that walk you through every step. If you sell just a few items or only want to sell through Facebook Shops, this might be all you need.
One downside is that you have to manually manage orders, and this can be time-consuming if you move many products. Another con is that you will only be selling through Facebook, so you’ll have no other sales outlets.
Syncing an Online Store/Ecommerce Platform
Top ecommerce platforms like Shopify let you list and sell products in Facebook Shops (plus many other places, if you wish). What these platforms offer over the Facebook-only option is a full suite of product listings and automated order and shipping management tools designed to save you time.
Time-saving benefits aside, the biggest plus is that you can sell just about anywhere using an ecommerce platform—such as with your own website, Amazon, eBay, Pinterest, and blog posts. They also make every ecommerce task as quick and automated as possible, from product entry to shipping updates.
The biggest downside is cost. In most cases, you’ll need a monthly paid account with an ecommerce provider such as Shopify. You can read my top picks for best ecommerce software if you are keen to go down this route.
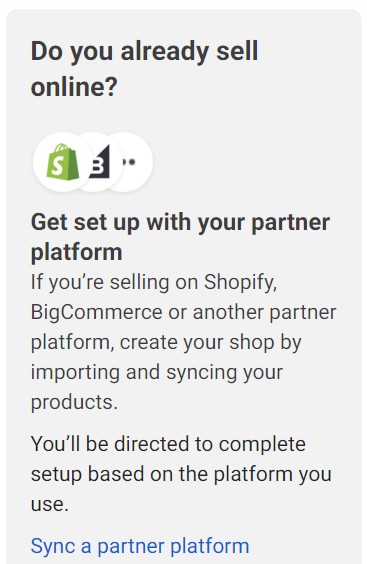
To sync an online store/ecommerce platform, add a new commerce account for your business and select ‘Sync a partner platform’, as shown below.
Step 5: Add Products to Your Catalog
Once you’ve set up your Commerce Manager account and connected your Facebook Page, you can start adding products to your catalog.
- A Facebook catalog is where all your product information (such as product titles, images, prices, descriptions, etc.) and inventory can be found.
- You can manage your catalog using the Catalog Manager tools found under the Catalog tab in your Commerce Manager sidebar menu.
- You can set up a catalog for physical goods as well as travel, real estate, auto, and entertainment/media.
There are multiple ways to add products to your catalog—via manual upload, CSV import, Meta Pixel (formerly Facebook Pixel), and syncing with an ecommerce platform. The method you choose depends on several factors—your inventory size, inventory type, and how frequently it changes.
Catalog Setup Methods
Via Manual Upload | Via CSV Import | Via Meta Pixel | Via Syncing with Ecommerce Platform | |
|---|---|---|---|---|
Inventory Size | Small, doesn’t change often | Medium to large, changes often | Medium to large, changes often | Small to large inventories, changes often and have multiple selling locations |
Inventory Type | Products, flights, destinations (hotels), vehicles | All inventory types | Products only | Products only |
Effort to Set Up | Low | Medium | High | Medium to high, depending on ecommerce platform |
Recommended If | Your inventory is small and doesn't change often | You want to set up scheduled uploads hourly, daily, or weekly | Your inventory is large or changes often or you already have a pixel installed on your ecommerce website | You have multiple selling locations and inventory sync is crucial |
Best For | Small business with few products | Direct to consumer (DTC) retail selling | Businesses that run dynamic ads on Facebook | Businesses that already have an existing online store |
Expand the sections below for more detailed information on catalog setup methods:
- Step 1: Go to the Commerce Manager and select your catalog.
- Step 2: Click on Add items.
- Step 3: Select Manual as your preferred catalog option.
- Step 4: Enter product information in the corresponding fields.
- Step 5: Add categorization details about the product—such as its condition, brand, and tax category.
- Step 6: Add delivery options and return policy information.
- Step 7: Add product variants, such as colors or sizes.
- Step 8: Once you’ve finished, click Upload items.
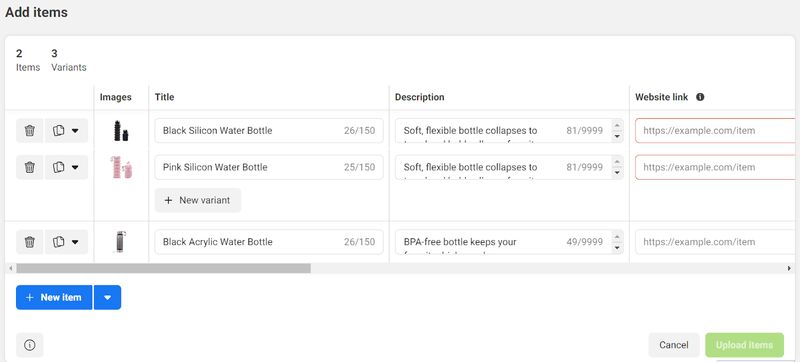
Ensure to enter as much information as possible in the product fields to set up your store items.
For more information, read Facebook’s step-by-step guide on adding products to a catalog manually.
A data feed enables bulk uploading of items using a spreadsheet file. You can upload a file once or set up a schedule to update your catalog automatically on a regular basis.
If you need a template, follow Facebook’s guide on how to download a data feed template.
- Step 1: Go to the Commerce Manager and select your catalog.
- Step 2: Open the Catalog tab on the menu sidebar and go to Data Sources.
- Step 3: Select Add Items. If a dropdown appears, select Add Multiple Items.
- Step 4: Select Data Feed, then select Next.
- Step 5: Under Are you ready to upload your spreadsheet or file?, select Yes. If you don’t have a file ready, learn how to create one using Facebook’s tutorial.
- Step 6: Choose how to upload your file (from computer, a URL, or Google Sheets), then proceed to upload.
- Step 7: Select Save Feed and Upload.
This guide covers uploading items in bulk for the first time. If you need to update your data feed, read Facebook’s guide to updating an existing feed file.
Meta Pixel (formerly Facebook Pixel) is an analytics tool that enables you to measure the effectiveness of your advertising by understanding the actions people take on your website.
When installed, you can run ads and ensure they are shown to the right people depending on your campaign. You can target new customers or people who have visited a specific page or taken a desired action on your website.
To connect an existing pixel to your catalog to add items from your website, follow these steps:
- Step 1: Go to Commerce Manager and select your catalog.
- Step 2: Open the Catalog tab and select Data Sources.
- Step 3: Select Pixel as your preferred catalog option.
- Step 4: Select Add Items. If a dropdown appears, select Add Multiple Items.
- Step 5: Select the pixel you want to connect and then Next.
- Step 6: Select Add Trusted Websites and enter the website domains you trust to use as sources for your item information. Don’t include the http:// or www (example: pitbull-andy.com). Select Save and then Next.
- Step 7: Select your default currency (USD). Select Next.
Your connected pixel will then appear in Data Sources. It may take up to 24 hours to be ready.
For more information, read Facebook’s step-by-step guide on adding products with a Pixel.
If you already sell online, you’ll be glad to know that Facebook has partner platforms that can sync with your Facebook Shop.
If you host your products on a partner platform like Shopify, BigCommerce, or WooCommerce, you can import them to a Facebook catalog and continue managing your products on your partner platform. Your updates will sync to Facebook on a regular basis.
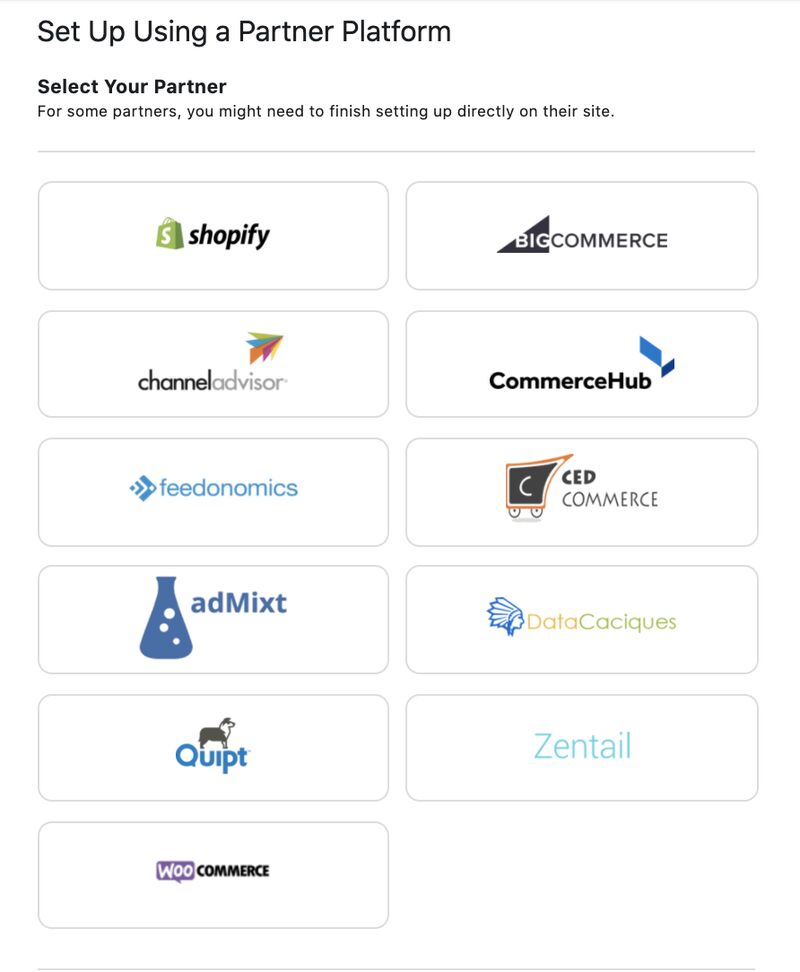
With these partner platforms, you can easily integrate your Facebook shop to sync items.
Facebook has different steps for each provider. Follow the steps on your partner’s website to connect your account with Facebook. You’ll be directed to complete the setup based on the platform you use. If you have an existing store that’s not on an ecommerce platform listed above, contact your platform’s support team to ask if they have a Facebook integration or check its Help Center.
If you’re looking to launch Facebook Shops with a standalone website from the get-go, you’ll want to consider the following full-featured ecommerce store platform plans. You can see a more detailed comparison in our article on the best ecommerce platforms.
After all of the above is complete, and your Shops section appears, you probably won’t see your products immediately. Facebook reviews all new Shops to ensure images and content meet Facebook Shop guidelines—essentially, you need images and accurate descriptions for each product.
It can take 24 to 48 hours for your Shop to be approved and populate the Shop section. Once approved, as you add new products, they should appear within 20 minutes or so. If not, you can resynchronize your listings from your store dashboard to send new items to Facebook.
Step 6: Market Your Products for Facebook Shop Success
Now your Facebook Shop products are primed and ready for promotion to your Facebook followers and countless potential customers.
With your products already housed on Facebook, you can easily and quickly select certain products or groups of products to promote via Facebook posts and ads. Then, you can market your products organically and through paid advertising.
Create Great Product Listings
Starting an online store can take some time, but it’s relatively easy to do. You’ll need to not only brand your store, but you’ll also have to market it.
Most search engines pull in your product descriptions when a user searches for a particular product. This means you must also create accurate, detailed descriptions.
To create your product listings, you must assemble four key components:
- Good product images: A fancy camera or professional photography is not necessary to have great product photos. You may only need your mobile phone. Learn how to take great product photos even at home.
- Detailed product descriptions: Don’t be shy when describing your products. Good descriptions should be chock-full of details that sell your product, plus any sizing, measurements, weights, or other necessary details. Learn how to create product descriptions that sell.
- Product size and weight information: These numbers can be entered with your product information in most ecommerce systems, so you can print accurate shipping labels. It’s optional but can be useful.
- Product numbers or inventory SKU numbers: You may wonder why Facebook Marketplace asks for stock-keeping unit (SKU) numbers—these are product codes that help track products in your online store.
Download our e-book on product photography so you can learn how to take quality photos at home. We show you how to take different types of product photography shots as well as give you the basics of a DIY photo studio.
Run Ads, Promos & Campaigns
Facebook shared its list of advertising essentials to boost the return on investment of advertisers’ campaigns. Here are the key points:
- Aim for ad frequency of one or two times weekly; it is four times more effective than getting a single ad out every two weeks.
- Produce mobile-optimized ads (generally, more vertical images and videos), it generates almost twice (1.9 to be exact) more ROI.
- Take advantage of Facebook’s automatic ad placements. Eight or more placements is three times more effective than campaigns with only one to three placements.
- Have your brand logo visibly displayed in your creative campaigns to increase your ROI five times, ideally within the first two seconds of the ad.
- You can use sound to enhance your ad, but note that your ads should still be understandable without the sound for users who browse Facebook with the sound off on their devices.
There are many ways—both free and paid—that you can market your Facebook Shop products to followers and larger audiences, including the following:
- Featuring products and specials via boosted posts—which are regular posts that, for a small fee, can reach a large, targeted audience.
- Running Facebook ad campaigns with featured products.
- Distributing offers and hosting contests to engage your audience and attract new viewers to your page and Facebook Shop products.
Consider Facebook’s paid advertising opportunities to give your business maximum exposure for a relatively small investment.
How to Sell on Facebook Marketplace
After you have a Facebook Shop, you can boost your store visibility by adding Marketplace as a sales channel. According to Facebook data, more than one in three US Facebook users buy and sell on Marketplace each month. Facebook Marketplace used to be a peer-to-peer shopping marketplace but has expanded to include merchant selling.
Easily add Marketplace as a sales channel by following the steps outlined below. Note that some steps may vary depending on the ecommerce platform you use. We recommend that you check your partner platform or connector for instructions as well.
Note: Marketplace no longer supports the ability to create real estate or rental listings and vehicle listings using a Facebook Business Page as of January 30, 2023. However, free person-to-person listings for vehicle, real estate, and rental listings will still be available.
Step 1: Enable Checkout On Facebook
Before you begin, set up a checkout On Facebook for your shop. If you have a Shopify store, set up a checkout on Facebook on Shopify first so that customers can complete purchases directly from the Marketplace.
Note: Store inventory and order management will still be managed through Shopify but payouts will be processed and sent from Facebook.
Step 2: Add Marketplace as a Sales Channel for Your Facebook Shop
- Step 2.1: Go to your Commerce Manager.
- Step 2.2: Select your shop.
- Step 2.3: In the left-hand menu, click Settings.
- Step 2.4: Click Business Assets.
- Step 2.5: Select Enable Marketplace.
After these simple steps, you’re all set! Listings get approved and usually start to show up in Marketplace within 24 hours. As with Facebook Shop products, all listings must comply with Facebook’s Commerce Policies and Community Standards.
Step 3: Advertise Your Store or Products on Marketplace
Once you add Marketplace as a sales channel, consider advertising to reach more people—even if you don’t plan to post directly on Marketplace.
Simply listing an item for sale isn’t as effective as creating a paid ad to appear when people shop on Marketplace. Marketplace ads are seen when people use the Facebook app on their phones to shop on Marketplace.
To create an ad for Marketplace, follow these steps:
- Step 3.1: Go to Ads Manager and choose your ad objective. Click Continue.
- Step 3.2: Choose your Destination.
- Step 3.3: Choose your Audience and define your targeting.
- Step 3.4: Choose Automatic Placements or Edit Placements.
- Facebook recommends automatic placement ads because if approved and compatible with your settings, your ad will appear on Marketplace and all other compatible placements on Facebook, Instagram, Messenger, and Audience Network.
- Step 3.5: Set your Budget and Schedule.
- Step 3.6: Choose your ad’s creative format. Follow the recommended video and image specifications.
- Step 3.7: After setting up your ad, click on Place Order.
You can also boost your Marketplace listings.
Tips for Selling on Facebook Shops & Facebook Marketplace
Selling products on Facebook Shops and Facebook Marketplace is a great way to increase sales revenue. Here are some tips to help drive more sales:
- Feature new products or best-sellers first to make the most of the prime space.
- Refresh your collections when you have new promotions, upcoming launches, season changes, or notice a trend among your followers.
- Bundle related products.
- Write clear and concise product descriptions.
- Have your collection titles be enticing to make people want to take a closer look.
- Use full-screen images that work well on mobile.
- For apparel, use images that complete a 360-degree view of the look in a variety of sizes.
- For beauty products, lean into before and after looks or transformations.
- For home and furniture, reinforce products that illustrate dimensions and showcase them in real-life settings.
- Use product tags in your stories and posts.
- Go live! Livestream shopping stats show that there is growing interest in livestream shopping among US consumers. Facebook is a great livestreaming platform to do live shopping or just announce new products or promotions.
- Repurposing your most engaging Live content for shoppable feed posts.
Frequently Asked Questions (FAQs)
Click through the tabs below to get the answers to the common questions about how to sell on Facebook as a business.
Yes, selling goods on Facebook through Shops and Facebook Marketplace is free, but Meta charges processing fees for every sale made. For Shops, fees range from 2.9 to 3.49%. For Facebook Marketplace, fees from 5% to 10% for products sold with shipping, and raised the minimum fee from 40 cents to 80 cents. Local listings sold without shipping (such as through local pickup or drop-off) will continue to have no selling fees.
You can start selling products on Facebook without any subscription or setup fees. However, Meta charges processing fees for every sale you make. For Shops, fees range from 2.9 to 3.49%. For Facebook Marketplace, fees from 5% to 10% for products sold with shipping, and raised the minimum fee from 40 cents to 80 cents.
To start selling on Facebook Shops, create a Facebook business page for your store, open a Shop, enable checkout, and sync products with your ecommerce store if you have one or upload products. Marketing will be a huge part of determining success for your Facebook Shops.
Yes, it is a good idea to expand or add Facebook as a sales channel as it is the top preference for buying on social media by online shoppers in the US.
Yes, you can. Facebook Marketplace is great at selling and reaching your local market. It is also great for selling gently-used, surplus, and limited (or one-off) products, making it a great place for recommerce. Think of it as the classified ads section of Facebook.
Only physical items are allowed to be sold on Facebook Shops. Prohibited items include digital media and electronic devices, alcohol, adult products, financial products, gambling, hazardous goods, ingestible supplements, jobs, animal products, medical and healthcare products, prescription drugs, recalled products, tobacco, weapons, ammunition, and explosives.
Bottom Line
Online store platforms that integrate seamlessly with Facebook offer the easiest Facebook Shop solution, especially if you’re new to ecommerce. From there, Facebook provides many free and paid marketing opportunities to promote your Shop. With a solid ecommerce platform and a good marketing plan, you’ll start to see your Facebook audience grow and, more importantly, start making sales.
Using an ecommerce platform is recommended for businesses selling products on a Facebook Shop and is all but necessary for businesses selling on multiple channels, such as Facebook, Amazon, Google, and through their own websites. Shopify and BigCommerce are Facebook partner platforms that are included in our top picks for the best ecommerce platforms.

