


Square for Retail is one of Square’s industry-specific point-of-sale (POS) systems. Like all Square products, Square for Retail is consistently one of our recommended choices for small businesses, topping our list of the best retail POS systems year after year. It is affordable and easy to use, comes with tons of free tools, and offers advanced plans and add-ons to support you as you grow.
This guide will explore how to use Square for Retail—from setting up the software to managing inventory, ringing up sales, setting up commission tracking, running reports, and improving customer relationships. Create your free Square for Retail account to follow along.
- Setting Up Square for Retail
- Managing Your Inventory
- Opening & Closing the Register
- Ringing Up Sales
- Issuing Refunds & Exchanges
- Managing Discounts & Promotions
- Managing & Tracking Cash
- Receiving & Fulfilling Online Orders
- Running Reports
- Creating Purchase Orders
- Setting Up Commission Tracking
- Using Customer Management Tools
- Using Square for Retail Frequently Asked Questions (FAQ)
- Bottom Line
Setting Up Square for Retail
Once you click the link above and select “Get Started,” Square will prompt you through your account creation, including setting a password and linking an email. It will also ask you to fill out a little information about your business and prompt you to download the Square app so you have access to your POS dashboard on the go and can complete mobile sales.
Managing Your Inventory
Square for Retail offers a complete set of user-friendly inventory management tools that will help you categorize and label your products, monitor stock levels, forecast purchasing needs, manage vendors, and more.
These tools include:
- Low stock alerts: Receive low stock alerts at set quantity levels simply by adding a low stock value to your product page in the designated spot. Alerts appear in your email inbox in 24-hour intervals.
- Barcoding
- Item Categories: Create item variants and categories that you can use to organize and filter your inventory.
- Stock count tools
- Print labels
- Smart stock forecasting
- Automatic purchase orders
- Vendor management
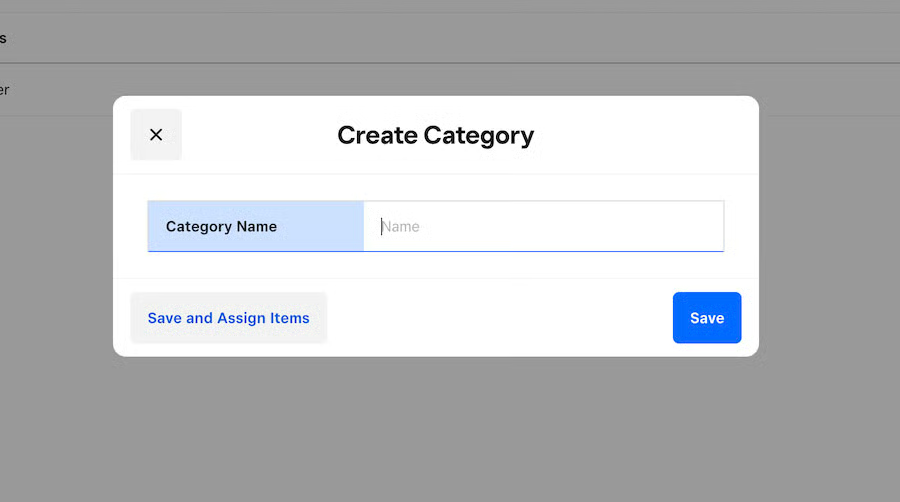
Create product categories in the Categories section of your inventory management library. 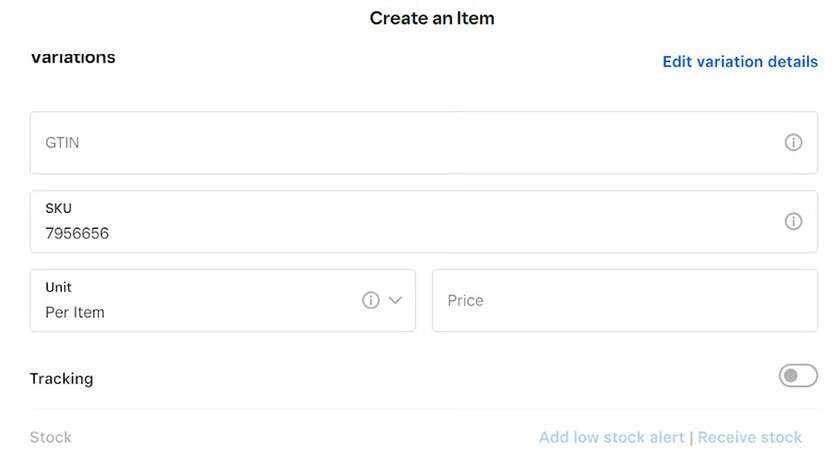
Add custom SKU codes to your products straight from your product pages.


If you are starting at the beginning and haven’t yet added any inventory to your Square for Retail item catalog, check out our article and video on using Square inventory management. As with our setup guide, it focuses on the main Square POS, but many of the steps are relevant to Square for Retail.
Opening & Closing the Register
At the beginning and end of each day, you must perform opening and closing procedures to get your POS up and running and closed for the business day. To start, you or your employees will log in to your POS device using the appropriate login key. Then, if you use cash, you will start by logging your starting cash for the day.
- Step 1: Go to your home screen.
- Step 2: Select the menu option in the upper left corner to view your menu.
- Step 3: Select “Settings” from the menu.
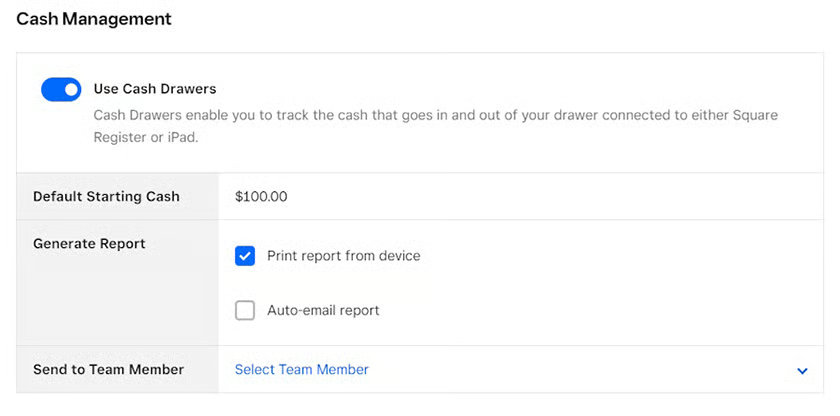
- Step 4: Select “Device Management.” Create or select a device from the list.
- Step 5: Enable cash drawers, and then log the starting cash value in the “Default Starting Cash” field.
- Step 6: Click “Save.” The number you entered will now be the default starting cash value for your cash drawer that is connected to Square Register or your iPad.
From there, you can use your Square register to perform daily transactions.
At the end of your day, you will also want to close your register out for the evening and let your POS system know that you have reached the end of your sales day. To close your register, you will:
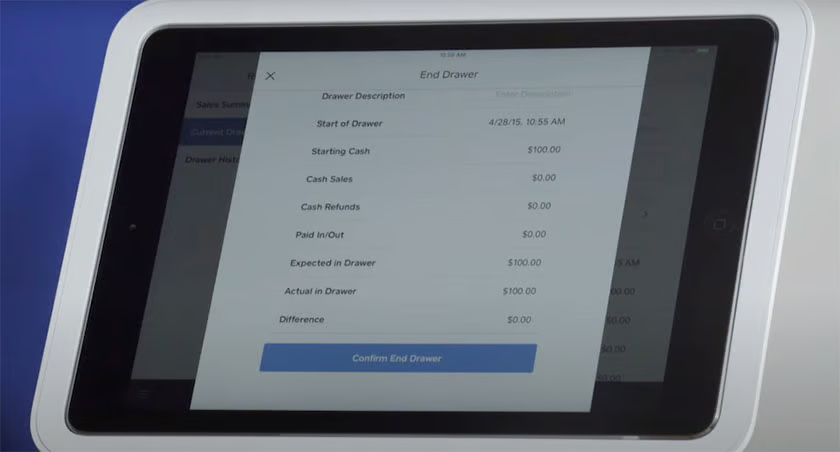
- Step 1: Record your ending cash value by returning to your “Current Drawer” reports
- Step 2: Click “End Drawer”
- Step 3: Enter the “Actual in Drawer” value
- Step 4: Select “End Drawer” to close out for the day
Depending on the email notifications you choose, you will automatically receive an end-of-day report when your register is closed for the day. This means, your staff’s closing procedures are done as soon as they close the drawer for the day and shut down your POS device.
Ringing Up Sales
If you are just setting up your checkout screen on the Square for Retail POS app, Square will immediately prompt you to add custom tiles for products, categories, or actions that you frequently use when ringing up sales. Each person with an individual login code can customize their checkout screen. From there, checkout is easy. Simply:
- Step 1: Add a product to the cart by searching for it or scanning it via its barcode
- Step 2: Add discounts or loyalty information (if applicable)
- Step 3: Add an existing customer to the sale
- Step 4: Charge the customer
- Step 5: Complete checkout
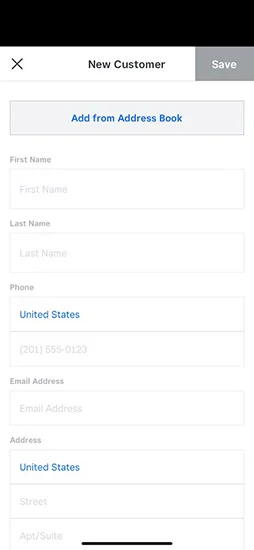
You will have the option to add a customer to your transaction, which will take you to this form where you can add the customer’s information.
Every Square account comes with a free magstripe reader, but you can also use other card processing devices or even the tap-to-pay function, where users can tap your checkout device to pay without using any additional hardware.
In addition to the tools above, with Square checkout you can also:
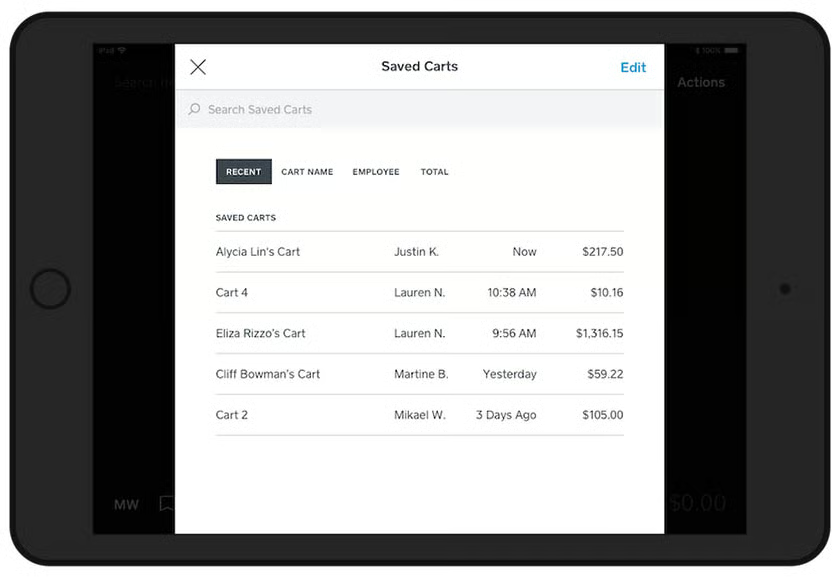
- Save your cart and return to it later: Instead of pressing “Charge” at the end of your transaction, click the three-dot option and select “Save Cart” and return to it later by pulling it from the saved cart list.
- Perform cross-location returns
- Perform exchange transactions
How to Offer Afterpay at Checkout
You can offer your customers buy now, pay later options through Afterpay at checkout from your Square POS dashboard on a PC or mobile device.
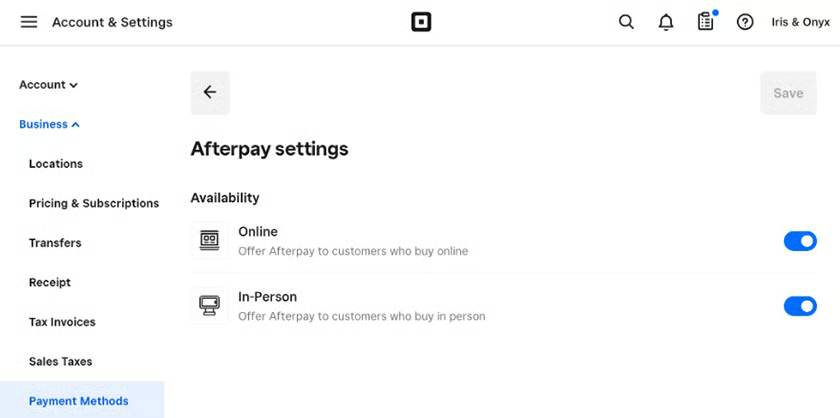
From your PC dashboard:
- Step 1: Select “Account and Settings,” then “Business information” and “Payment methods”
- Step 2: Click on “Edit settings” beside “Afterpay”
- Step 3: Switch the “In Person” setting to ON, and then save your changes
From the mobile app:
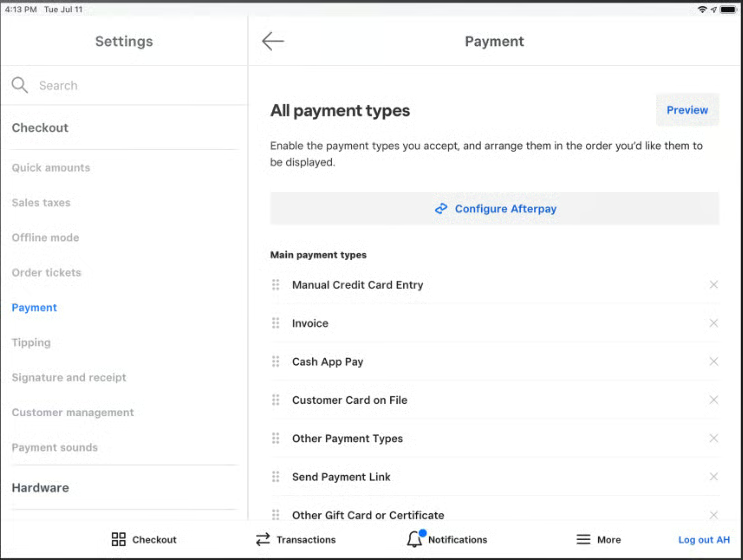
- Step 1: Tap the “More” option, then “Settings”
- Step 2: Select “Checkout,” then “Payment types”
- Step 3: Tap “Configure Afterpay.” The system will then open your Square dashboard in a browser window.
- Step 4: As on PC, switch the “In Person” setting to ON, and then save your changes
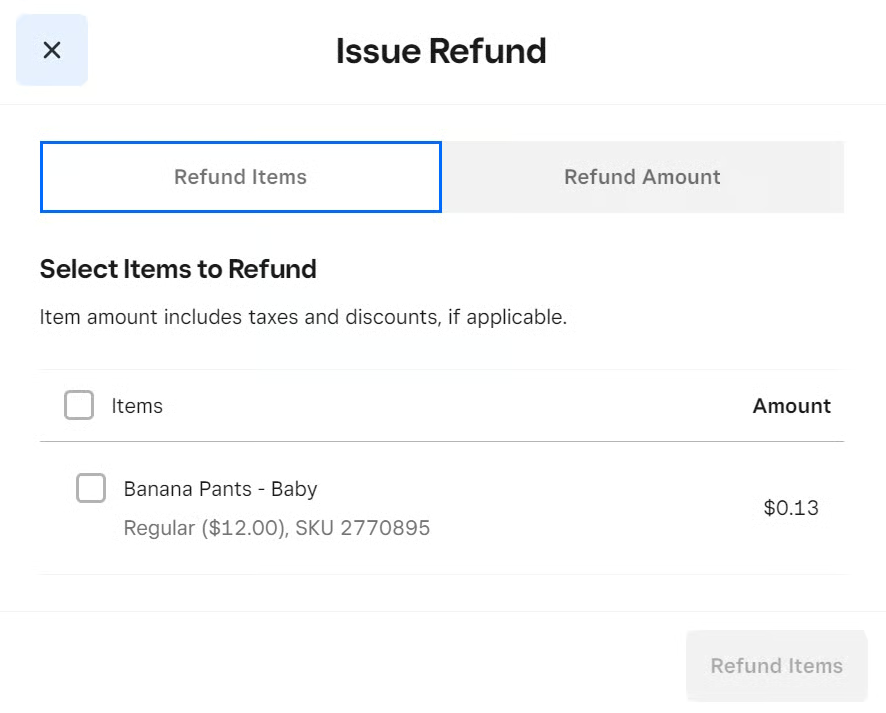
Issuing Refunds & Exchanges
With Square’s checkout, you can perform refunds, exchanges, and even void transactions. To issue a refund or exchange from your desktop POS:
- Step 1: Select “Customers” from your quick tiles or the menu on the left-hand of your checkout screen
- Step 2: Search for and select the customer that is making the return
- Step 3: Click “Activity” to access their transaction history
- Step 4: Select the transaction you are processing the return/exchange for
- Step 5: From the three-dot menu, select “Issue Refund”
- Step 6: Select the items you want to refund. Or, choose the “Refund Amount” option to type in an amount directly
- Step 7: This will take you to the checkout screen where you can
a. Select items to restock if you are adding them back to the sales floor/your inventory (you can also skip this step for damaged goods)
b. Refund the item by pressing “Refund”
c. Use the refund amount as store credit, add new items to the cart, and process the transaction as normal
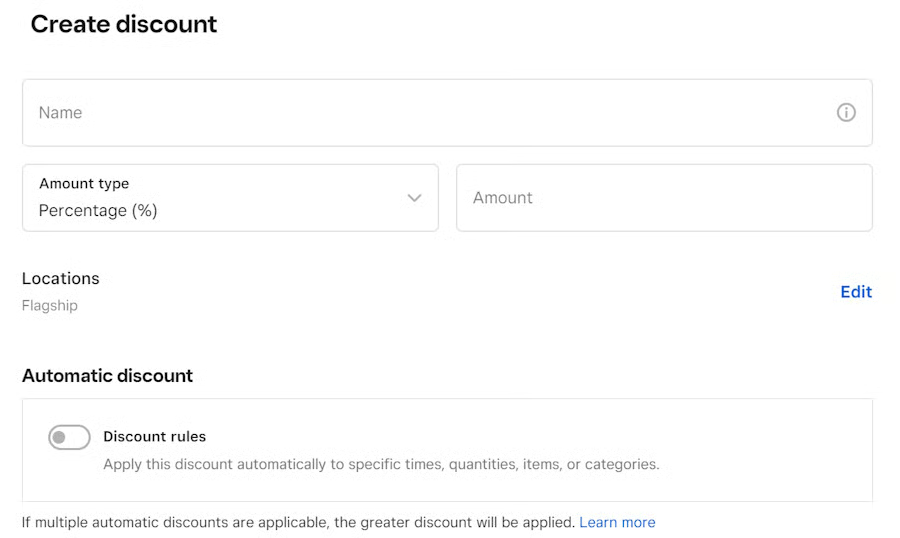
Managing Discounts & Promotions
To avoid employees accidentally offering the wrong discount or promo, you can add specific discounts for them to choose from rather than letting them enter the deals themselves. First, there are many different discounts you can create, including discounts for:
- Entire orders
- Orders over a set amount
- Individual products
- Specific product categories
- Set time frames
To create these discounts, head over to your POS dashboard. From there:
- Step 1: Select “Items”
- Step 2: Select “Discounts”
- Step 3: Select “Create a Discount”
- Step 4: Fill out the form to create the discount name, percentage, applicable locations, and other settings
When your employees go to add discounts or scan items with designated promotions, only the discount options you created will be available.
Managing & Tracking Cash
As we covered earlier, Square opens and closes the register daily by having you and your employees log your cash. There are also several other cash management metrics that Square automatically tracks as transactions occur. You can find these metrics in the “End Drawer” report, the “Drawer History” log, or “Cash drawers” under “Reports.”
Cash tracking and management tools include:
- Start of day cash log
- End of day cash log
- Cash drawer history
- Daily cash sales value
- Daily cash refunds value
- Cash paid in/out
Square will also note if there are any discrepancies between the cash that should be in the drawer EOD and what your staff actually records. This helps to prevent shrinkage.
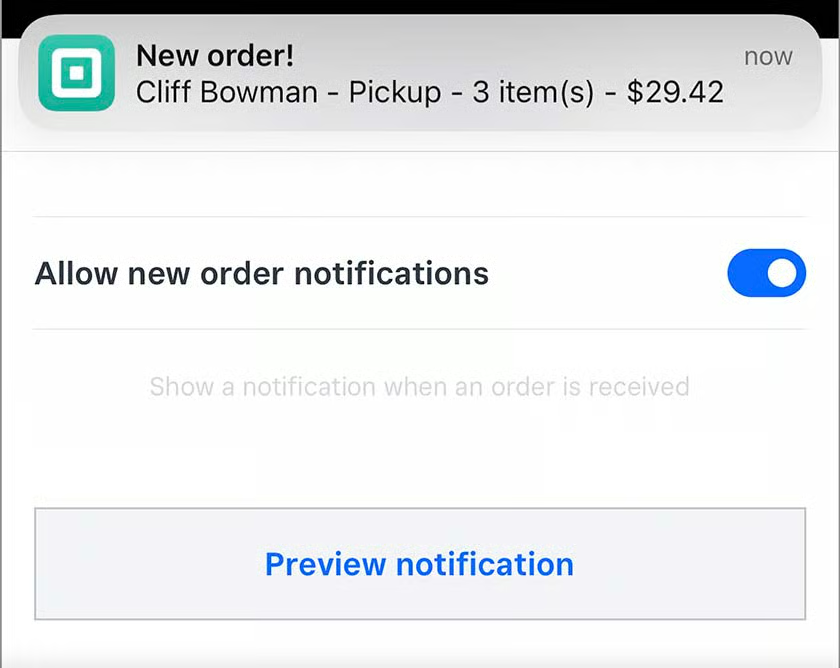
Receiving & Fulfilling Online Orders
You can sell online and manage orders directly from the “Orders” section of your online Square Dashboard. Here, all new orders will be highlighted in green. Once the order has been opened, the highlighting will disappear.
Depending on your notification settings, you can also receive notifications for online orders in your Square for Retail POS app. This way associates know an online order has come in without having to enter the backend Dashboard.
Once you have located your new online orders, it is time to fulfill them. Simply:
- Step 1: Open the order you want to fulfill
- Step 2: Select “Mark in Progress” to let customers know you are working on their item*
- Step 3: Prep the item for fulfillment
- Step 4: Select “Mark as Ready” when preparations are complete
- Step 5: From there, you will fulfill the order as designated by the customer**
- Step 6: When your customer acquires their order, mark the order as “Complete,” and it will move off your orders dashboard
*Customers can view their order status as it moves through the fulfillment process by going to the order status page on your website.
**With Square, there are many fulfillment options you can offer your customers, including delivery, pickup, curbside, and shipment orders.
Running Reports
Square for Retail offers users reporting in several areas, including:
- Sales data by item or category
- Cost of goods sold (COGS)
- Profit margin reports
- Vendor sales
- Projected profit
- Inventory sell-through and forecasts
Running reports is easy. All you need to do is select the “Reporting” option on the left-hand menu on your Square dashboard and select “Reports.” This will take you to your reporting page, where you can scroll through your different report topics, select the one you want to examine, and then run the report for your chosen timeframe.
Your reports page is also where you can see a list of the most recent POS activity and log and view cash drawer data.
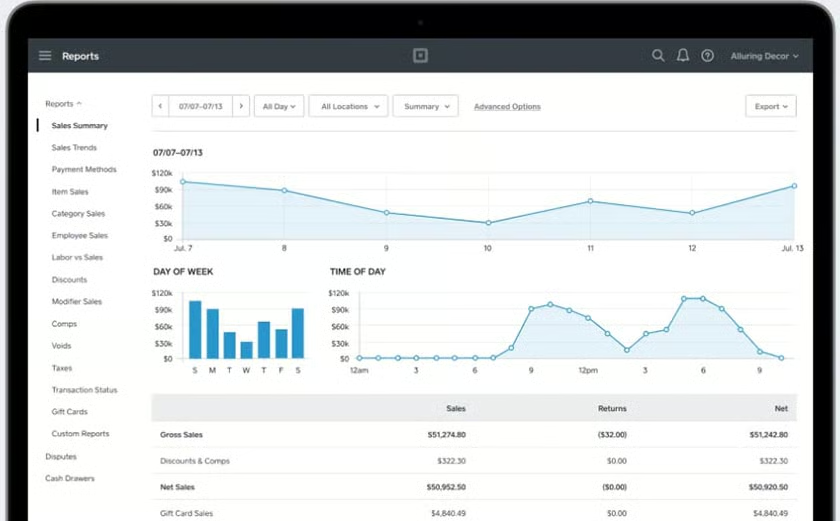
Analyzing the data from these performance reports can help you identify your business’s strengths and areas for improvement. Learn what products are most popular, which salespeople are most effective, what items get returned most often, and more. Explore our guide on retail metrics for other ways you can use data to drive sales.
Creating Purchase Orders
You can easily create purchase orders from the Square POS dashboard on PC or mobile. Note that you need to be subscribed to the Square for Retail Plus plan in order to create purchase orders.
From your PC dashboard:
- Step 1: Go to “Items,” then “Inventory Management,” then “Purchase Orders”
- Step 2: Click on “Create Purchase Order” and then fill in all the necessary information and details on the form on your screen
- Step 3: Click on “Create” (or save the purchase order as a draft if you’d like to come back to it later)
- Step 4: You can then preview the purchase order, or send it immediately to a designated email address. You can also save a PDF or CSV copy for yourself
From the mobile app:
- Step 1: Select “Inventory,” then “Purchase Orders,” then “Create purchase order”
- Step 2: Choose a vendor from the list
- Step 3: Choose the items for which you want to create a purchase order, then tap “Continue”
- Step 4: Adjust stock and item variations as needed to match the purchase order details
- Step 5: Review the details, specifically costs, item quantities, expected arrival date, and applicable taxes
- Step 6: Click on “Create” (or save the purchase order as a draft if you’d like to come back to it later)
- Step 7: You can then send the order immediately to the vendor, as well as save a copy for yourself
Setting Up Commission Tracking
One of the best ways to motivate your team is to reward their efforts with commission payments. To do this with your Square POS, you will need to subscribe to Shifts Plus, one of Square’s advanced team management tools. Shifts Plus is priced based on the size of your team; the more team members you have, the lower the price per member. This ranges from $2.50 to $4 per team member.
Within Shifts Plus, you can enter each employee’s commission rate into their profile. Simply:
- Step 1: Select the employee profile you want to add commission to
- Step 2: Toggle the “Earns Commission” option to “on”
- Step 3: Fill out the form to specify which items your employee can earn commission on and their rate
You can then view reports on your dashboard that show how much commission your staff is earning per transaction, and each staff member’s commission earnings.
Using Customer Management Tools
The final thing to learn when using Square for Retail is the software’s customer management tools.
Every Square for Retail account enables you to collect and organize customer information using Square’s form, generating customer profiles with shopper-specific details, saving cards on file, segmenting customers into groups, and even viewing reports on repeat visitors and customer retention.
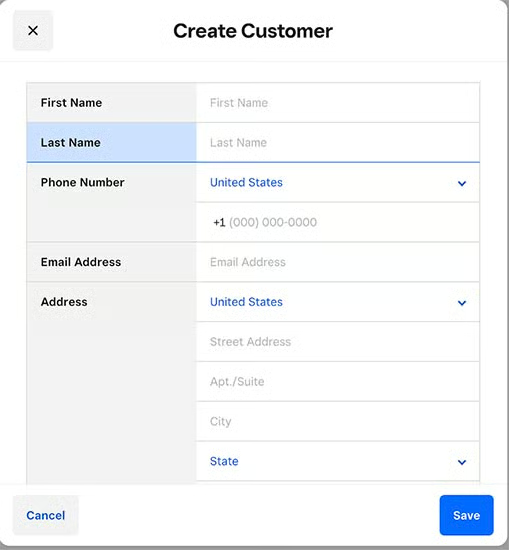
Either visit the “Customers” page or add a customer at the POS, fill out the form pictured below, and start learning more about your shoppers.
Also, Square for Retail’s built-in messaging tool (Square Messages) lets you send customers notes, payment links, and invoices. It consolidates all customer email, texts, and Facebook messages in one place.
Using Square for Retail Frequently Asked Questions (FAQ)
As with other Square POS systems, Square for Retail is generally well-designed and intuitive for both setup and operation. Here are a few more details to keep in mind when using Square for Retail:
How do I set up Square for Retail?
In short, you’ll need to learn how to manage inventory, open and close the cash drawer and register, process transactions, generate reports, and build and maintain your customer directory.
Is Square for Retail entirely free to use?
Square for Retail offers a forever-free subscription that includes basic inventory management and reporting. You can also opt for the Plus subscription at $60 per month to get advanced inventory features, purchase orders, and more in-depth reports.
For which businesses would Square for Retail not work well?
It’s not ideal for restaurants or appointment-based service businesses. Fortunately, Square has other POS systems designed for those industries. Businesses that want to emphasize ecommerce will also find more specialized POS systems elsewhere.
Bottom Line
As you learn how to use Square for Retail to run your business, you’ll find that the platform has a lot of great features to help you run your business, many of which you can access with your free account. Don’t worry, though—Square for Retail also has a paid Pro POS plan with advanced features to support you as you grow, and there are add-on tools for things like loyalty programs and payroll that will cost you only a few dollars each month. Learn more by visiting Square and signing up for your account today.