






Ecwid is an ecommerce builder that lets you sell online and in person through its hosted storefront, mobile app, your existing website, social channels, and marketplaces. Many merchants use Ecwid to add shopping cart and checkout tools to a site they already have, since it integrates directly with Wix, Weebly (now part of Square), and WordPress, and can be embedded on other builders like Squarespace with a simple code snippet.
In this guide, I show you how to set up an Ecwid store step by step, from creating your account to launching your first products.
Setting up Ecwid Store: Video Tutorial
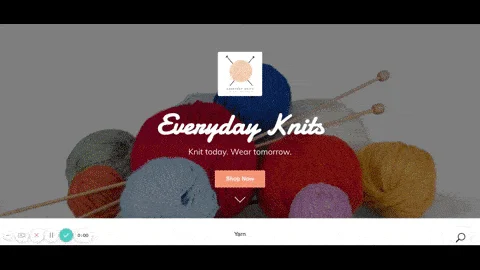
For this demo, we created an online store, Everyday Knits.
Step 1: Create an Ecwid Account
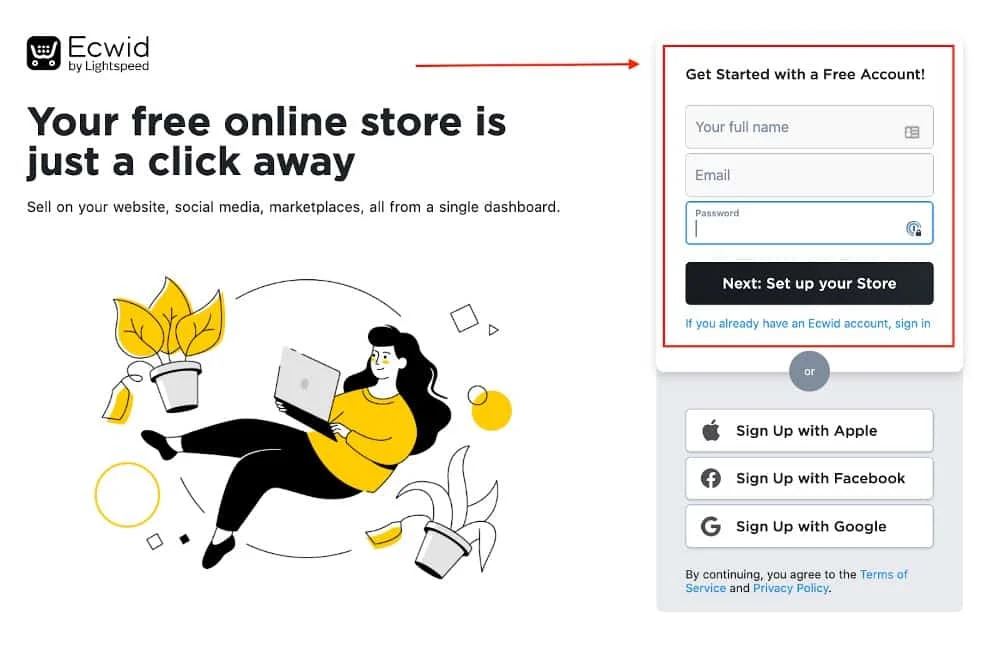
The first step to setting up an Ecwid store is to create an account. As mentioned, it has a free plan you can use to start. Under it, you can list up to 10 unique physical products, link your store to an existing website, and get access to shipping calculators—enough for you to launch your store. As you go through the process, you can decide whether upgrading to a paid plan is something your business needs.
All you need to create an account is your name, email address, and store name.
Set Up Your Store
After entering your name and email address, Ecwid takes you to a registration wizard. Don’t worry! Ecwid allows you to go back and change any of your answers at any time.
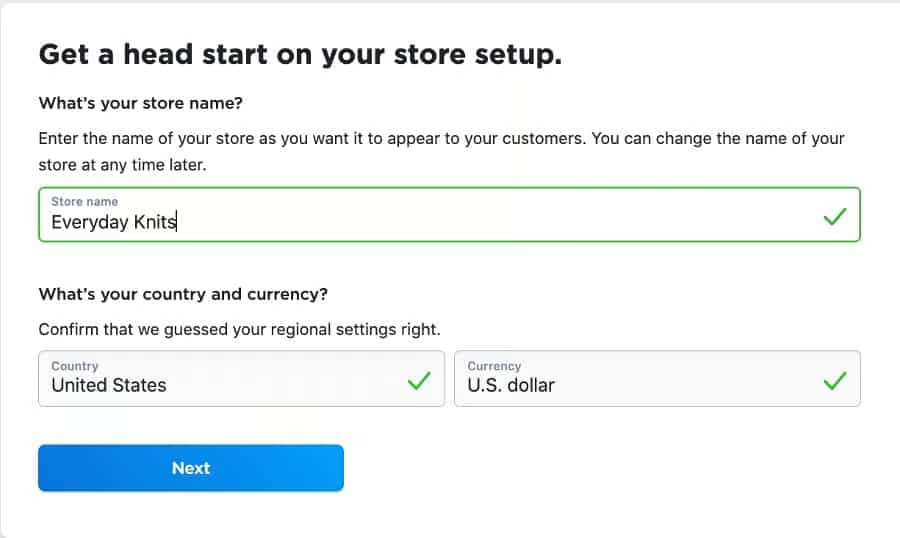
Every store must have a unique name. Enter your store name along with your country and currency. 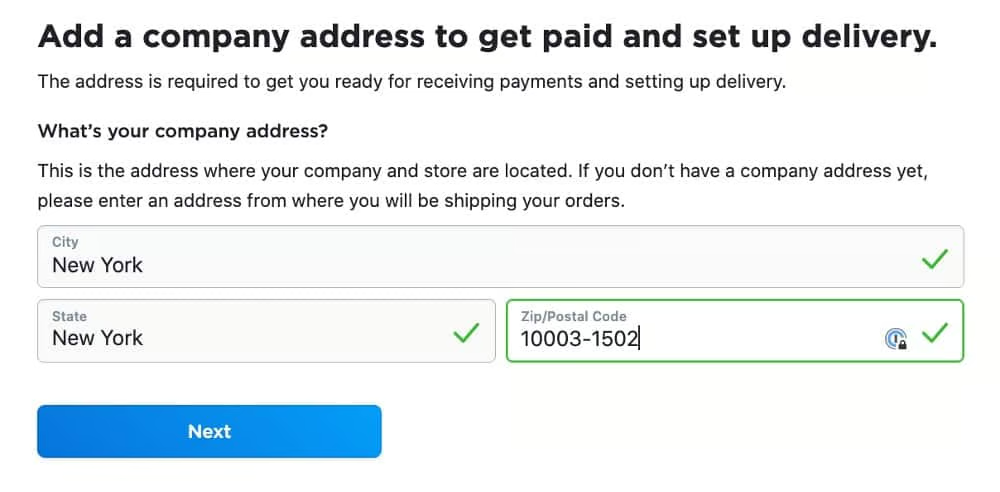
This is an important step because this address will be used for verification (if needed) and payment processing setup. If you don’t have a company address yet, you can enter one from where you will be shipping your orders. 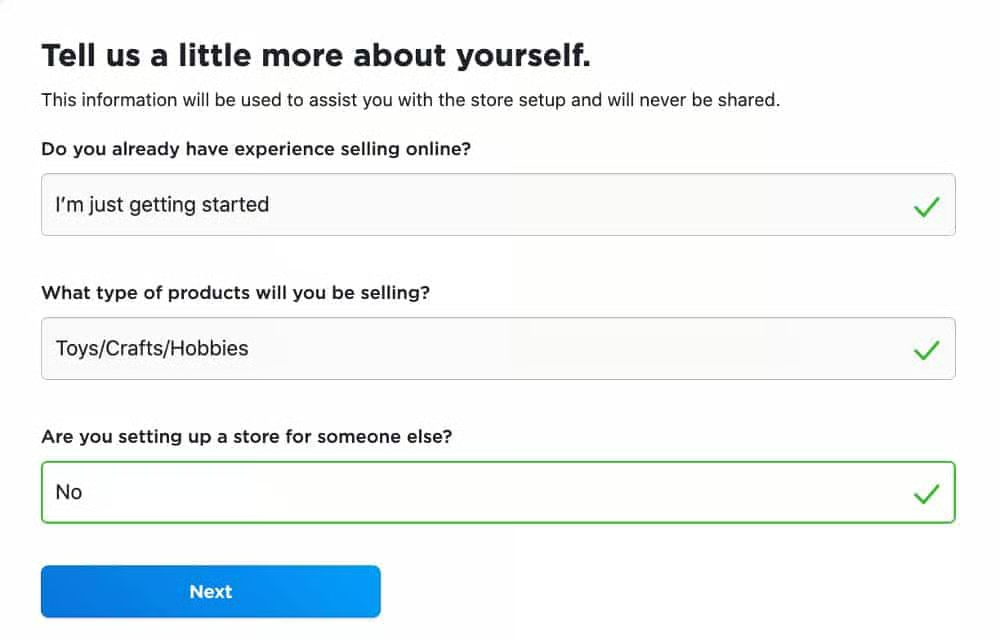
Your answers to these questions will be used to assist you with the store setup in later stages. 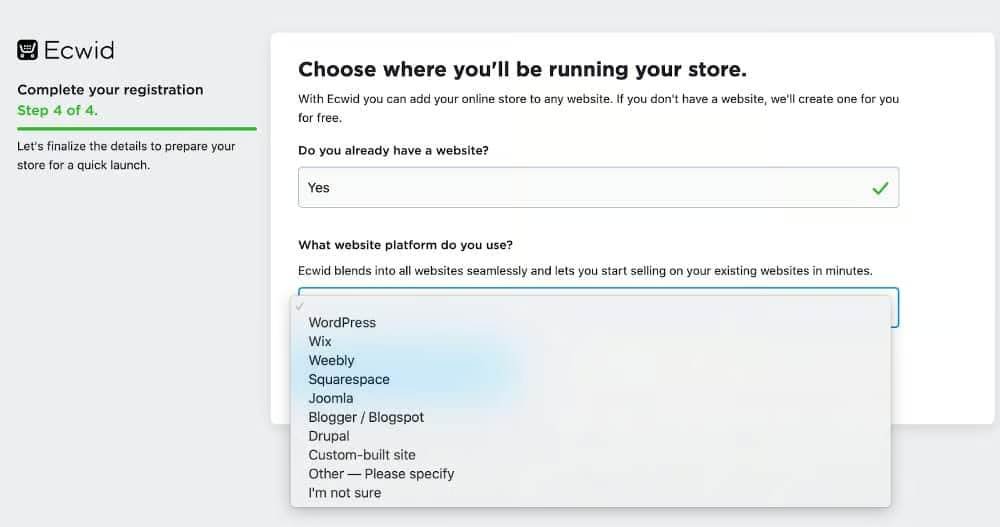
Before you finish setting up your store, Ecwid will ask you if you have an existing website. If yes, you can select your platform from the drop-down. You don’t have to integrate right now. 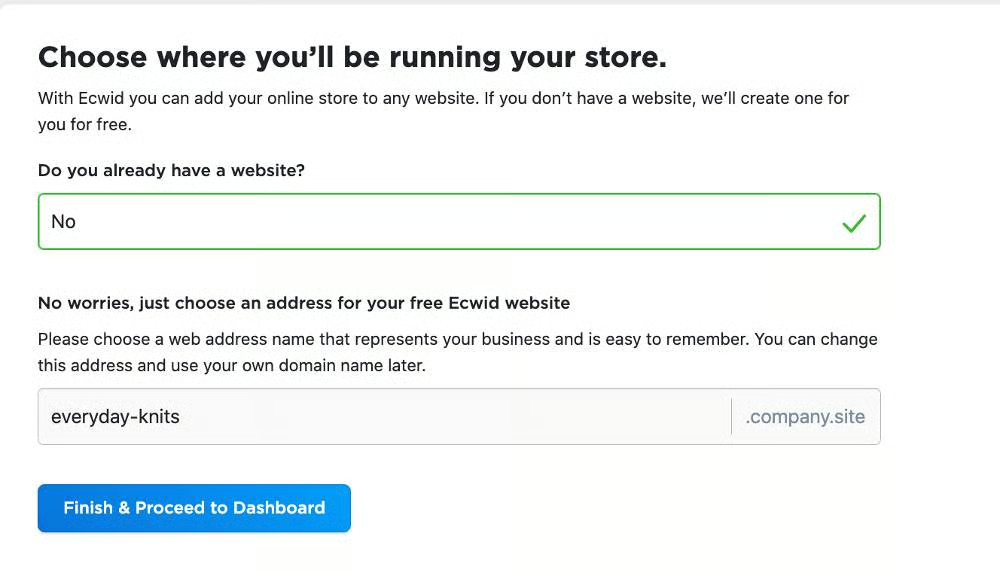
If you don’t have an existing website yet, you can get a standalone website hosted by Ecwid—you just need to choose a web address for your store. Keep in mind that you can use your own domain name later. Click the “Finish & Proceed to Dashboard” button to get to the Ecwid dashboard.


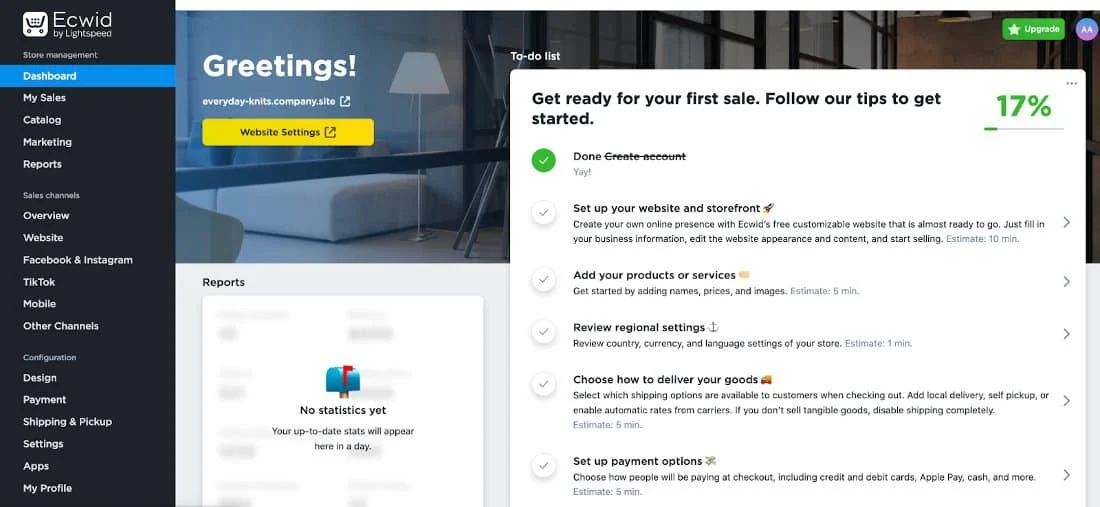
Once done, you will be taken to your account dashboard, which has a to-do list on how to set up your store. On the left is your control panel, where you set up your products and back-office settings.
Configure Your Store’s Regional Settings
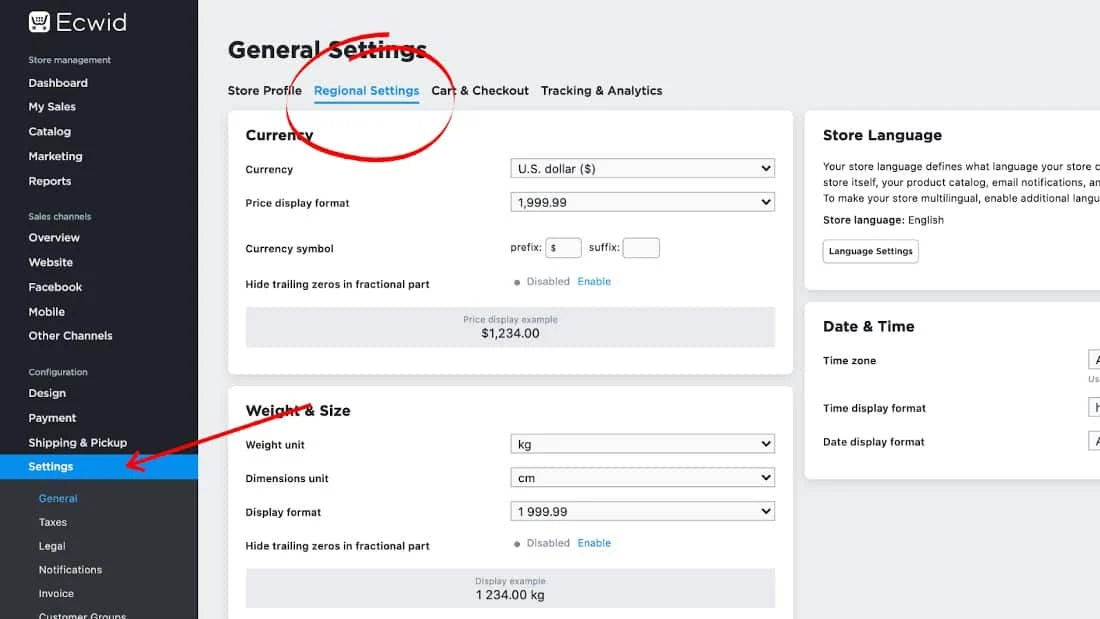
Before going any further, configure your regional settings. This is where you set up your default currency, store language, standard units of measurement, and your store’s time zone.
You can do this by going to your control panel, and under the Configuration heading, click on Settings > General > Regional Settings.
Step 2: Add Products & Categories
Once you’re done with your initial store setup, it’s time to add product categories and products or services to your store.
How to Add Categories
Categories are product groups that you want to show on your store page (e.g., On Sale and Bestsellers). Customers can more quickly navigate your store and find the products they need.
To set up your store categories, go to your control panel, and click through Catalog > Categories > Add Root Category.
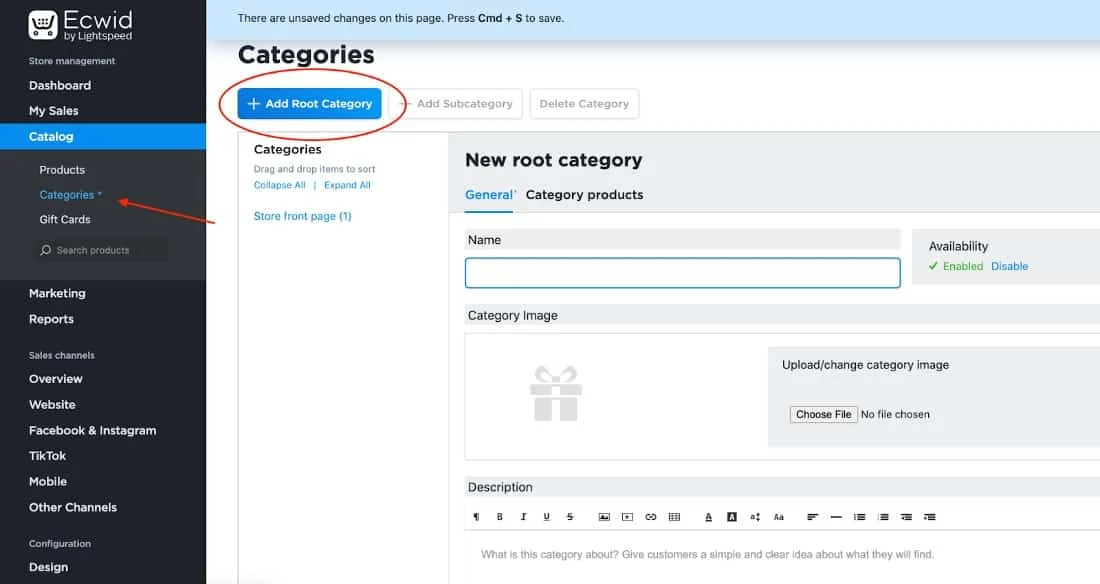
You can set up subcategories under a root category. After saving your root category, you can click on + Add Subcategory, and the same fields will need to be populated.
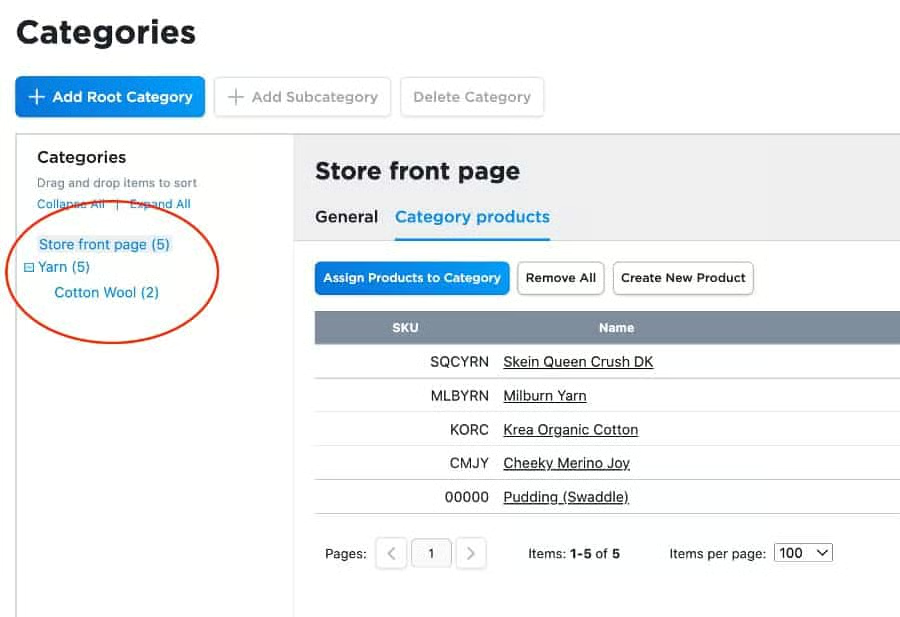
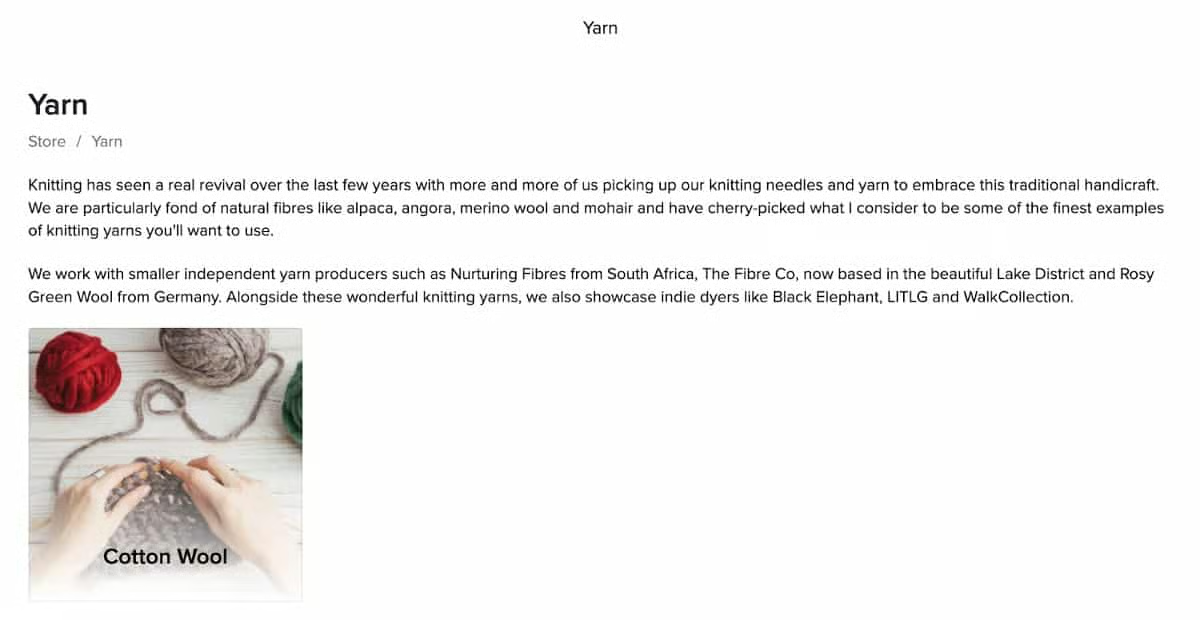
In our demo store, we were unable to add categories because a free account has a limit of two categories. You can see an example of what a category looks like when a customer clicks on a category image in your store in the image below. In our case, the Yarn category has a subcategory titled Cotton Wool.
How to Add Products to Ecwid
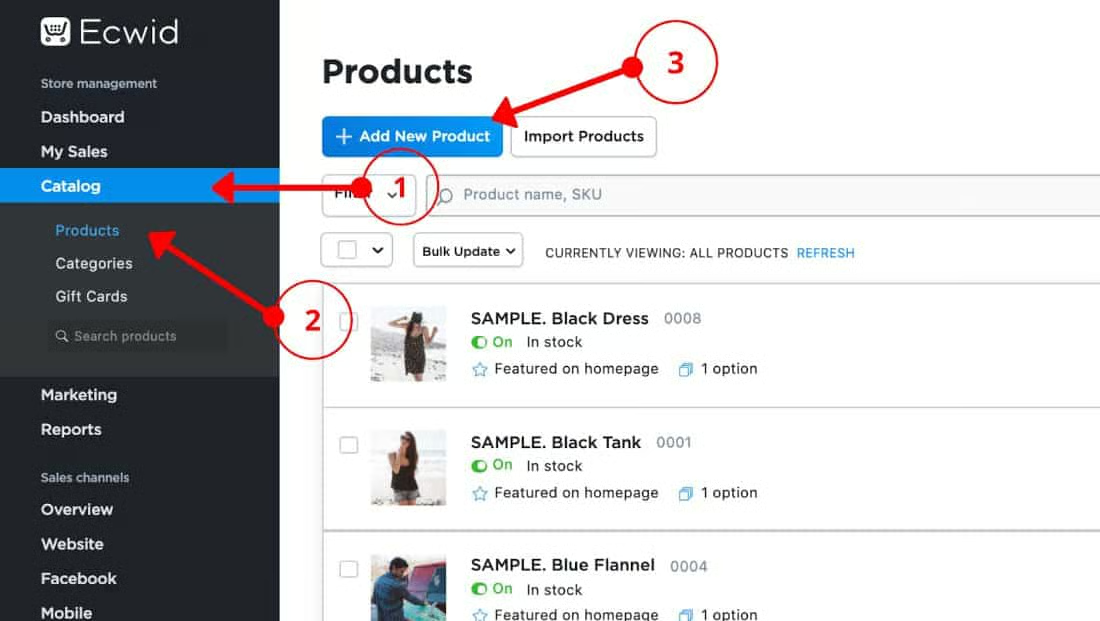
It’s time to add products. Easily do this by (1) going to the “Catalog” option under Store management in your control panel, (2) clicking on “Products,” and then (3) clicking on the blue button “Add new products” to populate the website with the items you want to sell in your store.
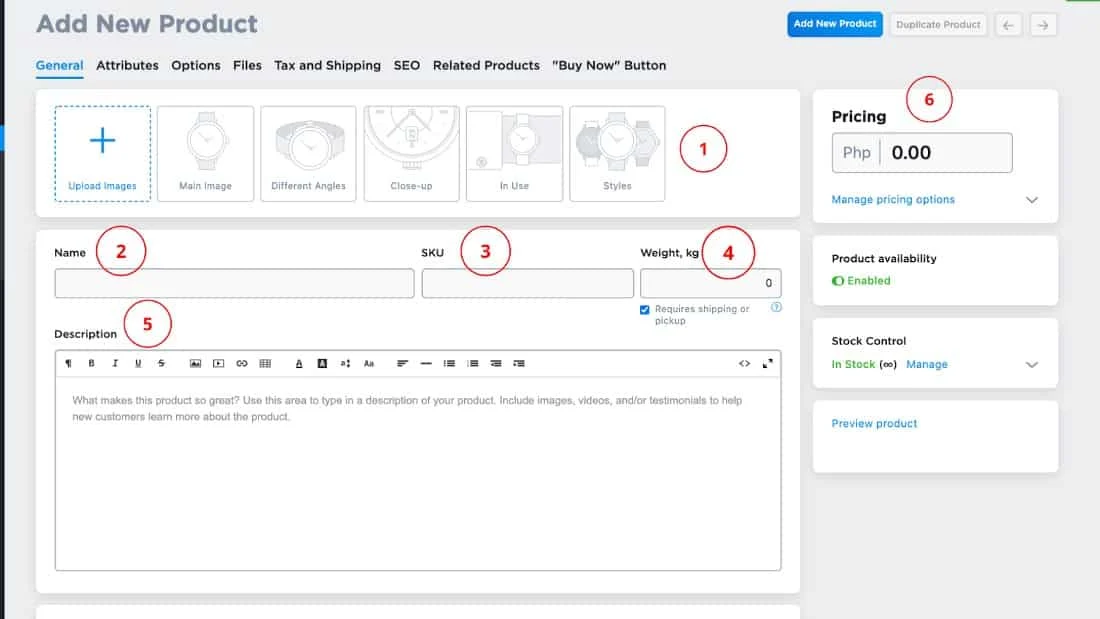
In the General tab, you can set up the following details:
- Product Photos: You can add as many images as you can—remember to use high-quality images—but the first image in your upload will be the main image. You can drag images to change placements.
- Product Name: The text you put in this field will be customer-facing.
- SKU: A stock-keeping unit (SKU) is a unique code made of letters and numbers that identify characteristics of each product, like brand, style, color, and size. This is an optional field.
- Weight: If you are selling physical goods, add the weight of each item because this will be used to calculate shipping cost.
- Product Description: This informs shoppers about the product and is a great field to add keywords for SEO. When setting up product descriptions, include all information that your customers will want to know to help them make a purchasing decision.
- Price: Add the price of your product. You can compare price and discount pricing if you upgrade to a paid plan. (Check out our guide to pricing your products to maximize your profits.)
You can further set up your product by going through the other tabs on the Products page.
Set Up Attributes (Optional)
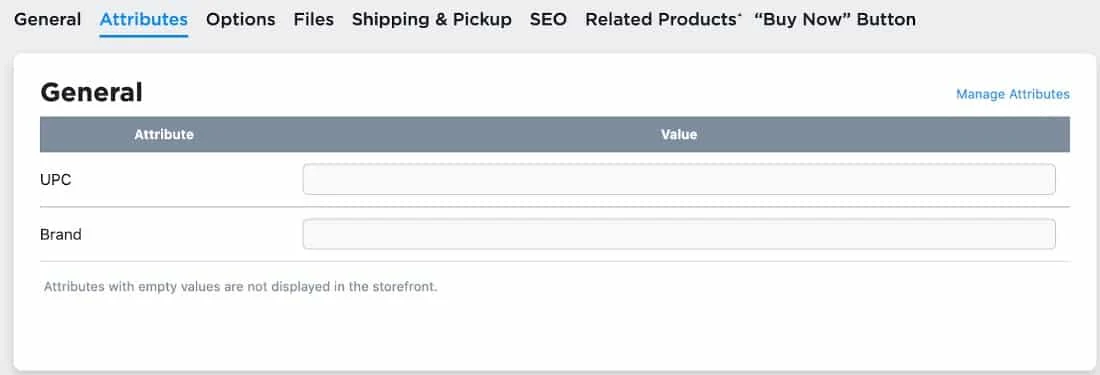
Under the Attributes tab, you can set up brand types for your product. This is ideal if you have several products under multiple brands and your target shoppers usually buy from specific brands.
Set Up Product Options (Optional)
You can also set up product options and variants under the Options tab. To do this, scroll through the slideshow below.
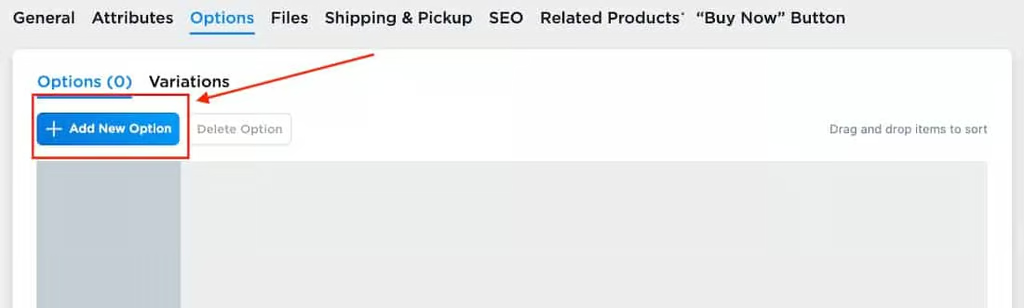
Click on Add New Option. 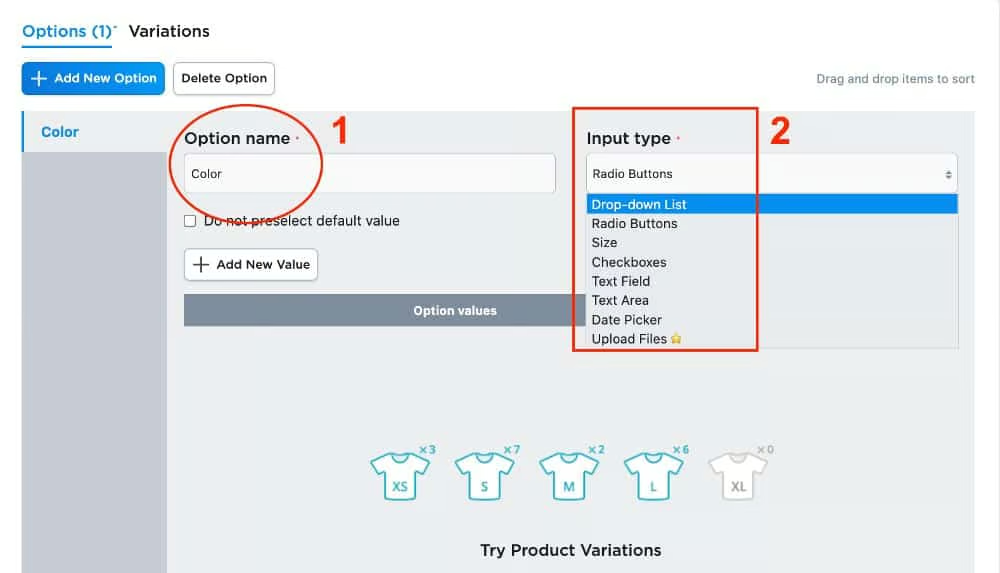
Specify the option you want to set up (size, color, etc.), and then choose how you would like them to be displayed on your product page. 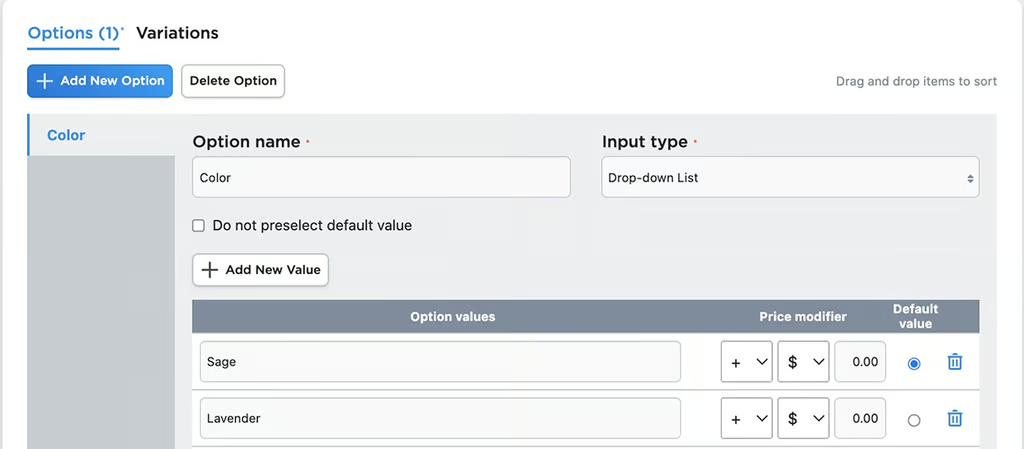
On our product page, we chose to set up color options. You can configure the default product option and modify prices. To set a separate image, price, SKU, quantity, and low stock notification for each set of product options, you need a paid plan.


If you upgrade to the Venture plan ($19 per month), you can sell up to 100 physical products and digital goods. You can also customize the metadata of the page title and description to improve the SEO ranking of your online store.
Configure SEO
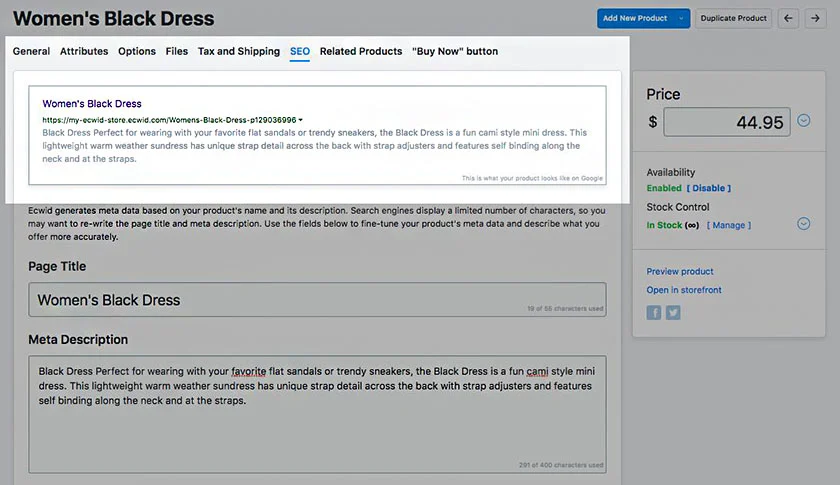
The SEO tab requires a paid subscription, but here, you set up the product’s title and meta description. Ecwid automatically takes care of your website’s robots.txt files and sitemap.xml, ALT-tags for product images, and product URLs—which we are not a fan of since you cannot customize it to your liking. You can read a more in-depth evaluation of Ecwid’s SEO features in our Ecwid review.
To configure SEO for your product pages, write text in the Page Title and Meta Description fields. Ecwid has a character count on the fields, but the best practice is to keep page titles under 55 characters and the meta descriptions to under 155.
Choose Related Products
You can set up product recommendations under the Related Products tab. (We’ll cover Shipping & Pickup later.)
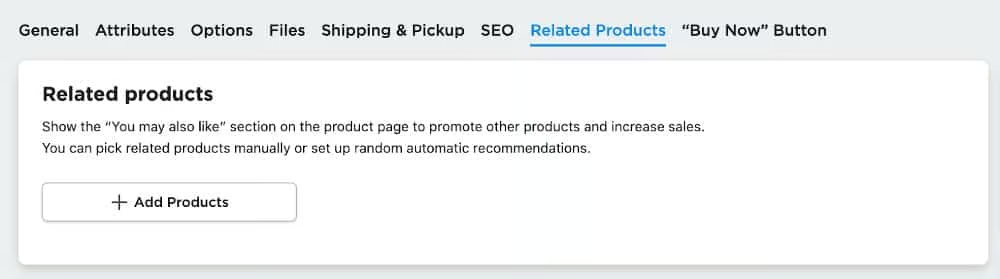
Click on + Add Products to configure how you want related products displayed. 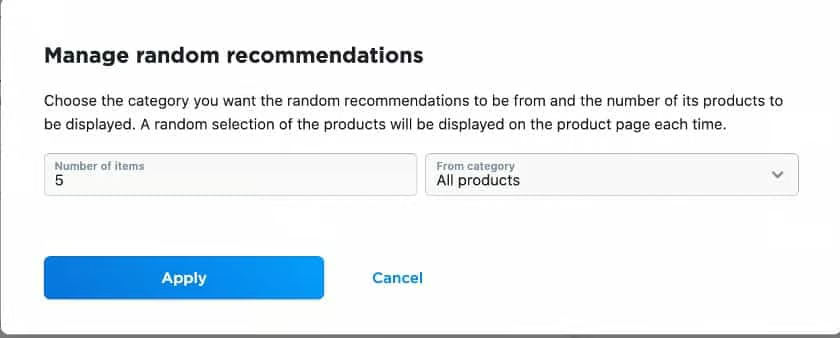
You can specify the number of related products you want displayed and its category.


To make the most out of related products, follow our cross-selling tips to motivate customers to buy additional products related to their current purchase.
Here are a few more ways to show related product or product recommendations:
- Show on the Cart page: To enable showing related products on the Cart page, go to Settings > General > Cart & Checkout.
- Show in an order confirmation email: Enable order confirmation emails with related products in Marketing > Automated Emails.
- Show recently viewed products: If you have a big catalog, you can add the Recently Viewed Products app (requires a paid upgrade) and have a product carousel displayed on your site.
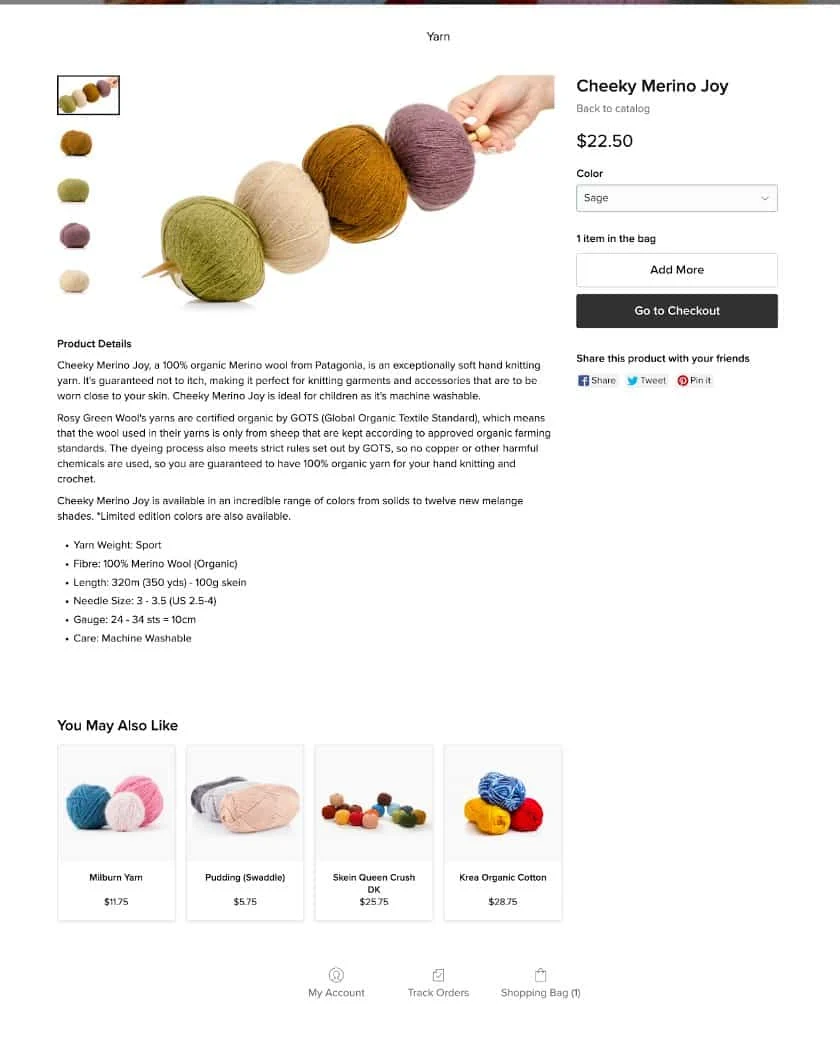
Here’s what the finished product page looked like in our Ecwid demo store.
How to Add/Sell Digital Downloads
If you sell downloadable items such as e-books, photos, music, and video tutorials, you can upload files that will be automatically delivered via unique download links after purchase. You can add as many files per product, and each file upload has a 25GB limit.
*This feature is only available on paid tiers (Venture, Business, and Unlimited).
To add digital products to your store, follow the initial steps of adding products, but in the General tab, untick Requires shipping or pickup.
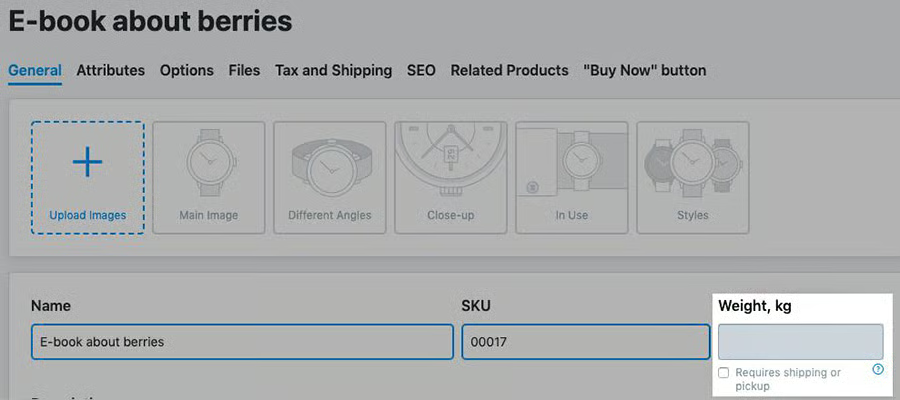
Next, click on the Files tab > +Upload Files > Click + to add more files. Add as many files per product as needed, but you can only add up to 10 products at once.
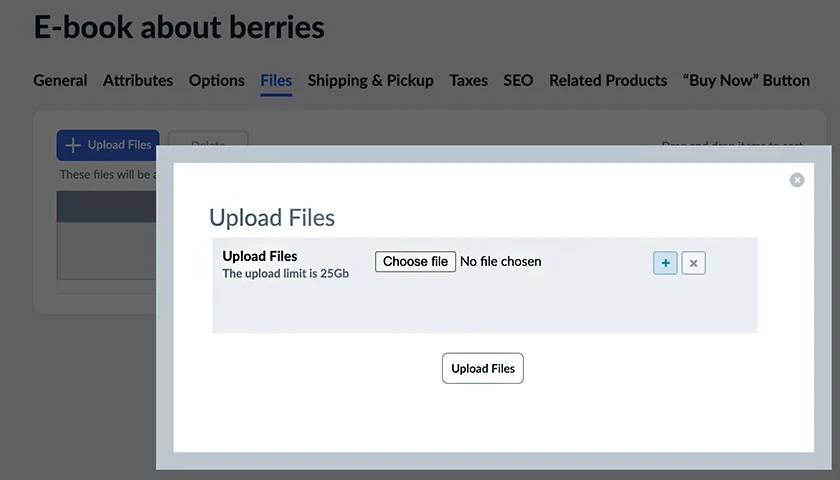
Customers automatically receive product link downloads after the order status is updated to Paid.
Protecting Download Links
You can protect your product download links and prevent customers from sharing download links by setting a lifetime for the link or limiting the number of downloads per link.
To protect download links, go to Settings > General > Cart & Checkout. Under the E-goods section > Add a number of hours and/or download attempts.
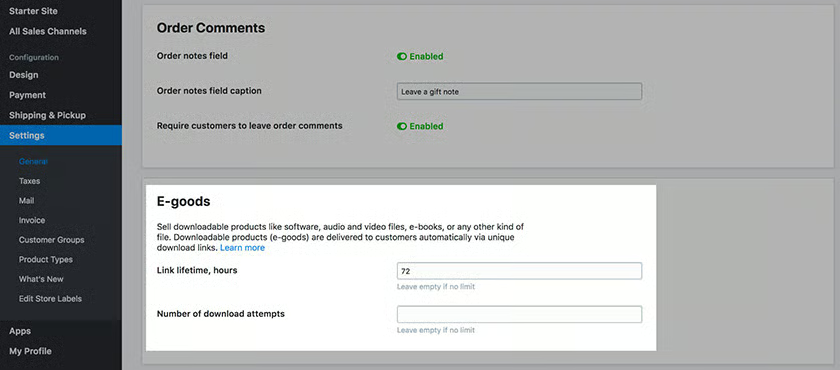
Managing Download Links
You can manually disable an order download link or generate a new download link for a buyer.
From your Ecwid admin, go to My Sales > Orders, click on the specific order, and open its details. Click Change and choose whether to renew or disable download links.
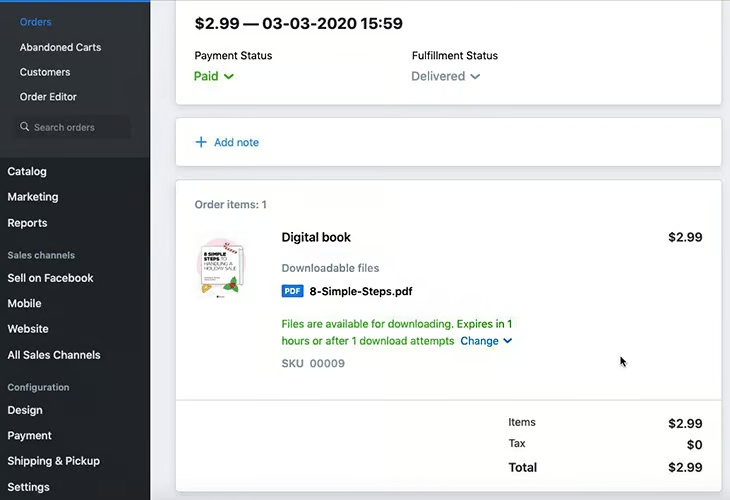
Step 3: Set Payment Methods
Ecwid supports a variety of payment solutions that enable you to accept credit cards and offer alternative payment options for your customers depending on your region. You can process payments through Lightspeed Payments, PayPal, Stripe, 100+ third-party payment systems, and mobile wallets (such as Apple Pay and Google Pay). You can also set up manual payment methods (like cash on delivery, bank transfer, invoice, purchase order, and check).
To set how you want to get paid by your customers, navigate to your control panel and under Configuration > Payment.
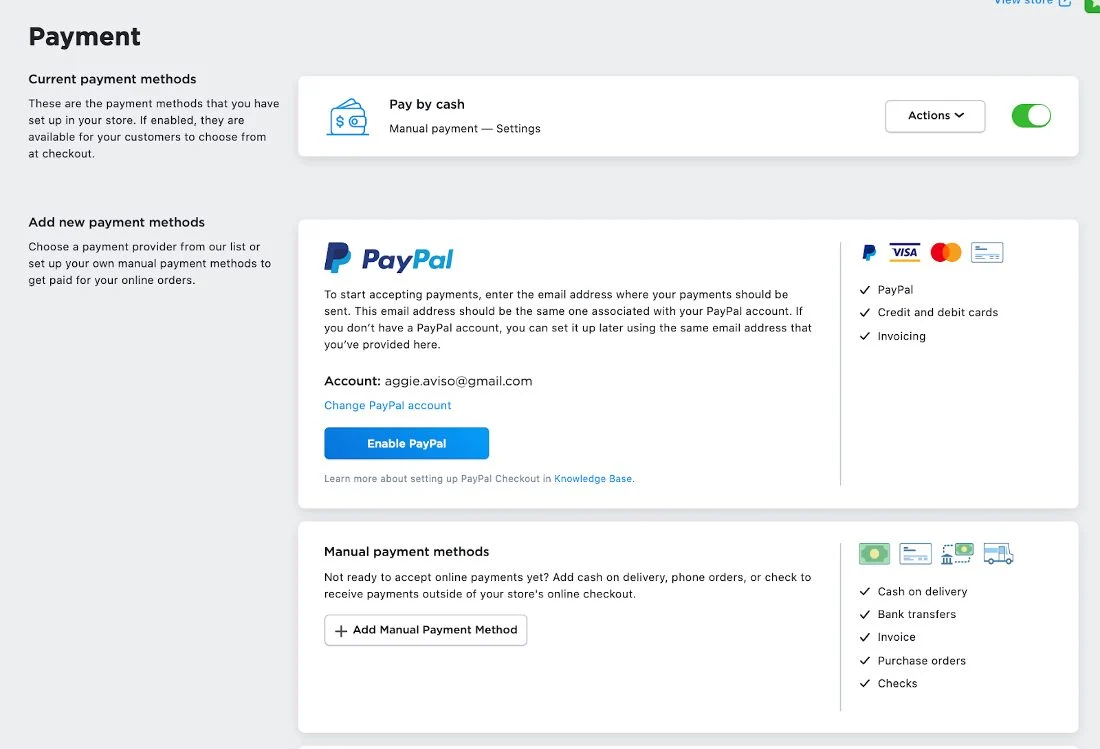
You can set up as many payment methods as you like. When setting up payment options, specify how you would like the payment method name to look like at checkout by configuring its appearance options.
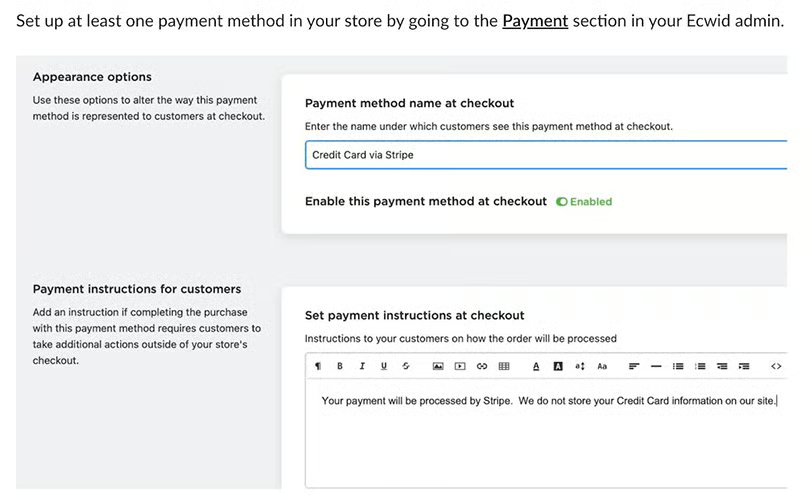
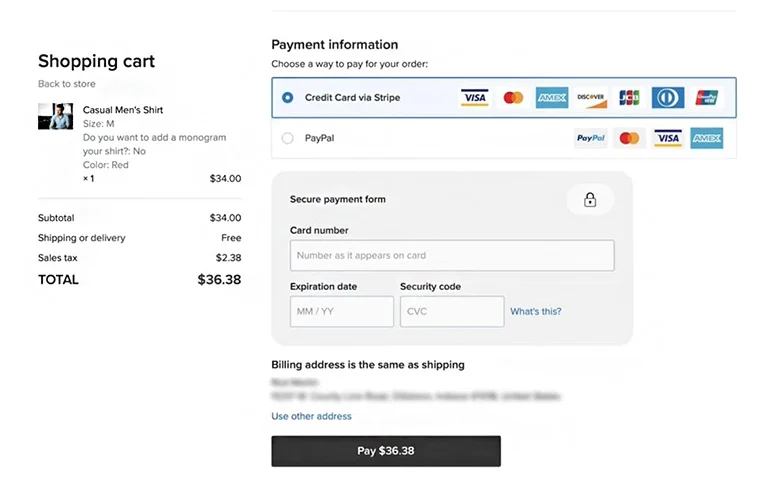
Here’s an example of how two payment methods are enabled on a checkout page and how they appear—particularly their names and descriptions.
If you sell in-person and use Square POS, you can easily integrate the two platforms to process payments in your Ecwid store through your Square account.
Customize Your Checkout Page
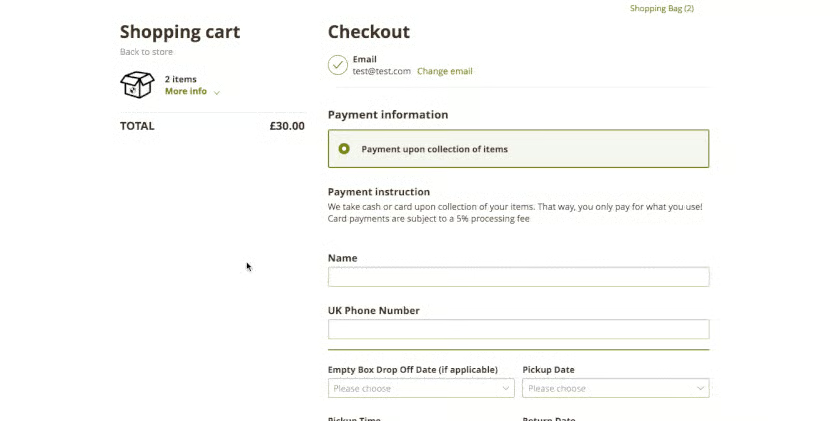
Your Ecwid store has a secure one-page checkout with several sections: customer’s cart, address collection, shipping methods, payments, warnings and customer comments, and buttons. You can customize any of them and set custom fields (required or optional) to collect additional information from customers and save it to their order.
To set up your checkout page, go to Settings > General > Cart & Checkout.
Step 4: Configure Shipping, Delivery & Pickup Options
If you sell physical goods, it is important to set up shipping and pickup methods. With Ecwid, you can choose to ship using carriers, do local delivery, or add a curbside, drive-thru, or in-store pickup. If you upgrade to a paid plan, you can also add a handling fee.
Ecwid provides real-time shipping rates from USPS, UPS, and FedEx. To set this up, go to your control panel, under Configuration > Shipping & Pickup. Choose which carrier or delivery method you would like to set up and follow the prompts.
In our trial store, we set up USPS and it gave us options to set up conditions for free shipping, custom rates, and a flat-rate or fixed-shipping fee. If you choose to get shipping rates calculated based on order details, for example, you need to specify your shipping origin—whether it ships from your company’s address or from another location or warehouse.
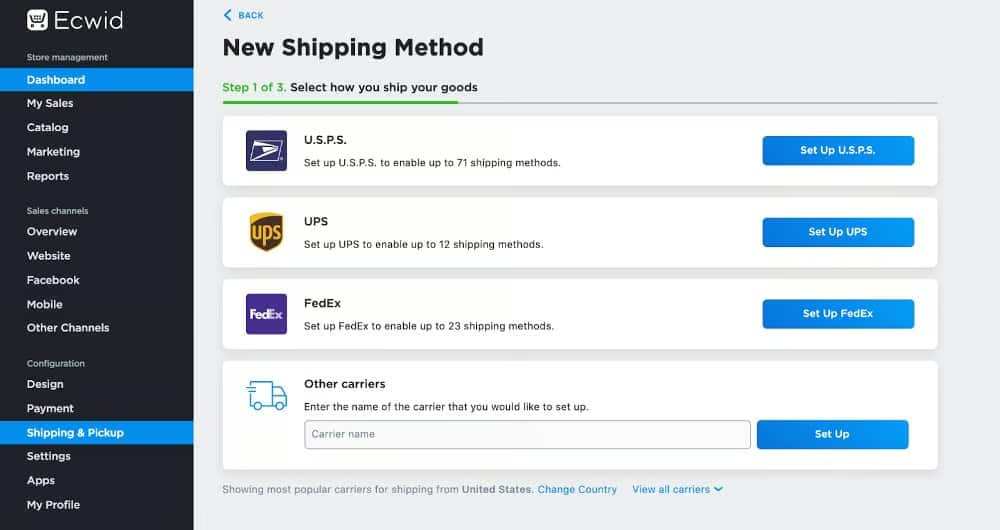
Ecwid automatically shows the most popular shipping carriers in your country. For the US, it provides real-time shipping rates for USPS, UPS, and FedEx. 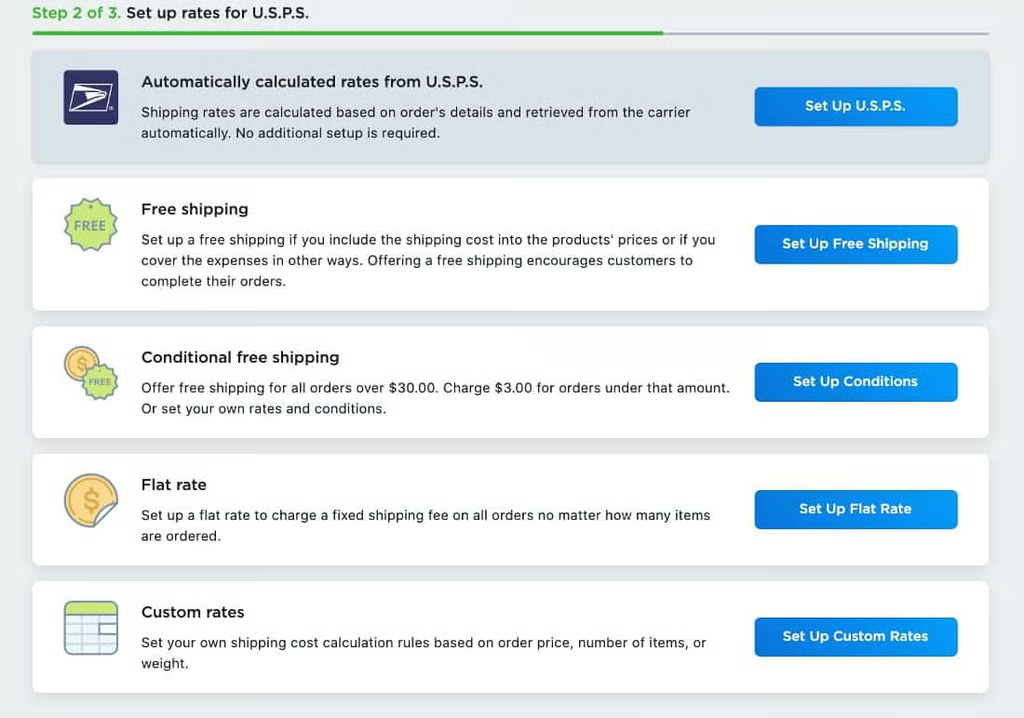
You can set up a variety of shipping methods per carrier.


Ecwid gives you many shipping options and offers a comprehensive video guide on how to choose and set up shipping options and zones for your online store. The platform also integrates with several top shipping solutions—including ShipStation, ShippingEasy, and Ordoro—to print labels quickly, which is handy if you ship in volume.
Now that you have set up your products and back-office settings, it’s time to customize how you want your store to look. There are two ways to do this. You can set up how your store will look when embedded into an existing site or configure your Ecwid standalone site.
Step 5: Customize Your Store Design
Go to your control panel and click on Design under the Configuration heading.
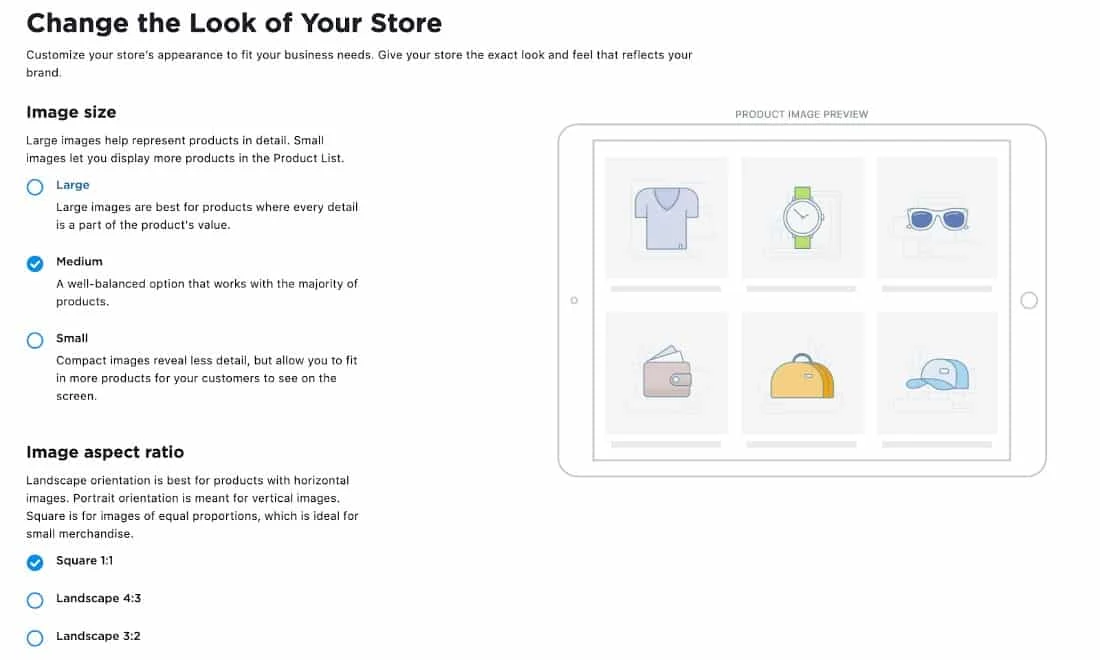
Here are ways to customize the appearance of your online store with Ecwid:
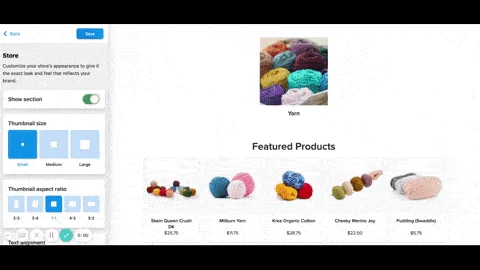
- Image size: You can set up how your product thumbnails look in your store (small, medium, and large).
- Image aspect ratio: Choose between square, landscape, or portrait orientations. Landscape is best for products with horizontal images; portrait is meant for vertical images; square is for images of equal proportions—ideal for small goods.
- Product card details and layout: You can choose which details to display on the product list and how they are positioned in a product card.
- Category name position: You can choose to display or hide them completely.
- Product page layout: You have the options to do two or three columns, with product descriptions on the right or left.
- Image gallery thumbnails: The layout for your thumbnail images in the product gallery can either be horizontal, vertical, or full-sized.
- Sidebar: Choose items displayed on the sidebar of the product’s page—product name, breadcrumbs (navigational text paths), SKU, price, product options, “add to bag” button, product details, share buttons, and wholesale prices.
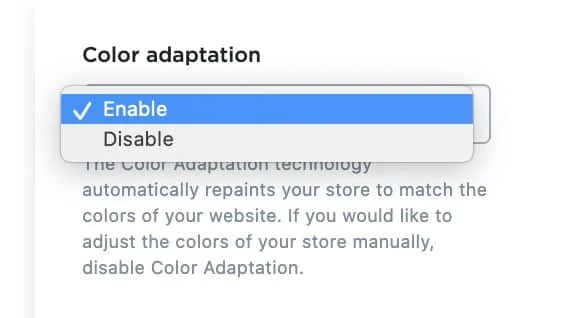
If you have an existing website, Ecwid blends seamlessly with your website’s colors and displays optimally. You can enable it on the Design page.
Step 6: Connect Your Existing Website
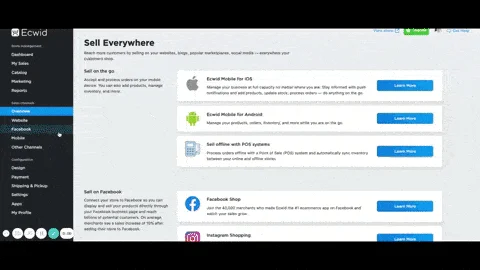
If you have an existing website, it is easy to connect your Ecwid store. Ecwid has built-in plug-ins and extensions for WordPress, Joomla, Drupal, other content management systems (CMSes), and popular site builders like Wix, Squarespace, and Weebly (now part of Square).
To connect your store to your website, go to your control panel, and under Sales Channels, click on Overview. Scroll down to see the Sell On Your Website heading.
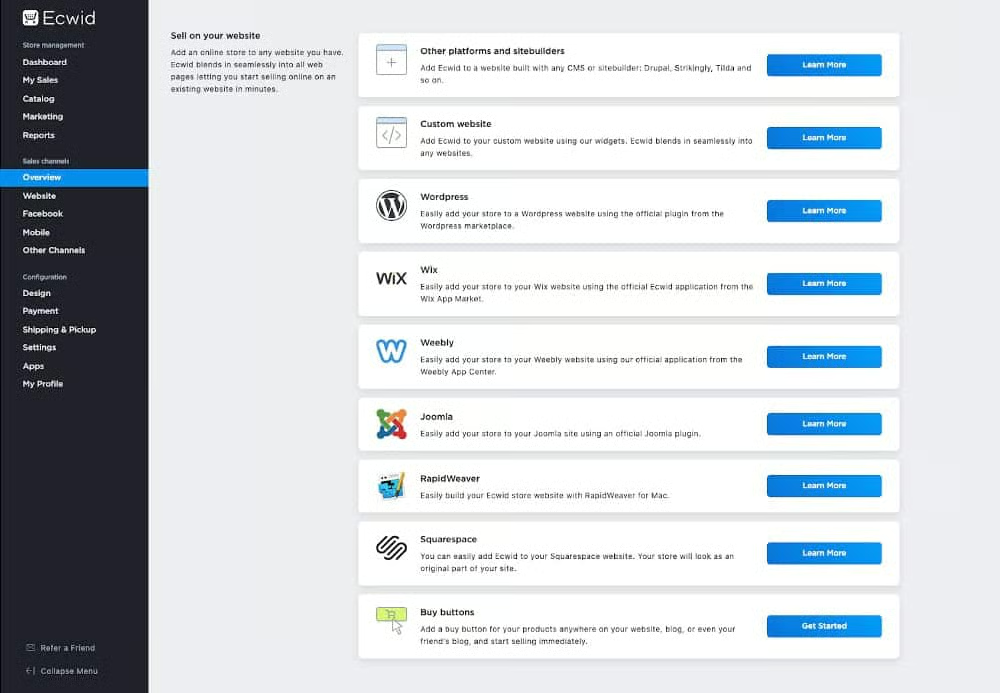
Ecwid has a step-by-step guide on how to add an online store to an existing website.
Use the Buy Now Button
If you wish to advertise a single product on your blog or another website, then you can opt to generate a buy button and start selling immediately. All you have to do is generate the code from your Ecwid dashboard and paste it on your page as an HTML code.
Step 7: Use Ecwid’s Instant Site
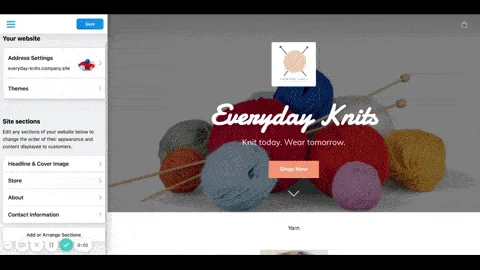
Don’t have an existing website? Ecwid provides a standalone site called Instant Site so you can launch your online store. It has an intuitive editor with many design options, helping you make the site your own.
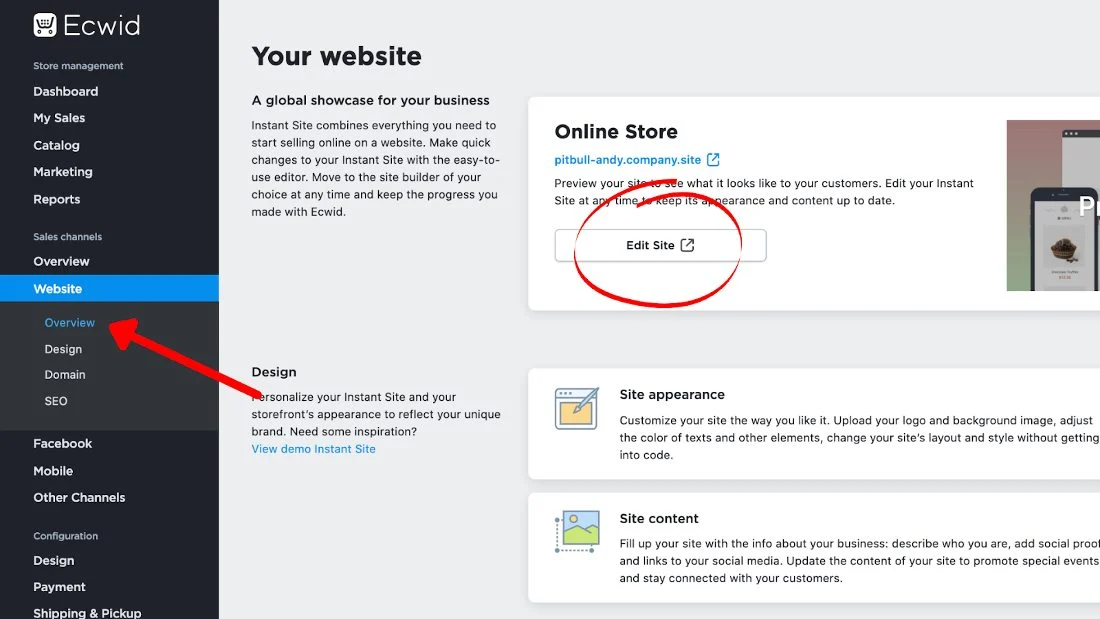
To customize your Instant Site, go to your control panel, click on Website under Sales Channels, and then Overview. Click on the Edit Site button under the Online Store box heading.
Choose Theme
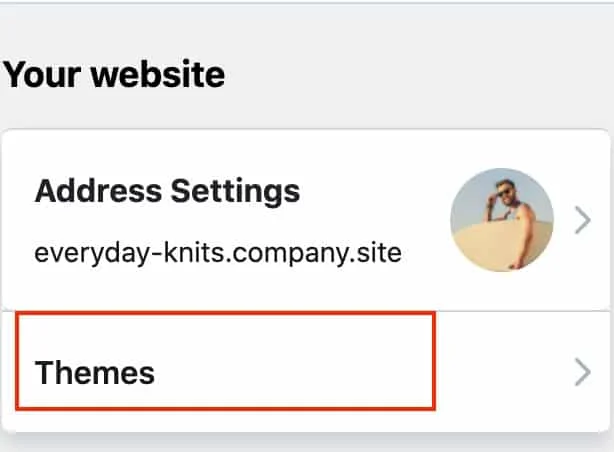
Ecwid offers a collection of predefined design themes, categorized by business type. Choose one and customize it further according to your brand.
Customize Site Blocks
Your Instant Site has many content modules, which it refers to as site blocks, that help you present your business and products.
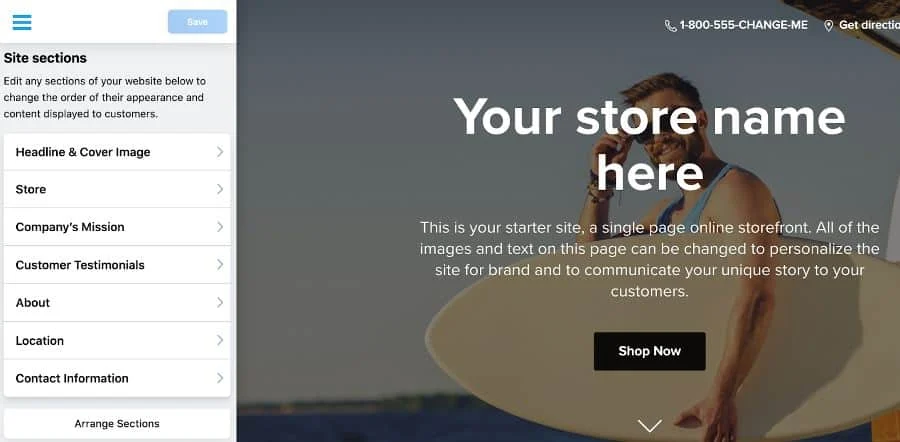
Your Instant Site has the following available section blocks. You can pick and choose which ones to use. Just click on the section and click Delete Block.
- Header
- Cover
- Store
- Customer Testimonial
- About Us
- Contact Us
- Footer
You can also add blocks like Special Offers, Delivery and Payment, Company Info, etc., if you need them.
Under the Store site block, you can configure how product thumbnails and product pages are displayed.
For product pages, you have the option to choose the page and image gallery layouts and select which information is displayed on the sidebar of the product’s page
Your Ecwid Instant Site is viewable on a free subdomain that defaults to using your store ID. For example, https://061313.company.site would be your subdomain if 061313 is your store ID. You can replace your store ID with your store name (like what we did with our demo store, Everyday Knits) or connect your own domain to your Instant Site if you have one. Note that custom domains can only be used on paid plans.
You can use your Instant Site as your:
- Main selling channel
- Landing page, such as a Coming Soon page or Website Under Construction. If you are still working on your store setup or running a seasonal business, you can hide the Store block and use it as a plain website.
- Online catalog. Your Instant site can be a place where your products are displayed but not offered for purchase. You can just disable checkout for your products.
Bottom Line
Setting up Ecwid is intuitive and easy enough even for the technically challenged. Its free plan already has features that allow you to carry out ecommerce operations easily, such as real-time shipping rates and product variants. If you decide to upgrade to a paid plan, you will unlock a more robust ecommerce platform that can compete with ecommerce giants like Shopify.
If you already have an existing website that generates a decent amount of traffic, Ecwid is the perfect option. Its Buy Buttons offer you the added ease of promoting a single product on other websites. Sign up for its free plan to launch your online store, no credit card required.
