


BigCommerce has a robust set of advanced selling features and management tools, and all of that power is surprisingly simple to harness. You can easily learn how to set up a BigCommerce store by following our 10-step guide.
BigCommerce offers a 15-day free trial with no credit card required. You can use it to follow our BigCommerce tutorial. When you are ready to launch your store, you just need to upgrade to a paid plan.

- Step 1: Sign Up for a BigCommerce Account
- Step 2: Create Product Categories
- Step 3: Add Products to Your BigCommerce Store
- Step 4: Configure Back-office Settings
- Step 5: Set Up Shipping Rates & Methods
- Step 6: Design Your Store
- Step 7: Create Your Store Information Pages
- Step 8: Set Up Your Store Navigation
- Step 9: Preview Your Store
- Step 10: Launch Your Online Store
- Bottom Line
Step 1: Sign Up for a BigCommerce Account
You need to create a BigCommerce account before developing your online store.

BigCommerce offers a free trial. Simply head to BigCommerce.com, click on the Essentials tab, and click Start Your Free Trial or Get Started (they take you to the same page). 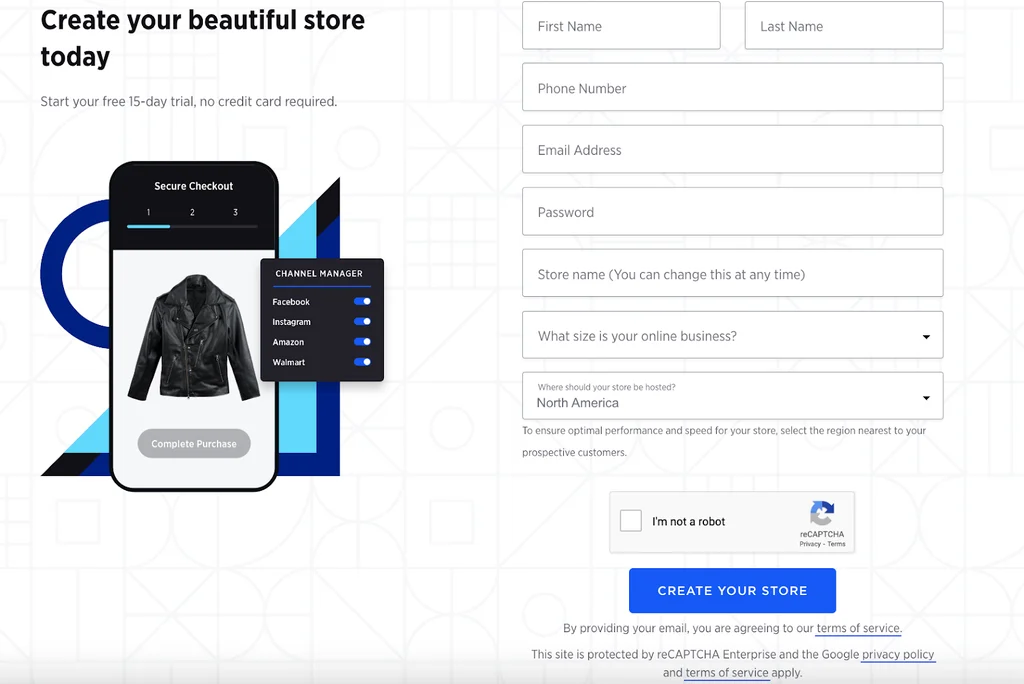
You will be taken to a screen where you are required to enter information about yourself and your store once you sign up for a free trial. Specify a password, provide your proposed or existing store’s name, and answer a few simple questions about your business.


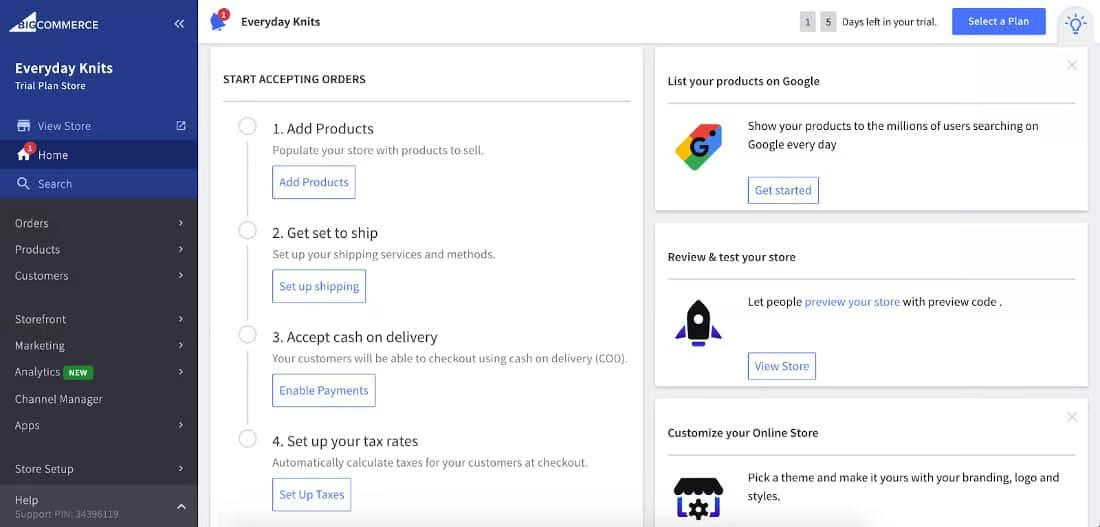
After you have signed up, you will be taken to your dashboard, where you can see an outline of recommended steps to launch your online store.
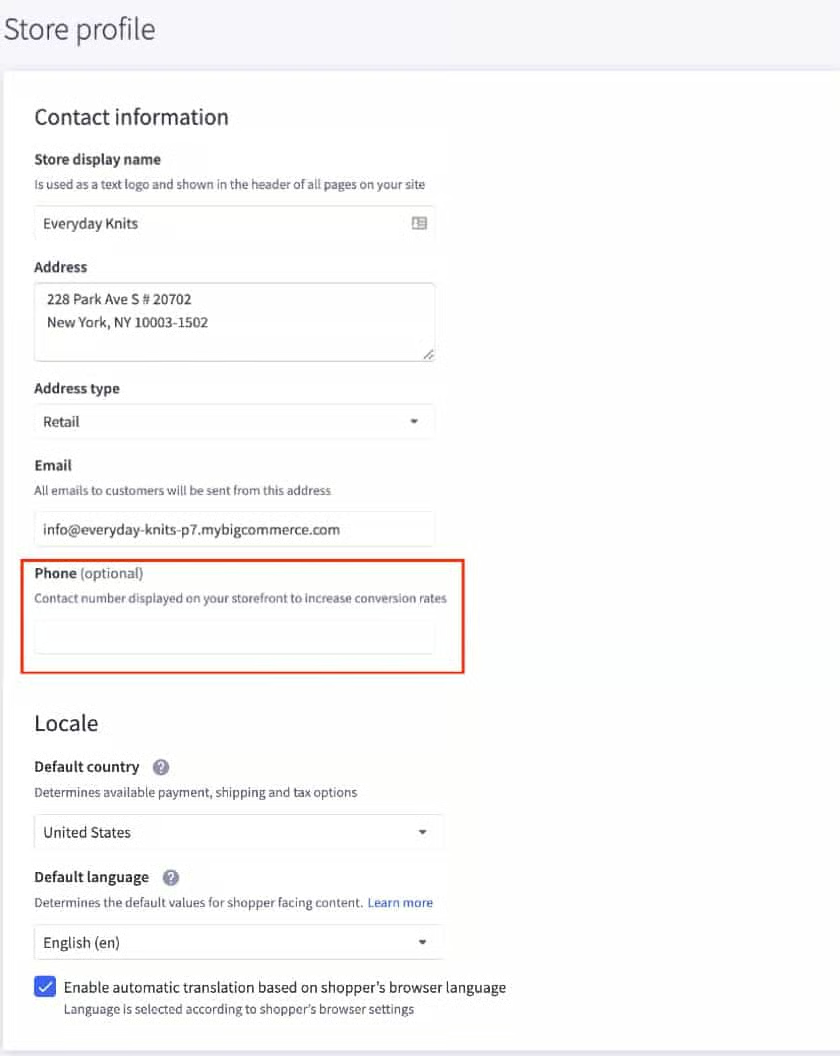
Set Up Store Profile
The Store Profile is where your basic store information is entered, like your store name, country, and contact information. This is important to set up first because its settings affect other store settings. For example, the store country determines which payment gateways are available, and the store address appears on your invoices. This contact information will automatically appear in the footer of your store as well.
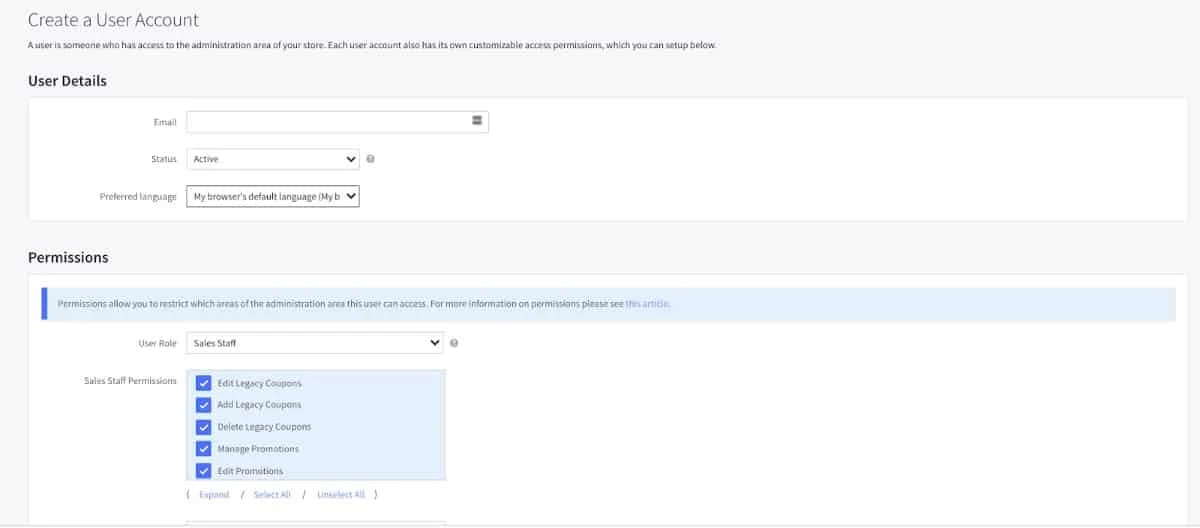
Add Users (Optional)
If you will be working with others to build your store, we recommend that you set them up as additional users.
Step 2: Create Product Categories
For online stores, product categories are a must to help visitors navigate your shop easily. As a bonus, categories also help Google understand the structure of your site, which means adding categories could help you rank higher on Google.
While it may not seem intuitive to create your product categories before you’ve created your products, we recommend doing this step first since you must assign your products to a category at creation. That way, you can select the proper category as you add each new product.
To begin adding new product categories, click on Products on your control panel. Then, click on Product Categories.
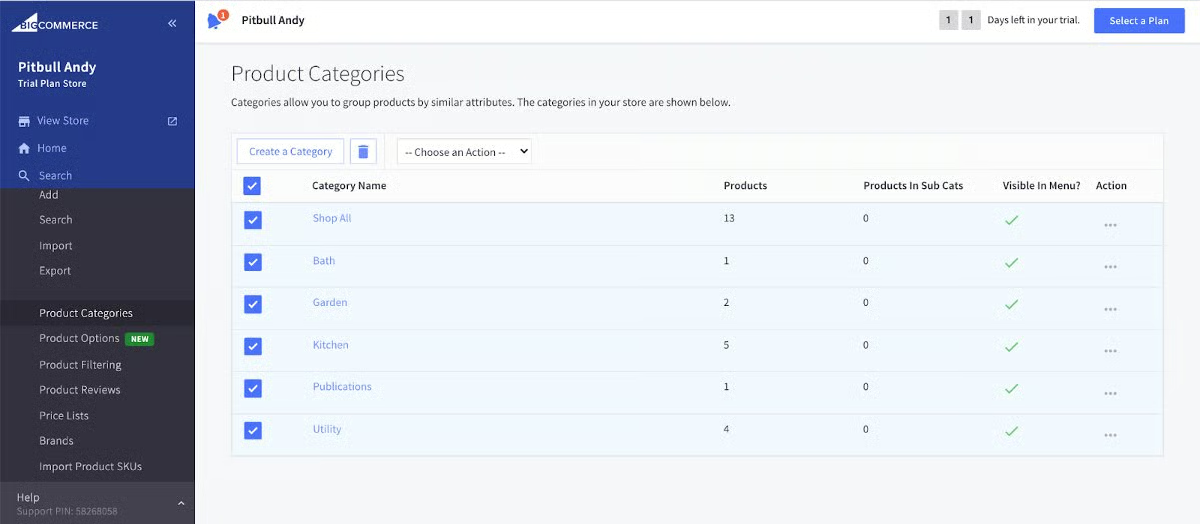
You’ll see that BigCommerce added some sample product categories to your demo shop by default. If the demo store categories match what you sell, keep those you need and delete those you don’t.
To add new categories, simply click on the Create a Category link. When creating a new product category, BigCommerce provides eight fields to add information about the new category.
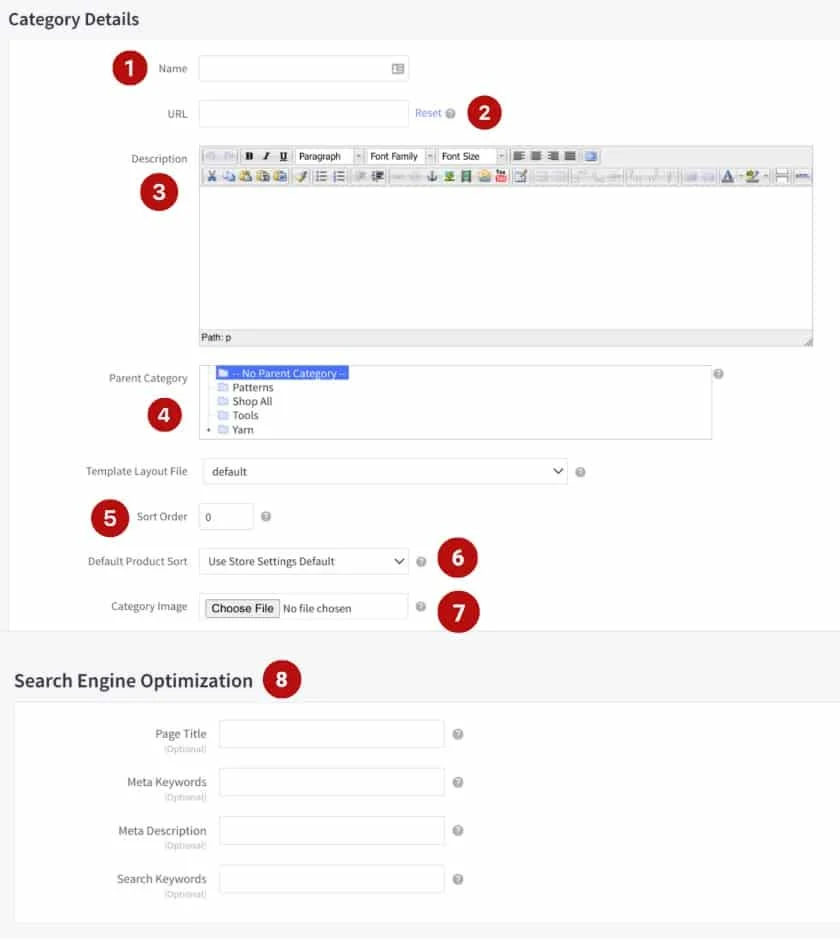
While you don’t have to complete all the fields, there is a handful that you’ll want to complete. At the very least, you need to add a category name (1), category page URL (2), and a description for the category (3) before you continue building your store. Elements 4 through 8 can be added at this stage or later—or you may choose to skip some altogether.
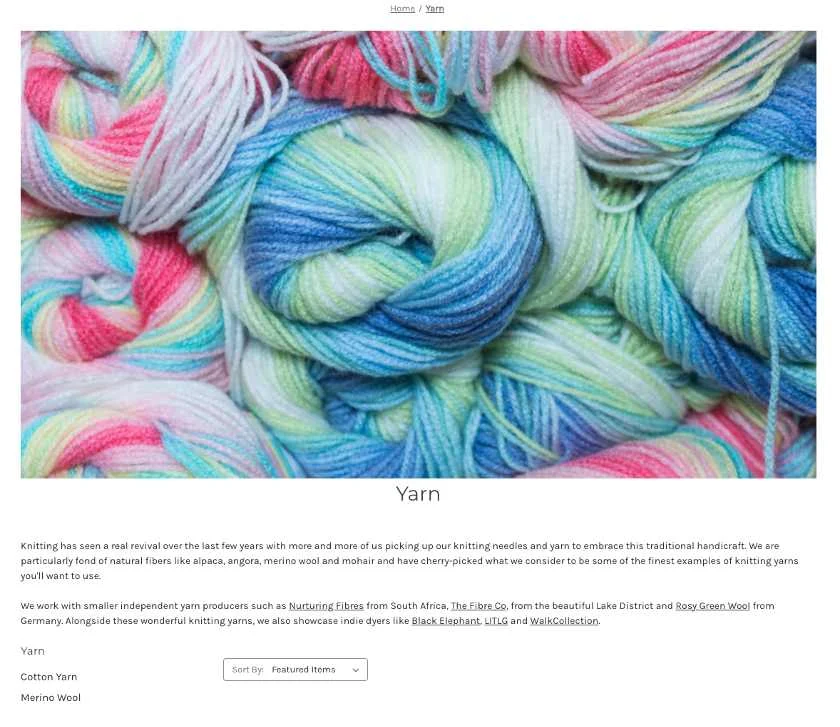
For our demo store, Everyday Knits, we set up three main/parent categories: Yarn, Tools, and Patterns. We wanted to have specific sub/child categories for Yarn as this is where the bulk of our products will be set up.
When setting up a parent category, you can add a description that will show up when a visitor clicks on your category page. You also have the option not to add anything. BigCommerce allows you to be as detailed as you want with your store.
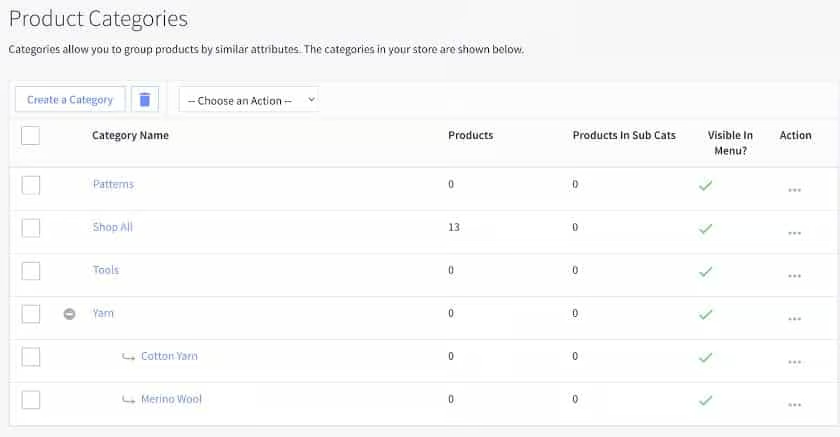
We set up three parent categories and two subcategories under one parent category. 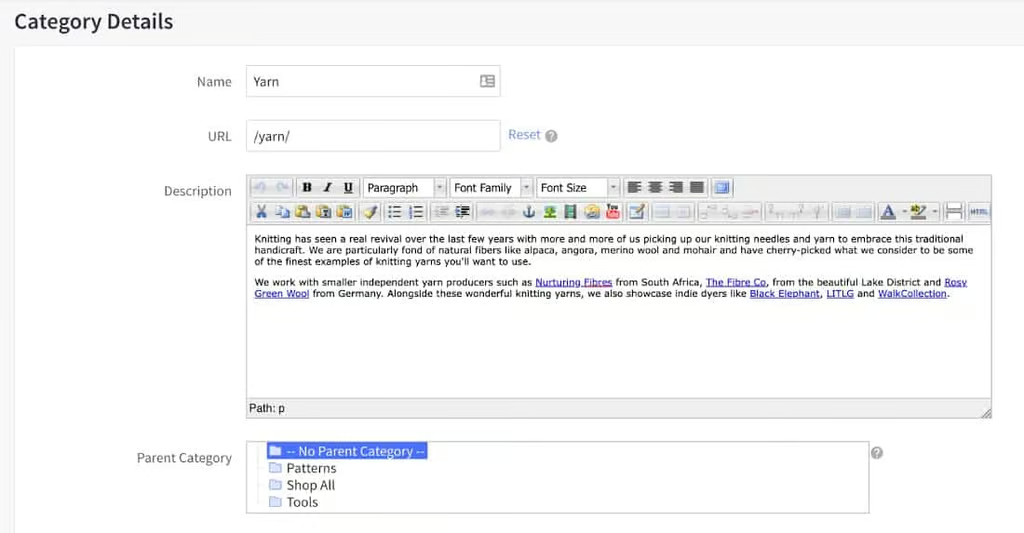
You can opt not to include any description or image for your parent categories, but it can help when you want to explain or highlight standout features for a set of products.


In Action: Here is how a category page in our Everyday Knits store looked when we filled out the category page.
Step 3: Add Products to Your BigCommerce Store
Once you create your product categories, it’s time to start adding products to your online store. You may be surprised and overwhelmed at first with how many fields you’ll need to complete to add thorough information about your products, but don’t fret—BigCommerce makes this process simple.
To manually add products to your online store, navigate to the Add Product screen by clicking on “Add” on the Products navigation bar on the left side of your screen; you’ll immediately see the Add Product dashboard. Within the dashboard, you’ll see five main categories to enter: product information, product options, storefront settings, fulfillment, and SEO.
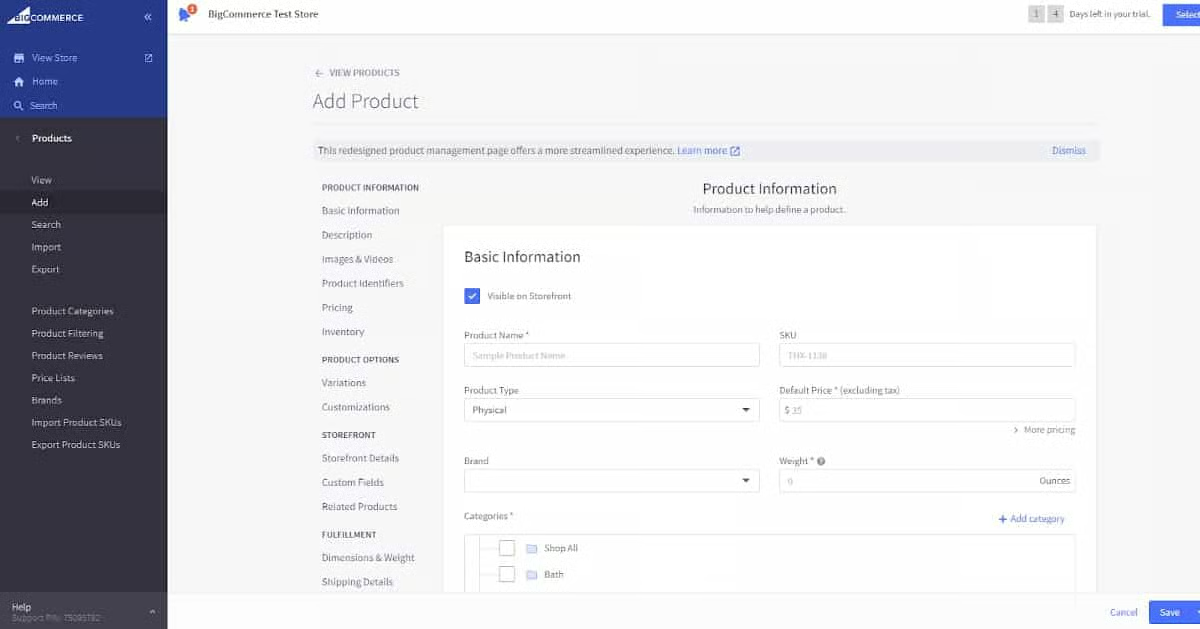
On the left-hand side of the “Add Product” screen, you’ll see a menu of different product information to enter. Here are the available fields for essential product information:
- Basic information: Add a product name, default price, and weight, and assign it to a product category. You might also want to include its SKU, product type, and brand.
- Product description: Write a text-rich description of the product to help store visitors understand the product’s core features and benefits.
- Images and videos: Here, you can upload or link to multiple photos and videos that showcase your product’s features.
- Product identifiers: You can enter more unique product identifiers, including the Universal Product Code (UPC), Bin Picking Number (BPN), Manufacturer Part Number (MPN), and Global Trade Number (GTN).
- Pricing: Enter a default price excluding tax, the product’s tax class, and your tax provider tax code. You can also enter advanced information related to price, including wholesale cost, sale price, bulk pricing discounts, and Manufacturer’s Suggested Retail Price (MSRP).
- Inventory: BigCommerce allows you to track inventory by entering the amount of stock available initially for the product. It then lets you set a “low stock” amount and hide or disable purchasing a product when it runs out. Go to your control panel to enable inventory tracking and click on Advanced Settings > Inventory.
You don’t have to enter all of the product information fields available on BigCommerce. It’s best to consider which fields will help you sell your products. Also, for the best store visitor experience, be consistent in adding the same fields for similar products in your online store.
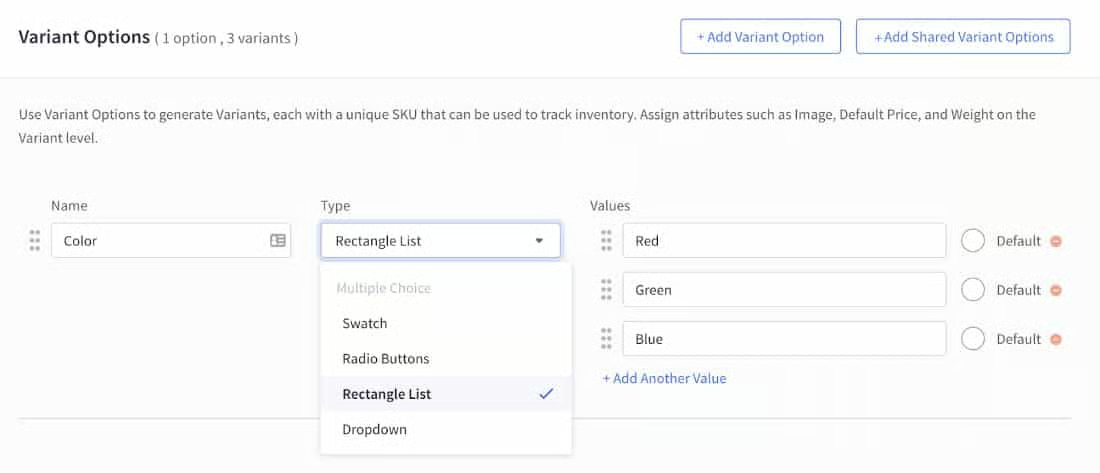
If you offer product variations or customizations, there are two more fields you’ll need to complete. Suppose your product has variants (different versions/SKUs of the same product) or modifiers (such as optional customizations or add-ons). In that case, you can add those into the Product Options section as Variations and Customizations.
In our product example, we wanted to set up color variants. You can choose to display these variants as radio buttons, lists, dropdown, or swatches on your product pages.
Learn more about product options in this BigCommerce guide.
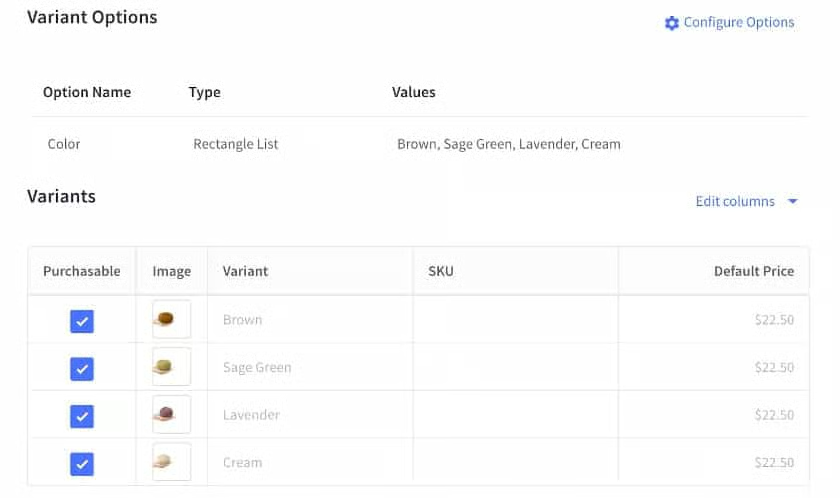
If your products have shared variant options, you can easily set this up by going into Product options in your control panel. These variants can be assigned to multiple products, so you save more time.
In our case, we set up color as a product option and its variants are brown, sage green, lavender, and cream.
This section of the Add Product dashboard allows you to enter more information that helps further establish what customers will see when they visit your online store. Some of these fields may apply to your store and some may not.
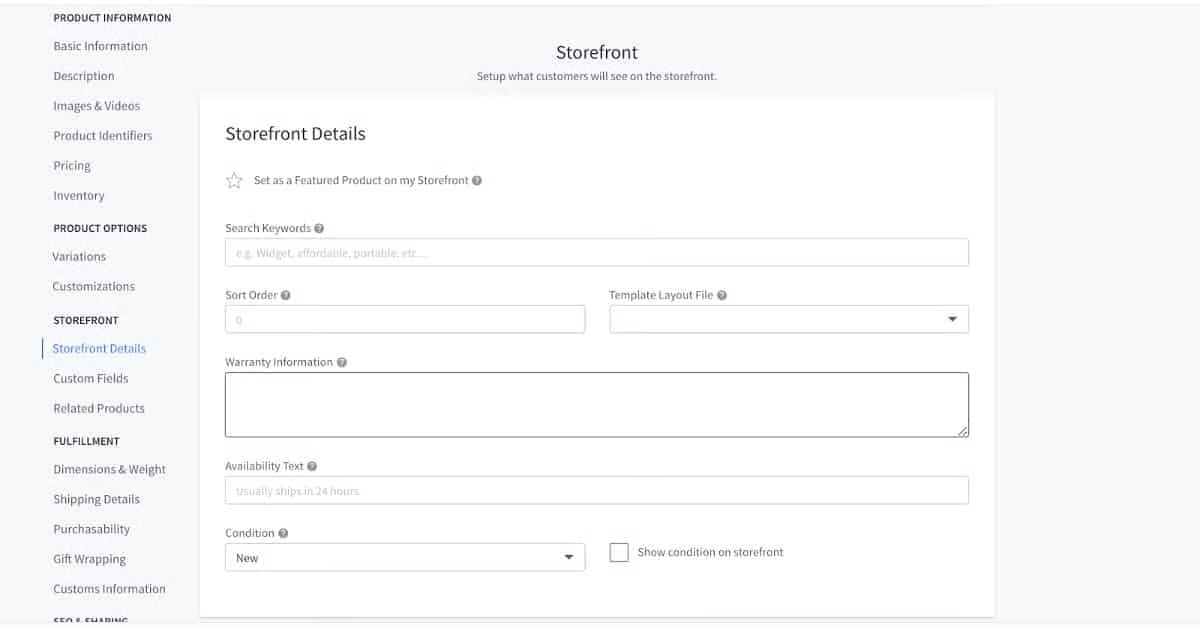
Here are the field options available in the Storefront section of the Add Product dashboard:
- Storefront details: Here, you can add information that tells BigCommerce how high you want the item to appear on your Storefront. You can also add product availability information—such as ships within 24 hours—as well as keywords that shoppers may be using in their search.
- Custom fields: If you offer products that require description fields not available in the standard BigCommerce Product dashboard, you can create a custom field here.
- Related products: You may want to link some products with other related products on your site. You can do that in this field.
Again, some of these fields may not apply to the products you’re adding to your store. If they don’t apply, simply leave the field blank.
The BigCommerce Add Products dashboard also contains information fields that can help fulfill product orders.
Here are the fields related to product fulfillment:
- Dimensions and weight: Here, you’ll add the weight in ounces, height, width, and depth of your product.
- Shipping details: This field lets you enter a fixed shipping price. You can also choose a free shipping option.
- Purchasability: Most products in your shop should be available for immediate purchase. Others may not be available yet but are coming soon, so you may want to take pre-orders. You can set options for both scenarios using this field.
- Gift wrapping: BigCommerce allows you to provide gift wrapping options at the product level, which means you can offer to wrap for some products and not for others.
BigCommerce does not have product fulfillment services. Still, its flexible and thorough dashboard options certainly aid in the product fulfillment process.
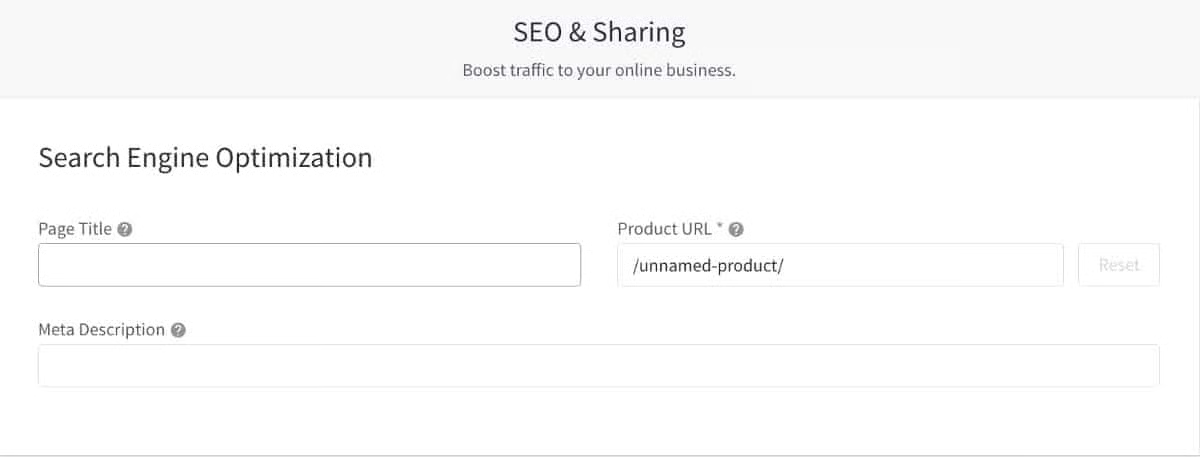
Lastly, the BigCommerce Add Product dashboard helps you generate organic traffic to your online store by providing SEO fields—including customizable page titles and meta descriptions—at the product level.
BigCommerce also allows you to establish open graph sharing, which gives you control over what shows up when someone shares your product page on social media and other channels.
On the left-hand side of the “Add Product” screen, you’ll see a menu of different product information to enter. Here are the available fields for essential product information:
- Basic information: Add a product name, default price, and weight, and assign it to a product category. You might also want to include its SKU, product type, and brand.
- Product description: Write a text-rich description of the product to help store visitors understand the product’s core features and benefits.
- Images and videos: Here, you can upload or link to multiple photos and videos that showcase your product’s features.
- Product identifiers: You can enter more unique product identifiers, including the Universal Product Code (UPC), Bin Picking Number (BPN), Manufacturer Part Number (MPN), and Global Trade Number (GTN).
- Pricing: Enter a default price excluding tax, the product’s tax class, and your tax provider tax code. You can also enter advanced information related to price, including wholesale cost, sale price, bulk pricing discounts, and Manufacturer’s Suggested Retail Price (MSRP).
- Inventory: BigCommerce allows you to track inventory by entering the amount of stock available initially for the product. It then lets you set a “low stock” amount and hide or disable purchasing a product when it runs out. Go to your control panel to enable inventory tracking and click on Advanced Settings > Inventory.
You don’t have to enter all of the product information fields available on BigCommerce. It’s best to consider which fields will help you sell your products. Also, for the best store visitor experience, be consistent in adding the same fields for similar products in your online store.
.cls-1{fill:#155E85;fill-rule:evenodd;}
You’ll improve your online store sales by describing your products in detail. Vivid images and quality product videos also improve sales. Add this information one product at a time via the BigCommerce Add Product dashboard.
If you offer product variations or customizations, there are two more fields you’ll need to complete. Suppose your product has variants (different versions/SKUs of the same product) or modifiers (such as optional customizations or add-ons). In that case, you can add those into the Product Options section as Variations and Customizations.
In our product example, we wanted to set up color variants. You can choose to display these variants as radio buttons, lists, dropdown, or swatches on your product pages.
Learn more about product options in this BigCommerce guide.
If your products have shared variant options, you can easily set this up by going into Product options in your control panel. These variants can be assigned to multiple products, so you save more time.
In our case, we set up color as a product option and its variants are brown, sage green, lavender, and cream.
This section of the Add Product dashboard allows you to enter more information that helps further establish what customers will see when they visit your online store. Some of these fields may apply to your store and some may not.
Here are the field options available in the Storefront section of the Add Product dashboard:
- Storefront details: Here, you can add information that tells BigCommerce how high you want the item to appear on your Storefront. You can also add product availability information—such as ships within 24 hours—as well as keywords that shoppers may be using in their search.
- Custom fields: If you offer products that require description fields not available in the standard BigCommerce Product dashboard, you can create a custom field here.
- Related products: You may want to link some products with other related products on your site. You can do that in this field.
Again, some of these fields may not apply to the products you’re adding to your store. If they don’t apply, simply leave the field blank.
The BigCommerce Add Products dashboard also contains information fields that can help fulfill product orders.
Here are the fields related to product fulfillment:
- Dimensions and weight: Here, you’ll add the weight in ounces, height, width, and depth of your product.
- Shipping details: This field lets you enter a fixed shipping price. You can also choose a free shipping option.
- Purchasability: Most products in your shop should be available for immediate purchase. Others may not be available yet but are coming soon, so you may want to take pre-orders. You can set options for both scenarios using this field.
- Gift wrapping: BigCommerce allows you to provide gift wrapping options at the product level, which means you can offer to wrap for some products and not for others.
BigCommerce does not have product fulfillment services. Still, its flexible and thorough dashboard options certainly aid in the product fulfillment process.
Lastly, the BigCommerce Add Product dashboard helps you generate organic traffic to your online store by providing SEO fields—including customizable page titles and meta descriptions—at the product level.
BigCommerce also allows you to establish open graph sharing, which gives you control over what shows up when someone shares your product page on social media and other channels.
In Action: Here is a finished product page from the Everyday Knits Store. We chose to display product variants as a rectangle list.
Depending on the number of products you intend to sell, setting up products will take most of your time. After you have completed this step, it is time to configure the ecommerce functions of your online store.
Step 4: Configure Back-office Settings
Back-office settings are the ecommerce functions of your store—currencies, payments, fulfillment, shipping, and tax rates. You need to set up your default (and preferred) currency, payment methods, and taxes. We will tackle shipping methods in the next step.
From your menu bar, navigate Store Setup > Currency. In the Default Currency section, you can click on Edit to set up the Currency display.
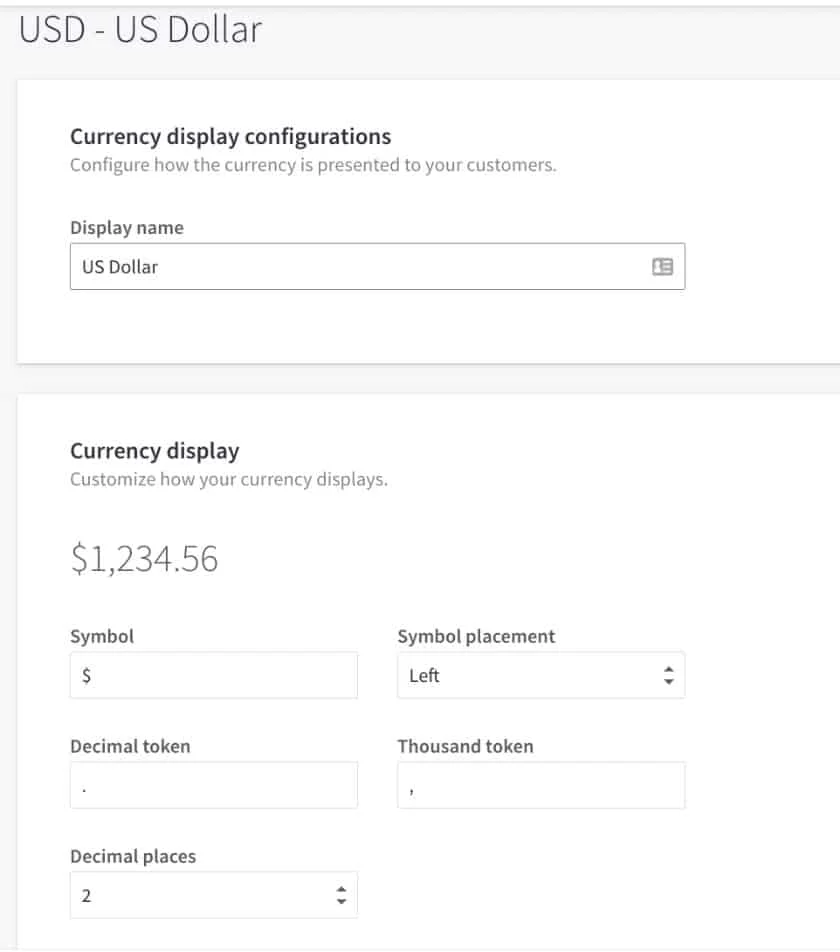
BigCommerce allows you to display product prices in different currencies so your customers can check out using their preferred currency.
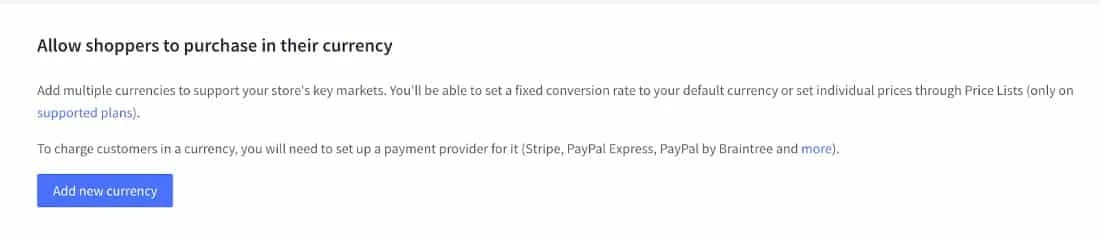
From the Default Currency section, click on Add New Currency.
Once you click on Add New Currency, choose a country currency you would like to transact with. Then, you need to edit some information as follows:
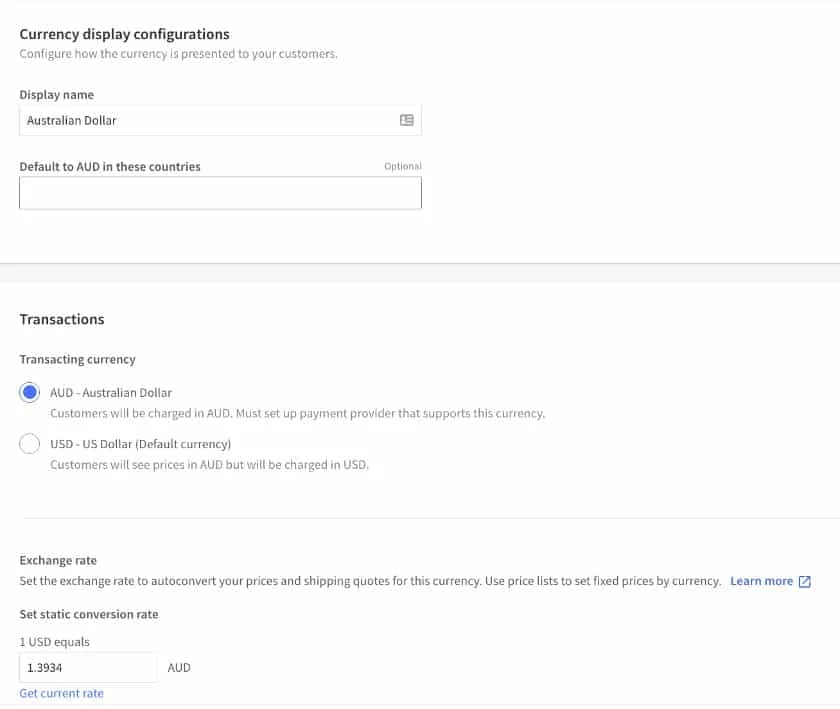
In BigCommerce, you can configure two types of currencies: display and transactional. If an added currency is set to display-only, your store visitors will see storefront prices in that currency but transactions will be done using your default currency.
On the other hand, your store will display transactional currencies in storefront product prices and payment orders. To transact with an added currency, you need to enable a supported payment gateway.
Remember that unless you have set up multicurrency in the control panel, your store transactions will be based on your store’s default currency, which is determined by your billing address.
.cls-1{fill:#155E85;fill-rule:evenodd;}
Selling in multiple currencies? Read a comprehensive guide from BigCommerce on how to set this up.
To set up your store’s payment options, navigate from your control panel to Store Setup and Payments. There, you’ll find many different ways to collect payments from your customers.
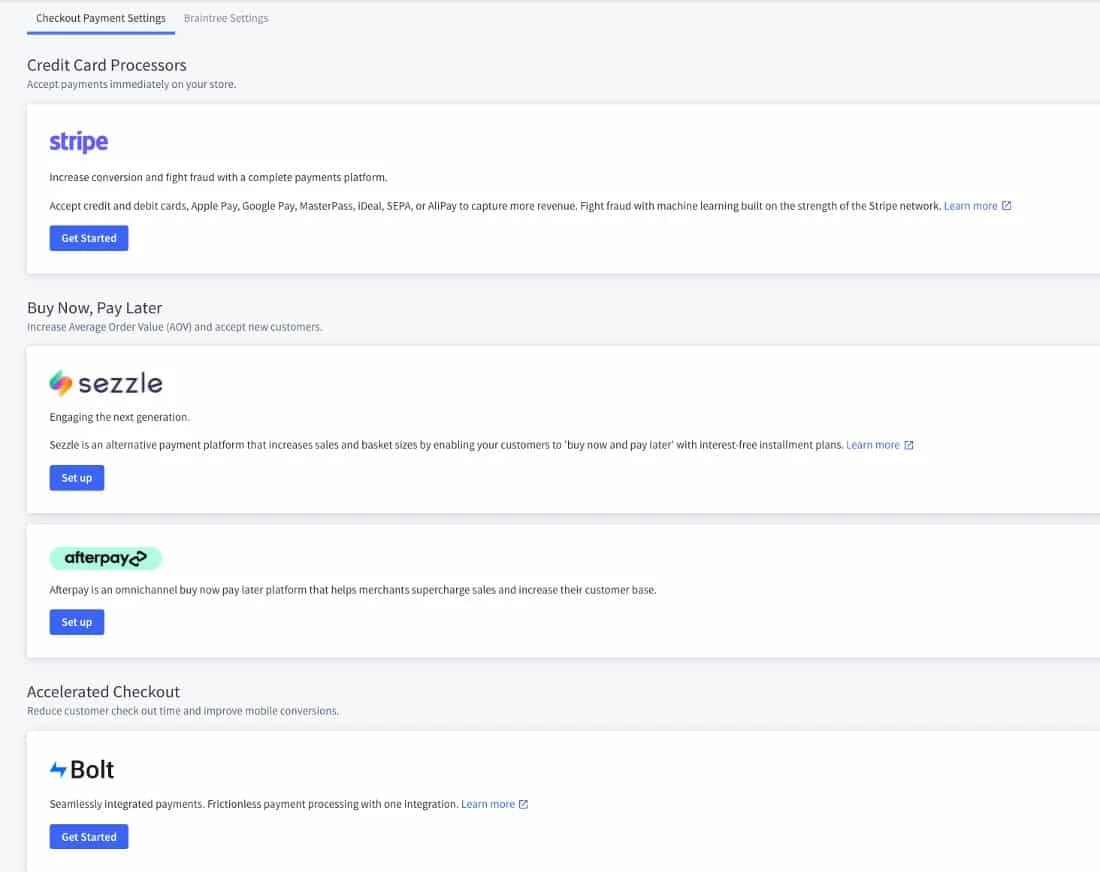
For your convenience, if you don’t already use an existing payment provider or merchant account, BigCommerce offers a default built-in payment processor, PayPal powered by Braintree. You don’t have to choose this payment processing option, though; just click “no thanks” and scroll down the page to set up the payment processing option that works best for you.
Here are the most popular options for accepting payments for your BigCommerce online store:
- Popular payment gateways: Sign up for a Square, PayPal, or Stripe account, and link your payment gateway of choice to your online store.
- Merchant service accounts: Set up a merchant service account, like Chase Payment Solutions®, to collect payments.
- Digital wallet solutions: You can link your online store to Visa Checkout, Apple Pay, Chase Pay, Google Pay, and Masterpass.
- Offline payment solutions: BigCommerce will also let you set up less common offline payment options, such as money order, cash on delivery, and in-store pay for items that customers pick up at your physical store.
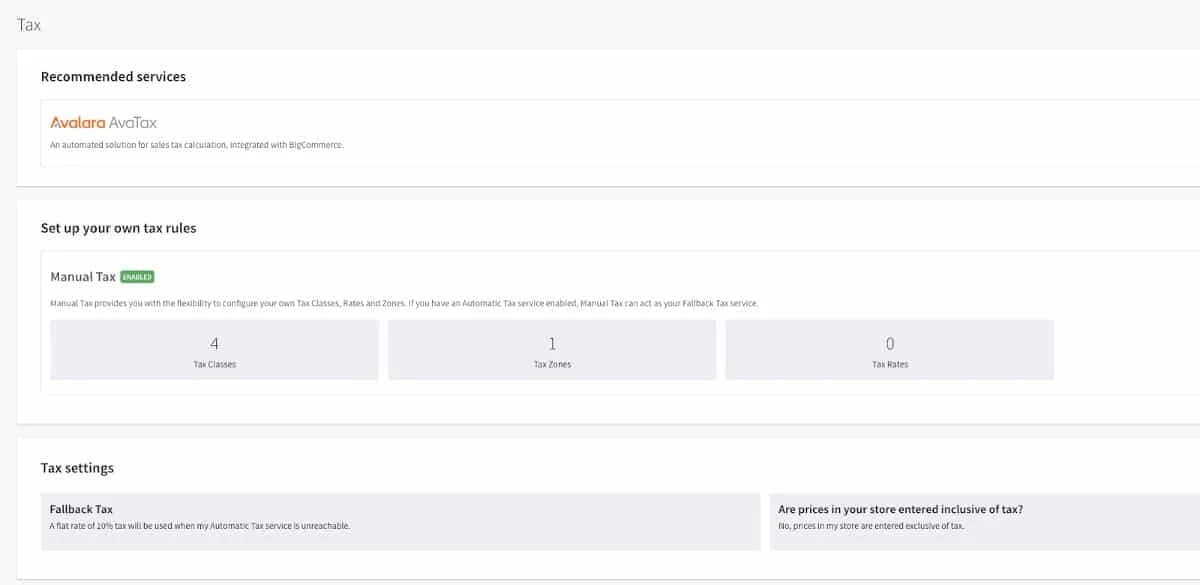
The default tax setting on BigCommerce is Manual Tax, which can be edited at any time. Sales taxes can get complicated, so it is highly recommended that you consult with an accountant to get a clear understanding of your obligations regarding collecting sales taxes. It’s also wise to visit the BigCommerce Help Center to view tutorials on manual tax setup.
From your menu bar, navigate Store Setup > Currency. In the Default Currency section, you can click on Edit to set up the Currency display.
BigCommerce allows you to display product prices in different currencies so your customers can check out using their preferred currency.
From the Default Currency section, click on Add New Currency.
Once you click on Add New Currency, choose a country currency you would like to transact with. Then, you need to edit some information as follows:
In BigCommerce, you can configure two types of currencies: display and transactional. If an added currency is set to display-only, your store visitors will see storefront prices in that currency but transactions will be done using your default currency.
On the other hand, your store will display transactional currencies in storefront product prices and payment orders. To transact with an added currency, you need to enable a supported payment gateway.
Remember that unless you have set up multicurrency in the control panel, your store transactions will be based on your store’s default currency, which is determined by your billing address.
To set up your store’s payment options, navigate from your control panel to Store Setup and Payments. There, you’ll find many different ways to collect payments from your customers.
For your convenience, if you don’t already use an existing payment provider or merchant account, BigCommerce offers a default built-in payment processor, PayPal powered by Braintree. You don’t have to choose this payment processing option, though; just click “no thanks” and scroll down the page to set up the payment processing option that works best for you.
Here are the most popular options for accepting payments for your BigCommerce online store:
- Popular payment gateways: Sign up for a Square, PayPal, or Stripe account, and link your payment gateway of choice to your online store.
- Merchant service accounts: Set up a merchant service account, like Chase Payment Solutions, to collect payments.
- Digital wallet solutions: You can link your online store to Visa Checkout, Apple Pay, Chase Pay, Google Pay, and Masterpass.
- Offline payment solutions: BigCommerce will also let you set up less common offline payment options, such as money order, cash on delivery, and in-store pay for items that customers pick up at your physical store.
The default tax setting on BigCommerce is Manual Tax, which can be edited at any time. Sales taxes can get complicated, so it is highly recommended that you consult with an accountant to get a clear understanding of your obligations regarding collecting sales taxes. It’s also wise to visit the BigCommerce Help Center to view tutorials on manual tax setup.
Step 5: Set Up Shipping Rates & Methods
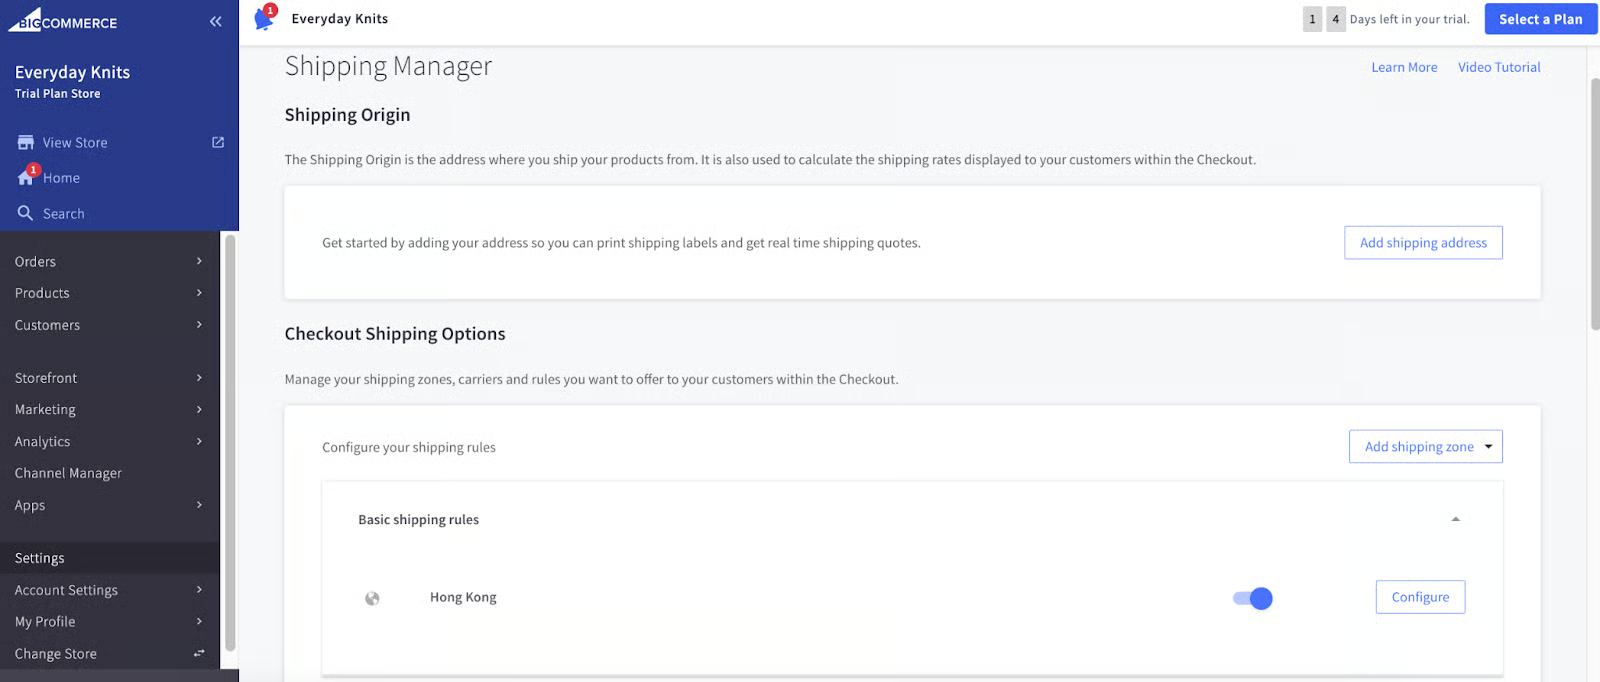
Access the BigCommerce Shipping Manager from your control panel under Settings > Shipping. BigCommerce gives you lots of options when it comes to shipping, so it’s best to watch its shipping video tutorial before setting up this feature so that you fully understand the best shipping solutions for you.
Once you navigate to the Shipping screen, it’s time to enter basic details about where you plan to ship your products from. If you’re just starting out in business, this may be your home address. If you have a business warehouse or brick-and-mortar store, you may choose to ship from there. You may also want to ship directly from a fulfillment company.
You can always print USPS shipping labels directly from within BigCommerce and take care of shipping yourself.
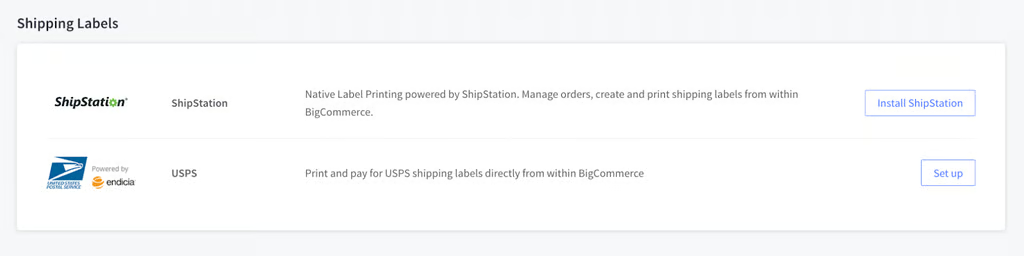
BigCommerce makes it easy to work with a wide variety of top shipping partners. 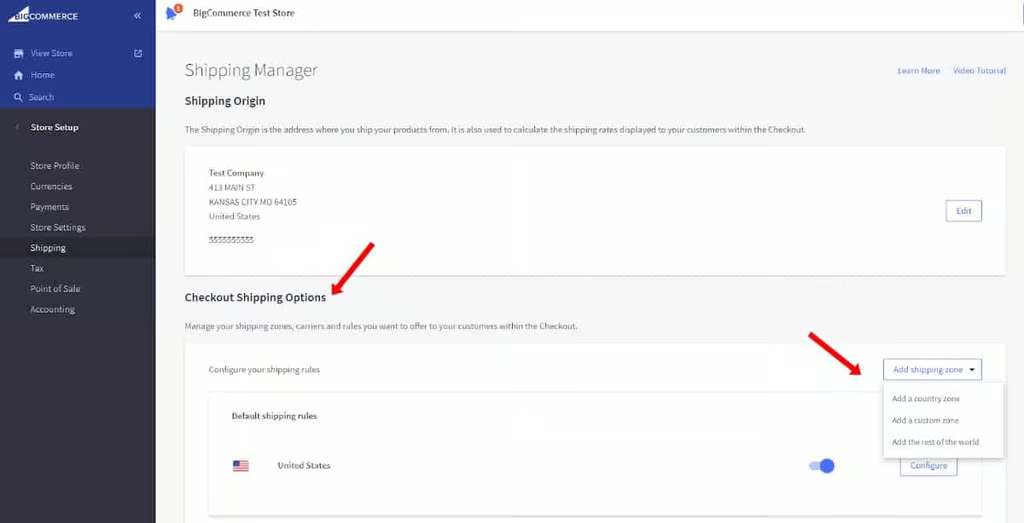
BigCommerce defaults to the US as your shipping zone. You can add additional shipping zones on the final screen of the Shipping Manager dashboard, under Checkout Shipping Options.


The next step in setting up shipping for your online store involves establishing specific options by shipping zone. To begin this process, select the Configure button. When you do this, the following screen will appear, where you can set various shipping parameters for the US, including static and real-time shipping quote options for your customers:
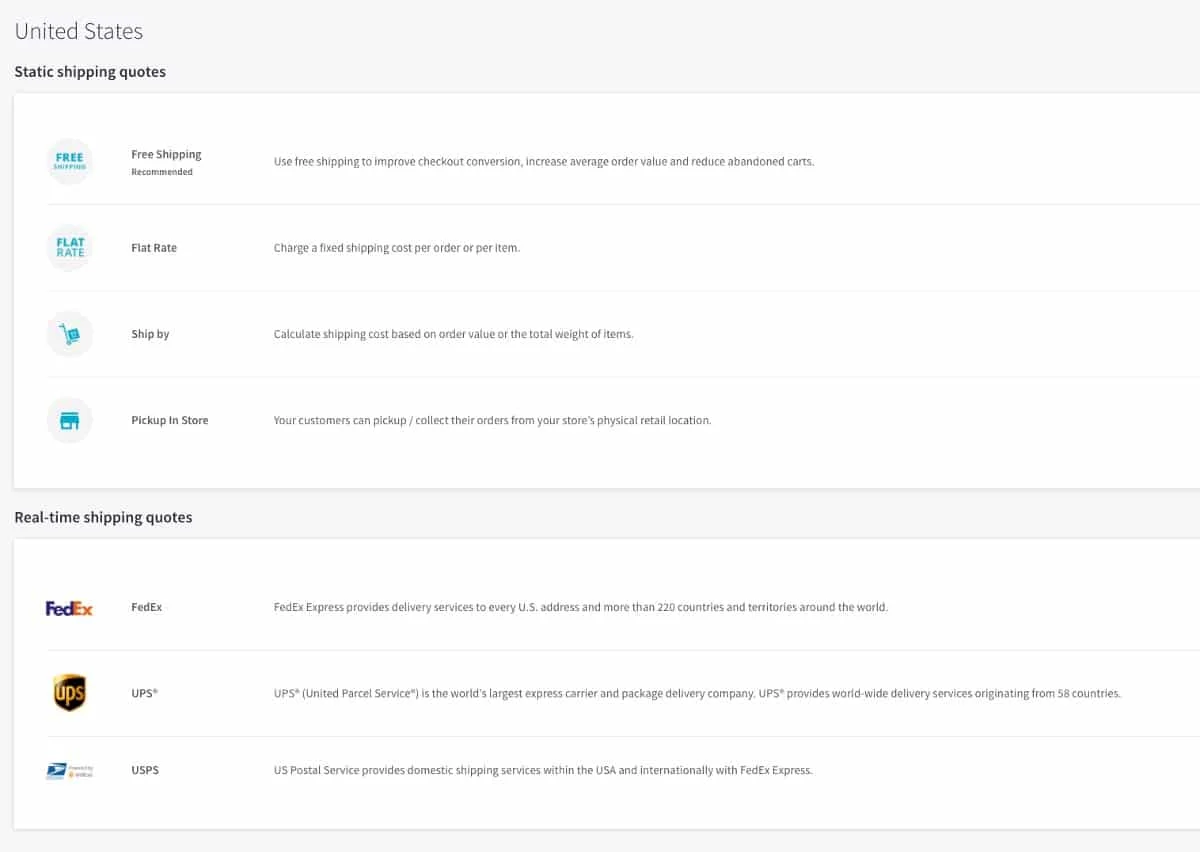
Here are the types of static shipping quotes you can add.
- Free shipping: BigCommerce allows you to offer free shipping on all products or just on products over a certain dollar amount.
- Flat-rate shipping: You can offer flat-rate shipping on entire orders or per item within an order.
- Ship by weight or total order: You can also set shipping rate ranges based on total order weight.
- Pick up in store: If you also have a brick-and-mortar store, you can create an option where customers can order products online and then pick them up in your store.
Though less common, you could also offer real-time shipping quotes on your online store. To do this, you need to connect your store to popular shipping carriers, including FedEx, UPS, and USPS.
Step 6: Design Your Store
After setting up your store’s back office, it is time to configure its front end—your store design. This is where it gets more exciting. First, you need to choose a theme, customize, and add your branding.
BigCommerce uses themes to control the overall design, look, and feel of your online store. The default theme for your BigCommerce Store is called Cornerstone, which offers a simple yet functional layout that’s suitable for a variety of online shops.
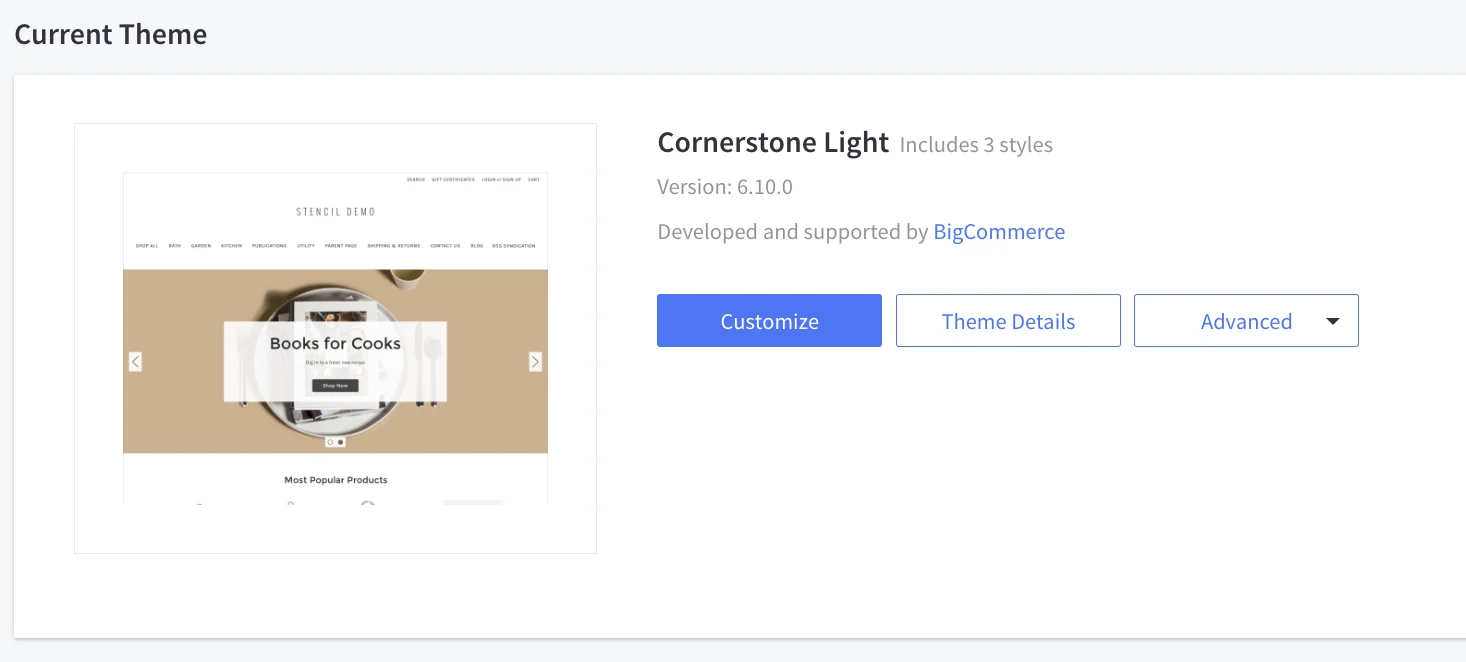
You also have the option to upload a custom theme. We only advise this if you have exceptional technical skills as BigCommerce does not provide technical assistance for uploaded themes. The platform cannot add new features to your custom themes, either.
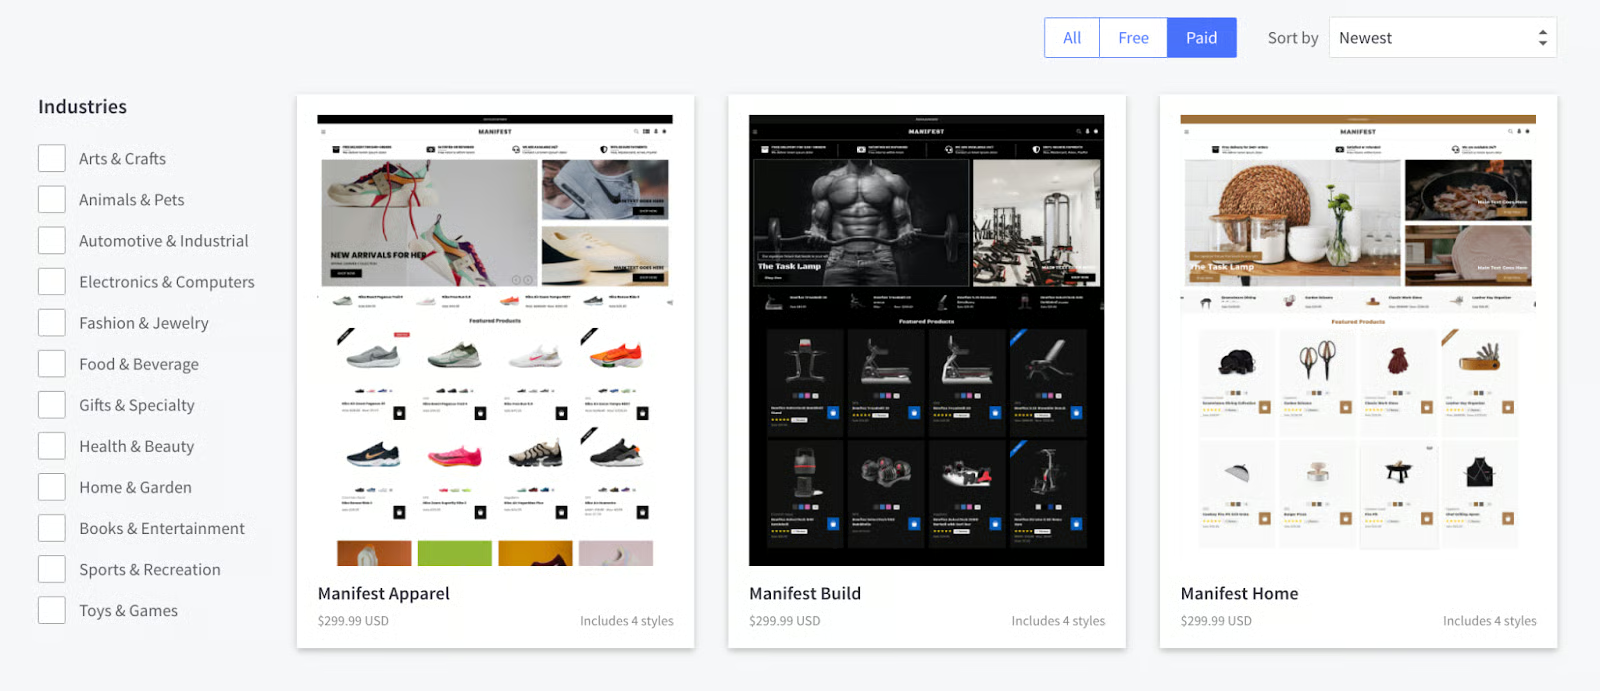
Free themes let you change images, colors, and typefaces and customize some store elements, but they don’t provide many optional features to enhance your site, such as sidebars or added homepage elements. To create an online store with an upgraded design and added functionality, you may want to consider a paid theme.
BigCommerce offers 12 free themes that are suitable for most new online stores. There are also more than 120 premium themes to choose from, priced anywhere from $150 to $300.
.cls-1{fill:#155E85;fill-rule:evenodd;}
If you’re new to working in ecommerce platforms and using themes, it’s wise to set up your store and add at least a few products using a free BigCommerce theme to get the hang of how things work. After you’ve worked in the system and have an idea of how you want your store to look and function, you can explore paid themes to see which one meets your specific selling needs.
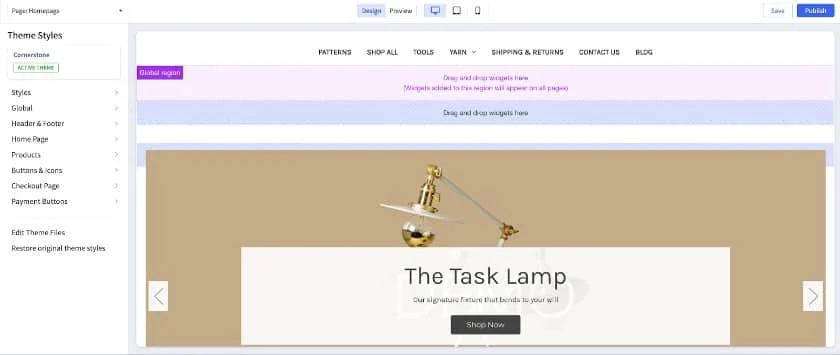
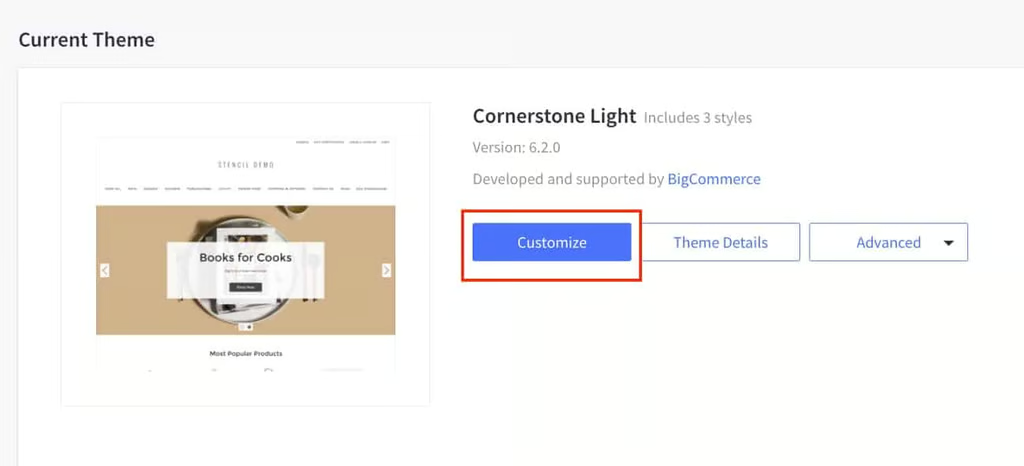
Once you’ve selected your theme, you can customize it at any time. From your control panel, simply navigate to Storefront > My Themes and click on the Customize button to begin editing your theme’s appearance.
Two core elements to add to your theme immediately are your logo and your header images, which are shown in a carousel-style slideshow. Adding these to your BigCommerce store is simple and straightforward.
Upload Your Logo
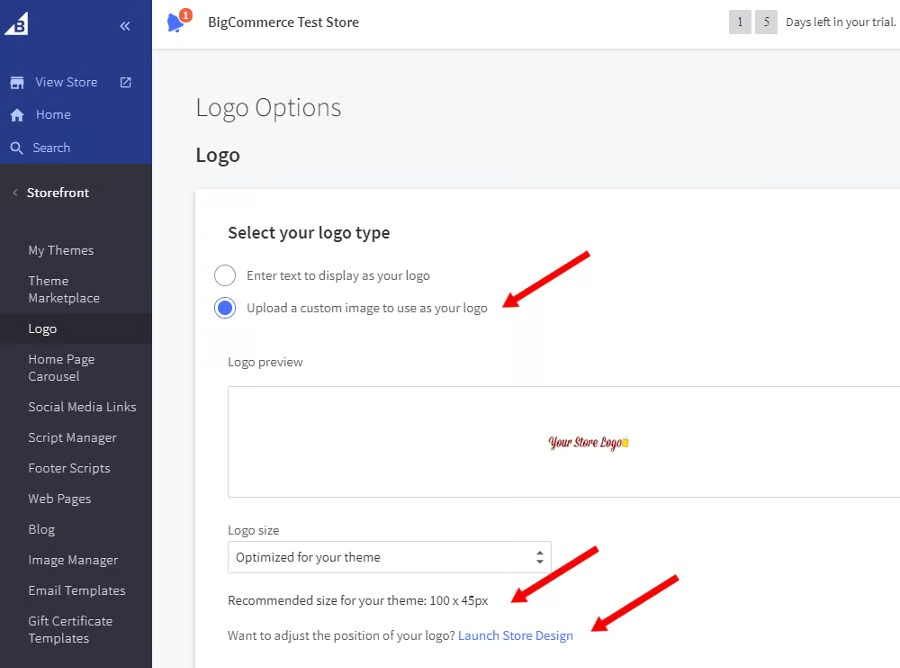
From your control panel, click on Storefront, which opens a sub-navigation bar that includes a Logo tab. Click on Logo, and the Logo Options screen will appear.
Once on this screen, decide between using plain text as your logo or adding a custom logo to your site. If you’re uploading a custom logo, make sure you refer to the logo size recommended for your theme. You can also adjust the position of your logo on your online store via the Launch Store Design link.
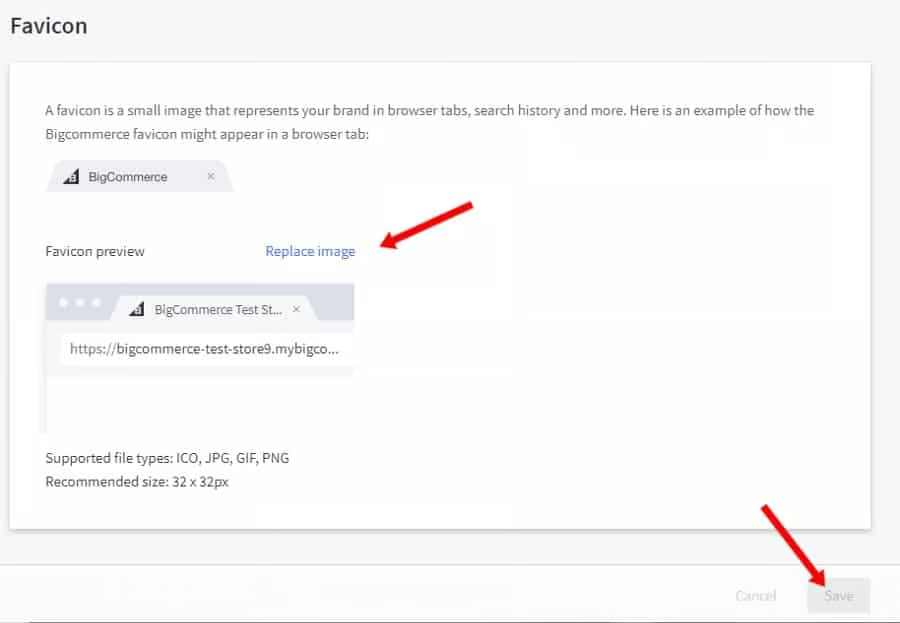
The Logo Options screen also allows you to add a custom favicon, simply a small image or icon representing your brand in browser tabs. This image should be 32×32 pixels in size. Be sure to save your logo and favicon using the Save button in the lower right corner.
Change Your Carousel Images
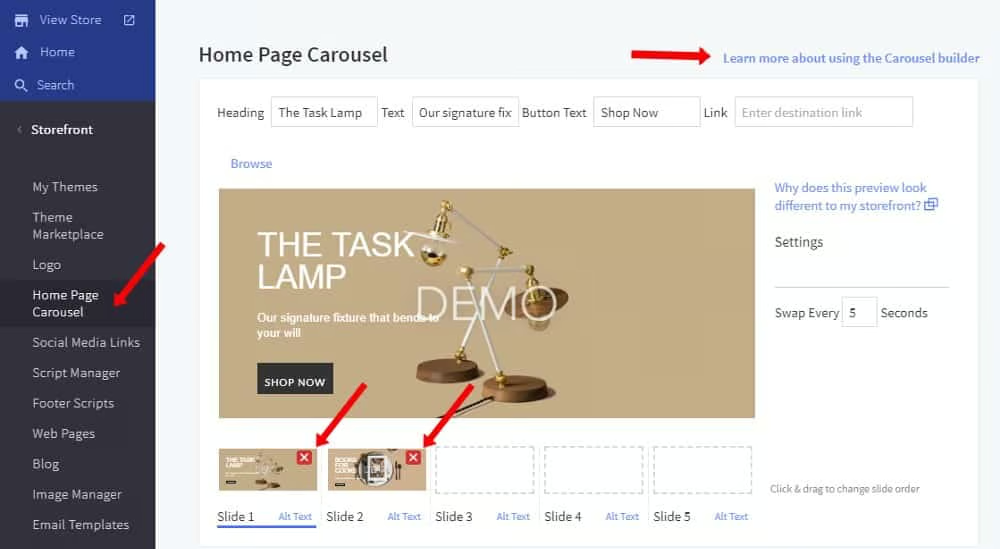
Once you add your logo and favicon, it’s time to add your header or primary images to your store, which BigCommerce calls the Home Page Carousel. Your Home Page Carousel is the featured graphics section on your online store and should contain eye-catching images that define your brand and highlight products worthy of special attention. You can insert anywhere from one to five slides on your Home Page Carousel.
To change your carousel images, go to the Storefront tab from your control panel and choose Home Page Carousel. When you navigate to the Home Page Carousel page, you’ll see the following screen that includes two preloaded demo images:

Your first step is to get rid of the demo images by clicking on the red Xs. This gives you a blank slate to work with. Your screen should now look like the image in the next slide.

Most BigCommerce themes use slide images sized 1200×600 pixels. Once you have selected images for your Carousel, it’s time to upload them to your store using either the drag-and-drop editor or the upload option.
When adding your images, you may also want to add the following elements to each slide, though none are required:
- Heading: This is typically a one- to five-word headline that explains the main point you want to make through your image.
- Text: You can add a short explanation about the image that offers a little more detail than is provided in the heading. For easy readability on desktop, laptop, and mobile devices, it’s best to keep this text short—a rule of thumb is no more than eight words.
- Button Text: Adding a button on your image tells your store visitors what to do next, such as “Learn More,” “Shop Now,” or “Browse the Collection.”
- Link: When a person clicks on an image, you need to direct them to the page that they are interested in viewing, and you do this by adding a link. Obviously, you don’t want to add a link here until the associated category or product page has been created.
Once your images are added, you can use the click-and-drag feature to rearrange slide order. BigCommerce defaults to a five-second “swap time” for every image in your Carousel, but you can change that setting to transition between images more quickly or more slowly.
If you have specific questions about a step, BigCommerce provides answers in just a few clicks. For example, in the upper right corner of the page, there is a link to “Learn more about using the Carousel builder,” which will take you to the BigCommerce Help Center. There, you’ll find extensive how-to instructions for adding featured images.
When viewing your images and their associated headlines, text, and buttons on the Carousel builder page, you may find that your images look strange. This is because the preview panel on the builder does not use the CSS styling that is incorporated into your theme. If you want to check to see how an image looks on your site, simply navigate to your home dashboard and click the “View Store” link in the upper left corner of your screen.
The best way to make sure you’re comfortable updating your site’s featured images is to experiment by adding different types of photos and illustrations to your Carousel. If you need some inspiration, pay close attention to what your competitors are doing in their stores and take note of the images on the other online stores you visit.
BigCommerce uses themes to control the overall design, look, and feel of your online store. The default theme for your BigCommerce Store is called Cornerstone, which offers a simple yet functional layout that’s suitable for a variety of online shops.
You also have the option to upload a custom theme. We only advise this if you have exceptional technical skills as BigCommerce does not provide technical assistance for uploaded themes. The platform cannot add new features to your custom themes, either.
Free themes let you change images, colors, and typefaces and customize some store elements, but they don’t provide many optional features to enhance your site, such as sidebars or added homepage elements. To create an online store with an upgraded design and added functionality, you may want to consider a paid theme.
BigCommerce offers 12 free themes that are suitable for most new online stores. There are also more than 120 premium themes to choose from, priced anywhere from $150 to $300.
Once you’ve selected your theme, you can customize it at any time. From your control panel, simply navigate to Storefront > My Themes and click on the Customize button to begin editing your theme’s appearance.
Two core elements to add to your theme immediately are your logo and your header images, which are shown in a carousel-style slideshow. Adding these to your BigCommerce store is simple and straightforward.
Upload Your Logo
From your control panel, click on Storefront, which opens a sub-navigation bar that includes a Logo tab. Click on Logo, and the Logo Options screen will appear.
Once on this screen, decide between using plain text as your logo or adding a custom logo to your site. If you’re uploading a custom logo, make sure you refer to the logo size recommended for your theme. You can also adjust the position of your logo on your online store via the Launch Store Design link. 
The Logo Options screen also allows you to add a custom favicon, simply a small image or icon representing your brand in browser tabs. This image should be 32×32 pixels in size. Be sure to save your logo and favicon using the Save button in the lower right corner.


Change Your Carousel Images
Once you add your logo and favicon, it’s time to add your header or primary images to your store, which BigCommerce calls the Home Page Carousel. Your Home Page Carousel is the featured graphics section on your online store and should contain eye-catching images that define your brand and highlight products worthy of special attention. You can insert anywhere from one to five slides on your Home Page Carousel.
To change your carousel images, go to the Storefront tab from your control panel and choose Home Page Carousel. When you navigate to the Home Page Carousel page, you’ll see the following screen that includes two preloaded demo images:
Your first step is to get rid of the demo images by clicking on the red Xs. This gives you a blank slate to work with. Your screen should now look like the image in the next slide. 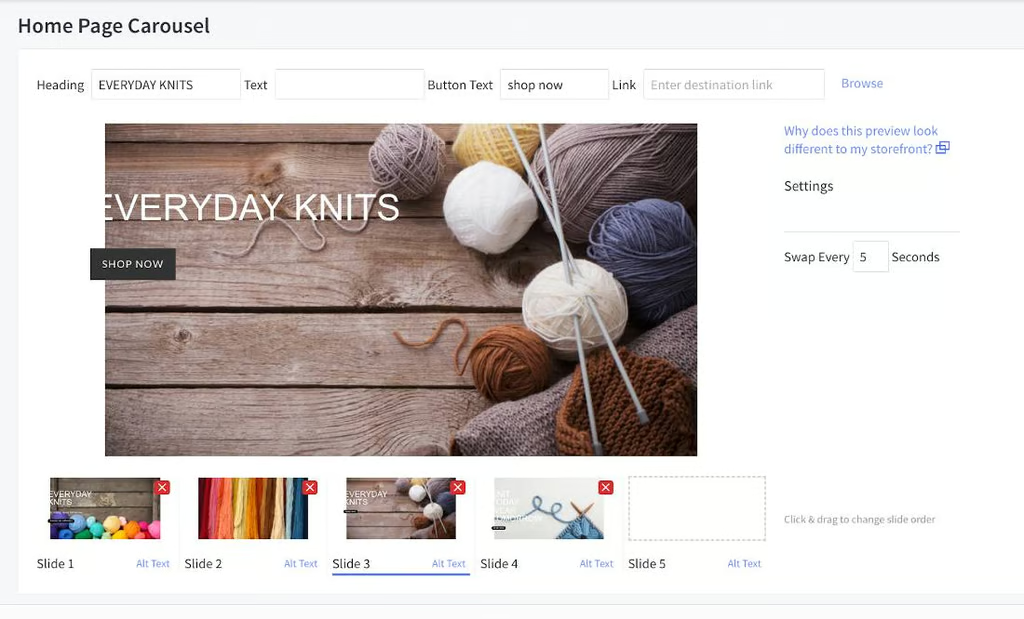
Most BigCommerce themes use slide images sized 1200×600 pixels. Once you have selected images for your Carousel, it’s time to upload them to your store using either the drag-and-drop editor or the upload option.


When adding your images, you may also want to add the following elements to each slide, though none are required:
- Heading: This is typically a one- to five-word headline that explains the main point you want to make through your image.
- Text: You can add a short explanation about the image that offers a little more detail than is provided in the heading. For easy readability on desktop, laptop, and mobile devices, it’s best to keep this text short—a rule of thumb is no more than eight words.
- Button Text: Adding a button on your image tells your store visitors what to do next, such as “Learn More,” “Shop Now,” or “Browse the Collection.”
- Link: When a person clicks on an image, you need to direct them to the page that they are interested in viewing, and you do this by adding a link. Obviously, you don’t want to add a link here until the associated category or product page has been created.
Once your images are added, you can use the click-and-drag feature to rearrange slide order. BigCommerce defaults to a five-second “swap time” for every image in your Carousel, but you can change that setting to transition between images more quickly or more slowly.
If you have specific questions about a step, BigCommerce provides answers in just a few clicks. For example, in the upper right corner of the page, there is a link to “Learn more about using the Carousel builder,” which will take you to the BigCommerce Help Center. There, you’ll find extensive how-to instructions for adding featured images.
When viewing your images and their associated headlines, text, and buttons on the Carousel builder page, you may find that your images look strange. This is because the preview panel on the builder does not use the CSS styling that is incorporated into your theme. If you want to check to see how an image looks on your site, simply navigate to your home dashboard and click the “View Store” link in the upper left corner of your screen.
The best way to make sure you’re comfortable updating your site’s featured images is to experiment by adding different types of photos and illustrations to your Carousel. If you need some inspiration, pay close attention to what your competitors are doing in their stores and take note of the images on the other online stores you visit.
In Action: This is our Everyday Knits store with our logo and header images uploaded.

Step 7: Create Your Store Information Pages
You’ll want to create a few store information pages to communicate details about your brand to customers and answer common questions. Having a good set of store information pages will save loads of time answering customer emails and phone calls.
BigCommerce makes this easy by providing customizable pages for your store through its Web Pages dashboard. To access the Web Pages section, go to your control panel and then select Storefront > Web Pages. This screen will appear:
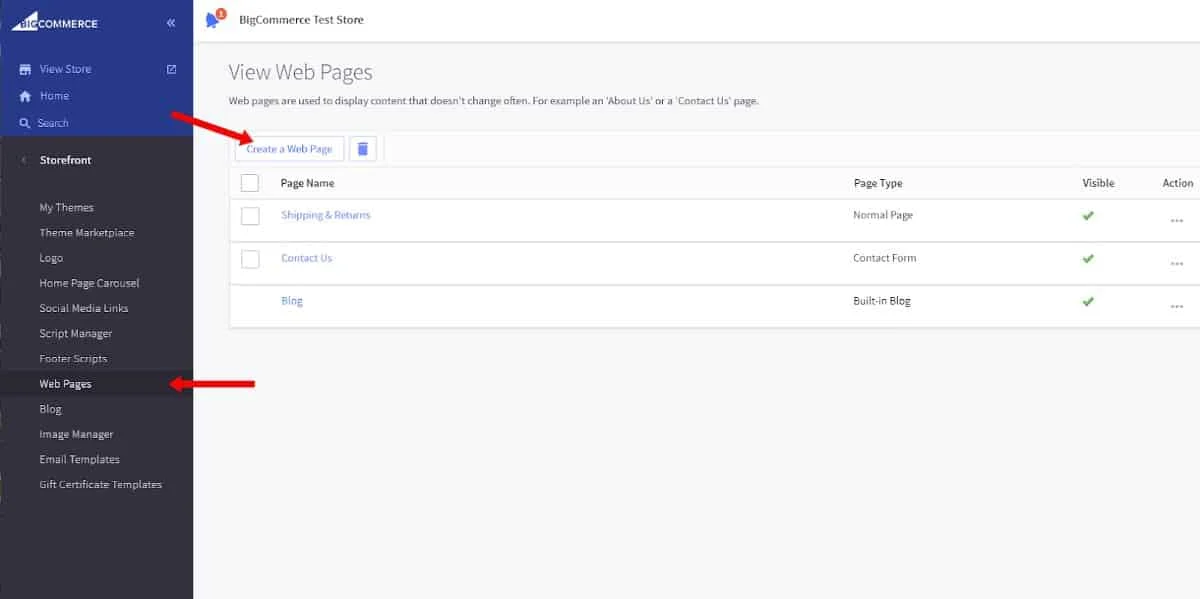
BigCommerce automatically sets up Shipping & Returns and Contact Us pages. It also offers a built-in blog, which you can choose to develop or disable.

Here are essential web pages you need to have on your website:
- Shipping and Returns: Change the details on this demo page to add your store’s shipping and return information, including shipping options, rates, and expected delivery times, return instructions, and refund policies.
- Contact Us: Replace the demo content on this page with your contact information and other pertinent information, such as your hours of operation.
- About Us: Many customers like to know more about a company before doing business with it, so it’s wise to create a new webpage that provides more information about you and your store.
- Privacy Policy: Your site’s privacy policy tells visitors what information you collect and store and what you do with that information. This policy is required by law.
While most online stores need the four pages above, many offer additional webpages on their site. For example, buyer’s stories and case studies often make for great online store content.
The process for editing and creating pages in your shop is the same for all types of pages.
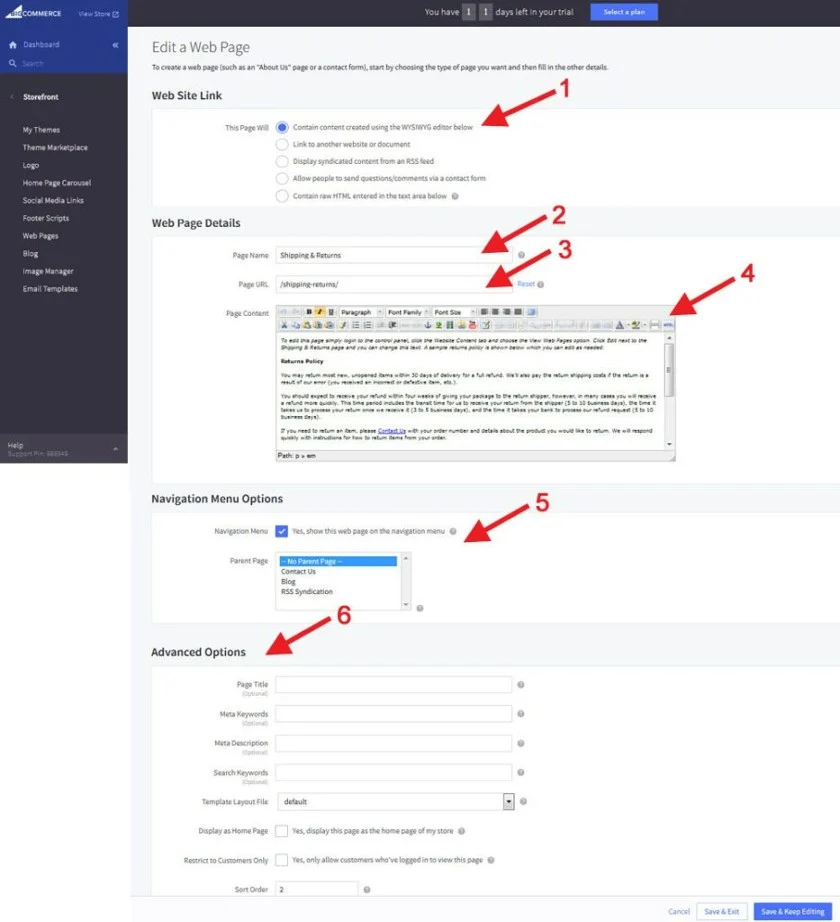
There are six key areas to pay close attention to when developing or editing a web page.
Here are the sections you’ll want to complete.
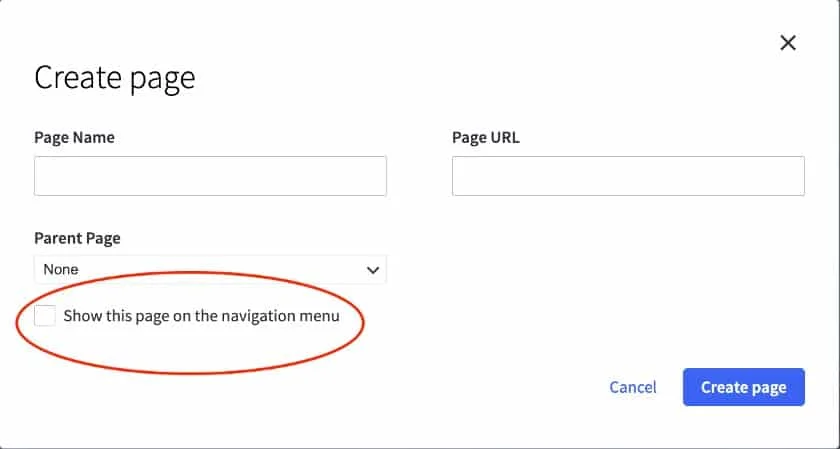
- Page Type: You’re given five different options here as you can link content to this page from various sources. In most cases, you’ll want to check the first option, which is “This page will contain content created using the WYSIWYG editor below” (which stands for “what you see is what you get”).
- Page Name: Simply fill in what you want to name the page. In this example, we’re editing the Shipping and Returns page.
- Page URL: Keep this simple and focused on appropriate keywords for the page.
- Page Content: This is where you get the opportunity to add page content. The BigCommerce editor allows you to format your content in a manner quite similar to the Microsoft Word editor.
- Navigation Menu Options: Choose whether you want to include this page on your website navigation menu. Remember that your space for your primary navigation menu is limited, so links to some web pages would be more appropriate in the site’s footer.
- Advanced Options: Here, you have the ability to add SEO content, such as search keywords and a meta description for your page, as well as choose from a few special settings that determine when and how this webpage is to be viewed.
Notice the small words and buttons in the lower right corner; they’re amplified below so you can get a closer look at what they say. When creating new web pages, you must remember to save your work.

When editing or creating web pages, BigCommerce gives you the option to Cancel, Save & Exit, or Save & Keep Editing. If you’re spending a lot of time creating your web pages, it’s best to hit the Save & Keep Editing button every few minutes; this ensures you never lose your work.
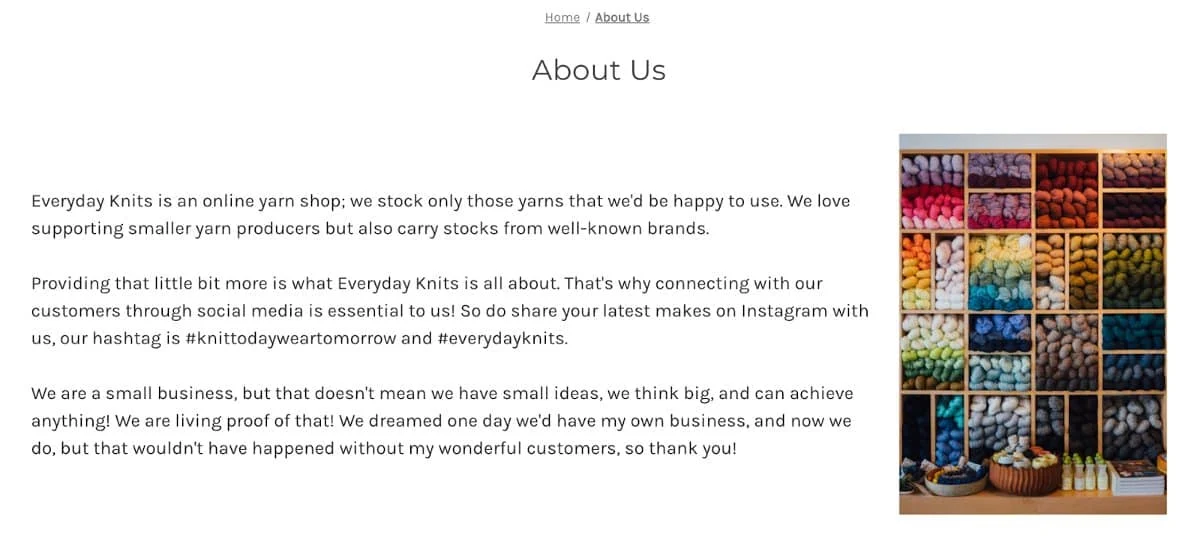
In Action: Here is our demo store’s About Page.
Step 8: Set Up Your Store Navigation
Your basic store setup is nearly complete. Now, it’s time to review your navigation menu and decide if you want to make changes.
You can add menu pages by returning to your theme. Recall that you can access your theme from the Storefront option on your control panel. Once you select Storefront, click on My Themes. Select Customize to begin the theme customization process, which includes navigation editing.

To edit your navigation menu, you need to customize your theme.
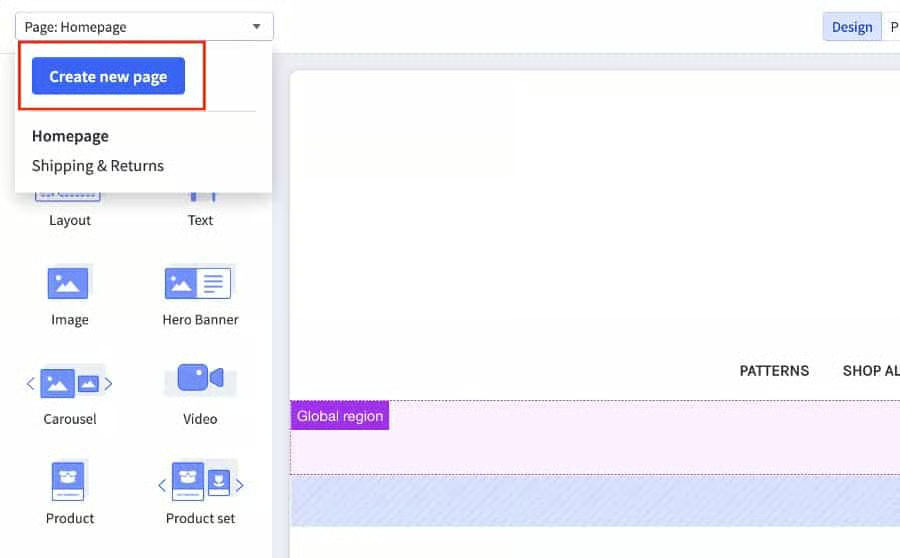
Once your store theme editor is open, click on the dropdown menu on the top right. Choose Create New Page.
The categories you added to your store will appear in your primary navigation menu. The web pages that you selected to appear in your menu will also automatically appear in your main navigation.
If you prefer that these pages not show up in your main menu, you can click on the Visibility option on your Theme navigation and deselect web pages. Once again, save your work after making any changes; on this screen, you’ll find the Save button in the upper right corner.
Sometimes you’ll want some web pages to show in your main navigation menu and others to show up elsewhere in your store—such as in your footer. The only web pages that will show up in your default navigation bar are those that you selected to appear there back when you created your web pages.
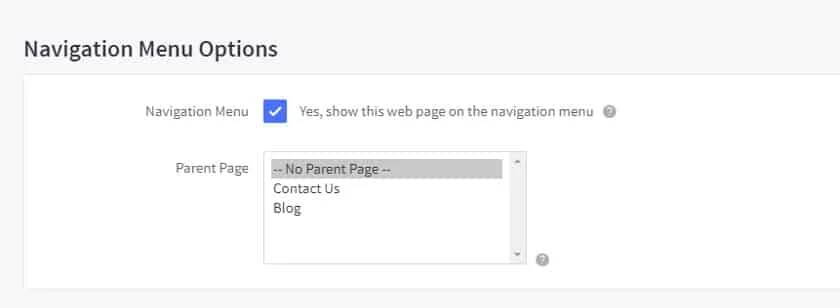
If something is appearing in your header that you don’t want there, return to your Web Pages dashboard (Home > Storefront > Web Pages). Click on the page that you don’t want to appear in your navigation menu and scroll down to the Navigation Menu Options. Then, deselect “Yes, show this webpage on the navigation menu” and save your changes.
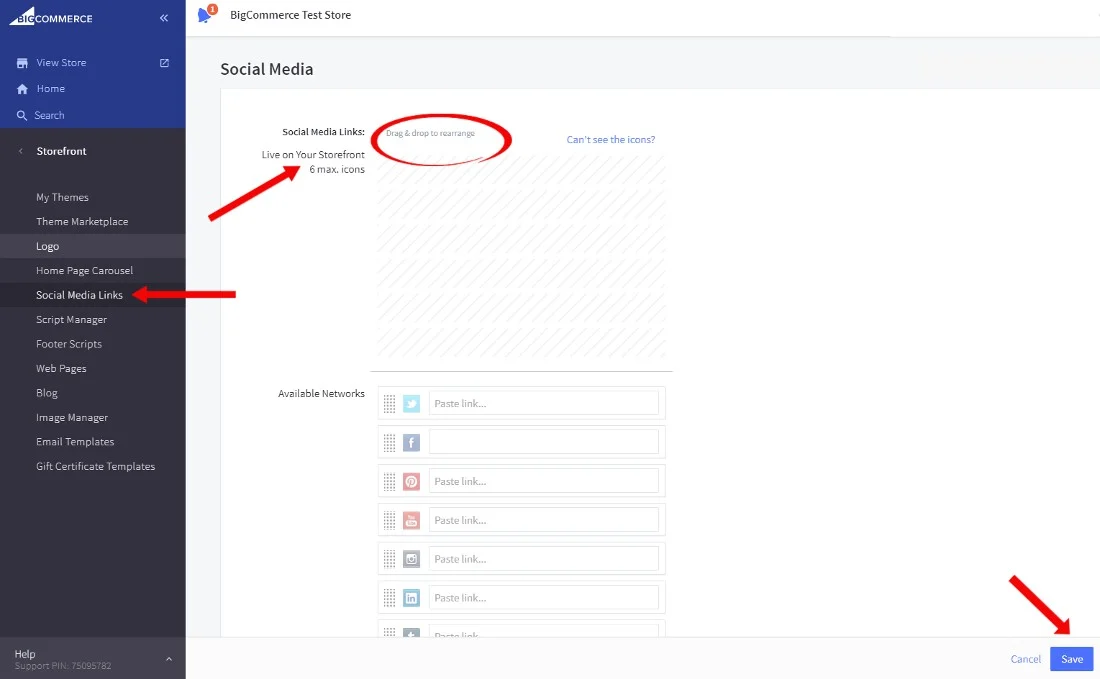
You can also add up to six social media links to your online store. To do this, go back to the Storefront option on your control panel and navigate to Social Media Links. Next, add your specific social media links to each network profile that you want to promote on your store. Then, drag and drop your links to the Live on Your Storefront section of the screen. Save your work so the social media icons appear on your website.
You can add menu pages by returning to your theme. Recall that you can access your theme from the Storefront option on your control panel. Once you select Storefront, click on My Themes. Select Customize to begin the theme customization process, which includes navigation editing.
To edit your navigation menu, you need to customize your theme. 
Once your store theme editor is open, click on the dropdown menu on the top right. Choose Create New Page.


The categories you added to your store will appear in your primary navigation menu. The web pages that you selected to appear in your menu will also automatically appear in your main navigation.
If you prefer that these pages not show up in your main menu, you can click on the Visibility option on your Theme navigation and deselect web pages. Once again, save your work after making any changes; on this screen, you’ll find the Save button in the upper right corner.
Sometimes you’ll want some web pages to show in your main navigation menu and others to show up elsewhere in your store—such as in your footer. The only web pages that will show up in your default navigation bar are those that you selected to appear there back when you created your web pages.
If something is appearing in your header that you don’t want there, return to your Web Pages dashboard (Home > Storefront > Web Pages). Click on the page that you don’t want to appear in your navigation menu and scroll down to the Navigation Menu Options. Then, deselect “Yes, show this web page on the navigation menu” and save your changes.
You can also add up to six social media links to your online store. To do this, go back to the Storefront option on your control panel and navigate to Social Media Links. Next, add your specific social media links to each network profile that you want to promote on your store. Then, drag and drop your links to the Live on Your Storefront section of the screen. Save your work so the social media icons appear on your website.
Step 9: Preview Your Store
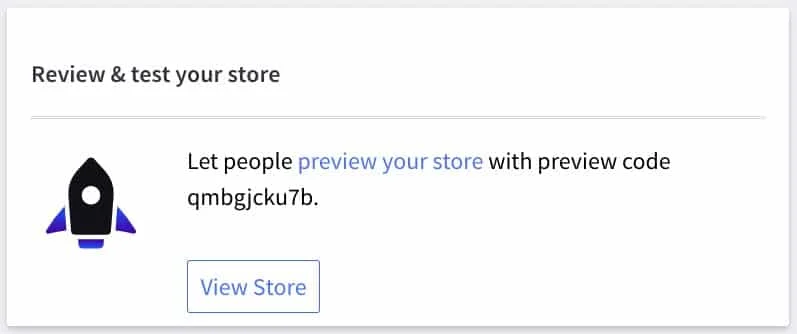
Before you announce that you’re open for business, conduct a thorough review of your online store to make sure that it looks the way you want it to look and says exactly what you want it to say. To do this, simply navigate back to your control panel and click on View Store to see your live BigCommerce store.
You may also want to enlist help to preview your store as, at this point, you’re probably so familiar with your website that you might have trouble catching errors. Plus, it’s always good to get others’ opinions. On your dashboard, BigCommerce provides store preview instructions and a preview code so that you and others can view your store before it launches.
Step 10: Launch Your Online Store
After you’ve completed all the steps outlined here, you’re ready to launch your store. Before your site goes live, though, you’ll need to upgrade your trial to activate your store. Access this from your home dashboard by clicking the Upgrade Your Trial button.
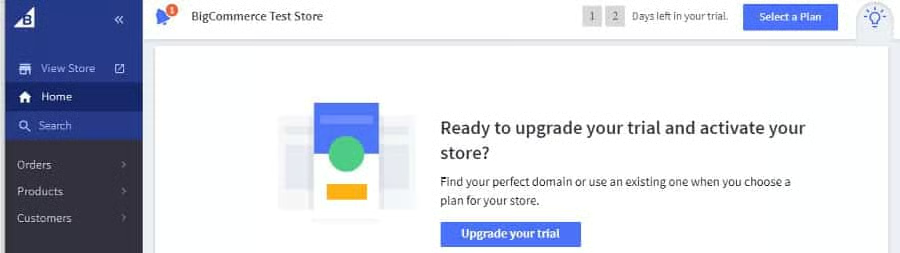
There are four plans available through BigCommerce. The features for BigCommerce plans vary, so before making a purchase decision, be sure to review the details BigCommerce provides about each plan.
You can always start with the Standard Plan and upgrade as your needs evolve. In fact, that’s how most online store owners launch new sites. Read our BigCommerce review for more details on the platform’s pricing and features.
Bottom Line
As you can see, it’s relatively easy to set up and learn how to use Bigcommerce. The dashboard is intuitive and the online store editor is simple and straightforward to use. There are more than 100 themes available, so you’re certain to find one that will work well for your online store, no matter what you plan to sell. The BigCommerce platform gives you everything you need to create and launch a stunning website quickly. Sign up for your free 15-day trial to get started.