


HubSpot CRM is one of the most popular and easy-to-use customer relationship management (CRM) systems for general use on the market. Sales teams use this CRM to store and manage all types of information, like contacts and deals.
The first step to using HubSpot CRM is understanding how to organize and import your CRM data. Next, set up essential features like email and calendar sync and learn how to use them to grow your small business. Here, we explore how to use HubSpot CRM from setting it up to maximizing its features to grow your small business.
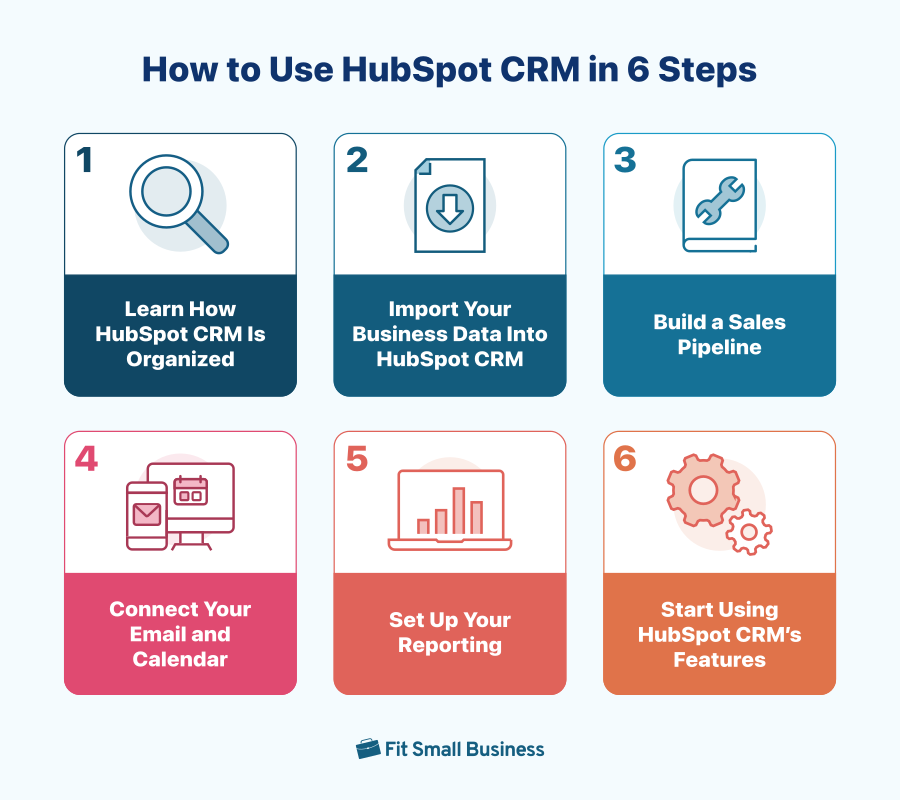
Step 1: Understand How HubSpot CRM Is Organized
A CRM system is a business solution designed to store contact information and automate tasks related to those contacts. It has features to assist teams in sales, marketing, and customer service operations. Like any other CRM system, it is important to know how HubSpot CRM is organized. This lays a foundation for understanding more advanced navigation and features as you learn how to use HubSpot CRM for sales.
Objects, Records, and Properties
The three key components in your CRM are objects, records, and properties.
| Definition | Uses | Examples | |
|---|---|---|---|
| Objects | Objects represent your business processes and relationships. HubSpot generally includes four standard objects: contacts, companies, deals, and tickets. | Objects can be used for segmenting and reporting. | Standard objects include contacts, companies, deals, and tickets, while additional objects include products, quotes, calls, payments, conversations, and other custom objects. |
| Records | Records refer to individual contacts, companies, tickets, and deals to which you add details. | You can associate records between objects to better understand their relationship or relevance. | For example, a contact record includes the person's name and interaction notes, while a company record contains its industry and key contacts. |
| Properties | Properties store all types of information gathered about your records in HubSpot. | Properties help segment, monitor, and report on the HubSpot database. | Default properties apply to all records within that object, whereas custom properties store additional types of information. |
A contact, company, ticket, or deal may have one or more properties that can be customized for sales, marketing, and service processes—also called custom properties. For example, you can create a property for a specific group of contacts like “first-time contactless payment users” or “social media-sourced leads.”
Before importing your business data in HubSpot CRM, audit the properties you use or desire to use. Then, you can create custom properties. In addition to properties, you can log activities like calls, emails, meetings, and associated tasks on all HubSpot records.
How to Create a Custom Property
Learn how to use HubSpot for customizing data and related properties to serve your leads and customers better. Follow these steps to create a custom property:
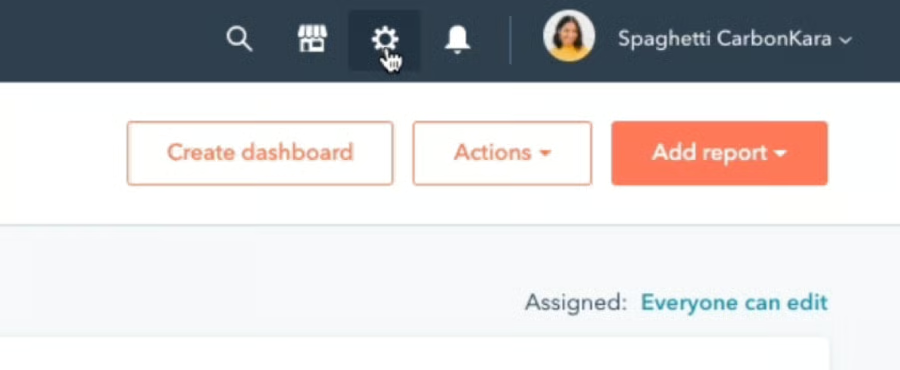
1. Navigate to the upper right-hand corner of your HubSpot CRM account and click the settings icon.
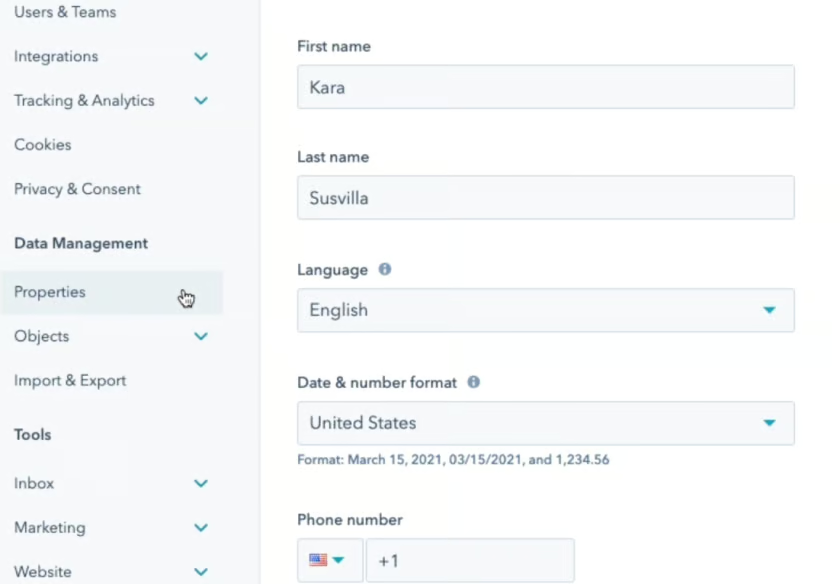
2. In the left sidebar menu, select Properties to see all existing properties.
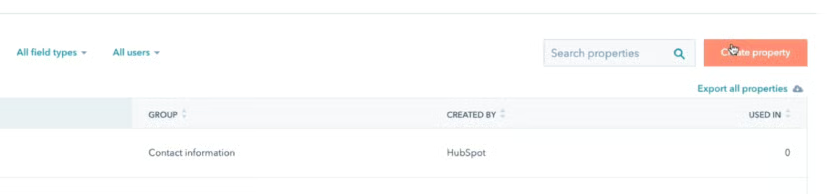
3. On the right-hand side, select the Create property button, and a panel will appear where you can enter the details of the property.
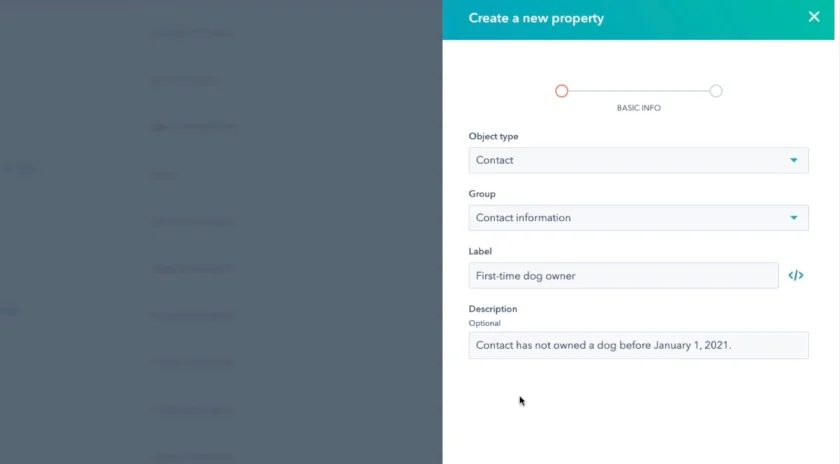
4. To enter property details, select the object type (contact, company, deal, product, or ticket). Next, choose the group the property belongs to (such as contact activity, deal information, and conversion information). Enter the label (name of the property) and the description.
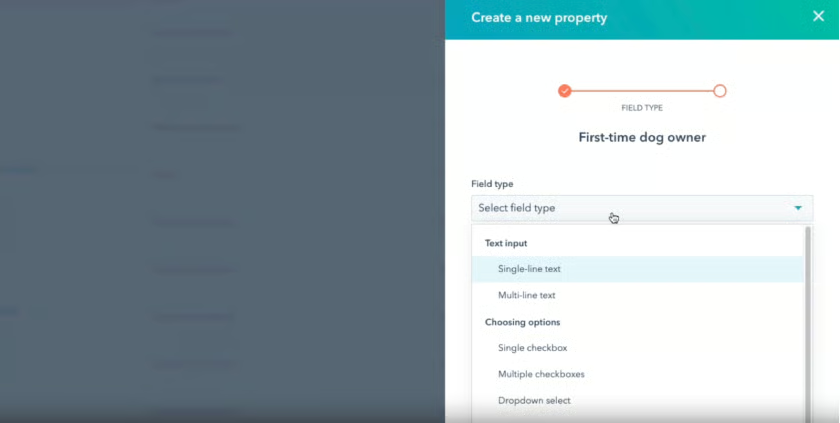
5. Click Next and choose a field type (like single-line text to enter a word or a short sentence, multiline text to enter a paragraph of text).
6. Tick Show in forms if you want the property to be displayed in your HubSpot forms. Click ‘create’ to save your custom property.
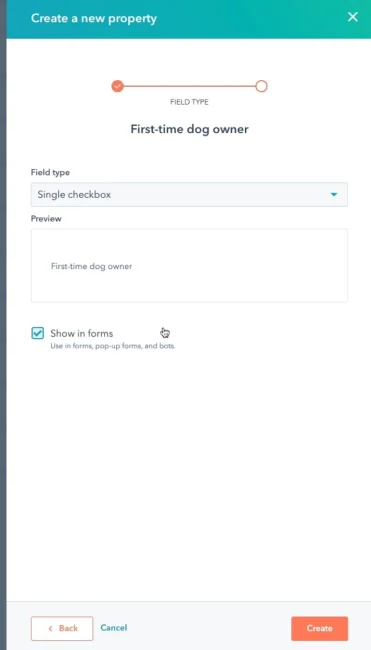
Check “Show in forms” and click “Create” to save a custom property in the HubSpot CRM. (Source: HubSpot)
Deduplications and Associations
HubSpot is one of the best CRMs for small businesses with deduplication tools. As you introduce and update records and properties in your business system over time, there is a risk of duplicating data.
Duplicate records can lead to reps following up with the same contact twice, which wastes time and effort. Deduplication is the process of managing similar records or duplicates by deleting any such instances flagged by the CRM.
HubSpot CRM deduplicates records in various ways to ensure users have a clean database. When comparing two objects, HubSpot looks into the name, company name, email, phone number, IP-derived country, and zip code.
The model learns to adapt to this model over time when you merge or dismiss a pair as duplicates. Moreover, contacts, companies, tickets, and deals can be deduplicated using a unique record identification (ID).
The associations show how your business data relates to one another. The properties in the records provide personalized information on each contact, company, ticket, or deal in your HubSpot CRM. Sales reps can use this information as a basis for prospecting, qualifying, and nurturing leads.
| Definition | How HubSpot Does It | |
|---|---|---|
| Deduplication | Scans data for similar records or duplicates | HubSpot automatically deduplicates data by using a user token (e.g., hubspotutk cookie), email address (comparing a matching value in the Email property), company domain name, custom unique value properties, or record ID. |
| Associations | Shows how your business data relates to one another | It is always a two-way record association (e.g., if record X is associated with record Y, record Y is also associated with record X), wherein the associations can be viewed in each record. |
How to Manage Duplicates
Learn how to use HubSpot to ensure you have clean data for your prospecting, lead nurturing, and other sales activities. Follow these steps to manage duplicates in HubSpot CRM.
1. Go to your Contacts or Companies in your HubSpot accounts’ home screen.
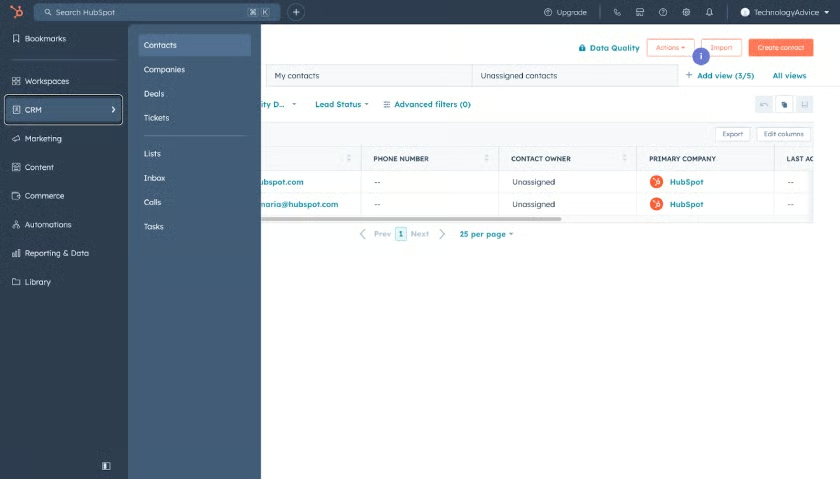
2. Click on Actions and select Manage Duplicates.
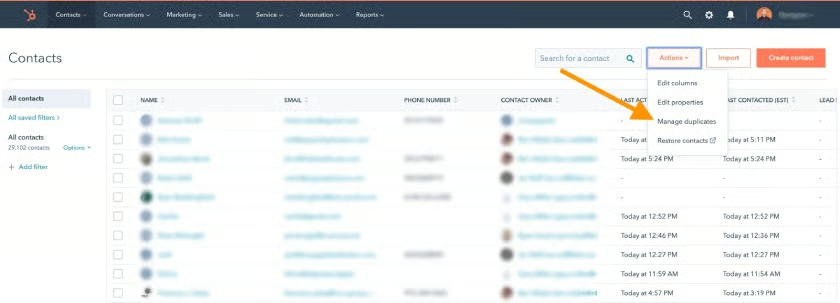
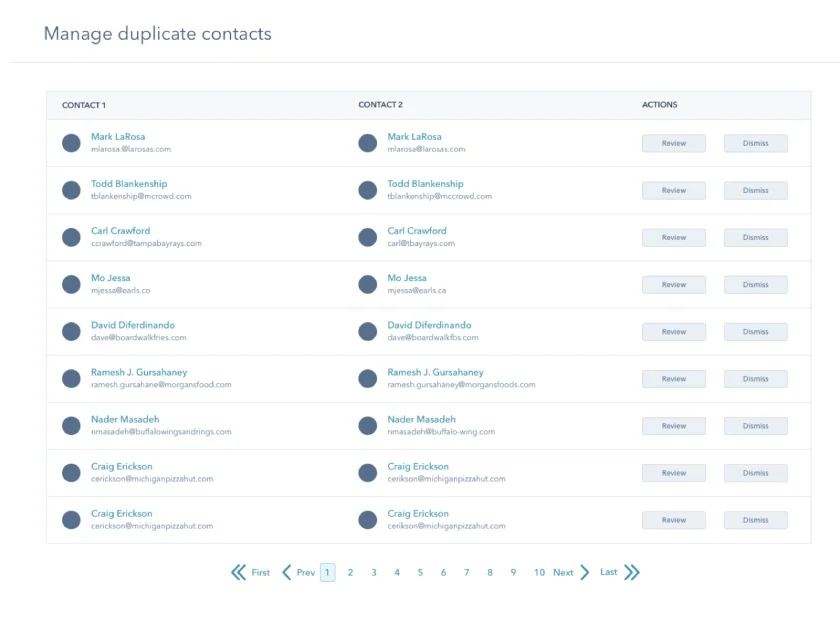
3. Once you are routed to the screen that shows a list of record pairings with a high likelihood of being duplicates, review them. You can either merge duplicate records or dismiss nonduplicates.
Pipelines
Pipelines are where you can see how deals move through the sales process and generate reports on their progress. The deal records, which include contact, company, and ticket associations, can be seen in different pipelines you build based on your business requirements. You can customize the deals associated with each deal record in the pipelines to help attain your sales goals. See how to build a sales pipeline below.
Step 2: Import Your Business Data Into HubSpot CRM
Importing your CRM data into HubSpot CRM happens in the initial setup. It aims to get the right data transferred into your CRM to help you establish an accurate database and feed your pipeline with up-to-date records for prospecting, lead nurturing, and other sales activities.
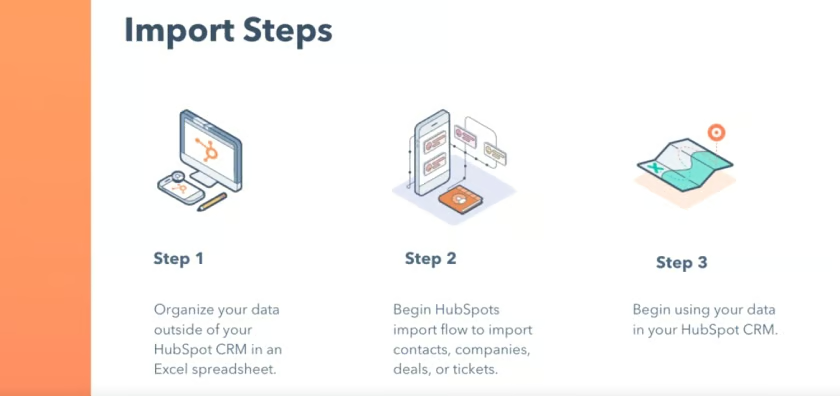
The three steps in getting your data into HubSpot include organizing your data in an Excel spreadsheet (saved as a CSV file). Use HubSpot’s import flow to get data uploaded, and then use that data to personalize your contact interactions. Once data is imported into your HubSpot CRM, you can track a contact’s movement across deal stages and individual deal records.
How to Import Single Objects Into HubSpot
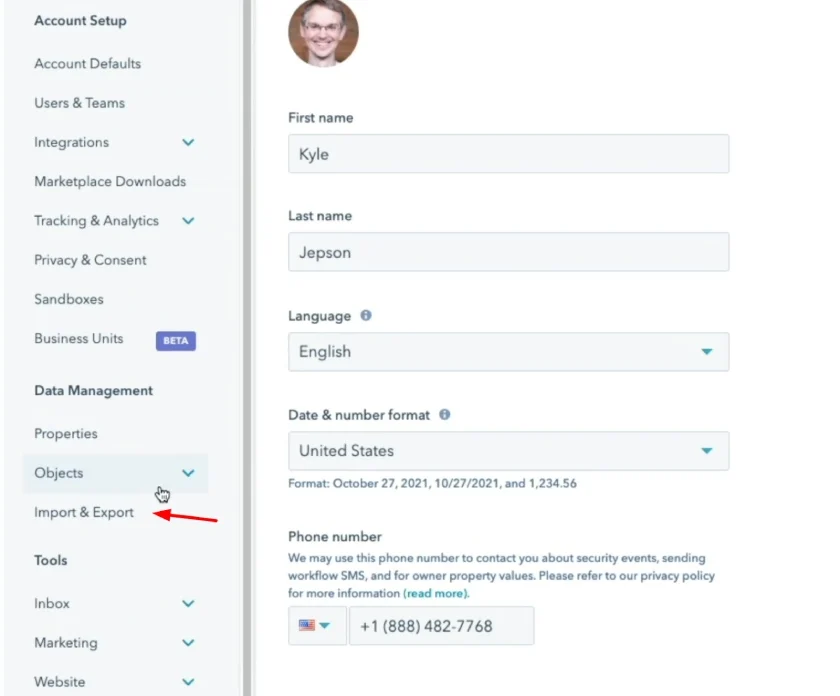
1. In the upper right-hand corner of the HubSpot dashboard, click on the settings icon.

2. In the left sidebar, choose Import & Export.
3. In the upper right corner, click on Go Import.
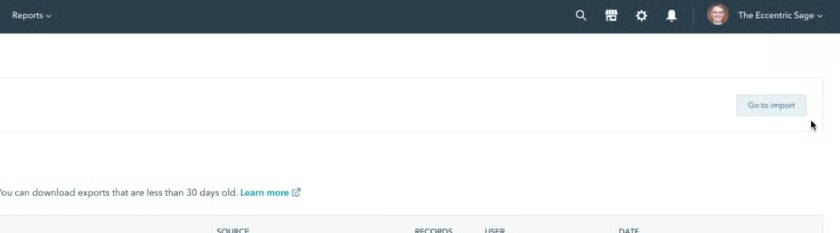
4. Choose the number (one or multiple) of files you are importing and select Next.
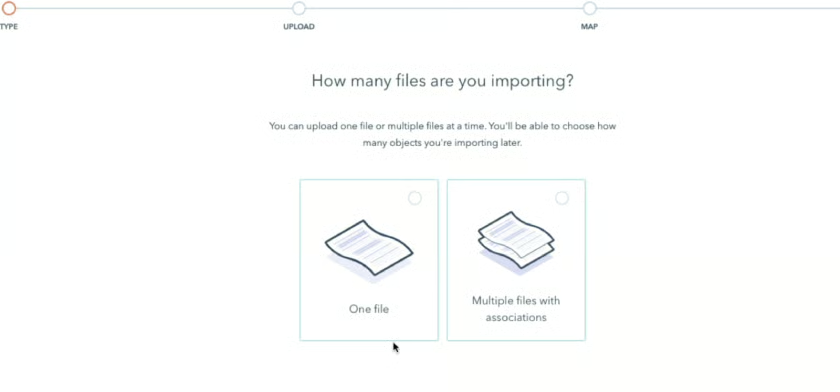
5. Choose the number (one or multiple) of objects you are importing and select Next.
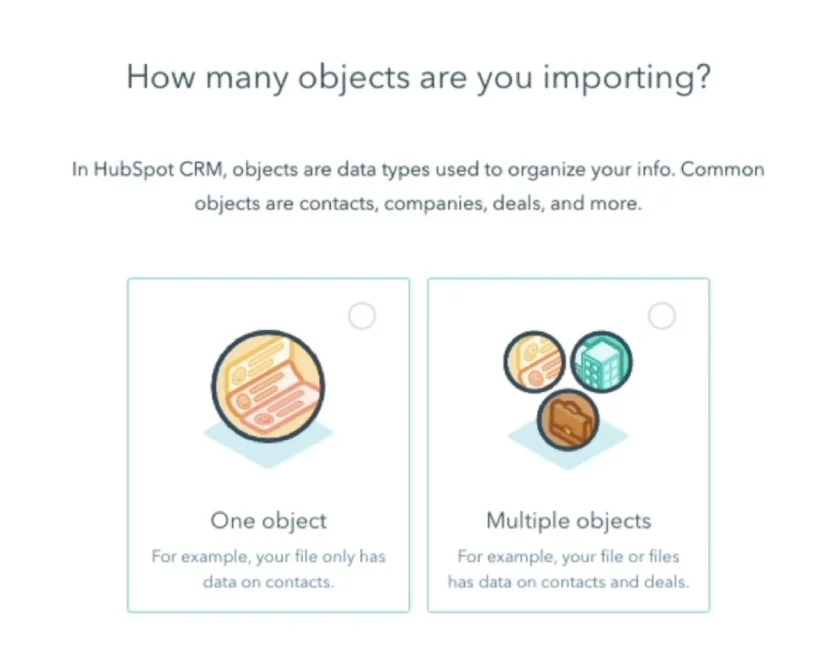
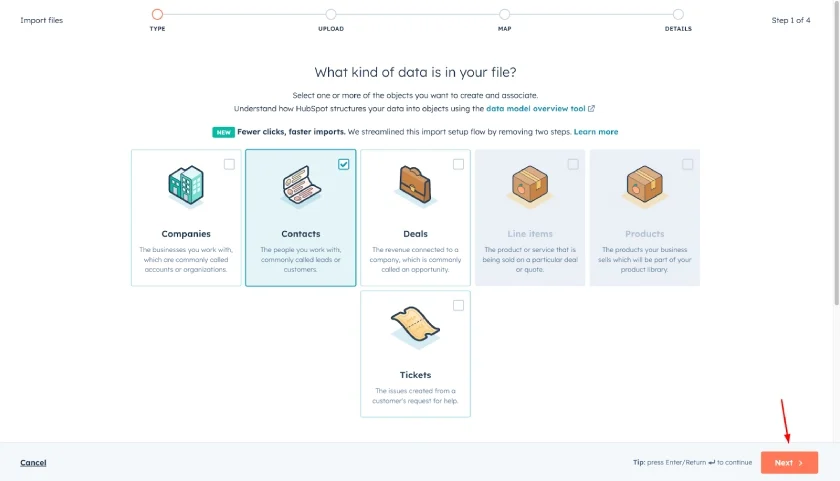
6. Choose the data (like contacts, companies, deals, or tickets) you want to import and select Next.
7. Drag and drop or choose a file (Excel or CSV file) to upload from your computer.
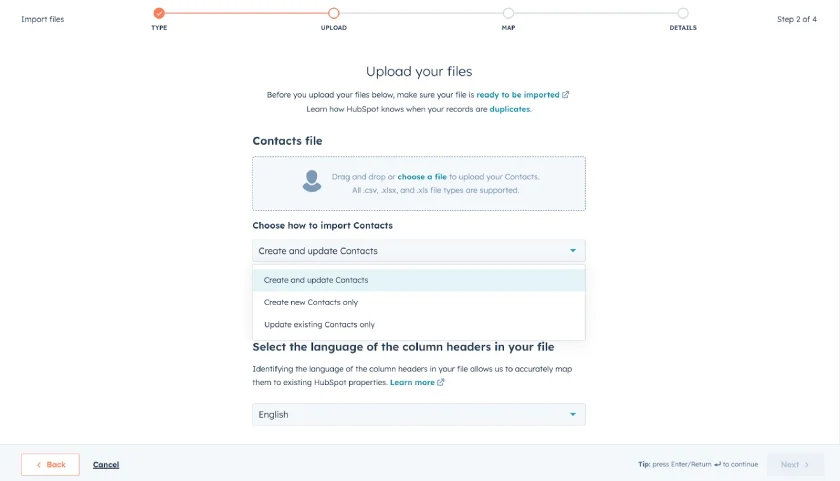
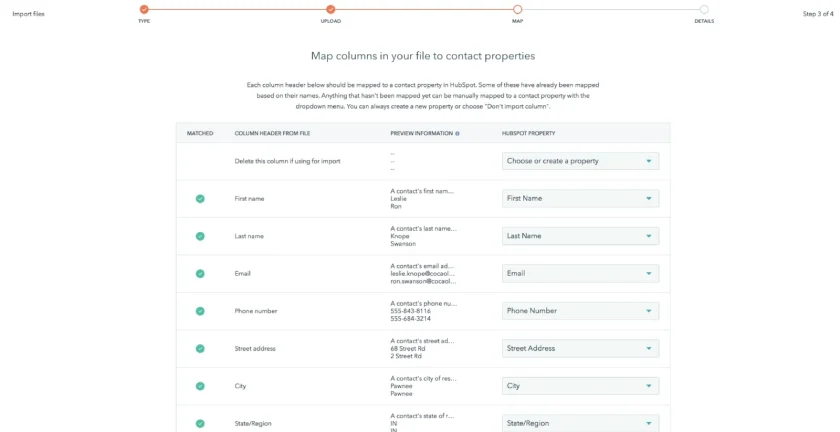
8. In the map screen, HubSpot CRM will automatically map your contacts to your contact properties. Review the property values from your spreadsheet in the Preview Information. After mapping the columns from your file, click on Next.
9. Select options for import, add final details, and click on Finish Import in the bottom right.
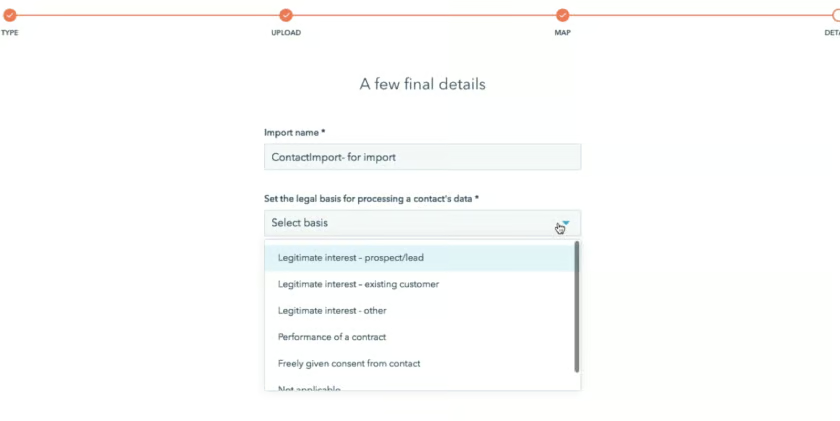
Add a few final details, like the legal basis for processing a contact’s data, for your imported data for more accurate properties. (Source: HubSpot) 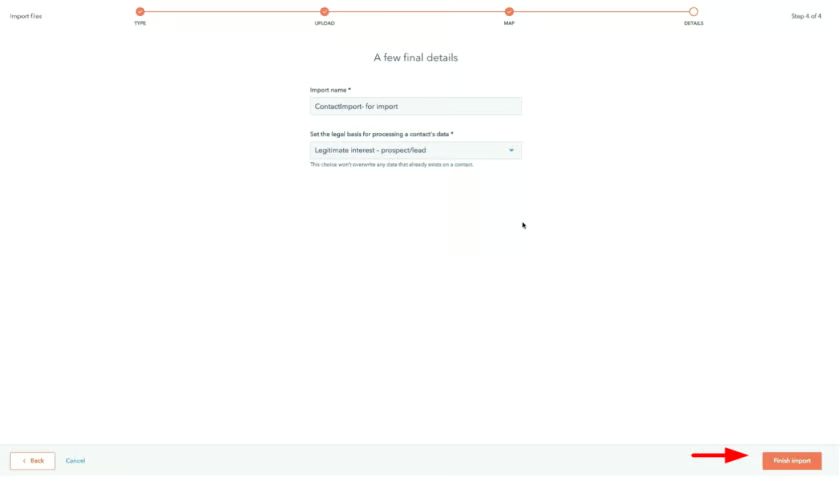
Select “Finish import” to complete the data transfer in the HubSpot CRM. (Source: HubSpot)


10. You will be routed to the Import dashboard, where you can rename your contacts and edit their properties. Click on New Contact List and use the pen icon to edit the name of the new file.
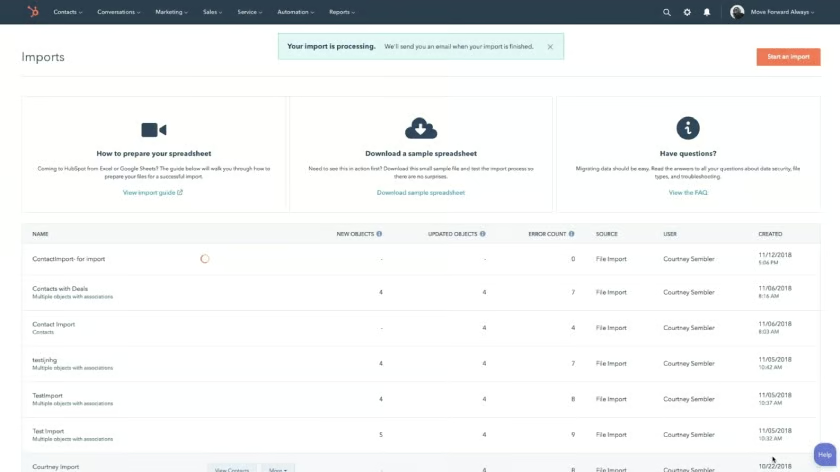
The “Imports” dashboard shows imported files, indicating successful data transfers. (Source: HubSpot) 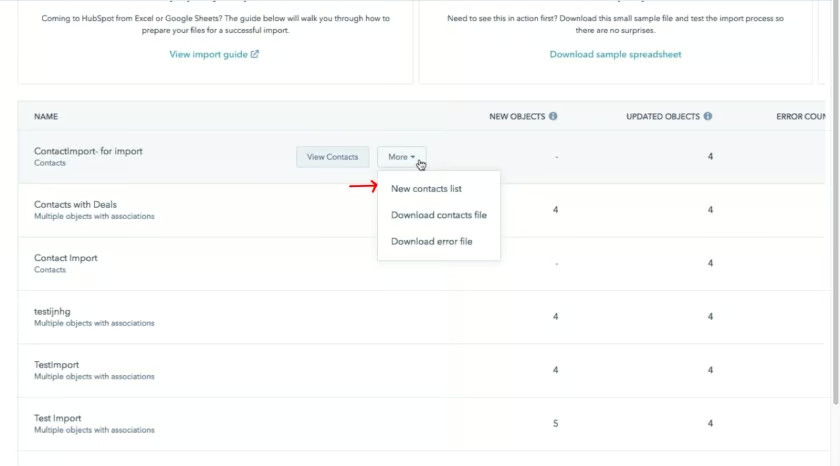
Select “New contacts list” to access newly imported files. (Source: HubSpot) 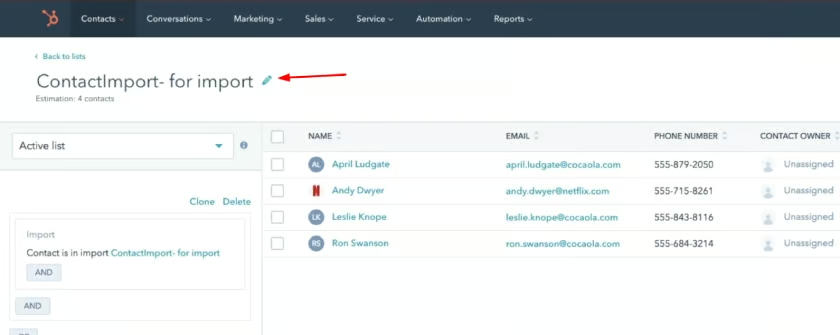
Select the pen icon to edit a contact name in the HubSpot CRM. (Source: HubSpot)


Step 3: Build a Sales Pipeline
A sales pipeline represents a customer’s journey across the stages of your sales process. Sales pipeline stages identify the internal activities within a sales cycle that move a prospect from initial contact to purchasing your product or service. Examples of these tasks include prospecting, lead qualification, nurturing, and product delivery—all of which can be tracked visually in your HubSpot CRM.
Building a sales pipeline involves defining the stages and determining the number of opportunities that continue through each stage. You can build one by calculating the number of opportunities needed at each stage to achieve your goals and identifying any commonalities among them.
Then, align or create your sales process based on this data. Moreover, continuously add leads and periodically review your pipeline to maintain its good standing.
How to Create a New Deal Pipeline
Generally, you can use the same deal pipeline across multiple teams and users and set user permissions to manage access. If you have a unique sales process, you can create additional or separate deal pipelines.
Follow these steps to create a new pipeline:
1. Click on the settings icon in your HubSpot Account’s top navigation bar.
2. Go to Objects and choose Deals in the left sidebar menu.
3. Click on the Pipelines tab.
4. Click on the Sales Pipeline dropdown menu, then choose Create Pipeline.
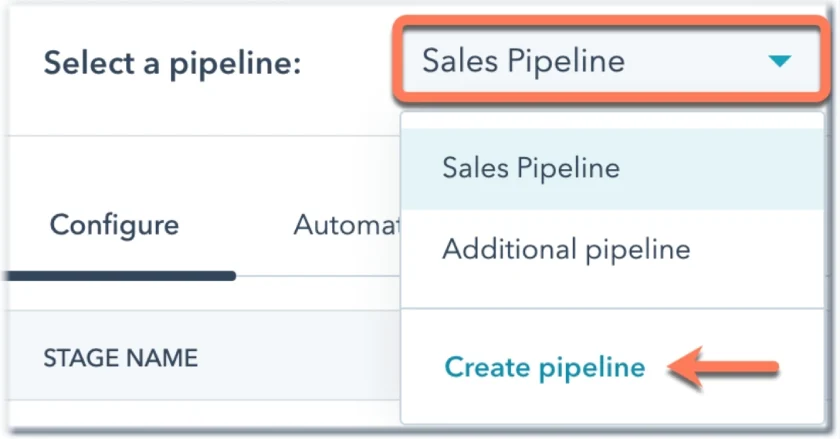
For instance, let’s say you have an online retail sales process with Closed Won, Closed Lost, and In Shopping Cart stages. You can keep these as your default deal pipelines. At the same time, you also deal with a wholesale sales process requiring additional deal pipelines. Hence, you can create separate deal pipelines like Contract Negotiation and Bulk Orders.
How to Set Up Deal Pipeline Automation
Next, you’ll have to learn how to use HubSpot CRM for sales by setting up deal pipeline automation. HubSpot users with a freemium account can customize close date automation. On the other hand, Sales Hub paid plan subscribers can set up automated actions (based on deal stages) and workflows for processes (based on deals).
Below are the steps for automating deal pipelines when using HubSpot CRM:
- Click the settings icon in the top right corner of the navigation bar.
- In the left sidebar menu, go to Objects and choose Deals.
- Click on the Pipelines tab.
- Click on the dropdown menu and choose the pipeline to automate.
- Click on the Automate tab and click to expand the Create workflows from scratch section.
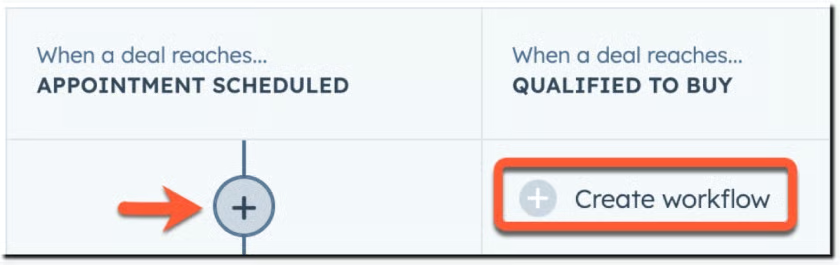
- Set up your action in the right panel. Choose Create task, enter the task details, and click Save.
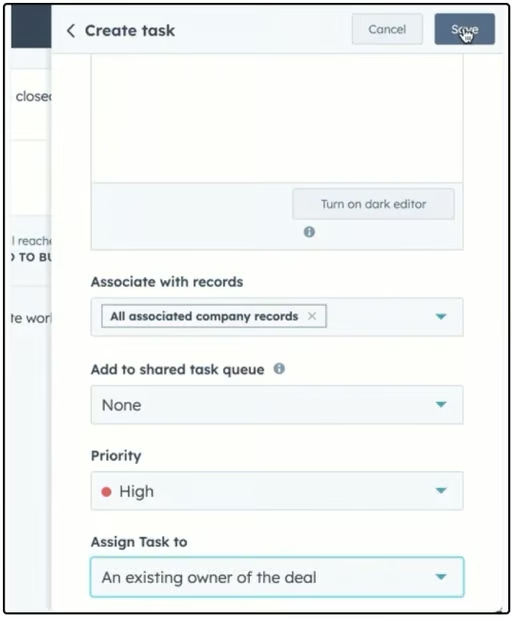
Assign a task to automate deal pipelines. (Source: HubSpot) 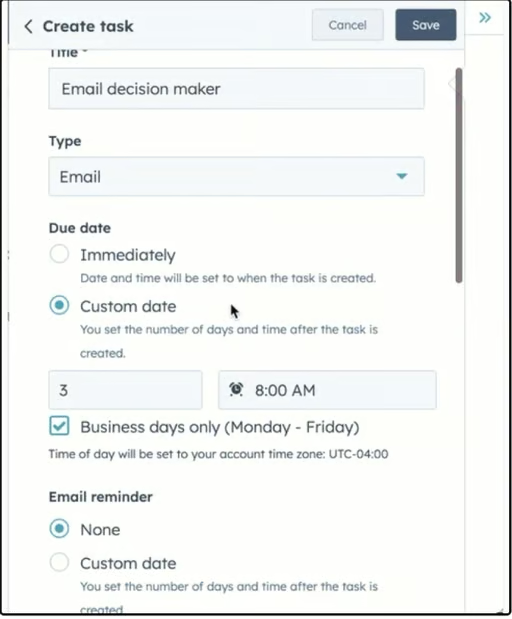
Set up custom dates to automate deal pipelines. (Source: HubSpot)


Step 4: Connect Your Email and Calendar
Before you can start generating and nurturing leads, you need to connect your HubSpot CRM account with your email inbox and calendar. This can help salespeople access emails and appointments in a centralized place, boosting efficiency and productivity.
When you connect your email accounts to HubSpot, you can log, send, receive, and track emails in your CRM. On the other hand, once your calendar is connected to HubSpot, you can sync your scheduled events, send meetings, and log outgoing meetings automatically. You can also see your HubSpot CRM tasks in your calendar.
How to Connect Your Calendar With HubSpot
You can use HubSpot CRM for appointment setting by connecting your inbox and calendar. Just follow the steps below.
1. Go to Settings by clicking on the settings icon of your HubSpot CRM account.
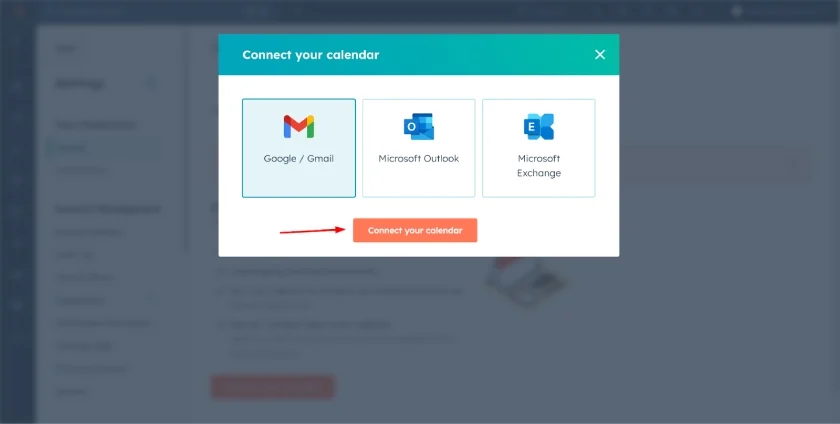
2. In the left panel menu, select General and choose the Calendar tab to connect your HubSpot CRM account with your Google, Microsoft Outlook, or Microsoft Exchange calendar.
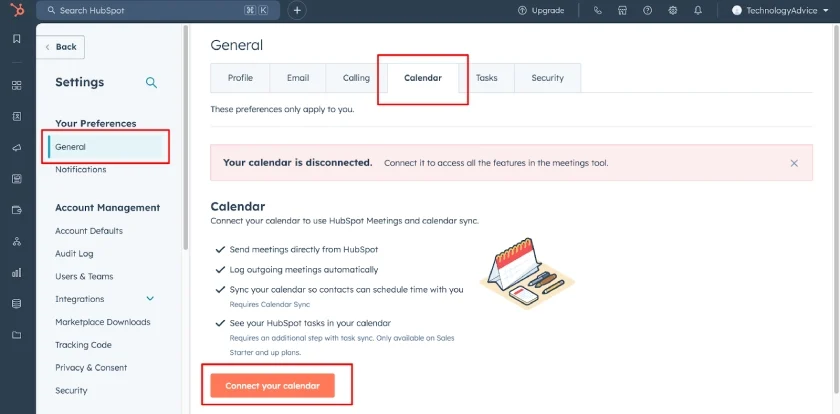
3. Click on the calendar you want to connect with your HubSpot CRM account and click on Connect your calendar.
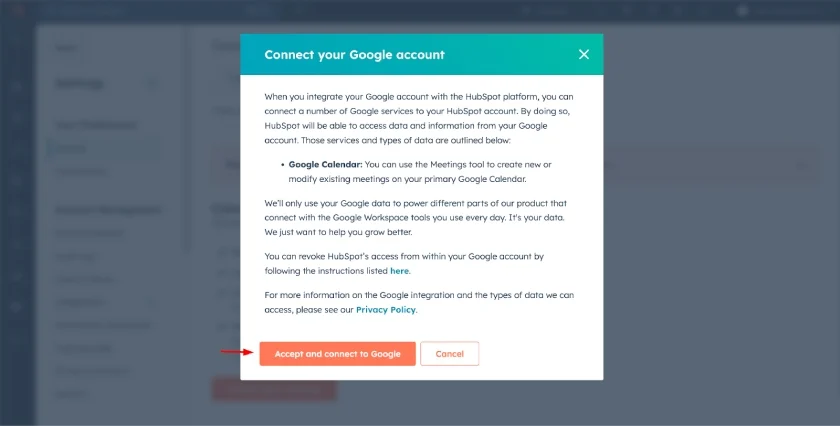
4. Read the disclaimer prompt and click on Accept and Connect to Google, Microsoft Outlook, or Microsoft Exchange calendar.
How to Connect Your Email Inbox With HubSpot CRM
Learn how to use HubSpot CRM for lead nurturing by connecting your inbox. Follow the steps below.
1. Go to Settings by clicking on the settings icon of your HubSpot CRM account.
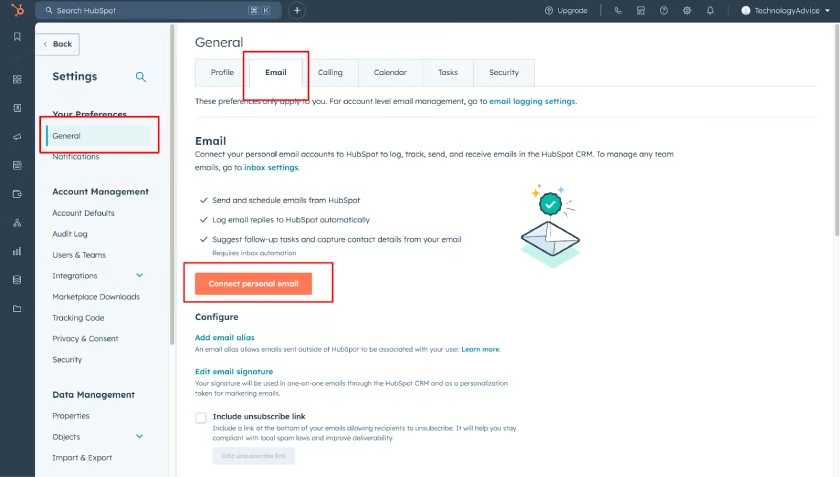
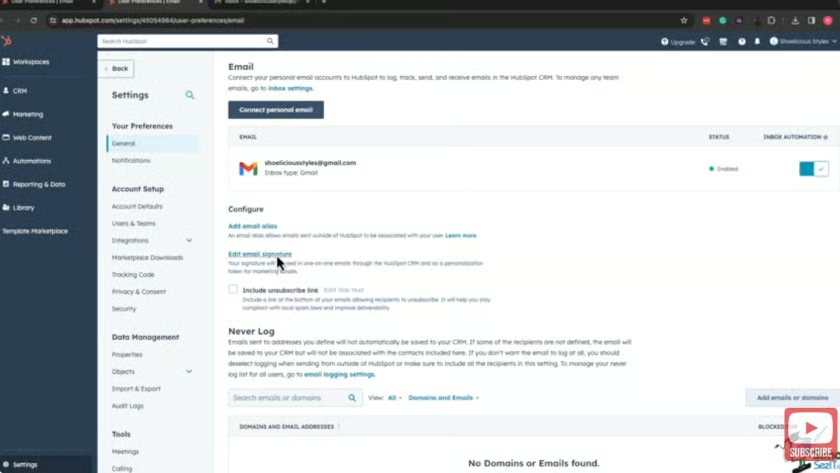
2. In the left panel menu, select General, choose the Email tab, and click on Connect personal email to connect with your Google, Microsoft Outlook, or Microsoft Exchange inbox.
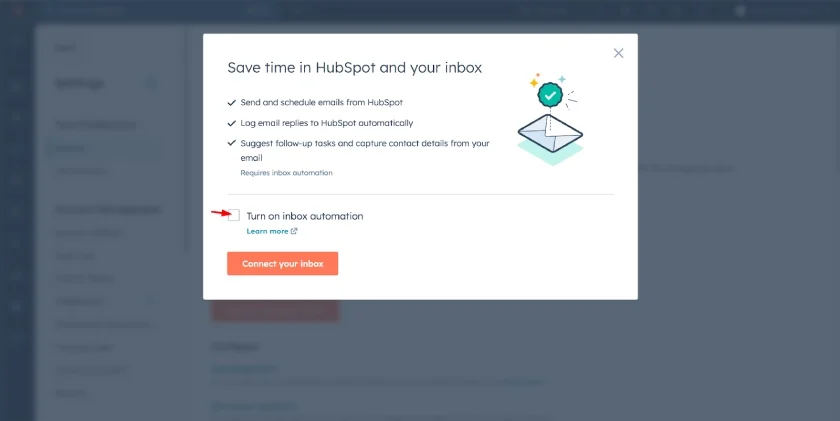
3. Read the disclaimer prompt and tick the box next to Turn on inbox automation if you want to send and schedule emails from HubSpot, log email replies automatically, capture contact details, and suggest follow-up tasks from your email.
4. Log in to your email account to verify that you allow its integration with HubSpot CRM. You can add your email signature, which will appear at the bottom of each email you send.
Step 5: Set Up Your Reporting
All HubSpot accounts have standard reports to help business owners measure their success. If you subscribe to the Sales Hub (Professional or Enterprise plan), you can customize sales analytics reports to monitor your sales team’s performance and your sales pipeline’s health. With customized reports, executives and sales managers have a comprehensive overview of their sales team’s progress and anticipated sales outcomes.
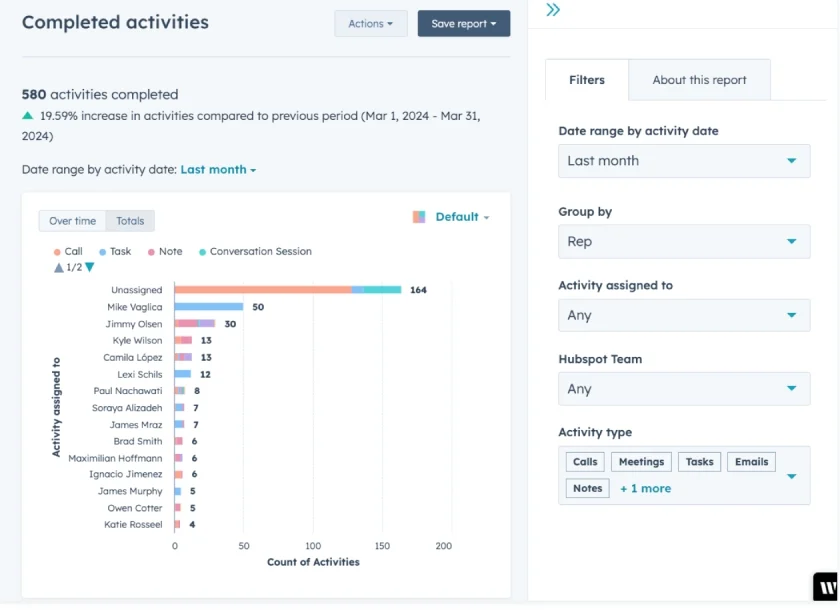
You can create different types of sales reports on HubSpot CRM. For sales performance monitoring, you can create reports for call outcomes, chat conversations, completed activities, created deals, meeting outcomes, and lead response time.
You can also generate reports for forecasts, pipelines, and outcomes like sales quotas and deal push rate reports or the number of deals with specified close dates per team, owner, or deal stage.
How to Create Custom Sales Reports
Learn how to use HubSpot as a CRM for sales by creating sales reports like quota attainment. Here are the steps to generate custom sales reports with sales analytics:
1. Go to Reporting & Data in your HubSpot account and choose Reports. Click on Create report to generate a new one from scratch.
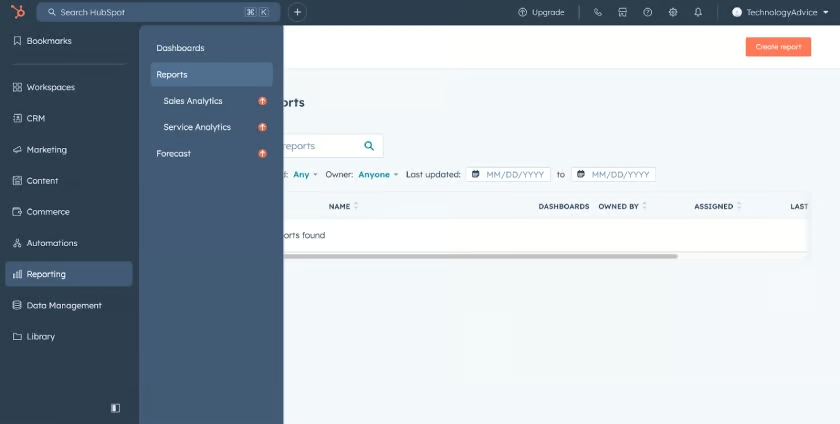
Open sales and service analytics reports from the “Reporting” tab in the HubSpot CRM. (Source: HubSpot) 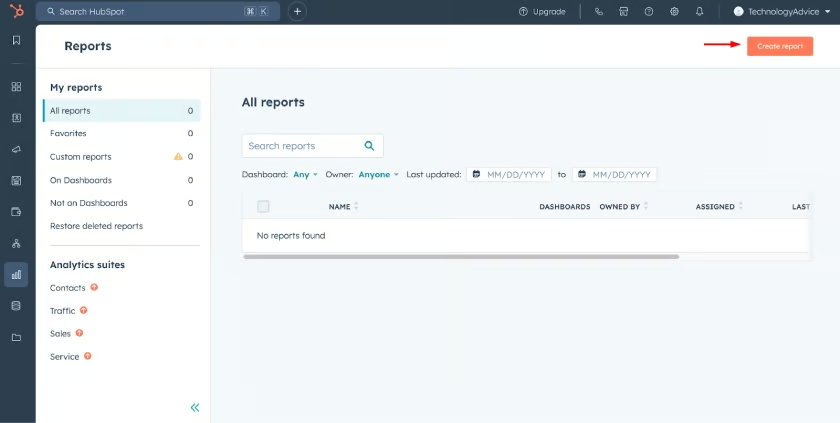
Create a report in the HubSpot CRM. (Source: HubSpot)


2. If you want to create a report using available sales data, click on Sales in the left panel menu and then click on the topic you need to analyze to see the available reports.
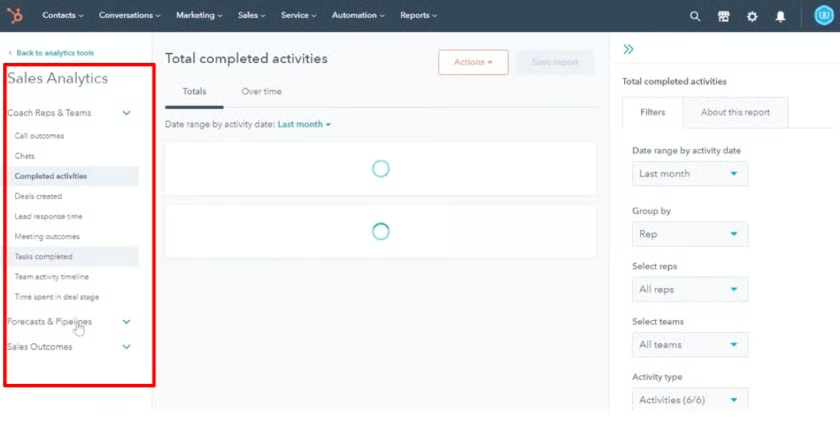
3. Choose the sales report (e.g., performance, forecasts, and sales outcomes) you want to work with. A preview of the sales report will appear in the center panel.
4. Click on the Over time/Totals toggle to modify the visualization to a column chart or a bar chart for compatible reports.
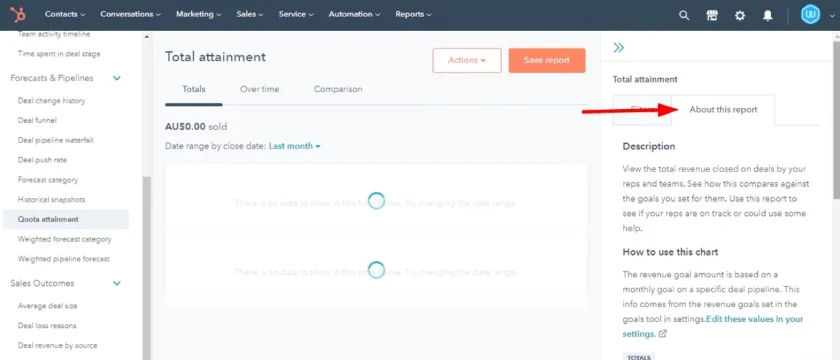
5. In the right panel, go to the About this report tab to learn more about the description and properties of the sales report.
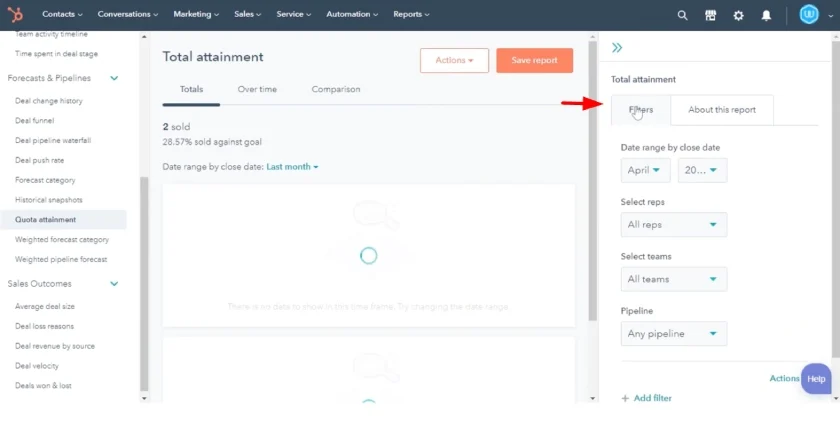
6. In the right panel, use the Filters tab’s dropdown menus if you want to filter the data. Click on Add filter and choose the criteria to add an additional filter.
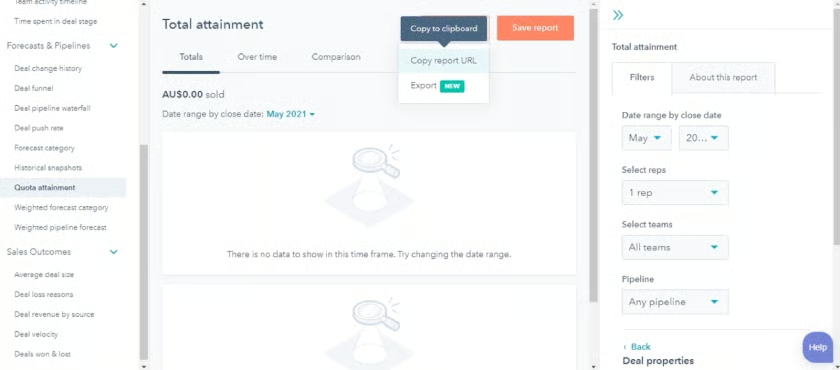
7. You can also share the customized sales report with other users by clicking on the Actions dropdown menu in the center panel and choosing Copy report URL.
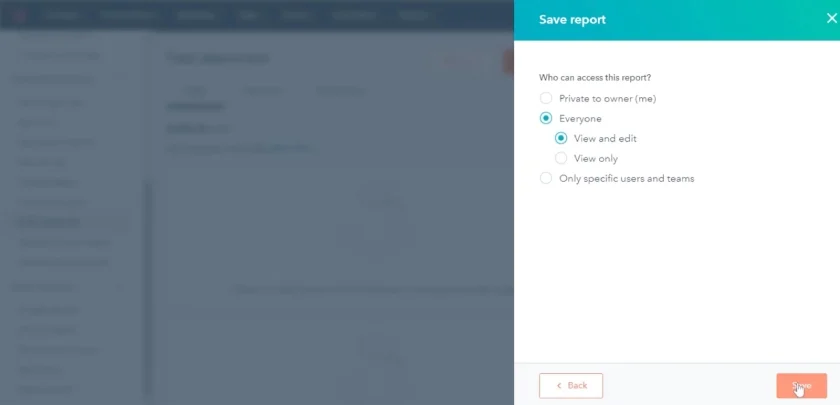
8. Click Save report once customization is complete to save it to your reports list. You can also add the custom report to a sales dashboard.
Step 6: Start Using HubSpot CRM’s Features
HubSpot CRM has many features that salespeople, marketers, and customer service teams can use to provide better experiences to leads and customers. When using this CRM, you will notice how easy it is to find what you are looking for because HubSpot has a clean and modern layout and intuitive user interface and features.
Based on our expert HubSpot CRM review, this provider offers advanced features in its free plan that other freemium CRMs do not offer. These free forever tools include artificial intelligence (AI) for content generation and task automation, mass emailing, and access to third-party integrations. This is why HubSpot is our best free CRM.
Check out the different features of HubSpot CRM and learn more about how your small business can benefit from using them below.
Contact Management
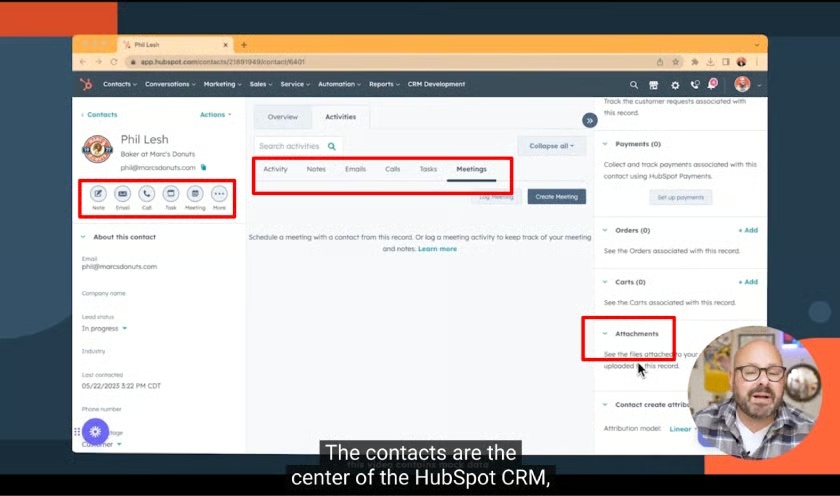
Contacts are the basis for everything you can build and do in your HubSpot CRM. Use the contact management features to access and manage your contacts in one place seamlessly.
In the Contacts dashboard, you can take notes, send emails, make phone calls, create task reminders, set meetings, and more. You can also track any emails, email attachments, recorded calls, deals, payments, and other tasks related to the contact.
Integrations
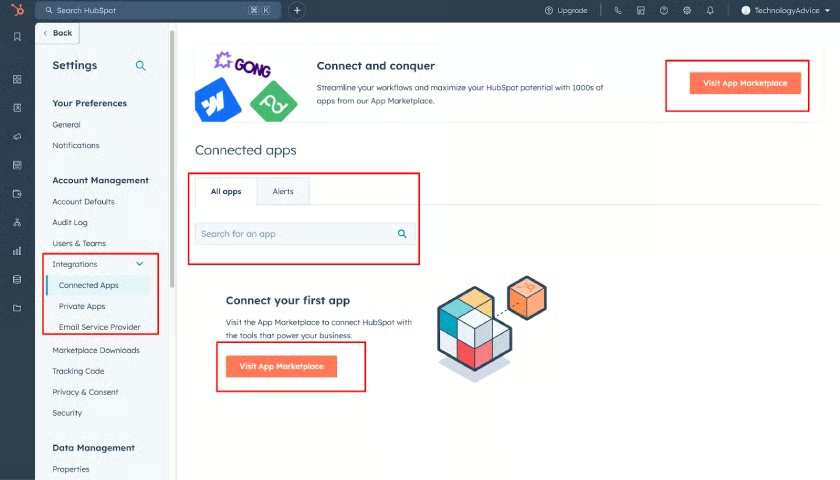
HubSpot CRM Integrations lets you connect your CRM with Xero for accounting capabilities and other applications. This capability adds more functionalities to your CRM, giving you a more powerful business system with everything you need in one place. To integrate apps in your HubSpot CRM, just go to Settings, Account Management, and Integrations.
Automation
CRM automation lets you automate workflows, sequences, and more. You can automatically score leads and assign them to your reps, manage bulk data, create tasks, and more on HubSpot CRM.
For instance, you can always keep in touch with your prospects with sequences (series of emails) to ensure you capture sales opportunities. Trigger internal notifications when a contact takes action, and include tasks to alert your sales reps about contacts they must follow up with.
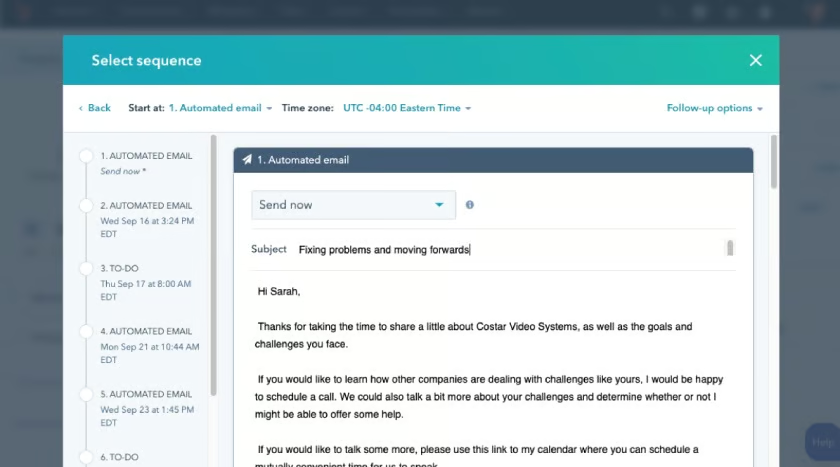
Set up email sequences in HubSpot to send follow-up emails automatically. (Source: HubSpot) 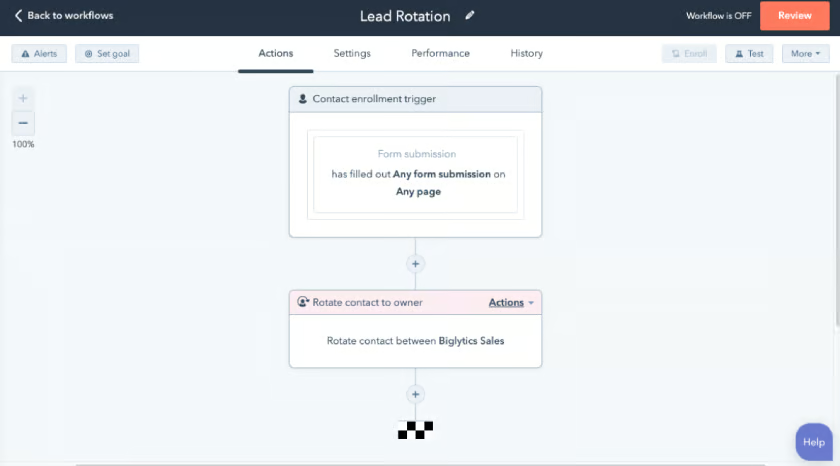
Use the lead rotation workflow in HubSpot to assign the contact to one or more sales reps being rotated. (Source: HubSpot)


Prospecting Workspace
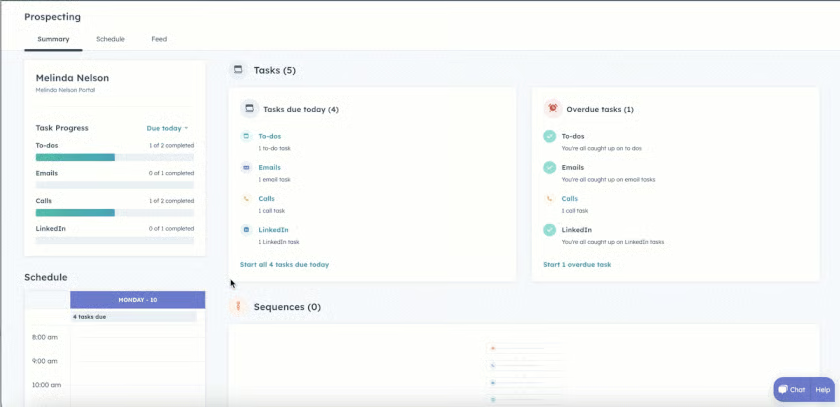
HubSpot has a dedicated prospecting workspace. This can help you efficiently manage your daily workload in HubSpot CRM from one place. You must be subscribed to the Sales Hub’s Professional or Enterprise plan to activate this feature in your CRM and review your goals and progress, execute your tasks, and review your schedule and sales feed.
Mobile App
HubSpot mobile app is available and compatible with iOS and Android devices. With the mobile app, you will never miss connecting with customers, getting insights on the road, closing deals, and more.
You stay on top of your email inbox, report customer issues, open support tickets, and track service level agreements (SLAs) on your mobile device. Moreover, you can check reports and manage deals and contacts, such as editing associations.
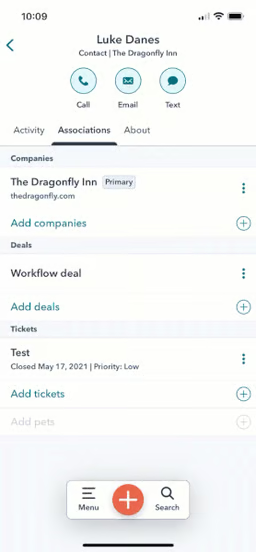
Edit an existing association on HubSpot mobile app. (Source: HubSpot) 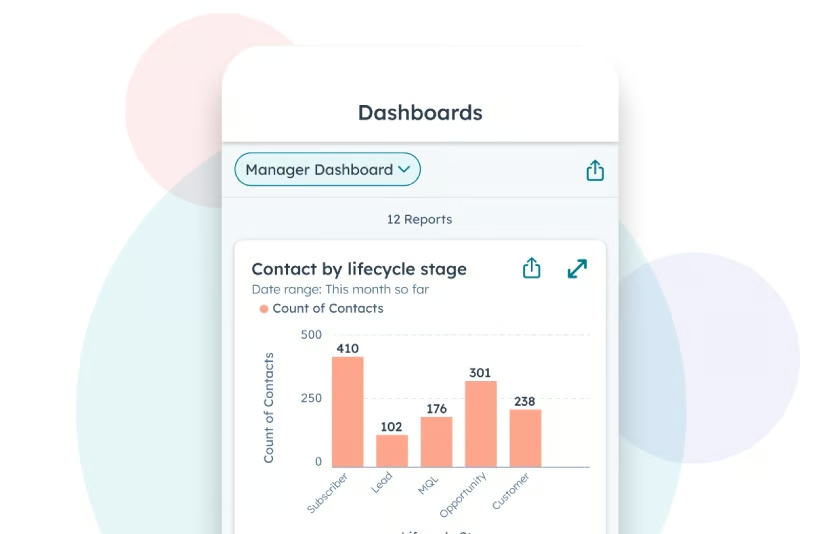
Sales managers get insights, like contact by lifecycle stage, through the “Manager Dashboard” on the HubSpot mobile app. (Source: HubSpot)


AI Tools
HubSpot is an AI-powered CRM, so it has tools like an AI image generator, AI translation, AI blog post generator, and AI assistant (ChatSpot.ai). Teams can use ChatSpot.ai to help them conduct company research, summarize conversations, and write prospecting emails, meta descriptions, social media copies, and more.
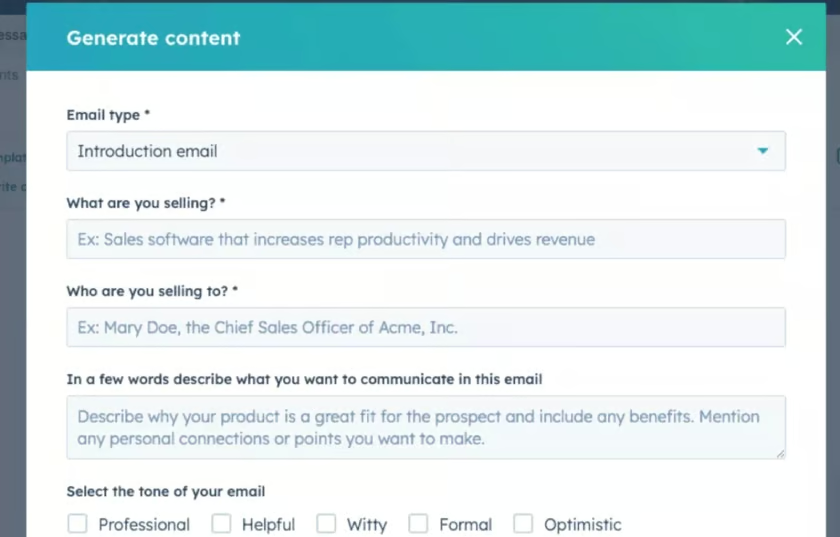
HubSpot AI content writer assists in generating sales and marketing emails. (Source: HubSpot) 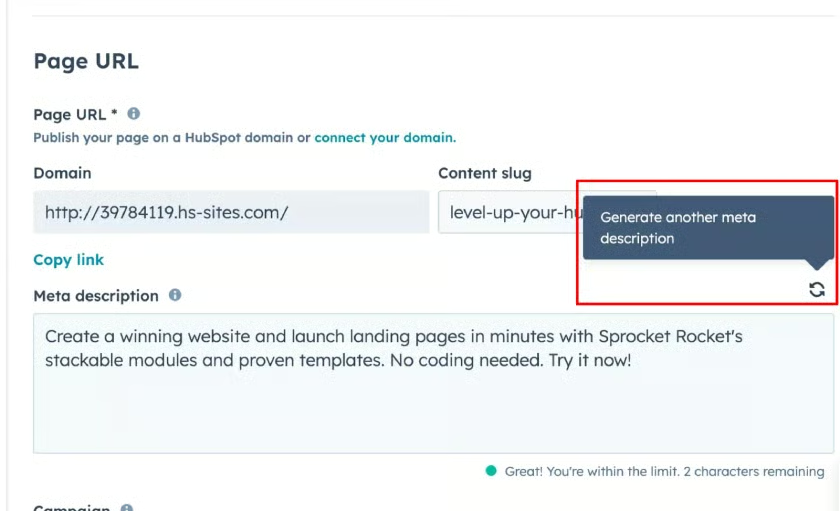
HubSpot AI content writer assists in generating meta descriptions. (Source: HubSpot)


Frequently Asked Questions (FAQs)
Is HubSpot easy to use?
Yes, HubSpot is one of the easiest customer relationship management (CRM) platforms to use. It has an intuitive user interface, quick-to-follow navigational flow, and easy-to-learn features. We gave this CRM provider a perfect rating in our expert review. As of this writing, HubSpot CRM has a rating of 4.3 out of 5 for ease of use on Capterra, a popular software review site.
Can I use HubSpot CRM for free?
Yes, HubSpot CRM offers a free plan for five users. Startups and small businesses can use this CRM to help them sustain and grow their operations. The free plan includes one shared inbox, 10 custom properties, 200 email notifications monthly, and up to three reporting dashboards. You can also connect your HubSpot CRM to Gmail, Google Workspace, and Microsoft Outlook and access HubSpot’s marketplace for other app integrations.
What is HubSpot CRM best for?
HubSpot CRM is best for individuals and small businesses wanting to grow. They can store, access, and manage their data securely in this centralized platform and boost efficiency using its workflow automation and other advanced features. HubSpot CRM is also recommended for growing teams and enterprises needing robust sales, marketing, and service tools.
Bottom Line
Sales teams can use HubSpot CRM to help organize, access, store, and analyze sales performance and other data efficiently. Once you learn how to organize your data, you can import clean data, build pipelines, connect your calendar and inbox, and set up reports for sales analytics. When everything is set up, you can use HubSpot CRM for predictive lead scoring and automation, marketing and service operations, and more.
