


A phone tree system, also called an interactive voice response (IVR) system, is an automated menu that routes a caller to the correct department or extension. Learn how to set up a phone tree system by creating a call routing diagram, assigning call groups, and configuring your phone system’s settings, including the operating hours. Knowing how to set up a voice-over-internet-protocol (VoIP) telephone tree system ensures your customers’ calls are routed to the correct agent.

- Step 1: Create a Call Flow Diagram for a Phone Tree
- Step 2: Assign Phone Tree Call Groups
- Step 3: Configure Settings in the IVR Menu
- Step 4: Set Your Menu Hours
- Benefits of Using a Phone Tree in Customer Service
- Resources Needed to Build a Phone Tree
- Recommended IVR Providers
- Frequently Asked Questions (FAQs)
- Bottom Line
Step 1: Create a Call Flow Diagram for a Phone Tree
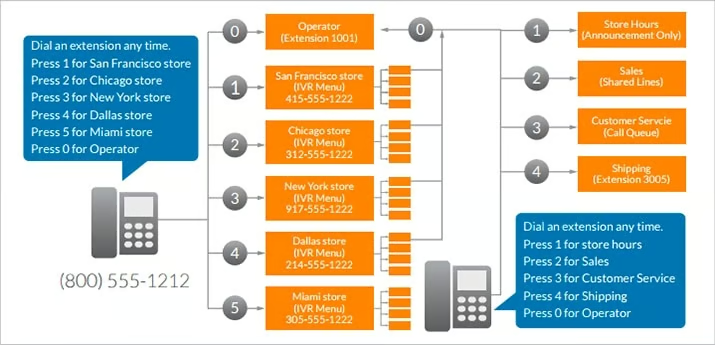
A tree begins with a diagram that maps out all the elements and individuals that take part in the customer’s journey from the time they call you until the resolution of their concern. When designing your call routing flow, consider the participating departments, language options, the extent of self-service options, and at what point calls will be transferred to a live agent.
The diagram should be able to provide details for the customers and answer questions, such as the department the customers need or the extension of the person they wish to call.
When setting up your diagram flow, make the instructions and options easy to understand using simple, straightforward language. Make sure to look at the process from the customer’s perspective. Fortunately, there is no shortage of online resources to help you design a call flow diagram, such as Canva, Visme, Adobe Spark, Crello, and even Microsoft Paint or PowerPoint. Developers often put pen to paper and draw out how they visualize the process.
To help you along, we have created customizable diagram templates for small businesses that are free to download. Take inspiration from our eight templates and use them as a starting point for your sales teams, support centers, and outbound call agents.

We created free customizable templates for small businesses to take inspiration from. 


Learn more about how to set up a phone tree by going through our list of critical components that should be present within your phone tree:
Main Greeting
The main greeting sets the tone for a customer’s interaction with your business. Once a customer dials in, they’ll be greeted with a prerecorded message that should include your business name and other packets of information, such as the main menu options, your service hours, and your intent to record the call.
When constructing your message, it’s best to keep it short and straight to the point. This avoids taking up too much time for a possibly irate client. We recommend including a concise reassurance statement emphasizing your commitment to helping, such as, “We are here to help.”
Language Options
Your language options should immediately follow your main greeting. This helps non-English speakers navigate through the process in the language that is most convenient for them. Be sure to include non-English submenus with all the proper counterparts for each language.
General Information & Announcements
Many businesses include an extension for company announcements, including special promos, statements about common concerns, and service reminders. Businesses also opt to record statements right before offering submenu options. For example, once a customer chooses bill payment, include an announcement on cut-off times for processing payments or what information they should have on hand for efficiency.
Call Groups
Call groups determine where calls will be routed, and in this stage, you need to identify and group the business departments your customers will engage. For example, your submenu will allow your client to press “1” for the sales department or “2” for the billing team. This submenu is dynamic and will continue to expand as your business grows.
Dial-by-Name Directory
Agent or representative directories allow clients to have immediate and direct access to their points of contact. Customize your tree to include a dial-by-name directory where agents have a specific extension number for customers with existing relationships with particular team members. This shortens the customer’s waiting time and connects them with someone familiar and knowledgeable about their account.
Step 2: Assign Phone Tree Call Groups
Once your diagram is completed, the next step is to classify your employees by their respective departments. Call groups are assigned to specific departments, so it’s crucial to ensure employees are assigned to the correct department to avoid misrouting calls. For example, a customer intending to reach customer support would find it frustrating to be routed to someone from the sales department.
When you set up your menu, it’s best to list all the names and extensions of employees who fall within a specific call group. Ensure that temporary and floating staff are included to make the directory as accurate as possible. With some providers, including RingCentral, you assign agents to multiple call groups.
Step 3: Configure Settings in the IVR Menu
Now that all your staff and departments have been identified and laid out, the next step is configuring your interactive voice response menus. The process varies from provider to provider, but typically, it would entail using its web portal and a visual hierarchy for IVR configuration. In the portal, account managers would outline each menu item, identifying the action corresponding to each key press.
For example, following the welcome message, each key press would have a corresponding action. So, “0” sends the caller to voicemail, “1” sends them to the call queue, and “2” sends callers to agent extensions. Other programmable details include the number of times the options are repeated, and with no valid input after the third cycle, the call will be disconnected.
To illustrate the process, we are citing RingCentral as one of our phone tree examples, as it currently has one of the best IVR systems on the market. Its IVR solution is part of a cloud-based call center solution with a Visual IVR Editor, which provides a clean user interface with drag-and-drop menus for users. This makes the process of setting up a menu simple and easy.
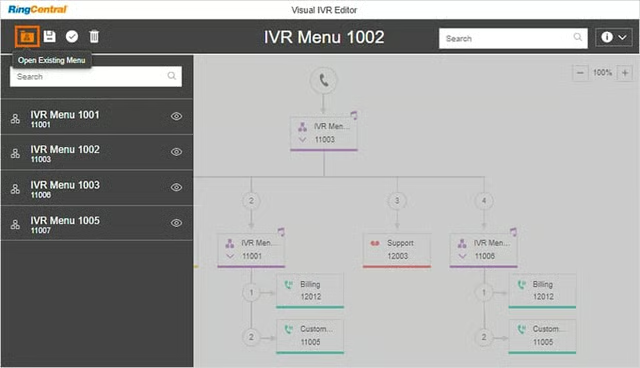
A phone tree diagram setup using RingCentral’s Visual IVR Editor. (Source: RingCentral) 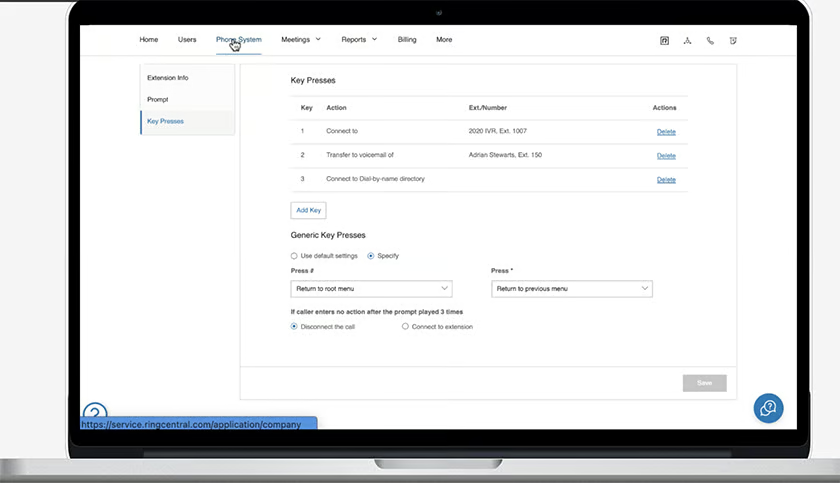
RingCentral’s admin portal allows users to create their own IVR menu with an easy-to-use interface. (Source: RingCentral)


Step 4: Set Your Menu Hours
Not all companies, especially small businesses, can run a service hotline 24/7, and this is where an IVR phone system comes in. By default, IVR systems operate round-the-clock, but certain providers, like RingCentral, offer a second menu that will be active after business hours. Its Ultimate Plan allows for programming up to 250 options at a time.
A separate after-hours IVR script and menu informs your customers of your business hours and will enable them to leave queries via voicemail. Having an IVR system available outside operating hours allows clients to lodge product inquiries for the sales team to follow through and report service issues. IVR systems capture concerns, take messages, and facilitate clients’ receipt of callbacks.
Benefits of Using a Phone Tree in Customer Service
Businesses need a reliable system to provide customer support, and using a phone tree system is a cost-effective and efficient solution to delivering the help clients need. This automated menu-driven response system allows users to navigate through a series of options and select the option that best fits their concerns. Below are some of the most significant advantages offered by phone trees:
Easy Setup
Modern phone systems are easy to set up and allow teams to begin using a phone tree menu as soon as all your settings are in place. Customize your phone tree to meet your specific customer needs, including language preferences and options that best reflect their common issues.
Increases Team Efficiency
Automated phone trees reduce the number of calls your staff needs to handle, allowing them to focus on higher-value activities like closing deals, answering VIP calls, and fast-tracking digital marketing campaigns. Free up your team’s time so they can be more efficient in handling essential tasks that contribute to your bottom line.
Improves Customer Satisfaction
Automated phone systems reduce wait times and enhance agent response times. Greeting callers with prerecorded messages and directing them to the appropriate extension or department means customers don’t have to wait for live agents to provide them with information or answer frequently asked questions (FAQs).
Provides 24/7 Availability
Phone trees let you answer your phone 24/7, making you available to your customers at all times. Your phone tree plays a message providing basic information like your hours, alternative contact information, and the option to leave a voicemail.
Resources Needed to Build a Phone Tree
Phone trees help your business improve the caller experience because they ensure that calls are directed to the correct department or person. When setting up a phone tree, you will need the following resources:
- Employees: You need a network of agents and people with different roles to make a phone tree system successful. Some key roles include the administrator, the assigned agents, and the scriptwriters who create the prerecorded messages.
- Software: Select a voice-over-internet-protocol (VoIP) software provider with phone tree or IVR features.
- Time: While setting up a phone tree is pretty straightforward, some tasks require attention, such as adding team members and setting up call routing rules based on your operating hours.
Recommended IVR Providers
IVR systems support businesses by increasing first contact resolution through enhanced self-service capabilities. IVR lets callers resolve issues through an automated process that traditionally would have required interaction with a human agent. Great IVRs incorporate call forwarding and routing prioritization, voice recognition, and third-party integrations. Below are three IVR system providers to consider as you develop your IVR automated system:
RingCentral (messages, video, and phone) is a complete cloud phone system that includes IVR tools for efficient call routing. Its tools include an easy-to-use Visual IVR Editor that helps configure menus and import/export extensible markup language or XML files. It offers multi-level auto-attendants, multiple options for creating IVR menus, and excellent voice recognition features.
RingCentral offers four plans: Essentials, Standard, Premium, and Ultimate. The Essentials plan comes with automatic call distribution and IVR. RingCentral’s phone system subscription starts at $30 per user, paid monthly, and comes with unlimited domestic calling, IVR, and call analytics.
RingCentral is an excellent fit for businesses with high call volumes looking for an IVR system with a multi-level auto-attendant. Read this RingCentral review to learn more about this cloud-based communications platform and what services it offers your business.

Grasshopper is a VoIP business phone service provider offering businesses virtual telephony features, including IVR systems, to improve customer service. Its call routing features include business hour schedules, call transfer, and forwarding, allowing users to create team extensions for efficient routing.
Grasshopper offers three plans: Solo, Partner, and Small Business, with its base plan starting at $17 monthly for one phone number and one extension, good for one person. All of its plans come with business phone numbers, call forwarding and transfer, simultaneous call handling, extensions, and voicemail.
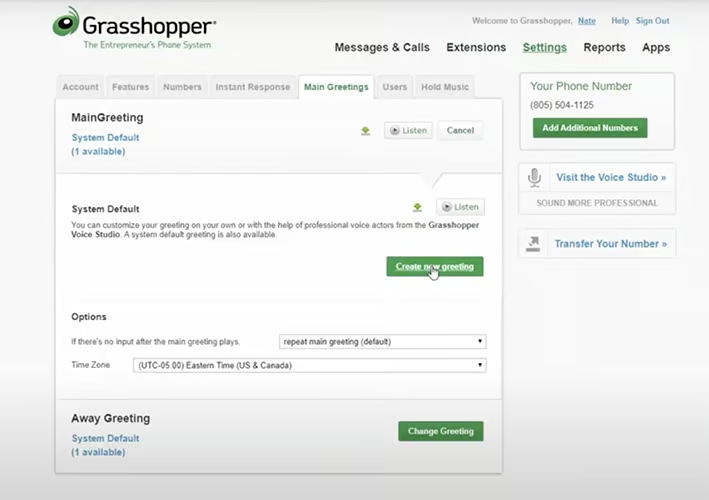
This provider offers some of the most affordable plans, ideal for solopreneurs and small business teams. It’s best for companies with low call volumes looking for a budget-friendly virtual phone system with an auto-attendant. Learn more about this cost-effective VoIP platform by reading our Grasshopper review.

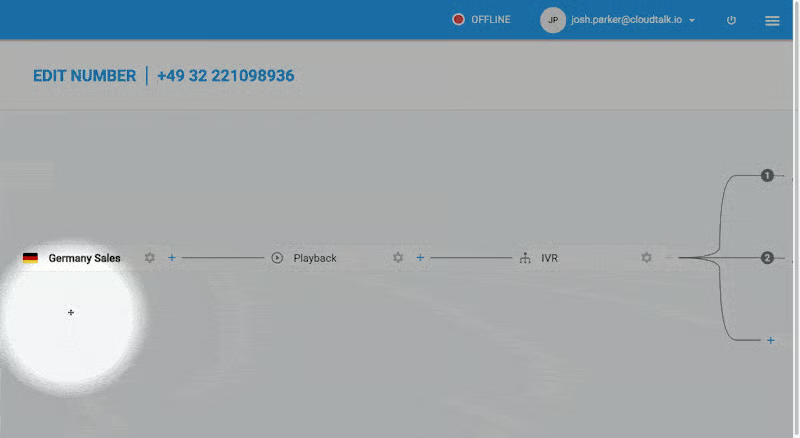
CloudTalk offers an IVR system with comprehensive features, including speech recognition, customer relationship management (CRM) integration, and outbound IVR. Its call flow designer lets you customize your IVR process and is an intuitive call flow designer. Create different menu branches, send calls to voicemail, and forward IVR calls to specific phone numbers.
CloudTalk offers three plans: Starter, Essential, and Expert. The Starter plan, which starts at a monthly price of $25 per user, billed annually, comes with unlimited inbound and intracompany calls, automated call distribution, and unlimited call queuing. CloudTalk offers skills-based routing features in its higher-tiered plans for advanced features.
Based on our evaluation, CloudTalk is the top provider in terms of its range of IVR tools. Its key features include intelligent detection, IVR surveys with email reports, and the earlier mentioned designer software.
Frequently Asked Questions (FAQs)
What makes a good phone tree?
Based on the steps outlined in this article, a good tree is carefully designed with the customer journey in mind. Messages are short and straightforward, menu options are clear and well-categorized, and give customers the chance to speak to an operator or agent at some point. Check out our guide on IVR design best practices to improve caller experiences and outcomes.
Is a phone tree automated?
Yes, they are automated VoIP features that connect callers to appropriate extensions and agents. Using a preprogrammed IVR system, callers are typically greeted and prompted to answer menus to ascertain their purpose and concern and route accordingly. The system recognizes commands based on predetermined protocols and programming, and routes callers to appropriate departments, ring groups, or call queues.
How much does this type of menu cost?
Popular phone solutions with IVR and automatic call distribution (ACD) usually cost $20 to $75 per user, paid monthly. IVRs are typically included in business communication phone systems offered by different VoIP providers.
What types of businesses need a phone tree?
This feature is used by companies of all sizes needing automated call routing solutions. Small businesses use this service to support lean customer service teams and provide 24/7 hotline availability. Companies in healthcare, finance, banking, retail, and other sectors that need round-the-clock answering services use IVR solutions.
Bottom Line
When setting up a phone tree, keep the process simple and your customer in mind. Consider how you phrase statements because a well-planned flow maximizes self-service, ensuring your agents are focused on the calls that match their skills. Now that we’ve learned how to set up a phone tree, it’s time to fit it into your VoIP communications system. Read our guide on how to set up a VoIP system to learn more.