







The Hostinger website builder offers one of the easiest and most affordable options for building a website or online store. Plans include secure and reliable hosting, a free domain, and an intuitive, no-code website builder with fairly robust ecommerce and artificial intelligence (AI) tools. Follow the steps below to learn how to build a website with Hostinger, from choosing a plan and domain to setting up your site, online store, and search engine optimization (SEO), then publishing it live.
- Video Tutorial: How to Build a Website With Hostinger
- 1. Choose a Subscription Plan & Sign Up for an Account
- 2. Claim Your Website’s Domain
- 3. Answer Prompts About Your Website
- 4. Choose the AI Website Builder or Start With a Template
- 5. Set Up Your Website
- 6. Set Up Your Online Store
- 7. Customize Your Website
- 8. Set Up Your SEO
- 9. Review & Publish Your Website on Hostinger
- Pros & Cons of the Hostinger Website Builder
- Best Alternatives
- Frequently Asked Questions (FAQs)
- Bottom Line
Video Tutorial: How to Build a Website With Hostinger
Check out the Hostinger website builder tutorial video below for step-by-step instructions that follow the steps in this article.
1. Choose a Subscription Plan & Sign Up for an Account
To make a small business website on any platform, you’ll first need to secure hosting and a domain. The good news is that Hostinger’s plans bundle everything you need in an affordable package, which is particularly helpful for beginners or when building a site from scratch.
On the Hostinger website, click on “Website Builder” on the home page, then scroll down to the “Website Builder & Web Hosting” plan section and click “Add to cart.”
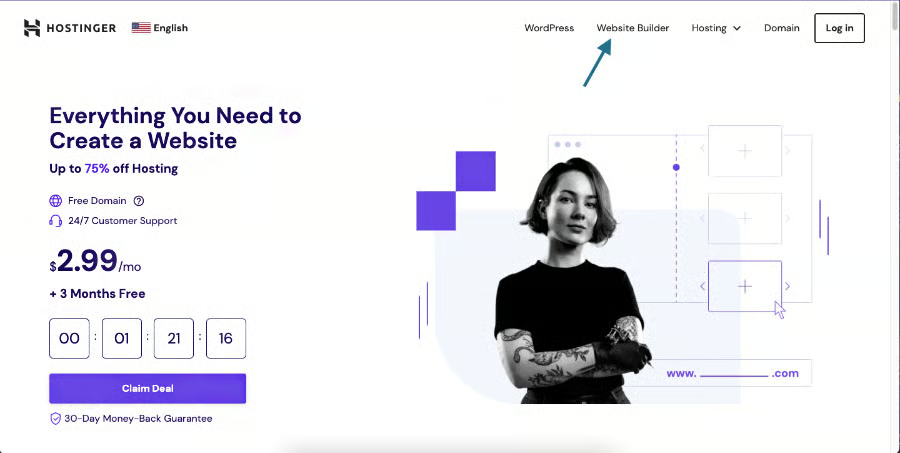
On the Hostinger website, click on “Website Builder” on the menu. 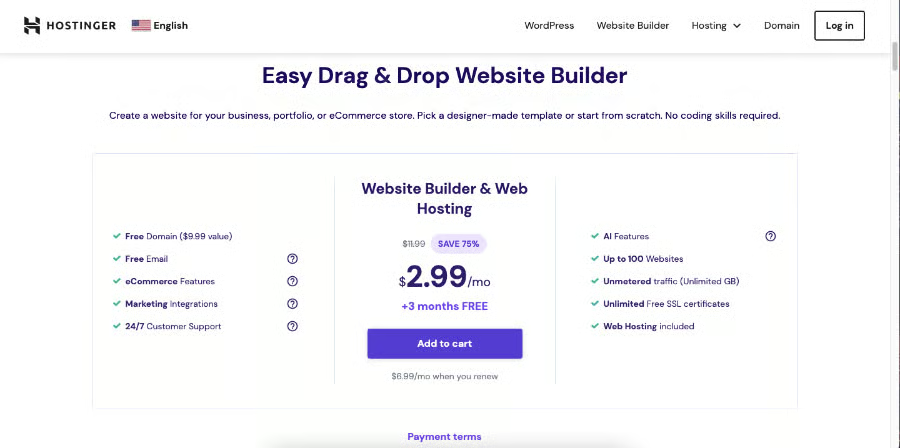
Click on “Add to Cart” to choose your website plan.


In the next screen, you’ll choose a subscription plan for your website, which automatically comes with Hostinger business web hosting, a web domain, and access to the website builder and logo maker. Your plan also allows you to build up to 100 sites using either (or both) the Hostinger website builder or WordPress from the same dashboard.
Hostinger Site Builder Pricing
Hostinger offers one plan that includes all features. The only choice you’ll need to make when choosing a plan is the length of contract and billing period you want:
- Hosting for up to 100 websites
- Free domain, SSL, and business email (12- to 48-month plans)
- No-code site builder
- AI content writer, logo maker, and heatmap analyzer
- Unlimited blogging
- Appointments
- Code embed for additional functionality
- Ecommerce for physical and digital products
- Free image library
- A small number of one-click integrations
- Multi-language websites
| Billing Period | 1 Month | 12 Months | 24 Months | 48 Months |
|---|---|---|---|---|
| Monthly Cost | $11.99 | $2.99 | $2.99 | $1.99 |
| Renews At | $11.99 | $8.99 | $7.99 | $6.99 |
| Domain & SSL | SSL only | ✓ | ✓ | ✓ |
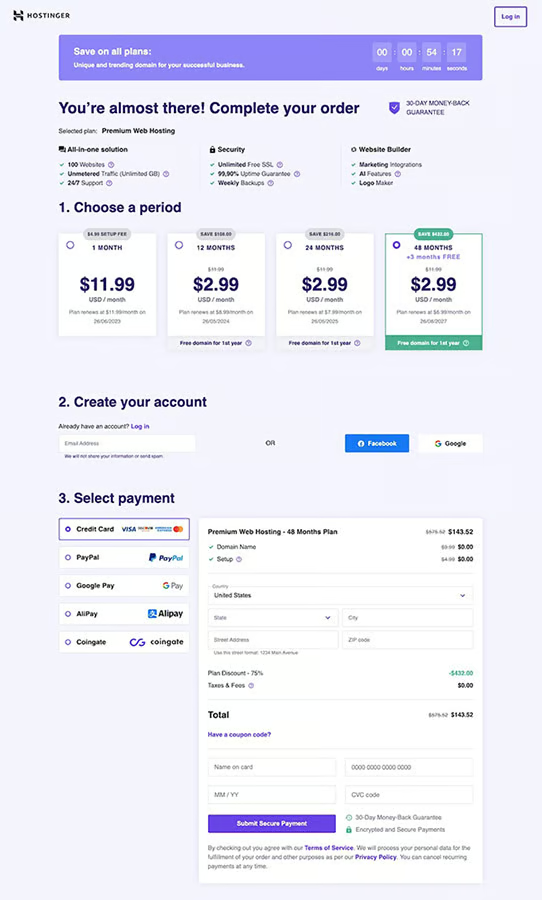
Once you’ve chosen a plan based on your desired contract length, scroll further down the screen to create your account, then select your payment method and add in your billing details. After filling in your details, click the “Submit Secure Payment” button to finalize your account setup.
2. Claim Your Website’s Domain
After setting up your account and subscription plan, you’ll enter the main Hostinger dashboard, which is where you’ll manage and monitor all the essential parts of your website, from your domain to your emails and SSL security.
Before anything else, set up your website’s domain. On the dashboard, click on the “Claim domain” button, then in the pop-up box, search for the domain name you want to use for your website and check if it’s available by clicking on the “Check availability” button. Once you’ve chosen an available domain for your site, click on the “Claim domain” button to officially use it for your website.
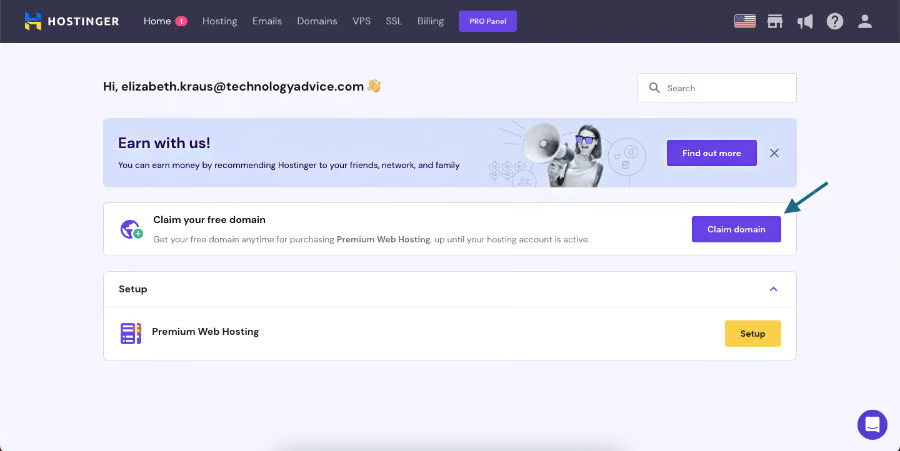
Inside your dashboard, you’ll first need to set up your domain. 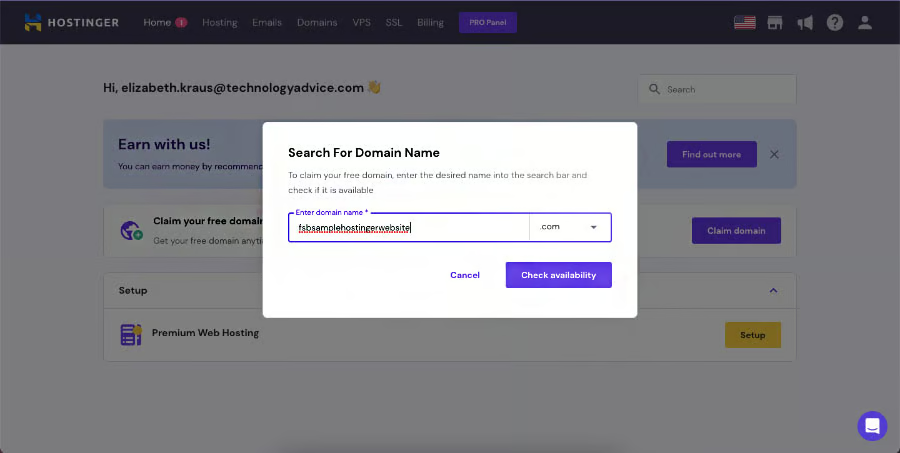
Click on “Check Availability” to check if your chosen domain is available. 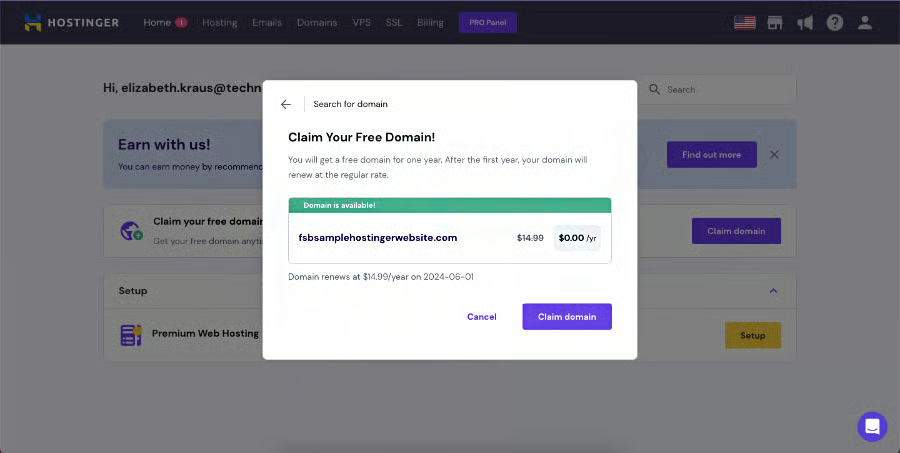
Click “Claim Domain” to officially claim your website domain.


Once you’ve connected your site to a domain, it’ll automatically show up in your dashboard. Alternatively, you can also set up your domain later on before publishing your website live.
3. Answer Prompts About Your Website
After choosing your site’s domain, the next step is to answer prompts about your website. These prompts will help Hostinger determine the tools you need to build your website.
On your dashboard, navigate to the Hosting tab on the upper menu, then on the next screen, click on the “Setup” button in the “Premium Web Hosting” box. Answer Hostinger’s prompts about your website, including who you’re creating the website for, the kind of website you need to build (e.g., an ecommerce site or a blog), and so on.
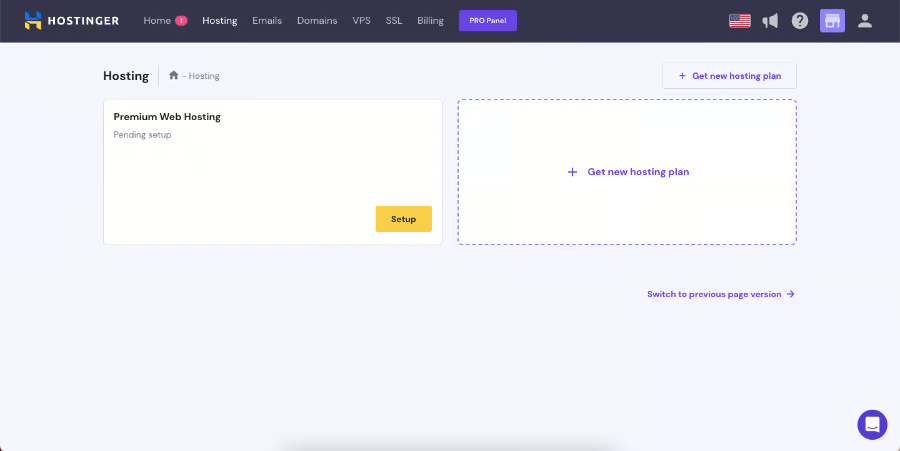
Click “Setup” to start building your site. 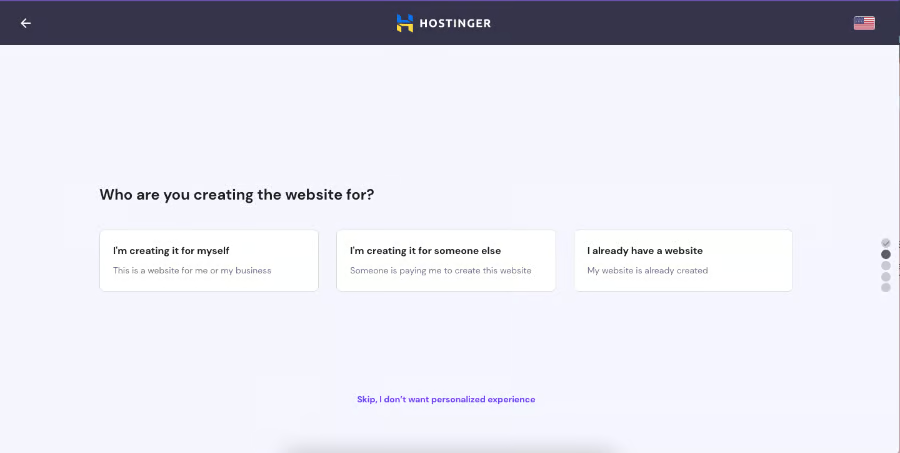
Answer Hostinger’s prompts about your website. 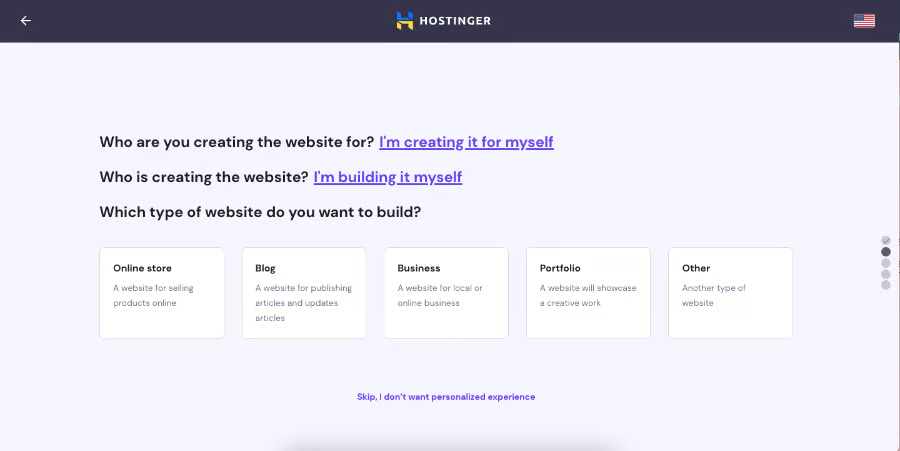
These prompts will include details about who your website’s for and the type of website you need, among others.


Finally, when prompted whether to create or migrate a website, choose to create a new website. You will then be asked to select the Hostinger website builder on the next screen.
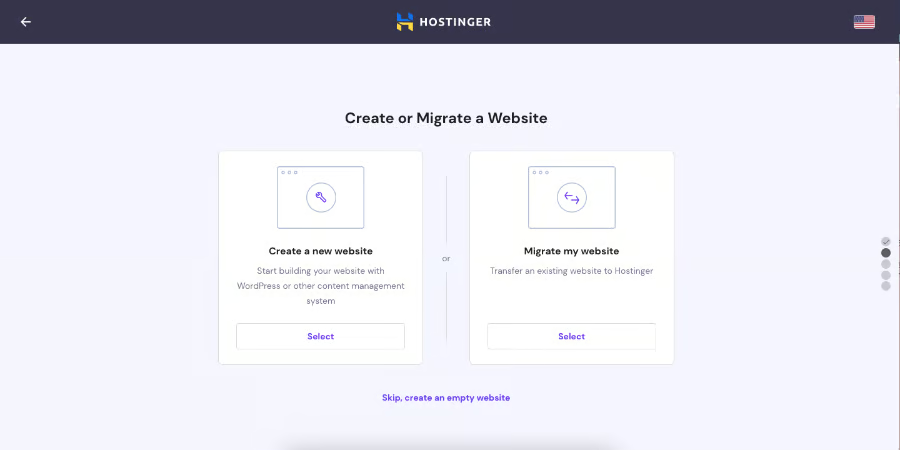
In the next prompt, choose to create a new website. 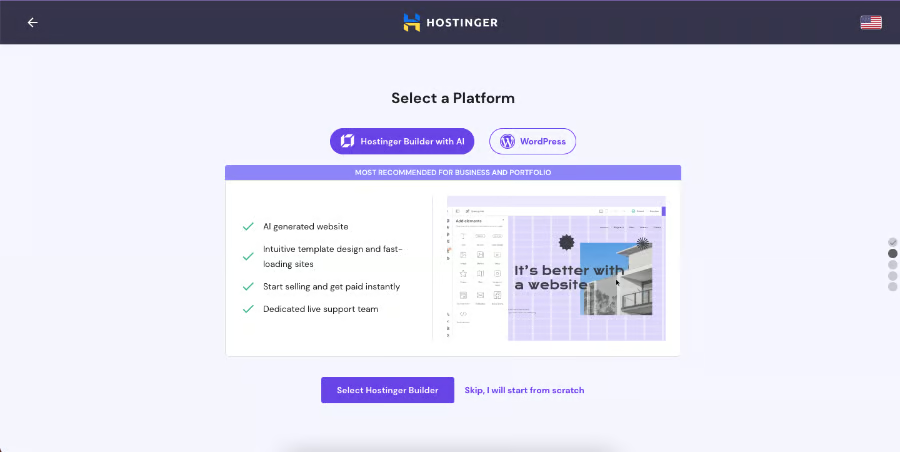
Finally, click “Select Hostinger Builder” to enter the editor.


If you chose not to connect your site to a domain in the previous step, you’ll be prompted to work with a temporary one while designing your website. Otherwise, if you already have a domain, you’ll automatically be directed to choose a type of Hostinger website builder—learn more about that in the next step.
4. Choose the AI Website Builder or Start With a Template
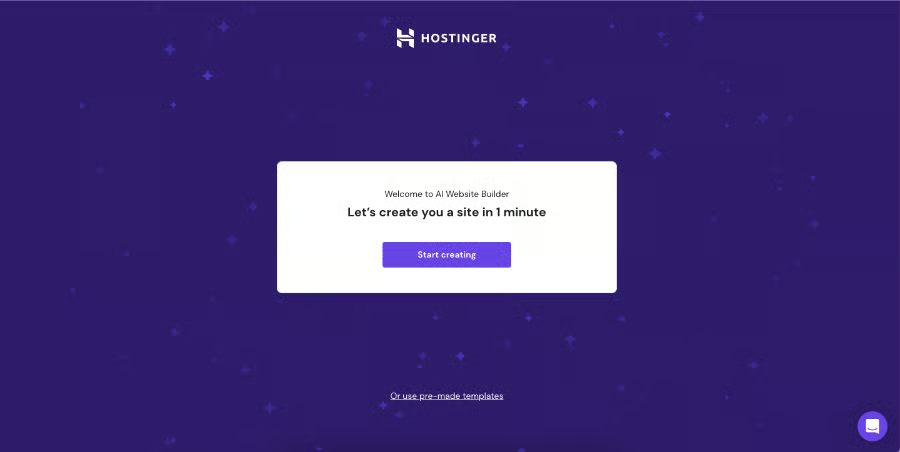
After answering all of Hostinger’s prompts, you’ll find the option to choose between using Hostinger’s artificial intelligence (AI) website builder to create your website or creating one yourself using one of the premade Hostinger templates. We’ll go through the process for each below.
5. Set Up Your Website
After choosing your preferred website template builder, the next step is to start setting up your actual website on Hostinger. Keep reading to learn the process of how to get your site started using either the AI template builder or starting with a premade template.
Using the AI Website Builder
When using the artificial intelligence (AI) website builder, you’ll need to answer a few prompts about your website, which will help Hostinger’s AI generate the specific website that matches your needs. In the pop-up box, enter your business name, choose the type of website you need, then type in a detailed description of your business website in the description box in a few sentences.
Once you’ve filled in the form, click the “Create a website” button to let Hostinger’s AI generate your website. Once your website is generated, you’ll automatically enter Hostinger’s main editing platform, where you can customize your website’s appearance, add and edit elements, and more.
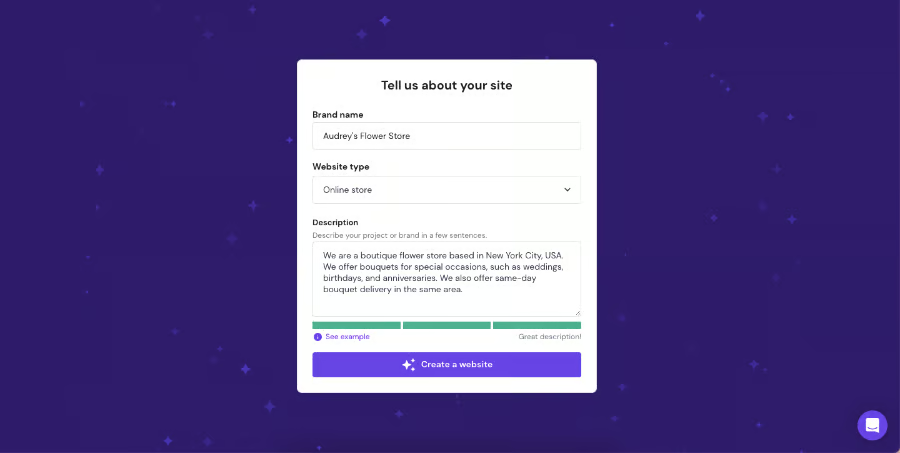
To use the AI website builder, answer the prompt with details about your website. 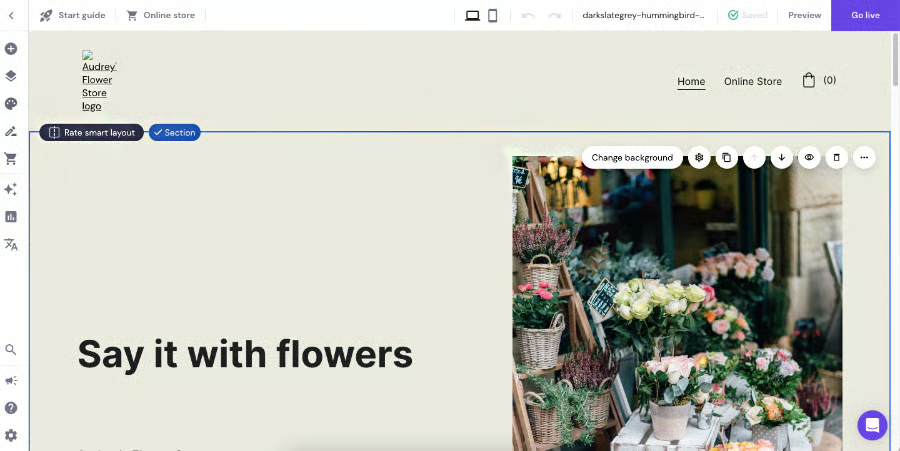
Example of an AI-generated website inside the drag-and-drop editor


Using a Template
If you choose to build your website using a premade template, after choosing the “premade template” option, you’ll enter Hostinger’s menu of templates. Choose and click on the template you want, then enter “Preview” to preview how it looks. Then, click on the “Start Building” button in the upper right corner to start customizing it inside the drag-and-drop editor.
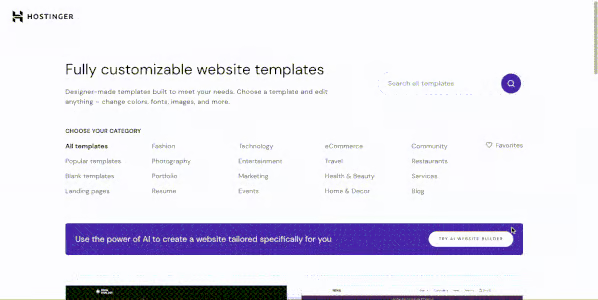
Choose from Hostinger’s menu of themes. 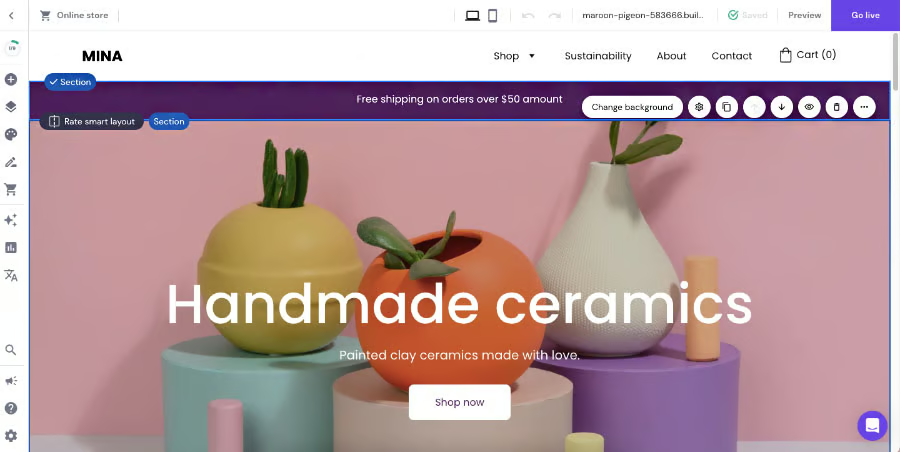
After choosing a theme, customize it in the drag-and-drop editor.


6. Set Up Your Online Store
Once you have your website’s main structure, you can then start customizing it inside the drag-and-drop Hostinger website builder. Whether you use Hostinger’s AI or a template to create your website, you’ll be able to customize your pages, elements, and design inside the drag-and-drop editor before publishing it live.
If you are selling products or services online, we recommend setting up your online store first. One of Hostinger’s best features is its ecommerce platform that makes it easy to create an online store, which you can then further customize later on in the drag-and-drop editor. Inside the drag-and-drop editor, click on the shopping cart icon on the left-hand menu, then click “Manage products” in the following menu to start setting up your store.
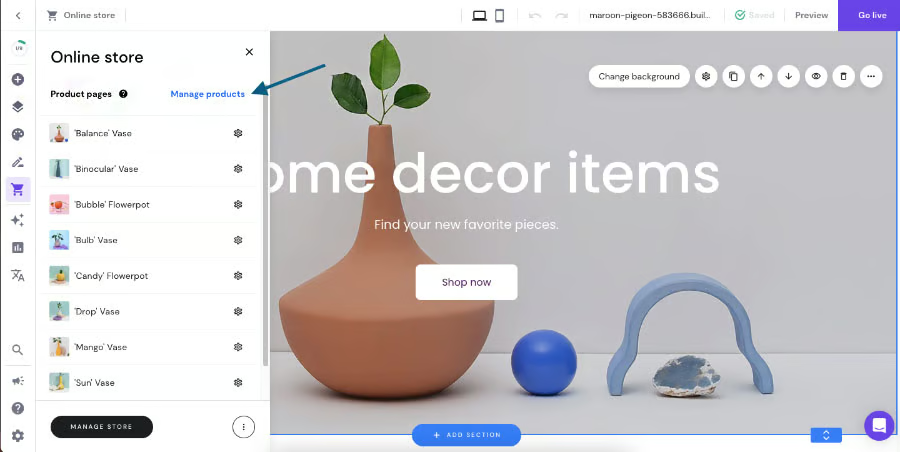
Click on “Manage products” to set up your online store. 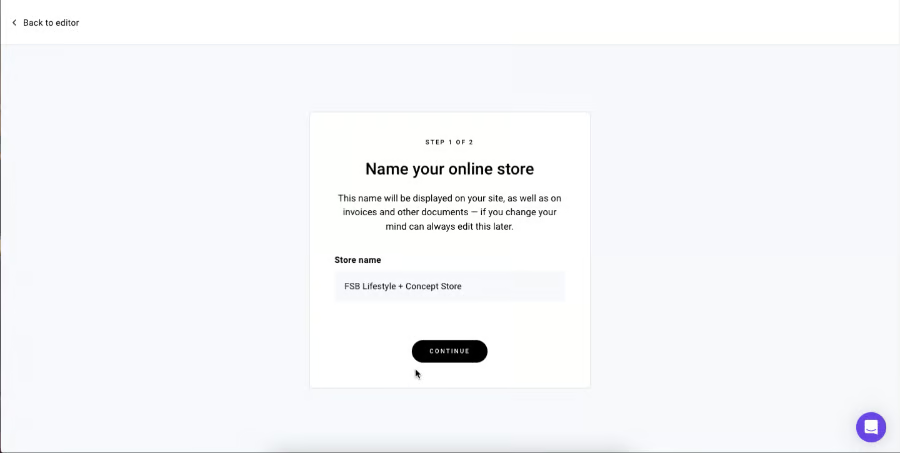
In the next screens, answer the prompts about your store’s name, location, and currency. 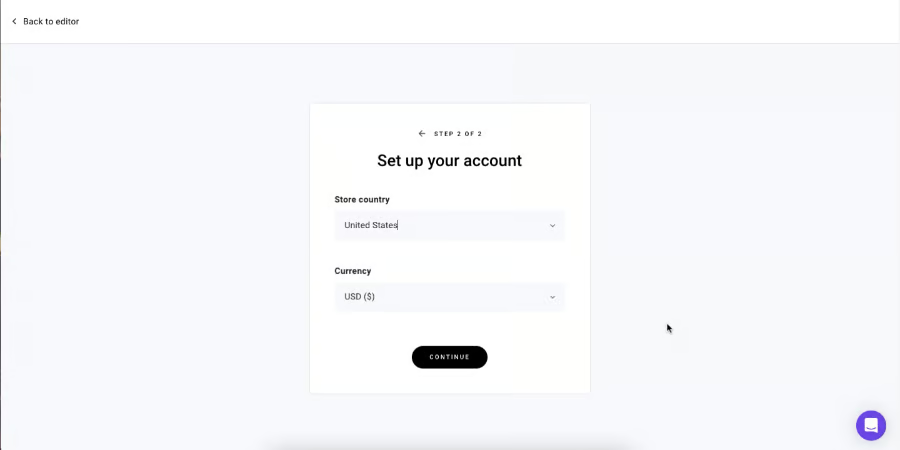
After answering the prompts, click “Continue” to enter your ecommerce center. 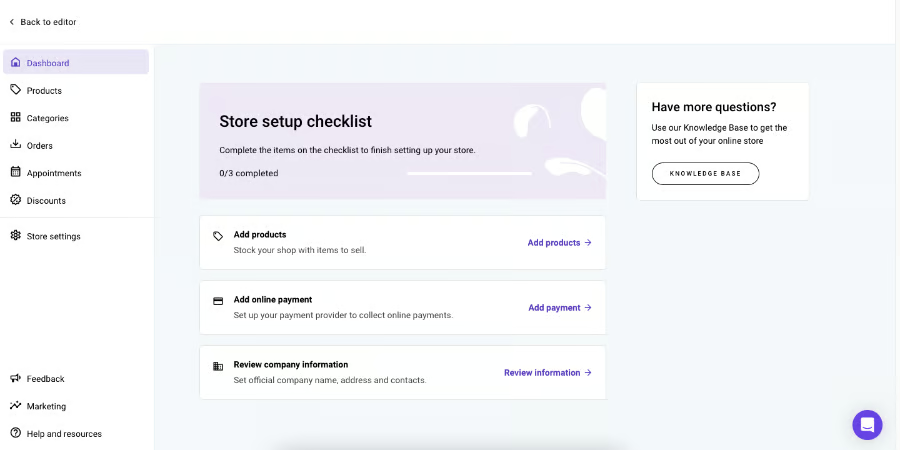
Inside your ecommerce center, manage your products, payment options, and more.


In the next screen, answer the prompts to set up your store’s name, location, and currency, then click on the “Continue” button to enter your site’s ecommerce center. Inside your commerce center, you’ll be able to manage all the elements of your store, from your products and orders to your discounts and appointments.
Open the drop-downs below to find out how to set up various ecommerce elements for your online store:
Adding & Deleting Products
To add products to your store, click on the “Add products” tab on your dashboard, then choose the kind of product you want to add (whether physical, digital, and so on). In the next screen, fill in the form with your product details, including its name, image, description, price, and more. Then, click “Save” once you’re done. Once you’ve added a product, it’ll automatically appear under the “Products” tab.
Conversely, to delete a product from your inventory, navigate to your products tab, click on the button with three dots (ellipsis button) next to the product you want to delete, then click on the “Delete” button.
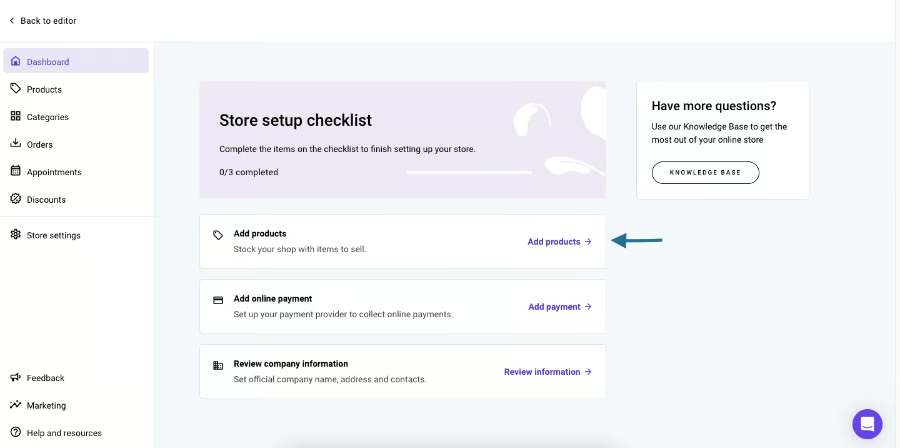
Choose the “Add products” tab in the dashboard to add items to your inventory. 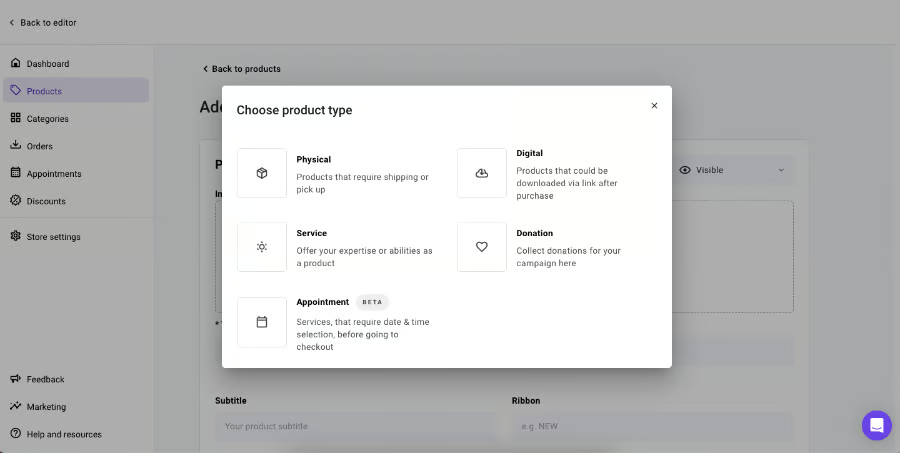
Choose a type of product in the pop-up box. 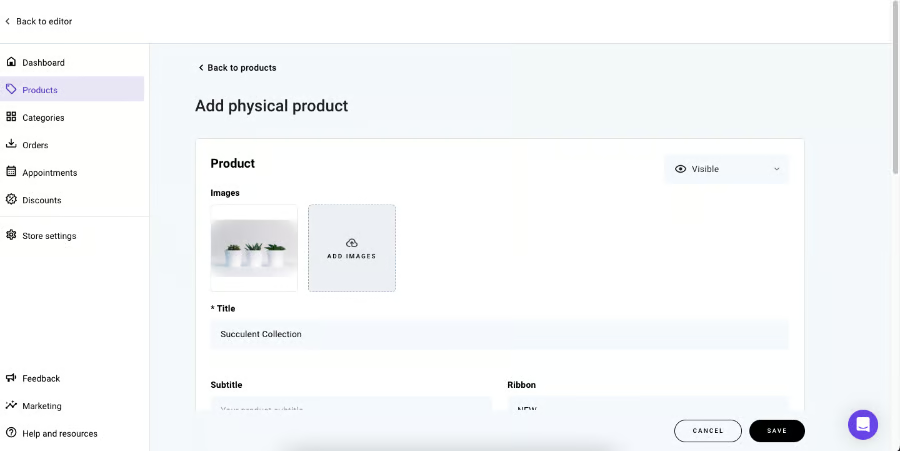
Then, fill in the form with your product details and click “Save.” 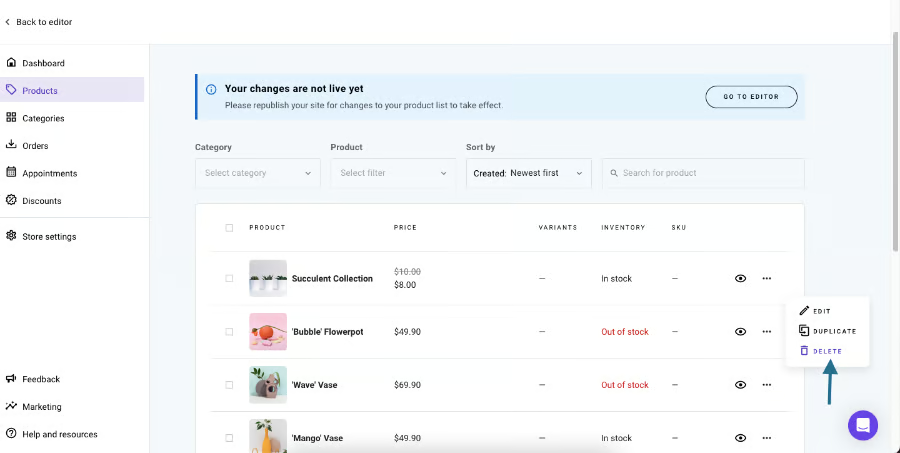
To delete a product, click on its ellipsis button, then choose “Delete.”


Set Up Online Payments
Next, after adding products to your inventory, you’ll also need to set up your store’s payment options. Navigate back to your dashboard on the left-hand menu, then click on the “Add online payment” tab. In the next screen, you can choose to connect with PayPal or Stripe or to enable manual payments, such as cash-on-delivery and bank transfers.
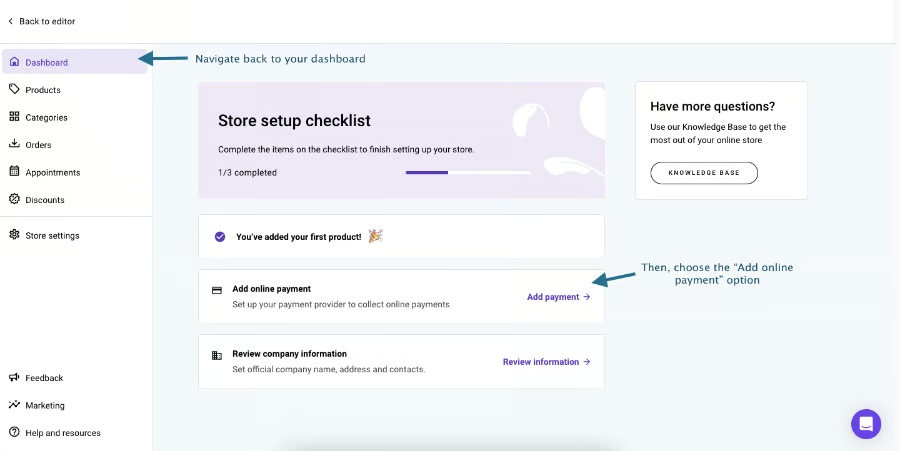
To set up payment options, choose “Add online payment” in your dashboard. 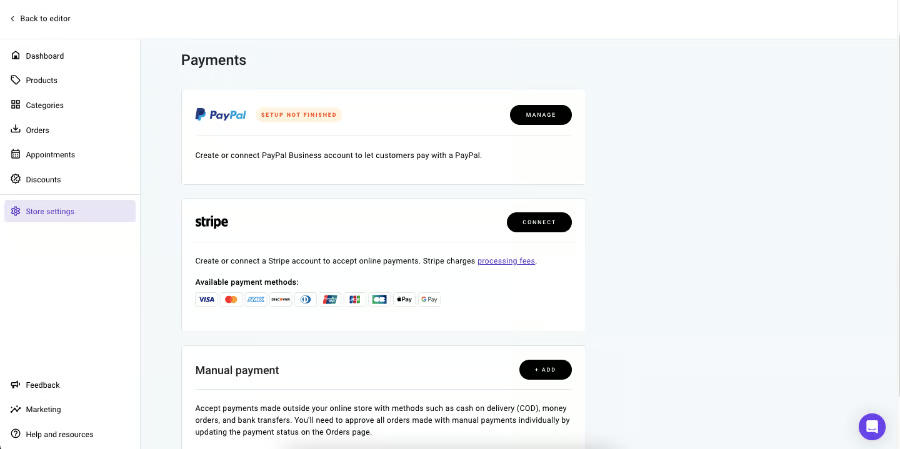
Then, choose a payment vendor to connect with.


Add Product Categories
Hostinger also has the option to add product categories to help keep your store organized and give your visitors a better overall user experience on your website. On the left-hand menu, navigate to the “Categories” tab, then click on the “Add category” button.
In the next screen, type in your category’s name, then click on the “Assign products” button to choose the products that go into that category. For example, a cafe might organize products by drinks, pastries, and so on.
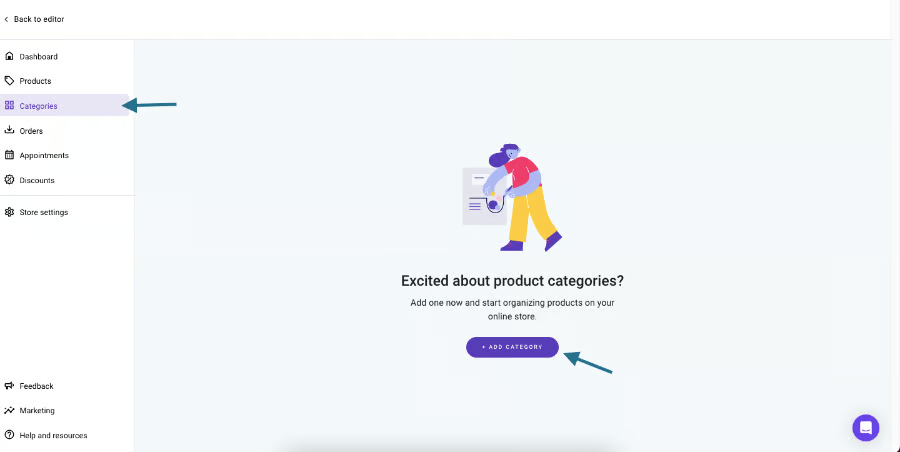
Navigate to the “Categories” tab, then click “Add category” to organize your products into categories. 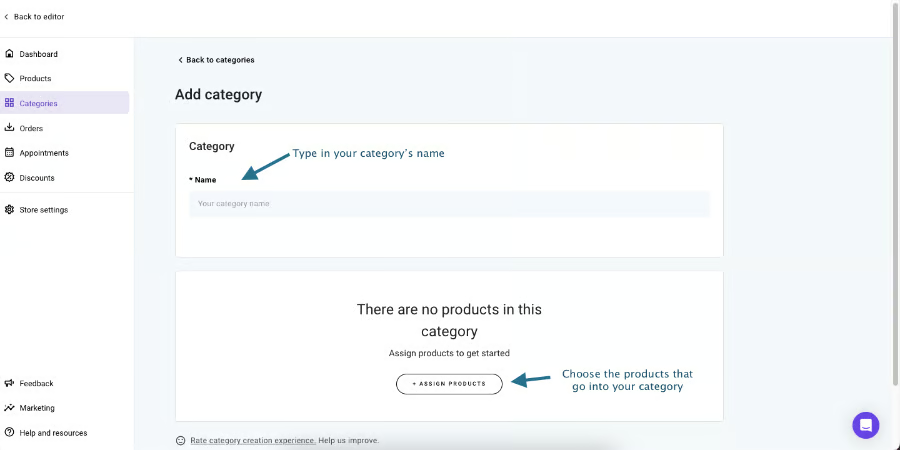
Type in your category’s name, then choose the products you want to add into the category.


Set Up Appointments
Hostinger’s ecommerce center also lets you set up appointment-booking features, which allows customers to book appointments with your business directly on your website. This is especially helpful for cafes and restaurants offering reservations, or professionals offering classes, such as tutors or fitness instructors, among others.
On the left-hand menu, navigate to the “Appointments” tab, then click on the “Enable appointments” button. In the next screen, click on the “Edit” button, then in the following pop-up box, toggle the buttons to edit your business’ appointment availability hours and click “Save.”
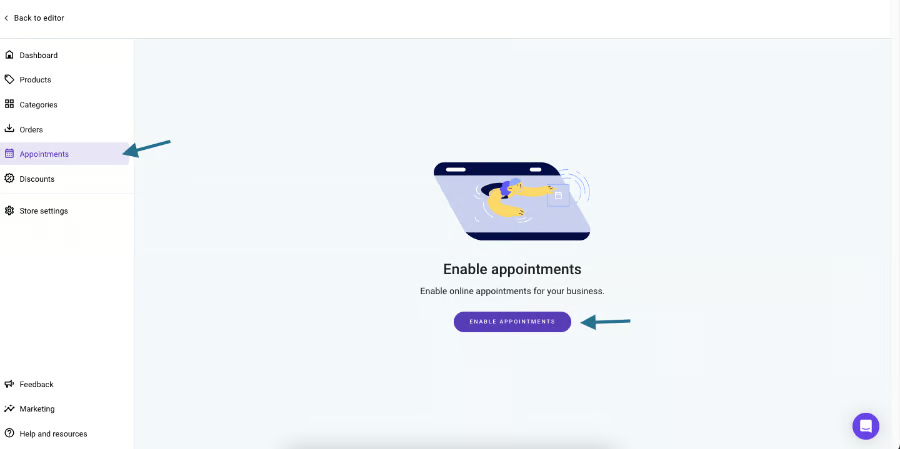
Navigate to the Appointments tab to enable appointment-booking features on your website. 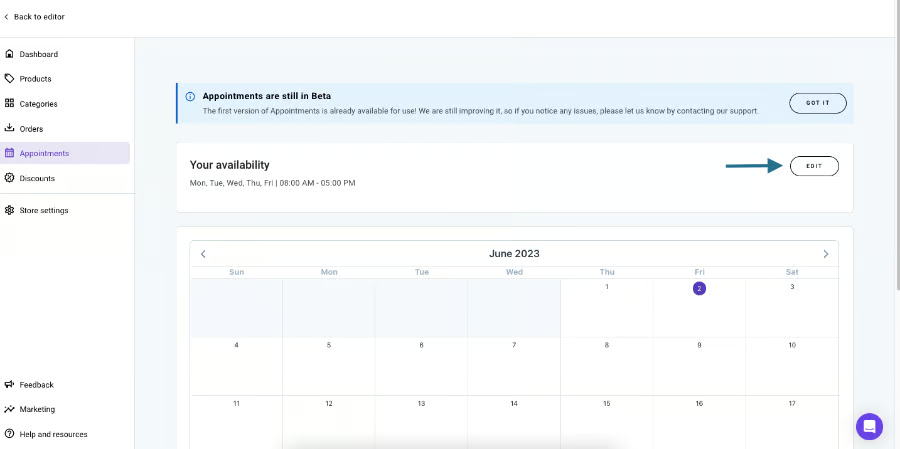
In the next screen, click on the “Edit” button. 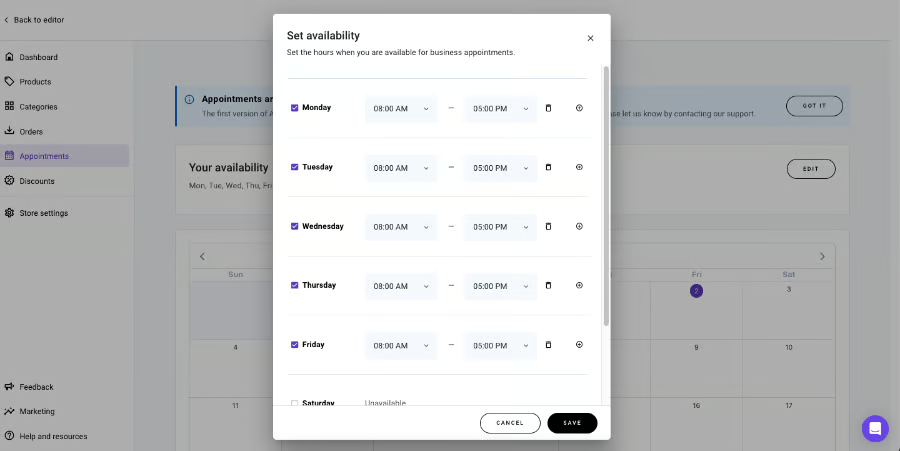
Then, toggle your store’s availability hours.


Add & Manage Discounts
Finally, you can add and manage your store’s discounts. Inside the Discounts tab, click on the “Add discounts” button. In the next screen, fill in the details of your discount, including your discount percentage, name and code, and the dates, times, and conditions that they’ll be active. After filling in the form, click on the “Save” button from the lower right corner. Your discounts will automatically go live once your website is published.
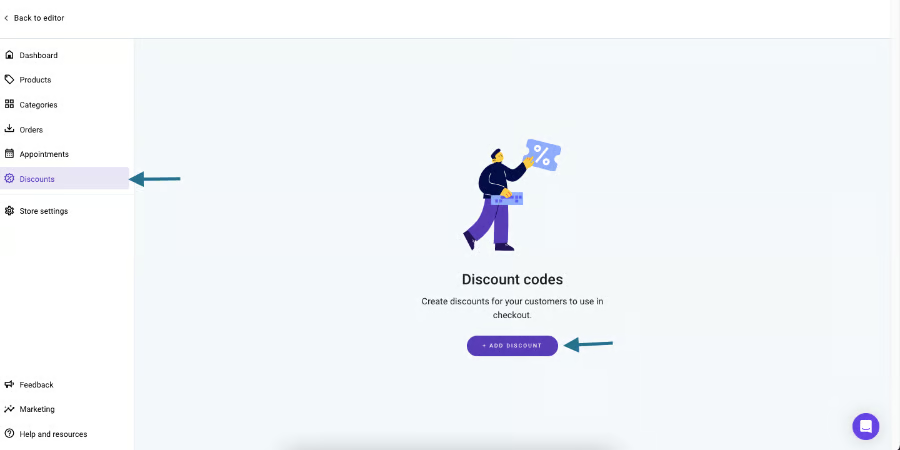
Navigate to “Discounts” to add discounts to your store, and click on the “Add Discounts” button. 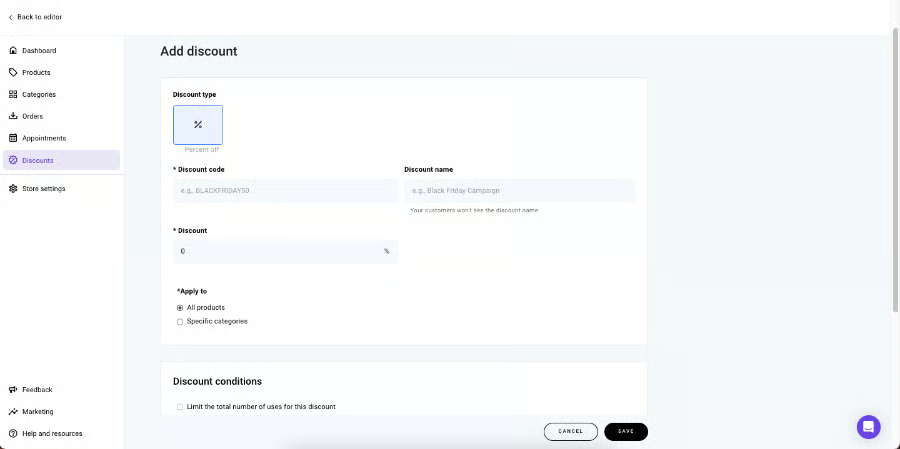
Add in your discount details, then click “Save” once you’re done.


7. Customize Your Website
Once you’ve set up all the parts and features of your online store, the next step is to customize its overall look, structure, and design, which you’ll do inside the drag-and-drop Hostinger website builder. On the upper left corner of the screen, click on the “Back to editor” button to return to the editor.
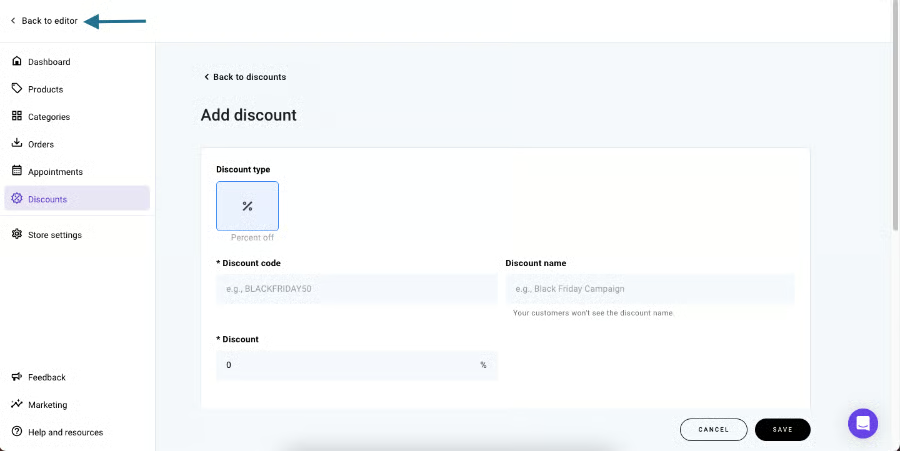
Open the drop-downs below to learn how to customize different elements with the Hostinger website builder:
Add & Manage Pages
Inside the drag-and-drop editor, you can manage all your website’s elements via the left-hand menu bar. To manage your pages, click on the pages icon from the menu. You’ll find that Hostinger also automatically generates a few standard website pages for you.
- To add a page: Click on the “Add page” button on the bottom of the menu, then choose the kind of page you want to add and its layout from the pop-up menu. You can also choose to add a new empty page. Once you’ve added a page, type in its name in the pop-up menu.
- To rename a page: Click on the gear icon next to the page you want to rename, then choose “Rename” and type in your preferred page name.
- To reorder pages: Click on the icon with six dots next to the page, then drag the pages around in your preferred order. They’ll also be reordered on your main navigation bar.
- To set up your page’s SEO: You can also set up your individual page’s search engine optimization (SEO) by clicking the gear icon, then choosing “SEO Settings.” In the following menu, type in your search-optimized page title and description, and add your page’s primary keywords.
- To delete a page: Click on the same gear icon, then choose “Delete” in the following menu.
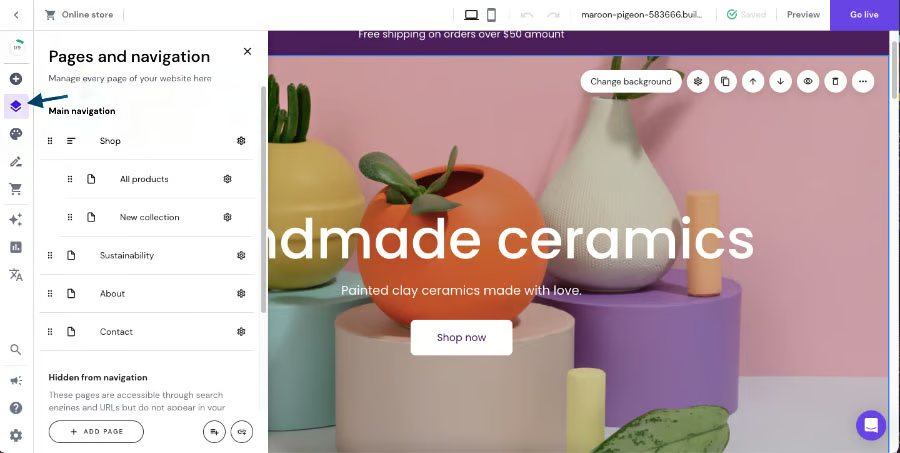
Click on the pages icon to open your “Pages & Navigation” menu. 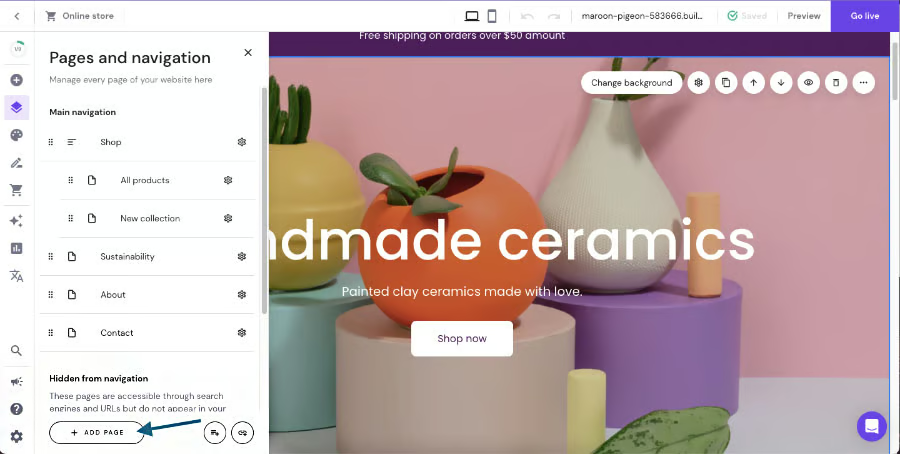
Click on the “Add page” button to add a new page to your site. 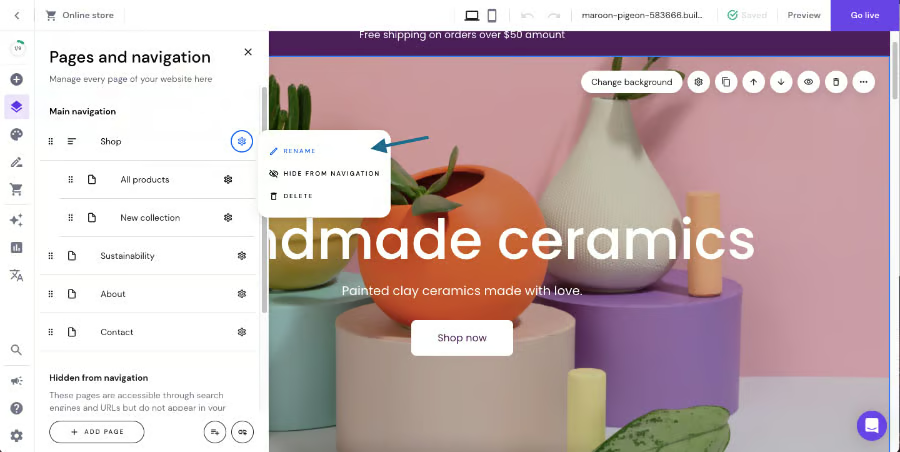
To rename pages, click “Rename” and then type in your page’s name. 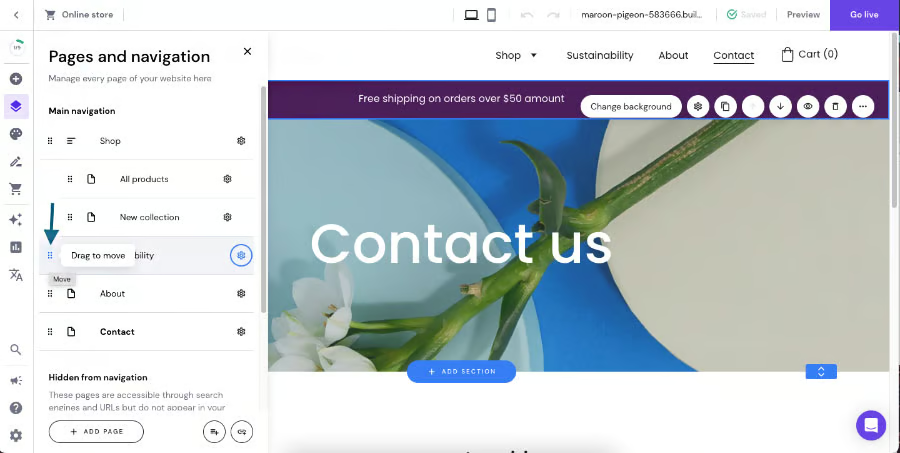
Click and drag on the dotted icon to reorder your pages. 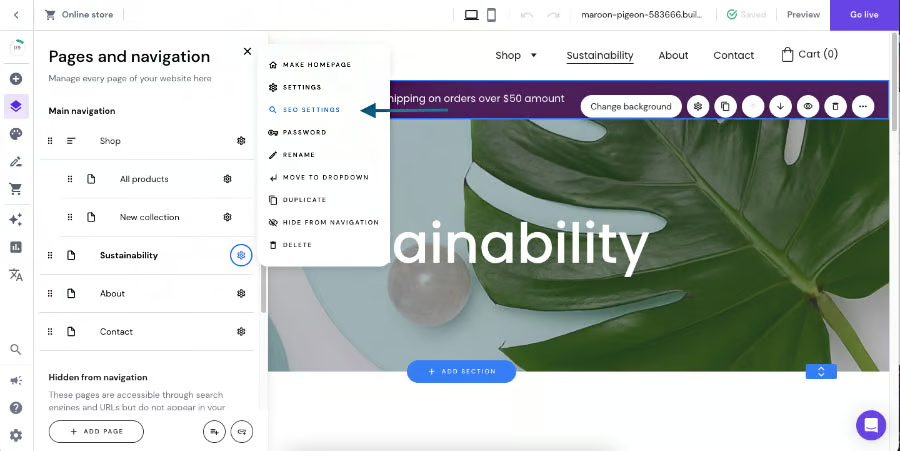
To manage your page’s SEO, choose “SEO Settings” from the menu. 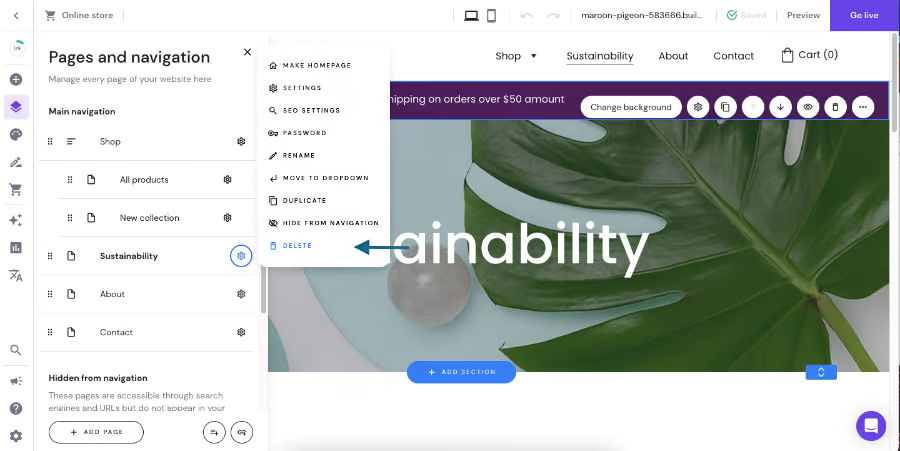
To delete a page, choose “Delete” from the same menu.


Edit Page Sections
Beyond managing your pages, you can also manage and edit the individual sections that make up your website, including where they’re placed, their overall appearance, and more.
- To add a new section: Click on the “Add section” button above or below the existing section you want to add a new one to, then choose the type of section you want to add (e.g. an image gallery, contact form, and so on), and its layout.
- To edit your section’s background: Click on the section you want to edit, then click on the “Change background” button. In the following menu, choose a background color for your section, or upload an image background.
- To reorder sections: Click on the up and down arrows in the upper right corner of the section.
- To delete a section: Click on the section you want to delete, then click on the trash icon in its upper right corner.
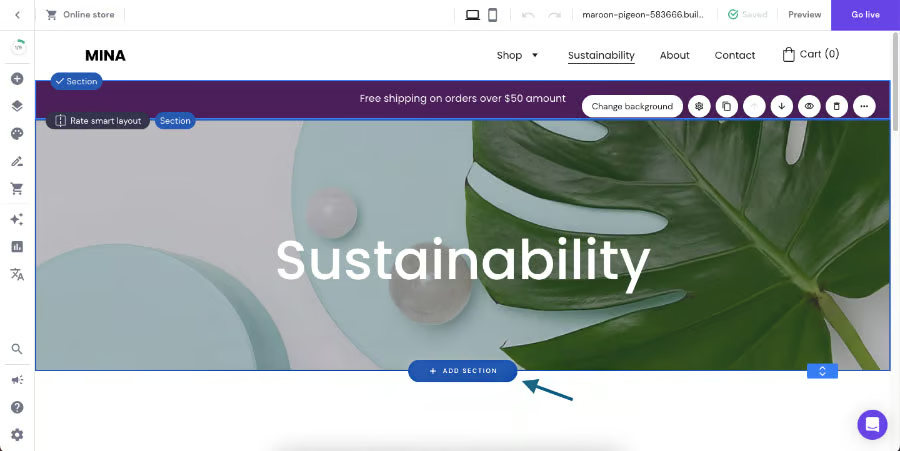
Click on the “Add Section” button in the editor to add a new section to your web page. 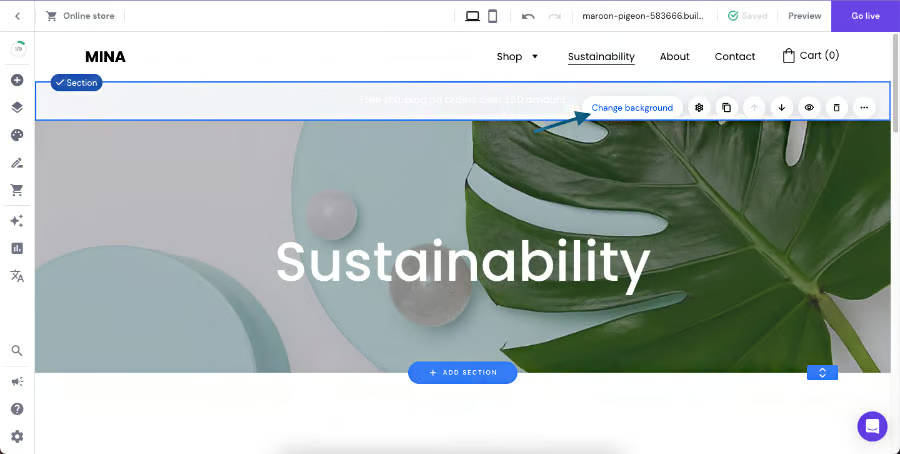
Choose the “Change background” button to edit your section’s background color or image. 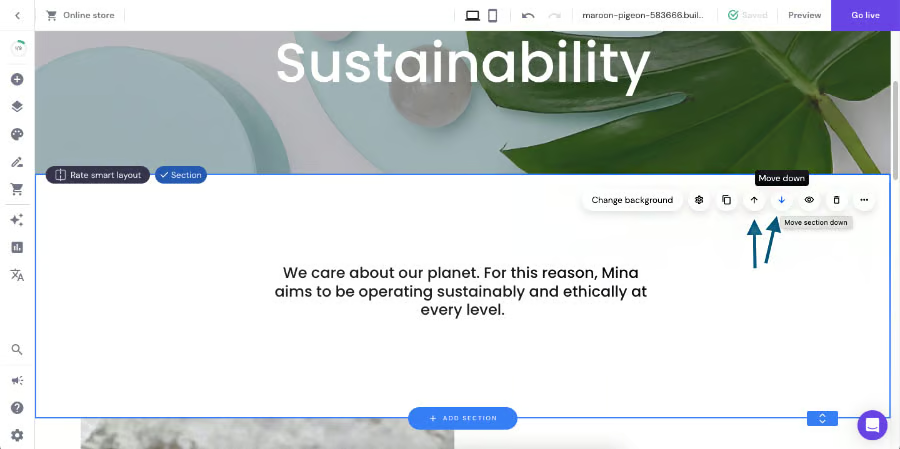
Reorder your sections via the up and down arrows in the upper right corner. 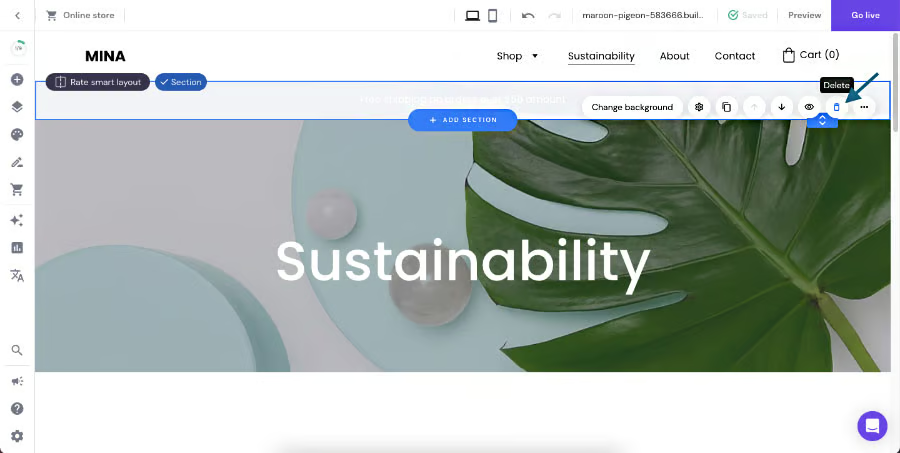
To delete a section, click on the trash icon in the same menu.


Add & Edit Elements
Hostinger uses a drag-and-drop editor, which means you can add, edit, and delete elements directly on your website, from text and images to buttons, contact forms, social icons, and more.
- To add an element: Click on the “+” icon on the left-hand menu bar, then in the following menu, choose and click on the element you want to add and drag it over where you want it placed on your screen.
- To edit an element: After adding an element to your site, click on it, then click on its “Edit” button. In the following menu, you can edit your element’s text, links, colors, size, and animations.
- To edit text: Click on the text element on your screen, then click “Edit text.” Type in your preferred text, then customize its fonts, size, style, and color.
- To edit images: Click on the image element, then click on the “Change image” button. In the following menu, click on “Replace image” and upload your own image. In the same menu, you can also customize its style, behavior, and animations.
- To delete elements: Click on the element, then click on the trash icon in its upper right corner.
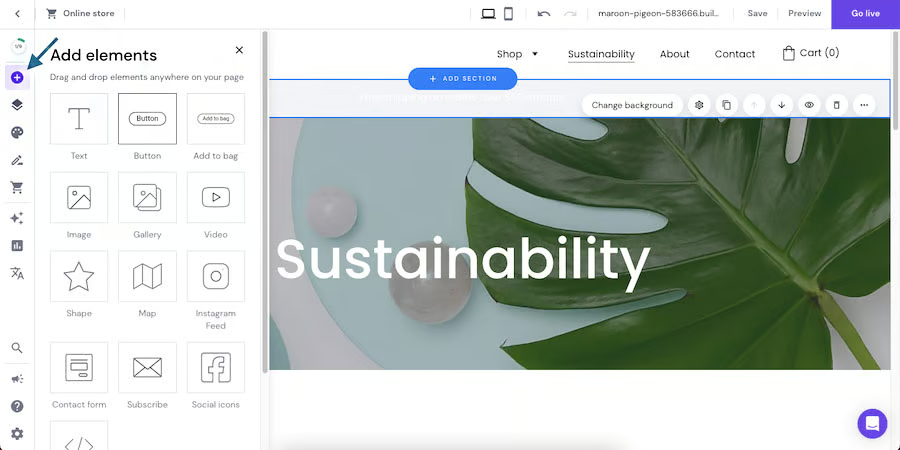
To add an element, click on the + icon, then choose and drag an element to your screen. 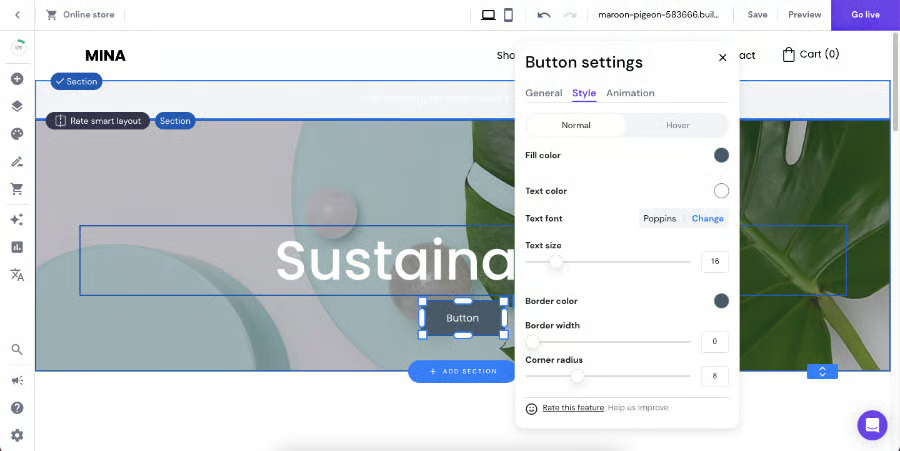
Customize your element’s content and appearance via its “Edit” button. 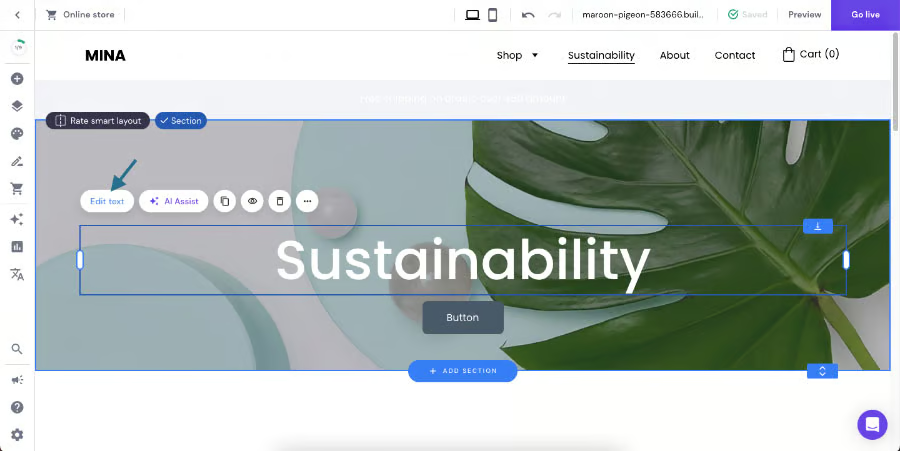
Click on the text element > Edit Text to customize your text. 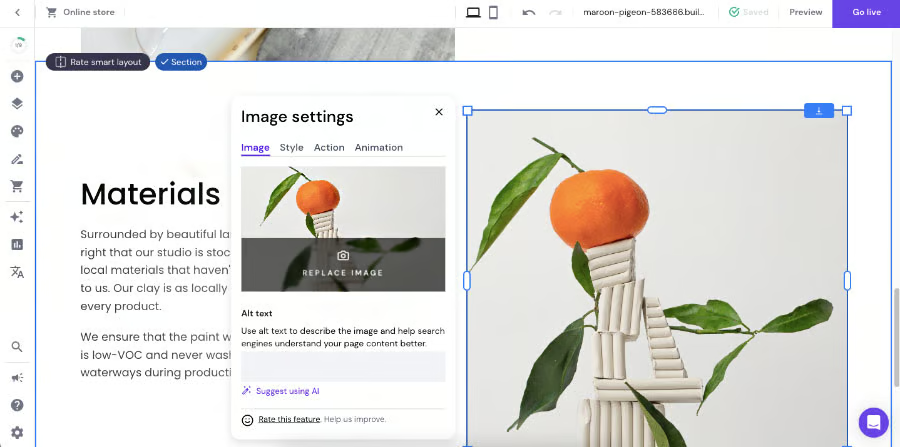
Edit images by clicking on the image element > “Change image,” then upload your own image. 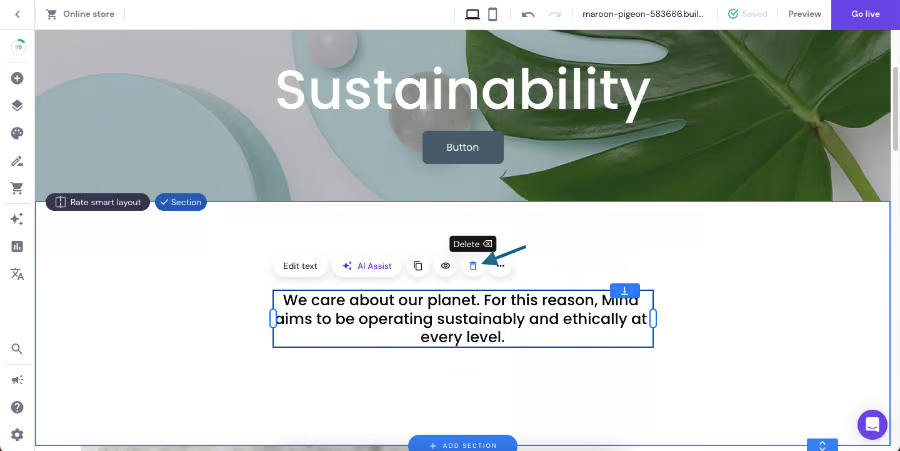
Delete an element by clicking on the trash icon in its upper right corner.


Customize Fonts, Colors & Buttons
Part of how to build a website with Hostinger is to customize your site’s design and appearance with your business’ branding. Your website is your brand’s foremost representative in the online world and the ground zero of all your digital marketing efforts. It’s therefore vital to keep your branding streamlined across all your assets to fully maximize your brand presence.
To start customizing your site’s colors and fonts, first click on the paint palette icon (below the pages icon) on the left-hand menu bar. This will open up your Website Styles menu.
- To customize your colors: One feature that makes the Hostinger website builder stand out is that it lets you customize each individual color on your website, instead of simply choosing one palette for your entire site. After opening the Website Styles menu, you’ll find a list of all the colors used on your site—simply click on each color to customize it via color picker or hex code.
- To customize your fonts: In the same menu, navigate to the “Text” tab, then choose and click on a font combination. You can also choose individual fonts for your headings and paragraphs.
- To customize your buttons: Navigate to the “Buttons” tab, then choose your preferred shape for your primary and secondary buttons.
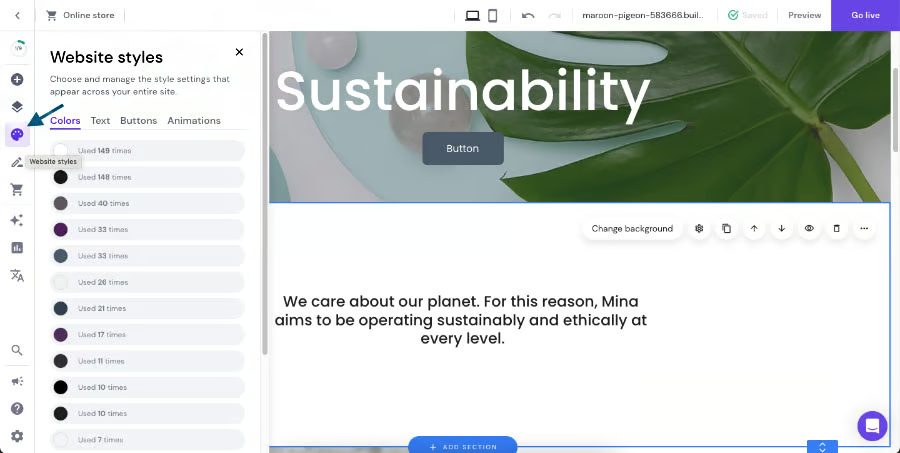
To start customizing your site’s design, click on the color palette icon on the menu to open the Website Styles menu. 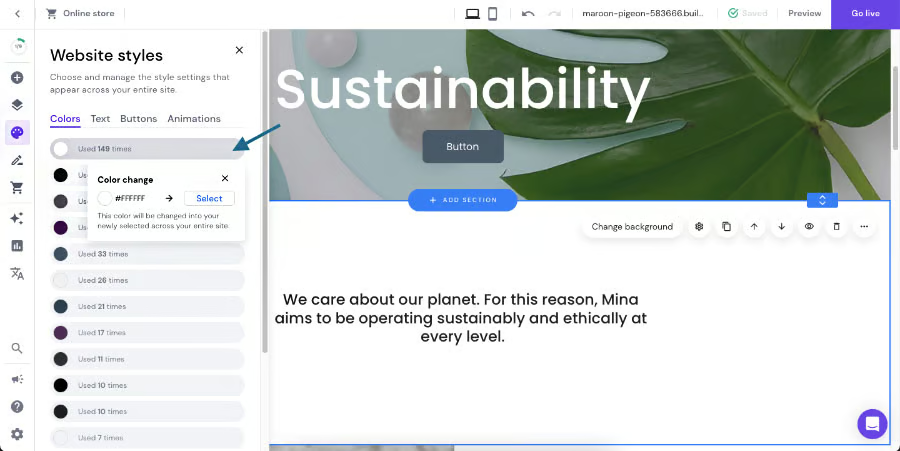
Click on each individual color on the menu to customize it. 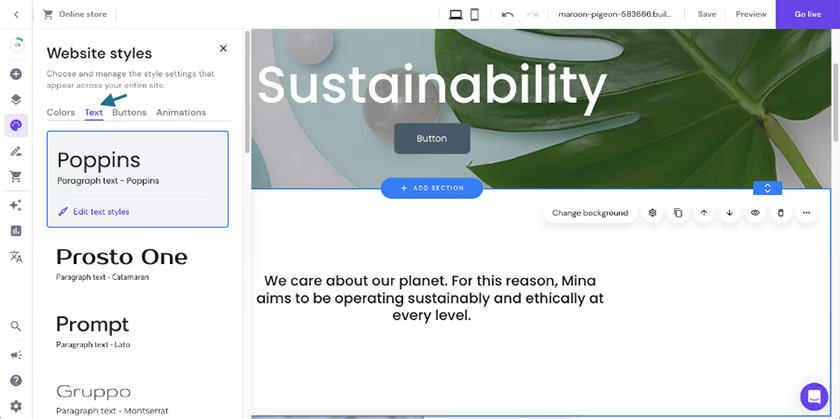
Customize your fonts inside the “Text” tab. 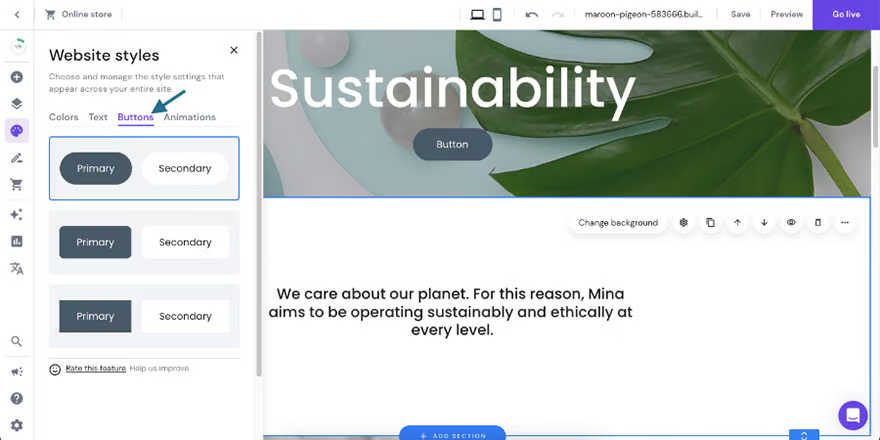
Inside the “Buttons” tab, choose your primary and secondary button shapes.


Customize Your Header & Footer
Finally, you’ll also need to customize the header and footer of your website. On your header, you’ll need to add your logo and organize your site links, and on your footer, you can add relevant information like your social media links, contact details, and even a newsletter sign-up form, among others.
- To add your logo: Click on your website’s header, then click on the “Change logo” button. In the pop-up menu, click “Replace image” to upload your own logo, then customize its width, spacing, and position.
- To edit your header’s layout and design: Click on your header, then click on the paintbrush icon. In the following menu, edit your header’s spacing, icons, fonts, and background color.
- To edit your footer’s social icons: Navigate to your footer, then click on the social icons > Edit social icons. In the following menu, you can add and delete social media links and icons, and edit their style, layout, and animations.
- To edit your footer’s background: Click on your footer, then click on “Change background.” In the following menu, choose a background color for your footer, or upload an image background. You can also edit its height and spacing.
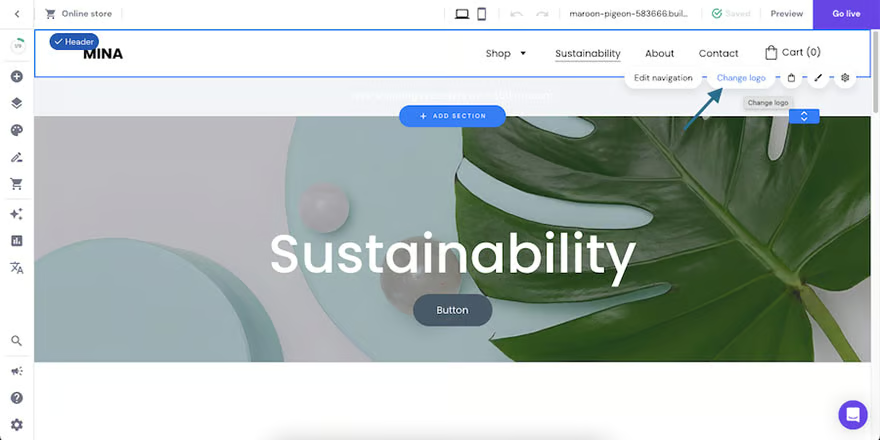
Click on “Change logo” on your header to upload your brand logo. 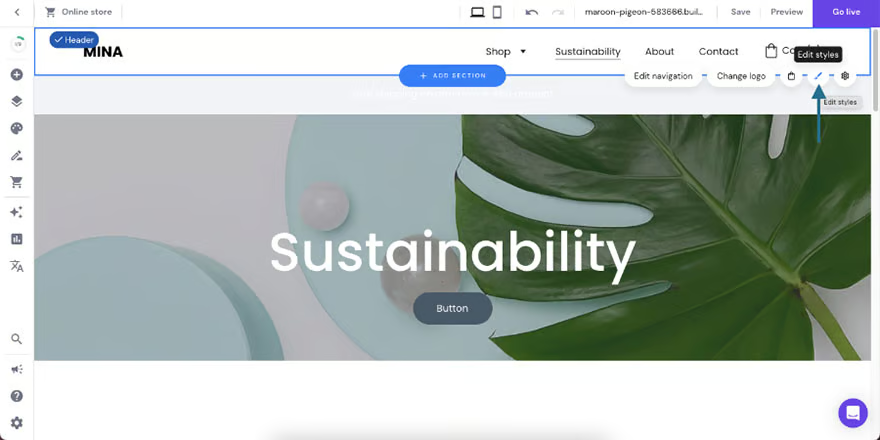
Click on the paintbrush icon to customize your header’s design. 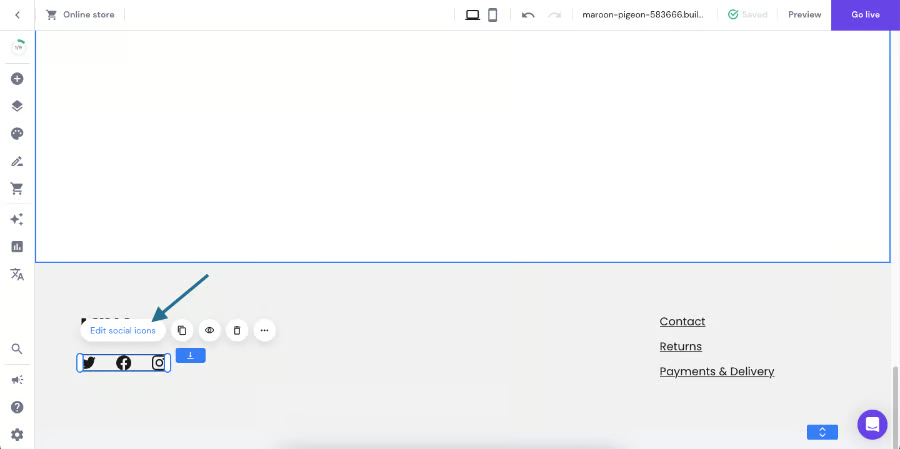
Click “Edit social icons” to customize your footer’s social media links. 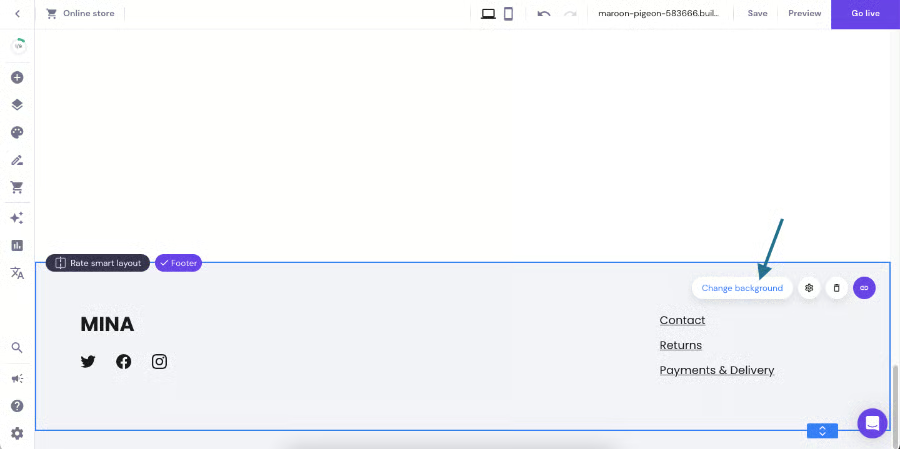
Finally, choose your footer’s background color or image by clicking the “Change background” button.


If you don’t have a logo yet, you can create one right in the Hostinger site builder dashboard. Click on the artificial intelligence (AI) tools and access the logo builder. Share some details about your business and indicate your design preferences, then choose your favorite option from the AI-generated logos.
Add a Blog
Adding a blog to your website can significantly boost your search engine optimization (SEO), build your brand’s authority and credibility, and even gather new leads for your business. In short, blogging is a great low-cost, high-return content marketing tool. And with the website builder Hostinger offers, creating a blog is possible with just a few clicks.
On the left-hand menu, click on the pencil icon (below the palette icon), then click “Start a blog” in the following menu. This will automatically prompt Hostinger to create a new blog page on your website.
On the new blog page, click on “Edit post” to create a new blog post, then on the next screen, add your blog post’s title, image, and text. You can also add videos, image galleries, and other elements via the left-hand menu bar.
Uniquely, Hostinger is one of just a handful of site builders that makes writing blog posts easy as well. It has a built-in AI content writer you can use to quickly generate content for a wide variety of business types. Your post will automatically go live as soon as you publish your website.
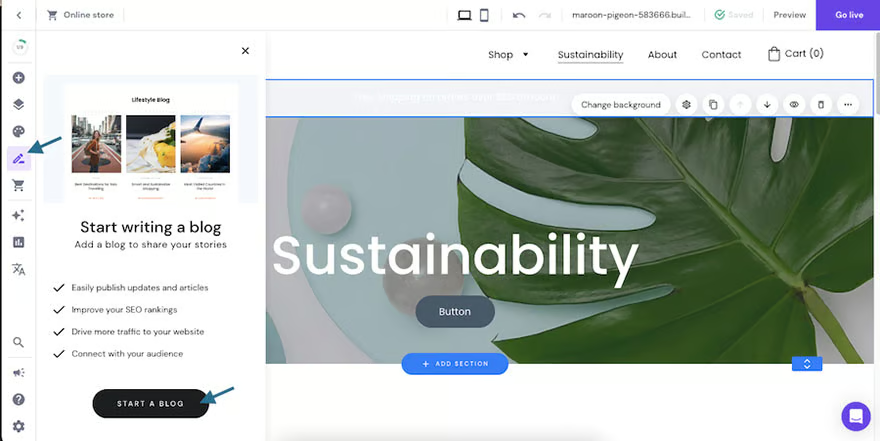
Click on the pencil icon > Start a blog to set up a blog for your website. 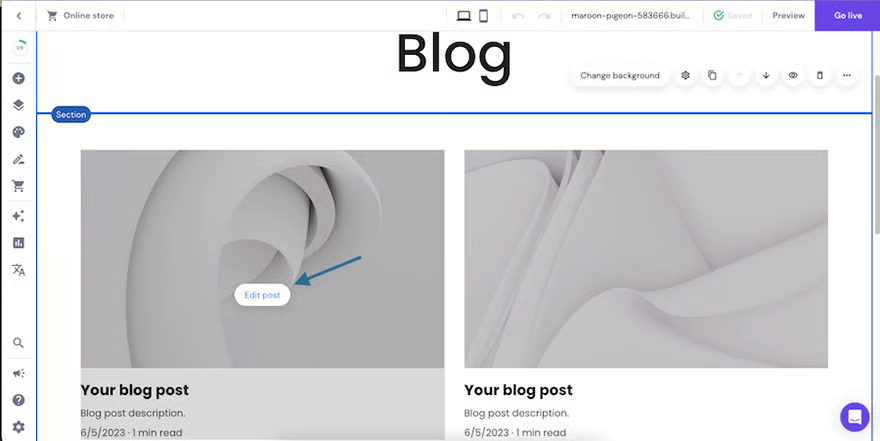
On the new blog page, click “Edit post” to add a new blog post. 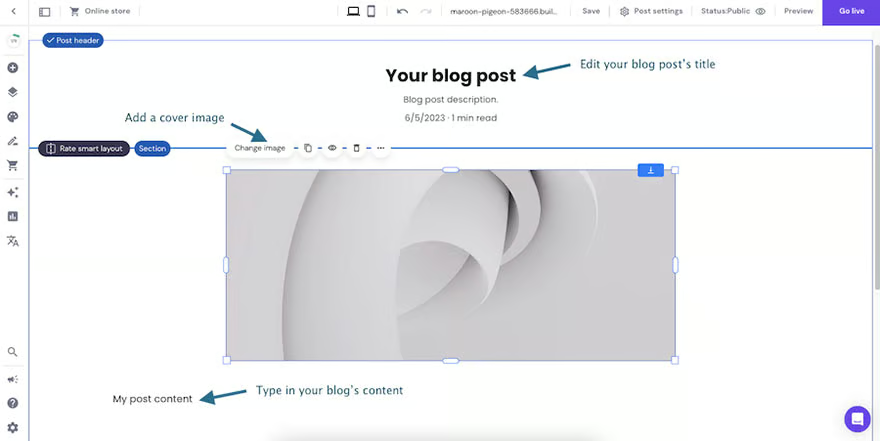
Then, edit your blog’s title, text, and image.


Countless studies and case studies have proven how blogging can boost your brand presence and help generate revenue. However, writing isn’t everyone’s forte. To help you out, Hostinger’s AI content writer is embedded right into the editor. You use the AI writing assistant to help with everything from titles and meta descriptions to on-page and blog content.
8. Set Up Your SEO
Finally, before your website goes live, an essential step is to set up its search engine optimization (SEO) to ensure it ranks on search engine results and reaches your target audience. To set up your site’s SEO, navigate to the Analytics menu by clicking on the graph icon on the menu bar, then click on the SEO tab in the following menu.
Hostinger will then prompt you with a series of questions to set up your SEO, including your business name, description, and primary keywords. After setting up your SEO, you can also edit it again later in the same tab.
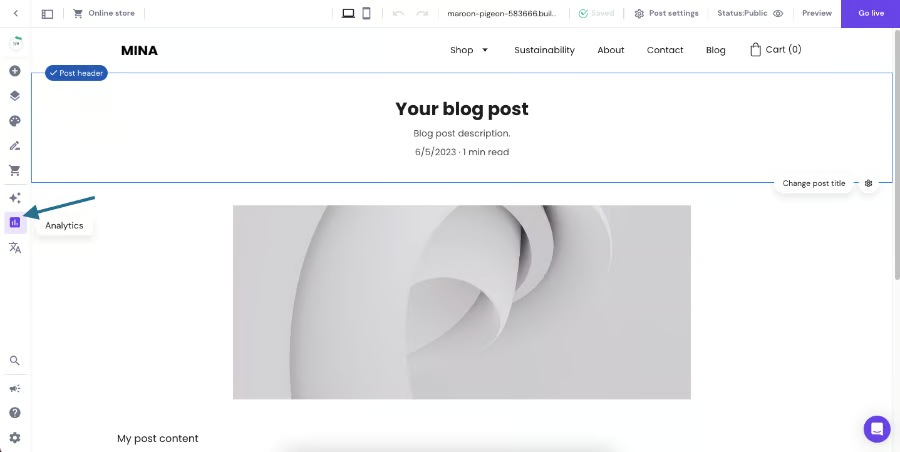
Set up your site’s SEO under the “Analytics” tab. 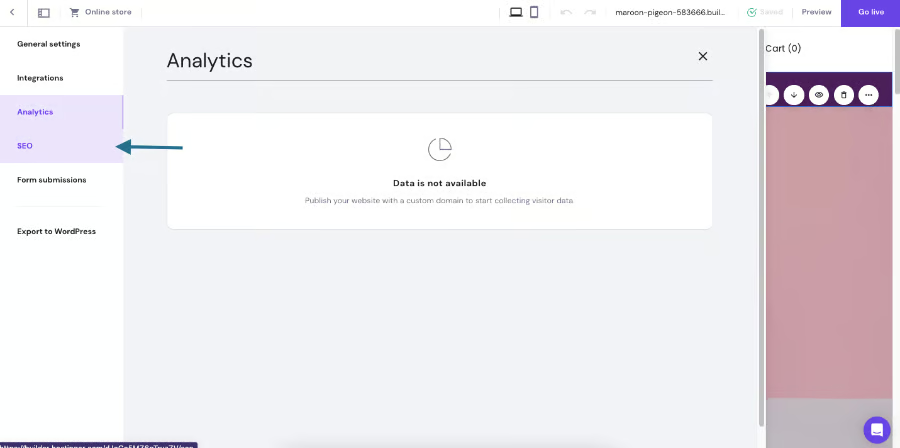
On the next screen, click the SEO tab. 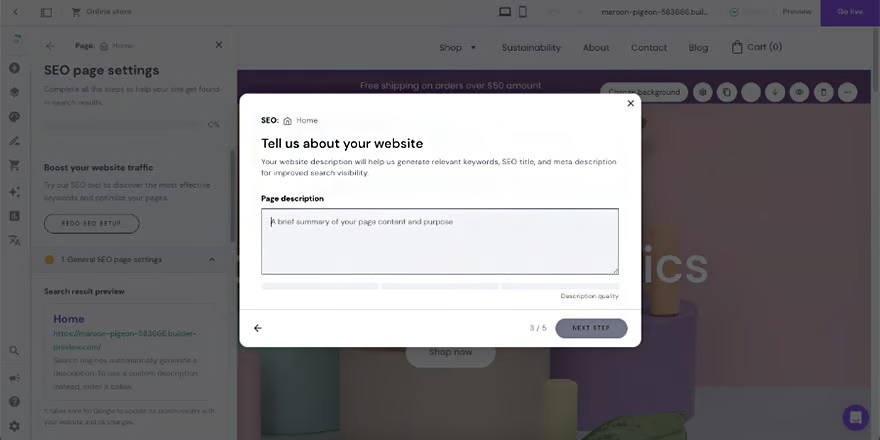
Then, fill in the prompts to set up your site’s SEO. 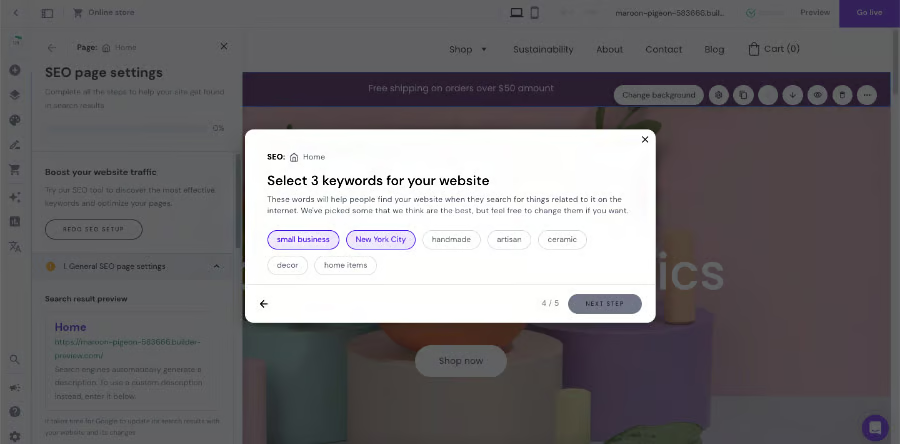
Prompts will include your business name, description, and primary keywords.


Hostinger accounts for many of the search-friendly features it takes to get found online. To ensure your site is set up for success, read our article with specific tips for how to rank higher on Google and other search engines.
9. Review & Publish Your Website on Hostinger
Once you’ve set up your site’s SEO, it’s nearly ready to finally be published live. But before you leave the Hostinger website builder, do a full review of your website first to ensure that all its parts are functioning properly and fit your branding. Here are a few things to review before officially publishing your site.
- Navigation: Good site navigation is the cornerstone of any good website user experience. Ensure that the menu bar on your header has all the essential page links and that they all lead to the correct pages.
- Branding: As mentioned above, your website is your business’ most essential digital marketing asset. Double-check that your site has your logo and that your colors, fonts, and content are all consistent with your overall branding.
- App integrations: Third-party apps can significantly improve your site’s functionality and features, and Hostinger offers a handful of apps you can connect with, such as Google Analytics, Facebook Messenger, and more. Add app integrations by clicking the gear icon on the menu bar > Integrations.
- Cookie banners: While they aren’t mandatory for U.S.-based websites, cookie banners are increasingly becoming a staple for any business website, and can help boost your site’s trustworthiness with visitors. Set up your cookie banner by clicking on the gear icon on the menu > General Settings > Cookie banner.
- Favicon: Your site’s favicon is a small icon that visually represents your website on the internet; they usually come in the form of your logo or a variation of it. Learn more about them in our guide to favicons. Similar to your cookie banner, add your site’s favicon by clicking the gear icon > General Settings > Favicon.
- Mobile site experience: Finally, the last step of what makes a good website is to ensure that your site is as fully functional and well-designed on mobile screens. This is essential, as mobile devices now generate over half of all web traffic, a number likely to grow even further. You can check how your site looks on mobile by clicking on the mobile icon on top of the editor.
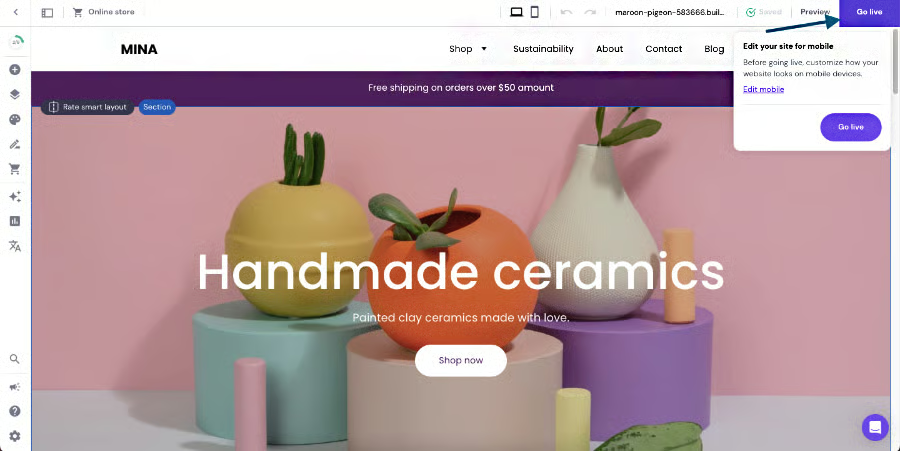
Once you’re sure all the website basics are accounted for, it’s ready to be accessed by the public. Inside the editor, click on the “Go live” button on the upper right corner of the screen to officially let your website go live. Once your website is live, be sure to check on it consistently. Check your site’s analytics, website health, and SEO, and make changes as necessary as your business grows.
Ready to get started? Head over to Hostinger today.
Pros & Cons of the Hostinger Website Builder
While Hostinger offers plenty of benefits—its all-inclusive plans and easy-to-use drag-and-drop site editor, to name a few—it also has a few limitations compared to other site builder platforms. For example, there is no Hostinger free website builder plan, and there are fewer app integrations, unlike others like Weebly and GoDaddy. Here are a few of the biggest benefits and drawbacks of using Hostinger.
| PROS | CONS |
|---|---|
| Generous plan: 100 websites, free domain, free SSL, and business email | No free plan |
| Very easy and intuitive to use | Not many 1-click integrations, especially compared to Wix and Weebly |
| 1-click integrations for Google AdSense monetization and Google and Facebook remarketing | SEO isn’t as full-featured as Wix or Squarespace |
| Flexible ecommerce options and no extra cost for ecommerce | Email marketing is an add-on |
| Baked-in AI, including a content writer, logo maker, and on-page engagement heatmap analyzer | Email account only includes 1GB of storage |
Best Alternatives
Now that you know how to build a website with Hostinger and its pros and cons, check out the table below. It shows how Hostinger’s website builder compares to other alternatives to help you determine if it is the best option for you.
| Alternative |  |  |  |
|---|---|---|---|
| Key Features vs Hostinger |
|
|
|
| Free Plan | ✓ | ✕ | ✓ |
| Starting Cost/Month | $10 | $16 | $16 |
| Starting Cost/Month for Ecommerce* | $0 | $23 | $27 |
| Learn More | How to use Weebly | How to use Squarespace | How to make a Wix website |
*Billed annually, or pay a higher cost month-to-month
Frequently Asked Questions (FAQs)
Is WordPress better than Hostinger?
WordPress offers more capabilities and customization than Hostinger’s website builder. However, it’s far easier and faster to build a site using the Hostinger website builder, and it will also cost a lot less. You can use Hostinger to build a website for less than $40 the first year and sell physical or digital products. To do the same on WordPress requires a paid plugin for digital ecommerce, which would cost a few hundred dollars per year on top of your costs for hosting and domain.
How much does it cost to host a website on Hostinger?
Hosting a website on Hostinger costs $2.99 a month for the first year with annual billing, or as little as $1.99 a month if you are willing to sign up for a 48-month contract. However, after the base plan, you can build multiple websites, so your hosting cost per site drops rapidly with more websites.
Is Zyro free with Hostinger?
Yes (sort of). Hostinger purchased Zyro and built its technology into a proprietary site builder now included with all Hostinger web hosting plans. Hostinger is continuing to develop the site builder included in its plans independently of Zyro, so it’s reasonable to expect that the Hostinger website builder will have more features than Zyro as development continues.
Bottom Line
The Hostinger website builder is undoubtedly one of the most affordable platforms available. All-inclusive plans include web hosting, a custom domain, and full use of its site builder for up to 100 websites, including ecommerce sites. And it’s easy enough for even true web design beginners to use. Follow the steps above to learn how to build a website with Hostinger, and get started making yours today.
