


Retail store inventory management is about stocking products buyers want, pricing and promoting to sell those products at a profit, and maintaining stock levels that meet demand without over-purchasing. As a retailer, you know that your merchandise is the crux of your business, so creating an accurate and efficient system to manage products will play a huge role in determining your store’s success.
Here we outline several retail inventory management best practices, including the tools to use for your business.

1. Understand Retail Store Inventory Metrics
Before you can start inventory analysis, running promotions, and placing orders, you have to understand the metrics businesses use for inventory management in retail.
We recommend using a point-of-sale (POS) system to track these metrics via built-in reporting features and easily monitor them in real time. Here are two options for POS systems that offer retail inventory reporting tools:
- Square for Retail: Square is our top-recommended low-cost cloud-based retail POS system that allows you to get real-time data, review templated or customized reports, and set low-inventory alerts so that you never run out of an item. Learn more about Square for Retail.
- Lightspeed: Lightspeed is a cloud-based POS system that gives you unparalleled inventory control and retail analytics (it’s our top POS inventory software). Lightspeed is best for stores with multiple locations or businesses with a slightly higher budget. Check out our Lightspeed Retail review.
Alternatively, if you would rather use a spreadsheet, download our free inventory management workbook. It will help you track your stock levels so you can calculate the different metrics we outline below.
Here we will look at some of the most critical metrics in small business retail inventory management, how you can calculate them, and what they tell you about your business.
Inventory Quantities
Watching for low product quantities is a key part of a good retail inventory management process. This will help you avoid stockouts, frustrated customers, and missed sales. It will also give you a better picture of your inventory so you can optimize your purchase processes and reduce costs in the future.
For example, a new business (or an existing business trying out new products) might choose to order in minimal quantities to begin with. This way, the business avoids having excess stock in case the product launch is unsuccessful. If it turns out that customers are eager to buy, the business can then increase its order sizes, allowing it to stay in stock consistently and meet its customers’ needs.
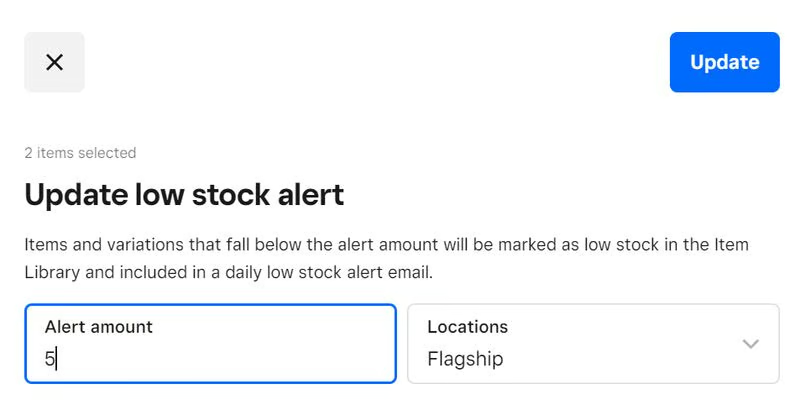
You can track inventory quantities manually by constantly checking your inventory and spotting low-stock products. You can also track low stocks automatically by using a POS system that sends out alerts once your inventory reaches levels that you set yourself. With both Square and Lightspeed, for example, you can set a low stock threshold, say, at 45 units. Then, you would receive notifications to place a reorder when any product reaches 45 units.
Low-stock alerts often correlate with reorder points. The exact level or amount of stock that correlates with your reorder point will depend on demand for the product, production times, shipping speed, and the supply chain.
Individual Product Profits
One of the most important things you should know to manage your inventory is the profitability of individual products. Finding your most profitable item is not always as simple as which item sells the most frequently or has the highest price tag. To get the full picture, you need to look at each item’s pricing, average amount sold per purchase, and frequency of sales over time.
Let’s say your most popular products are hair clips. While you sell these in high volume, they have a low profit margin, yielding a low overall profit.
On the other hand, say, you sell a custom gown only about once a week, but because they are expensive with high margins, custom gowns are actually your most profitable product.
Understanding the profitability of your products will help you decide when to run sales, how frequently and how much to order from your supplier, and how you should price your items; it can even guide your merchandising process.
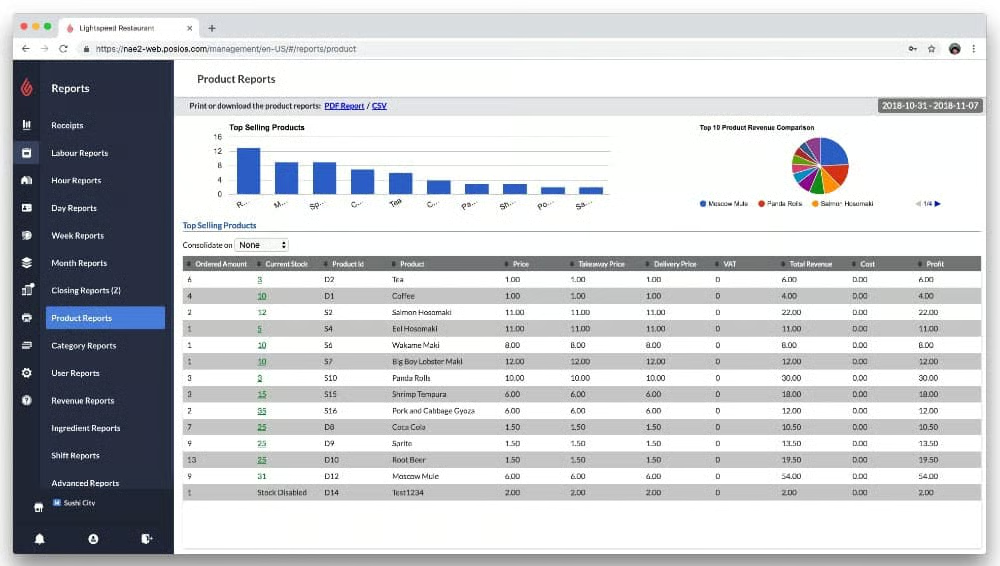
With a POS system, you can automatically pull reports on your products and see how individual items perform in real time. Otherwise, you can use our retail margin and markup guide to access our gross margin calculator and also learn how to calculate the profitability of your products by hand.
Inventory Value
Another metric you should be aware of when managing your inventory is your inventory value, or the dollar amount your on-hand inventory is worth. Knowing your inventory is important not just for your financial statements, but also for learning how much profit potential you have sitting in unsold inventory.
With a POS system, you can determine this number instantaneously. If you choose to go the manual route, you will have to either run frequent counts (a topic we will get to later) or rely on estimations to determine an exact inventory value.
To calculate your inventory value by hand:
- Step 1: Count all the inventory you have on hand (using an inventory template helps).
- Step 2: Calculate the gross profit that each item would yield if sold.
- Step 3: Add all the individual products’ gross profit. For example: (30 hair clips × $1.50 gross profit) + (12 earrings × $7.00 gross profit), etc.
- Step 4: Find the total—this is your inventory value.
While possible, this manual method takes a lot of time and energy. We highly suggest using either a POS system or inventory management software to do these calculations so you can make more informed decisions about your business faster.
Inventory Turnover Ratio
Your inventory turnover ratio measures how efficiently inventory is turned into sales. In retail, the average turnover ratio is 10.88% as of Q2 2024. A higher inventory turnover typically indicates a healthy business, whereas a lower number can mean the company is suffering financially. There are, of course, exceptions to this rule.
Knowing your inventory turnover can help you decide how and when to run sales, if your pricing is off, what items to reorder more frequently, and what merchandise you might not order again.
At a minimum, you should calculate your inventory turnover rate annually. A POS system will be able to share your rate at any time, but to calculate your inventory turnover ratio by hand, use the following formula:
Inventory Turnover = Cost of Goods Sold (COGS) ÷ Average Inventory
Best Sellers & Slow Sellers
Another thing that you should identify when doing store inventory management is your best and slow sellers—this is a great way to help gauge order sizes, understand your customer preferences, and make more informed purchasing decisions.
Your best sellers are products that sell the most often, and thus require larger order quantities and more frequent repurchases to avoid stockouts. On the other hand, slow sellers are products that sell less frequently and therefore require restocks less often and in smaller order quantities. You can easily identify your best and slow sellers on POS systems or by using your own sales data and observations
Past Sales Performance Data
Another metric you should look at to get a complete picture of your inventory is your past sales data. It can provide insights into seasonal trends, future demand, and consumer preferences, and will help you make better-informed purchasing decisions.
Inventory management software and POS systems can run reports that project future demand based on past data. They can even factor in seasonality and lead times to help you better anticipate your reorder schedule.
Inventory Carrying Costs
Your inventory costs include all the costs associated with holding your inventory, and can also be called “holding costs.” Your inventory or holding costs include all the costs related to receiving, equipment, labor, protective measures, maintenance, stock counts, storage, facility, insurance, handling, losses, and products expiring or becoming obsolete.
Keeping track of your holding costs will help you judge when it’s time to put an item on sale, what products are costing you the most, and your actual revenue.
The formula for inventory carrying costs accounts for all the expenses associated with your stock and is also known as your inventory carrying rate. The formula is as follows:
Inventory Carrying Rate = (Inventory Costs ÷ Inventory Value) + Opportunity Cost (as a percentage) + Insurance (as a percentage) + Taxes (as a percentage)
Inventory Shrink
Another important metric you should account for in your inventory management is your inventory shrinkage—the difference between a product’s recorded stock count and the amount physically on hand. The difference between these two amounts is referred to as “shrink.”
In general, there are three main causes of retail shrinkage: employee theft, clerical errors, and shoplifting. You will want to keep an eye on your shrinkage and identify its source as quickly as possible so you can mitigate and prevent future losses.
You can read more about inventory shrinkage, what it is, why it’s important, and how you can prevent it with our inventory shrinkage guide for small businesses, which also includes a shrinkage calculator.
Accurate Demand Forecasting
Demand forecasting is a type of predictive analytics that helps you anticipate your upcoming consumer demand to make better supply chain, management, inventory, and budgeting decisions. Having an accurate understanding of your future demand is incredibly important in retail as it determines your ideal inventory quantities, the types of supplies you will stock, and when you should be purchasing more.
As you gain experience with running your business and managing your inventory, you should continually improve the accuracy of your demand forecasting. Over time, you should become better and better at gauging the degree of closeness of the predicted quantity compared to that quantity’s actual (true) value.
When you start demand forecasting, you will inevitably identify areas where you are under and over-ordering. By monitoring your demand forecast’s accuracy and adjusting your analysis over time, you can come closer to perfect demand forecasting.
2. Outline Your Purchasing & Receiving Procedures
Once you have a grasp on your inventory, where it is profitable, how much it is worth, and how well it is selling, you are ready to make informed, data-backed purchasing decisions. Here, we will look at how you can ensure that your purchasing and receiving go as planned.
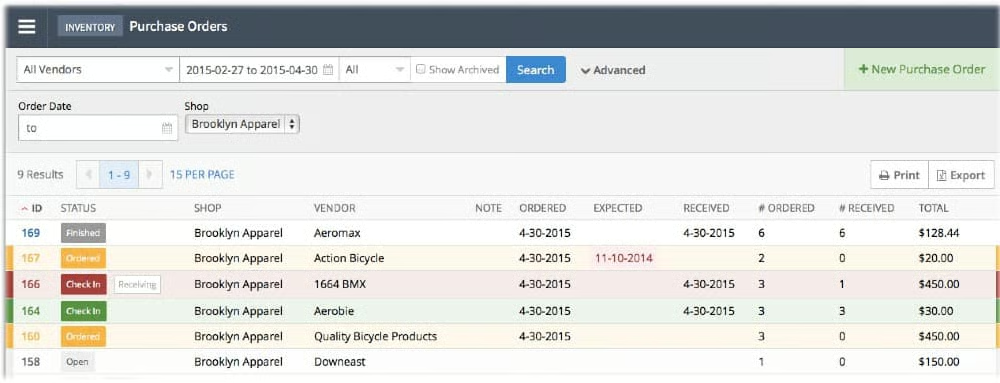
A purchase order (PO) is a standardized document or form used to request products or services from your supplier. It includes details about items you intend to purchase, such as unit cost, a short description or photo of the product, and the quantity you want.
You should be sure to keep a copy of all of your POs to use as a tool for checking received quantities and order accuracy. For example, say, your supplier sent you 20 units of candles, but on your PO, you see that you ordered 45. You could then contact your supplier about the discrepancy and get it sorted quickly.
.cls-1{fill:#155E85;fill-rule:evenodd;}
You can use your POS system to file your POs, and, for products that you order routinely, you can set it to generate new POs automatically at set stock levels.
Once you have checked your POs against what your supplier actually sent, you can create a stock receipt. A stock receipt is a document that records all the goods you received from your supplier. If you have discrepancies in your initial order count, all your future counts will be based on inaccurate figures, leading you to false conclusions about your inventory.
To ensure that your stock receipts are accurate, perform the following procedures:
- Count all units in the shipment: Before opening boxes or unpacking pallets, make sure you received all of the packed units expected. If your shipping labels or freight bill-of-lading state “1 of 4, 2 of 4,” etc., make sure you have all four units. If not, track those to see if they’re still en route and arriving separately.
- Organize your unpacking: Unpack the entire shipment and organize products for a receiving count.
- Count products against your purchase order: This is the most crucial step! Do not rely on your supplier’s order slip for accurate receiving—if they got your order wrong, this will not show up on the internal slip and will only be apparent against your original PO.
- Note errors, shortages, and any damage: If the received goods don’t match your PO, note problems on the paperwork and follow up with your supplier. Also, check for damaged or defective products, and report them to your supplier immediately so you aren’t stuck paying for a product that you cannot sell.
- Adjust inventory counts for received goods: Update the stock counts in your inventory management system. If you use a POS system, you simply receive the PO, and it automatically adjusts your stock counts. If using paper logs or spreadsheets, you’ll need to make count adjustments manually.
Tip: Handle Damage, Defects & Supplier Returns Quickly
It’s important to get unsellable inventory off your floor—and your books—as quickly as possible. This includes unsellable returns, incorrect or damaged stock shipments, in-store damages, and unsold stock like seasonal goods that can be returned to the supplier.
This inventory, often referred to as “deadstock,” has a bad habit of stacking up and affecting inventory counts and valuation reports. To avoid shrinkage, you need to deal with returns quickly and keep your books and inventory counts up to date with your actual quantities on hand.
Tip: Build & Maintain Good Relationships with Your Suppliers
Supplier relationship management—which includes the approaches you take to maintain a mutually beneficial business relationship with suppliers—is a factor you need to keep in mind when thinking about your purchasing and receiving procedures.
Better relationships with your vendors mean more consistent and predictable purchases (and operations in general), fewer missed sales, and lower inventory carrying costs.
To build and nurture these relationships, make sure your supplier contracts are ironed out and clear for both parties; collaborate and strategize with your suppliers to decide on an ordering cadence and minimum order quantity (MOQ), and stay in regular contact with suppliers to check that everyone is still on the same page.
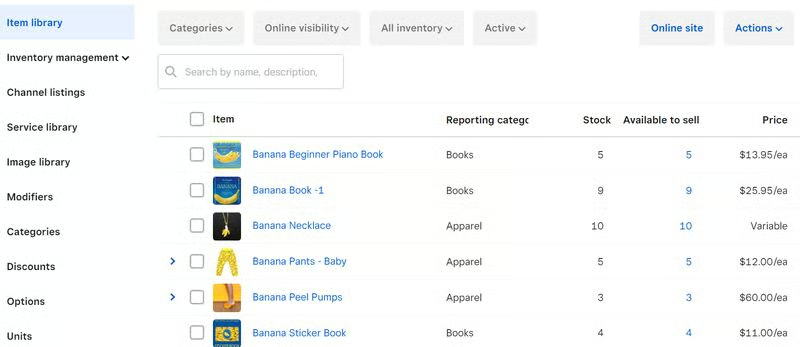
3. Log Your Product Data
Once you have acquired your merchandise and have accurate receiving counts of everything in your inventory, it is time to log your products. From there, either manually or through your POS system, you will need to track each of your product line’s inventory levels with your sales to avoid stockouts, losses, and frustrated customers.
Any inventory plan relies on a centralized record of data for every product stocked. This makes it easy to access any information needed to complete your store inventory management tasks—from reordering costs and department locations to sales tracking.
Whatever technology you use—paper logbooks and files, computer spreadsheets, or a POS system—you will need the following product data management procedures:
- Create a filing location: This might be built into your POS system or your own file cabinet to store physical folders. Either way, define where you are going to keep your product information and create an organization method so people can find specific products easily.
- Determine a recording method: Decide when and how you will record your products. Before or after storage? While unpacking new orders? Do you want one person to do it, or will you disperse the responsibility? Whatever you choose, create a uniform method to avoid inaccuracies.
- Define the product information you track: Determine what kind of information you want to record on your product pages. Some of the most important information to include in your product sheets are:
- Product name
- Your internal SKU
- Variants like colors or sizes
- Your regular and sale pricing
- Your sales category, department, or class
- Brand, line, or collection details
- Related store promotions, if any
- All suppliers for the item
- Supplier SKUs and/or UPC code
- Product cost
- Case pack amounts for stock orders
- Lead times for reorders
- Inventory on-hand (or adjust following new product receipt or a stock count)
- Product description and images (if using a POS)
- Make product updates: Vendor prices and other purchasing information change over time, so have a plan to make these updates as needed.
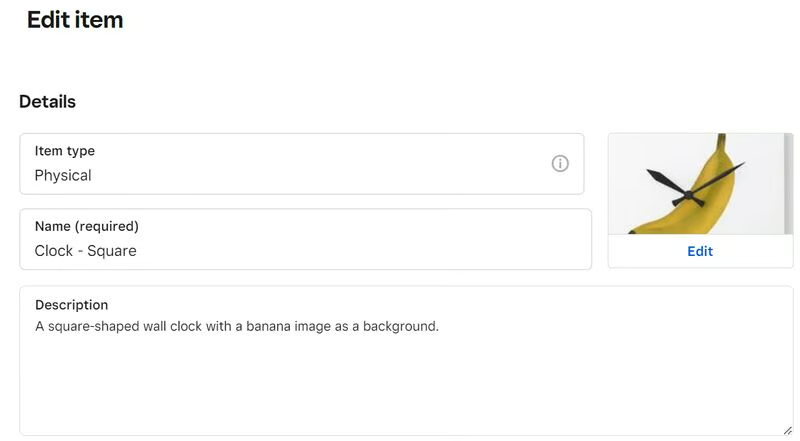
If you use a POS system, you can also add a product description and images to your product data entries. This helps clerks answer customer questions, speed up store checkout, and connect product data to online sales channels.
The important thing to remember as you set up this procedure is that smart inventory management requires a full record of product data details—not just an item name, SKU, and stock amount. The more information you track—pricing, product costs and taxes, variants, vendor lead times, locations, store categories and departments, etc.—the easier it will be to handle other inventory management tasks and gather meaningful data.
4. Create a Storage System to Avoid Losing Stock
Once your inventory is logged into your system, you will have to define an organized and implementable way to store your goods.
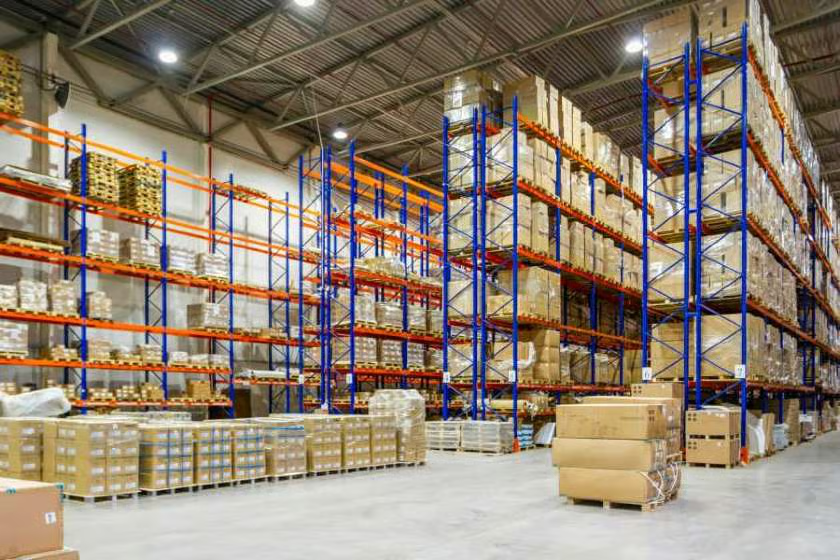
You have to know where your stock is to properly merchandise and sell it. Forgotten products shoved to the back of displays or storeroom shelves result in unsold goods, miscounts, over-ordering, and excess stock. All of this equals money lost for a small retailer.
There are different ways to organize your merchandise: department or category mapping, SKU numbers, barcode labels, color codes, and even high-tech RFID tagging (tracking information via smart labels). Whatever method you choose, be sure you train your employees to implement the system as well. This will ensure that you have an accurate picture of your stock and will save your associates time and frustration.
5. Maintain Accurate Stock Counts
Stock counts are an integral part of any successful inventory management plan and retail store operation. If you don’t know what products you have in stock and how many of each, it’s impossible to place accurate restock orders. This leads to both stock-outs and overstock situations—all of which leave profits on the table. Accurate stock counts also tell you when you’re sitting on excess stock that needs to be marked down to get it moving.
Along with keeping inventory levels on track, counts help you spot costly inventory problems. Issues, like incorrectly shelved or displayed goods and inventory shrink from theft, unrecorded damage, or receiving errors, all come to light through inventory counts.
For retail, there are two main kinds of inventory counts that you need to consider: your cycle counts and your annual counts. Let’s take a look at what these inventory counts are and how they can function for your business.
Cycle Count
Cycle counts are periodic partial counts of particular segments of your inventory, such as product lines. Cycle counts target specific goods, saving you time and helping you assess focused areas of your inventory. Additionally, they can be done frequently because they only tackle small portions of your inventory.
For example, a boutique might perform weekly denim cycle counts where they count all the denim in stock, including size and style information. This gives store owners an ongoing view of their denim inventory and helps them properly time reorders or efficiently move stock around between locations.
As a general rule of thumb, you want to perform more frequent cycle counts on high-turnover merchandise and less frequent cycle counts on your slow-selling items. A boutique in which denim is a top-selling category might want to do weekly cycle counts for denim. On the other hand, it might only need to perform counts every six weeks for categories that don’t sell much.
To perform a cycle count, follow these steps:
- Step 1: Select category
Choose the merchandise you want to count and either filter that item in your POS system or, if using paper logs, make a list of items to count. - Step 2: Pull your inventory count sheet
Count sheets show the expected current amount of inventory you should have on hand, barring any shrinkage. This number is easy to find on your POS system because it tracks your inventory levels in real time as you make sales. If you are using a manual system, you will have to determine this number based on how many items you should have started with (based on your purchase orders) minus how many of those items you have already sold.
- Step 3: Assign counts to staff or teams
Give a staff member your inventory count sheet and ask them to count the physical inventory and record any discrepancies. For small counts, one person can handle counting and recording numbers. For larger counts, however, it is faster and more accurate to assign teams of two. - Step 4: Check discrepancies
If you find unexpected shortages or overages, double-check to ensure all stock is found and counted accurately. If the discrepancy turns out to be accurate, you will want to investigate the shrinkage and determine where the problem started. - Step 5: Adjust inventory numbers as needed
Make adjustments to your inventory records so they reflect your physical counts. Be sure to note the reasons for any adjustment for accounting purposes. If you are using a POS system to perform your cycle count, the software’s inventory management tools should allow you to indicate the reasons for stock adjustment.
Annual Count
Annual counts are year-end counts of your entire inventory for accounting and tax purposes. Since these are store-wide tasks, annual counts are generally done after hours or on a day the store is closed. Depending on the size of your operation, annual counts can be handled with just your staff, or you might want to hire helpers to come and speed up the process.
Just like with cycle counts, using a POS system will simplify your annual count process because it prepares all of your count sheets for you based on your inventory levels and up-to-date sales numbers. Additionally, POS systems streamline your accounting procedures and will keep them organized in one place. If you decide to go the manual route, you can opt for our count sheet templates to stay organized.
To perform your annual count, follow these steps:
- Step 1: Prepare sales floor and storage areas
Organize and tidy all stock areas and locate any overstock that’s not on the sales floor, so counters don’t waste time looking for products on their lists. This will make things easier to find and count when the time comes. - Step 2: Have a system cutoff time
If you use a POS system, make sure all pending sales and returns are completed. Then, assign a system cutoff, so no sales or other inventory-affecting transactions are logged between when you pull your stock counts and start counting. - Step 3: Print inventory count lists
Print or prepare your count lists and sort them by line, category, or department, whichever works best for your counting teams. - Step 4: Assign two-person counting teams
Assign two-person teams to count specific areas, lines, or categories. Ideally, one person is counting (or scanning), and the other is recording (if using paper sheets) and spot-checking counts. The two-person team is widely used and a proven way to get the job done quickly with very few, if any, errors. - Step 5: Check discrepancies
Like with cycle counts, if you find unexpected shortages or overages, double-check to ensure all stock was found and counted, including overstock, and that the correct items were counted. Then, try and figure out where the discrepancy arose. - Step 6: Adjust inventory numbers
Adjust your on-hand counts in your inventory management system after the counts and spot checks are complete, and note the reasons for each adjustment (damage, shrink, etc.) for accounting and tax purposes. - Step 7: Print a year-end inventory report
If using a POS system or spreadsheets, it’s a good idea to create a complete printout of your annual count for your records. This should include your final adjusted on-hand numbers, plus your year-end inventory valuation for accounting and taxes.
Frequently Asked Questions (FAQ)
Expand the questions below to see answers to some of the most common retail inventory management questions.
What type of equipment do I need to manage my inventory?
We recommend using a POS system or standalone inventory management software to manage your inventory. These software contain tools that let you file your inventory in one location, run reports, receive and count stock, get real-time updates, and even place purchase orders. You will also want to acquire a label printer for labeling products and a barcode scanner for inventory counts.
What are the different inventory management methods?
There are many different kinds of store inventory management that you can use depending on the type of business that you run, your industry, and your goals. They can also be used in conjunction with one another. Several of the most common inventory management methods include just-in-time inventory management, ABC inventory analysis, first-in, first-out (FIFO) inventory method, last-in, first-out (LIFO) method, and average cost (AVCO) method.
What are the benefits of inventory management?
Managing your inventory effectively improves customer sentiments about your business, reduces costs, improves efficacy and accuracy of purchasing and pricing, facilitates or improves multichannel selling, saves time, and increases profits.
Bottom Line
Proper inventory management for retail is critical if you’re aiming for efficient business operations and effective cash management. It is important that you develop procedures to manage your inventory accurately and effectively. This guide walks you through the best techniques for managing your inventory.
Additionally, while you can do all your accounts by hand, using a POS system like Lightspeed or Square will simplify every aspect of the retail inventory management process. A POS system provides accurate and instant insights into your sales, product data, and inventory levels, as well as tools to manage your stock better.