

Shopify POS is one of the best small business point-of-sale (POS) systems on the market. It comes free with every Shopify ecommerce account, is user-friendly, includes inventory and customer management tools, and is particularly great for omnichannel selling.
This article looks at how to set up Shopify POS and use it to run your store—from choosing your hardware and setting up your sales channels to adding a payment processor and integrating marketing campaigns.
- Step 1: Sign Up for Shopify
- Step 2: Choose Your Hardware
- Step 3: Log Into Your Shopify Account
- Step 4: Set Up Your Sales Channels & Locations
- Step 5: Add Your Inventory
- Step 6: Import Customers
- Step 7: Create Staff Profiles & Set Permissions
- Step 8: Configure Your Account Settings
- Step 9: Add a Payment Processor
- Step 10: Integrate Marketing Campaigns
- Step 11: Set Up the Shopify POS App
- Step 12: Start Managing Your Register
- Frequently Asked Questions (FAQs)
- Bottom Line
Step 1: Sign Up for Shopify
To begin using Shopify’s POS system, the first thing you will want to do is sign up for Shopify. While Shopify is primarily an online selling platform, the company also offers a brick-and-mortar POS.
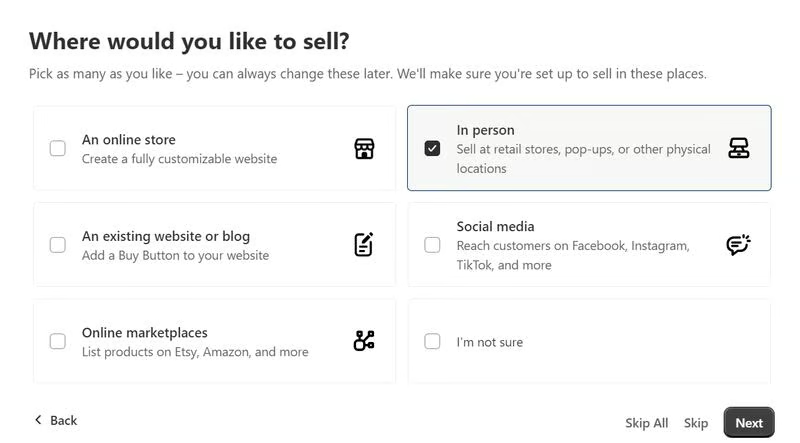
When you sign up for the POS software, Shopify asks you a few questions about how and where you want to sell. (Source: Shopify)
With Shopify’s structure, you can access the POS system (POS Lite version) just by subscribing to any ecommerce plan. You also have the option to upgrade your POS to the Pro plan, which costs $89 per month, with or without a Shopify ecommerce subscription.
Shopify offers a completely free three-day trial for any subscription and your first three months for only $1 each. Sign up for your free trial to follow along with the rest of our guide.
Once you have signed up for your Shopify plan and decided whether to upgrade your POS option, you must download the Shopify POS app. While Shopify POS’s back-office and management features are all desktop-based, the selling interface is only on an app.
For many, the app-based system is great because it allows for sales on the go and gives you tons of mobility; however, it does mean you will want to invest in a tablet to conduct sales in your store.
If you want to learn more about this POS system in general, read our
.
Step 2: Choose Your Hardware
Once you have successfully signed up for your Shopify account, you will need to get hardware to host your POS. Shopify POS is an app compatible with iOS and Android devices, so you will need to supply your own tablet and pair it with a scanner (or your device camera) and a card reader.
If you don’t want to use a card reader, you can opt for Shopify’s Tap to Pay function for iPhone. Just tap the customer’s payment method on your iPhone, and Shopify’s POS app will be able to process the transaction—no card reader required.
You can opt for compatible third-party accessories; however, Shopify also has affordable and highly rated POS terminal and accessory options.
| Retail Kit | Shopify POS Go Mobile Kit | Shopify Tap & Chip Card Reader | Barcode Scanners |
|---|---|---|---|
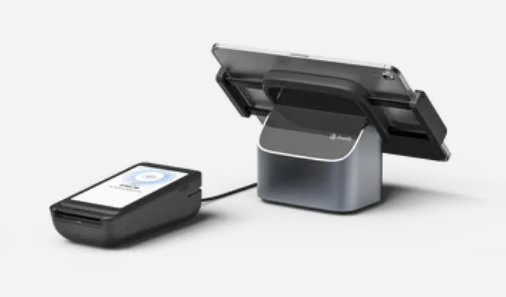 |  | 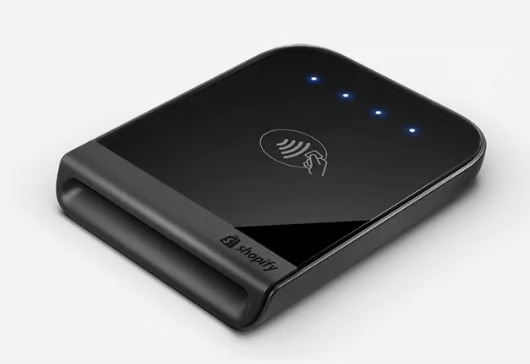 |  |
| $459Shopify Tap, Chip. & Swipe Card Reader + POS Terminal, POS Tablet Stand | $319Shopify Go POS Device with Integrated Card Reader and Barcode Scanner | $49Wireless Chip & Contactless Payment Reader | $199 - $289 |
| Shop POS Terminal Countertop Kit (USB-C) | Shop Go Mobile Kit | Shop Tap & Chip Reader | Shop Barcode Scanners |
Shopify has other auxiliary hardware accessories like cash drawers, receipt printers, and gift card sleeves on its site.
Step 3: Log Into Your Shopify Account
Now that you are signed up for your Shopify account and have your hardware, it’s time to start setting up your Shopify POS account from the inside. You can log in to your account on any web browser via Shopify.com and configure your overhead settings, view reports, and handle your inventory.
Step 4: Set Up Your Sales Channels & Locations
Once you are logged into your Shopify POS account, the first thing you want to do is set up your sales channels. With Shopify, you can seamlessly integrate your products with an array of platforms—including Facebook, Instagram, TikTok, Google, eBay, and Walmart.
With the Buy Button feature, you can even add a shopping button to your personal blog or website. From there, Shopify POS will track sales and inventory across all of your locations and run reports for all of your storefronts.
To add sales channels to your POS account so you can start tracking their sales and performance, head to the home screen of your Shopify account and click on “Settings” and then “Apps and sales channels” on the left-hand sidebar. Then, click “Shopify App Store.” You can then select and add the sales channels of your choice.
Add new sales channels easily and watch as Shopify tracks and manages all of them from one simple interface.
Once your sales channels are added, Shopify will prompt you through the login process to get everything synced. Then, sales, inventory changes, and customer information across all of your sales channels will appear on your Shopify account so you can manage them all from one place.
Want to learn more about how to start selling on your social channels and add additional sales channels? Check out our how-to guides on selling on Instagram, selling on Facebook Shops and Marketplace, selling on Etsy, and selling on TikTok.
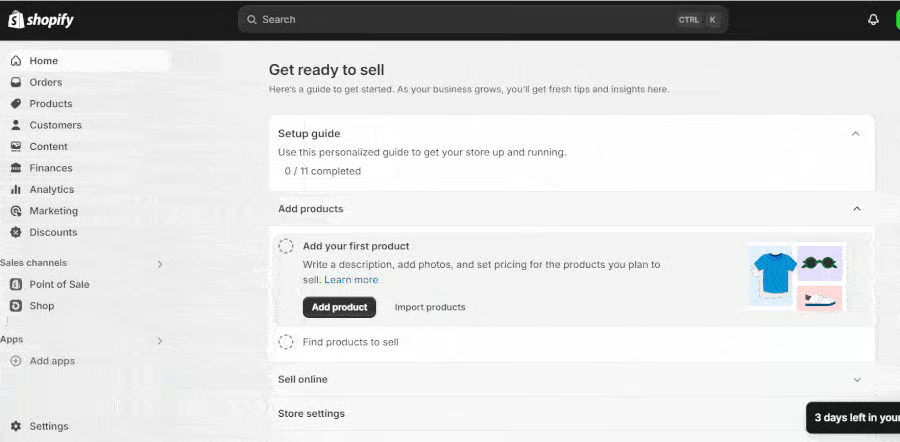
Step 5: Add Your Inventory
With your sales channels integrated into your POS system, it is time to add your inventory. Note that it is important that you add your sales channels before your inventory, as you assign inventory to specific locations or channels when adding products. Shopify makes it easy to add inventory—all you need to do is head over to your account and select the “Products” and then “Inventory” buttons from the sidebar menu.
Then, you will come to your inventory list, where you can view all the products you have in stock and add new ones. You will see two options. You can 1) import products in bulk (“Import”); or 2) add products individually with the “Add Products” option.
If you need to import in bulk, select the “Import” button and then download the CSV template where you add your products and all the relevant information in a format that Shopify will be able to read. If, instead, you want to add products individually, select the “Add Products” button, which will take you to a form where you can add tons of product information, including:
- Product title and descriptions
- Product images
- Price and cost
- SKU and barcode information
- Assign which sales channels your product will be available on
- Shipping and customs information
- Weight
- Product tags
- Product variants (color, size, etc.)

Shopify lets you add tons of product information so you can keep track of everything your items need.
Inventory Management Features
Once you have added products to your POS system, Shopify will manage them with its built-in inventory management tools.
Excellent inventory management is one of the top criteria for retail POS systems. Read more about our top
POS inventory management systems
—where Shopify takes the number two spot.
Shopify’s inventory management tools include the following:
- Demand forecasting: Shopify analyzes the performance of your products to help you anticipate demand and better stock your shelves.
- Transfers: Request transfers from other locations and facilitate a transfer through your POS system.
- Sale item suggestions: Based on sell-through time and holding costs, get suggestions about what items should move to a discounted price.
- Inventory analysis: Decide which products are worth reordering and which are taking up valuable storage space based on stock performance.
- Stock levels: Monitor your stock levels live across all your locations and watch as levels update with every sale.
- Inventory counts: Use a barcode scanner to perform inventory counts and compare your projected and actual quantities.
- Receive inventory: Use your barcode scanner to count inventory shipments to check that they match your purchase orders.
- Purchase orders: With the Stocky app, create and manage your purchase orders and watch as they seamlessly integrate into your POS system.
- Detailed inventory reports: Find an array of inventory reports in the Analytics section of your Shopify account that will help you make better product decisions.
- Low stock alerts: When creating products, indicate at what level each will need to be reordered. Then, when you reach this level, Shopify will send you an email that it’s time to restock.
For additional tools and features, you can integrate third-party
into your Shopify account via the Shopify App Store—no programming required. Compatible apps include
, Katana, and
.
Step 6: Import Customers
With your inventory uploaded and ready to go, it’s time to start adding your customers. Shopify allows you to keep a detailed customer database full of client information and run customer reports to better understand your shoppers. Whether you have a list of clients you need to input or not, Shopify has a solution for you.
First, head over to the “Customers” option on your home screen sidebar. From there, you will come to a page where you have options for adding customers. You can either “Import Customers” in bulk or “Add Customers” individually.
For the bulk upload option, you will click the “import customers” button, which will lead you to a page where you can download a CSV file. This file is where you can input bulk customer information in a format Shopify can read and then create customer profiles in mass.
If you need to add customers individually, select the “Add Customer” button, and you will come to a customer form that you can fill out. With these customer forms, you can include detailed information—including contact information, notes, marketing material preferences, tags, and tax information.
Once you have input your customers and their information, each one will have its own profile where you can see transactions, contact information, marketing preferences, and any notes other associates may have included. Also, in the Analytics section of your Shopify account, you can view a plethora of customer reports that will help you better understand and target your customers, like
- Customers over time
- First-time vs returning customer sales
- Customers by location
- Returning customers
- One-time customers
- At-risk customers
- Loyalty customers

Include an array of customer information every time you input a new client.
Step 7: Create Staff Profiles & Set Permissions
Another key feature you should set up on your Shopify POS account is staff profiles. With this feature, you can create a profile for each of your staff members where you can set access permissions, create employee pins, track individual performances, and create “manager approval actions” for things like adding discounts and editing taxes.
To get started, navigate to the sidebar of your Shopify POS account and select the “Point of Sale” option from your sales channels. From there, a dropdown menu will appear; select “Staff.” This will take you to a new screen with your complete employee list with an “Add Staff” button on the top right. If you select that button, you will be taken to a staff form where you can start inputting employee information and permissions and set their log-in PIN.
Every employee will have an individual PIN that they will use to log into the Shopify POS app to complete transactions. This PIN corresponds with their employee profile and its permissions and will ensure you can track individual employee performances.

Each employee profile includes contact information, a staff PIN, and permission settings.
Staff Permissions
With the way that Shopify does permissions, each type of staff role (associate, manager, assistant manager, etc.) comes with a designated permission set. Then, you assign those roles to your staff, and the corresponding permission set comes with it.
To get you started, Shopify includes three default roles with set permissions: Associate, Limited Permissions, and Full Permissions. These options are great; however, you can also create a new role with a custom permissions set if needed.
Simply select “Manage POS Roles” from the new employee form to be taken to a page where you can see your full list of existing roles and a button to “Create POS Role.” If you select this, you will then be taken to a form where you can set permissions for actions and access, including:
- Manager approval: Set whether the person in this role can offer manager approval.
- Checkout actions: Permissions for adding a custom sale discount, applying discounts, shipping to customers, and editing taxes.
- Orders: Permissions for managing orders at all locations and returning/exchanging orders
- Customers: Permissions for adding a new customer and editing customer profiles
- Access: Access to analytics and reports, staff management, and POS settings
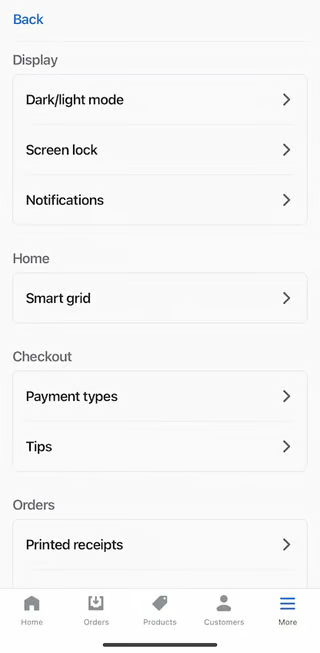
Step 8: Configure Your Account Settings
With all the most important information input into your POS system, it’s time to start selecting your account settings. To begin, click the “Settings” option at the bottom left of your Shopify account. We will be focusing on your checkout, shipping and delivery, and tax settings.
The first setting you will want to explore from the settings menu is “Checkout Settings.” Here, you can customize all the following areas:
- Customer accounts: Decide whether you want your transactions to be associated with a customer or not and whether or not adding a customer profile to a purchase is required.
- Customer contact method and information: Decide how you want to stay in touch with customers and what information is required for creating a client account.
- Tipping: Decide whether you want to display a tipping option at checkout.
- Order processing: Set how you want orders to be processed and when and where they should be dispatched.
- Consent for marketing: Decide the default marketing consent settings that new customers will be enrolled in when they create an account.
- Order status page script: Write a custom script to appear at the bottom of order status correspondences.
- Language settings: Decide what language your checkout page and POS appear in.
In addition to the checkout settings listed here, there is one more area where you can add an important customization setting—your receipt settings. To get there, navigate to your “Point of Sale” option on your sidebar and select “Settings” from the dropdown menu.
Then, if you click the “Receipt customization” button under “Checkout”, you will access another set of customization options. These include adding a header and footer text box and logo and choosing what customer and purchase information is displayed.

Customize what receipt information you show and add text boxes and custom logos.
The next area you should set up in your Shopify account settings is your shipping and delivery preferences. This is where you decide on things like your carrier preferences, shipping rates, and payment terms. To do this, return to your settings menu and select “Shipping and Delivery.” Then, you will come to a page where you can set your preferences for:
- Shipping: Decide whether you want to ship domestically or internationally and set your shipping rate. You can also set custom rates for specific products or destinations.
- Expected delivery dates: Decide whether to show delivery dates at checkout and automatically display expected delivery dates for eligible orders (to entice customers to buy).
- Local deliveries and pickups: Set where you are able to do local deliveries and accept pickups based on your store’s location.
- Add packages: Add different package sizes that you can select when fulfilling orders so that you can get an accurate shipping label and rate. If you would rather skip this step, Shopify will use a default sample package to provide an approximated rate.
- Packing slips: Customize your packing slip’s verbiage and appearance so that it is ready to go when you are fulfilling orders.
- Carrier accounts: If you do not want to use one of Shopify’s discounted shipping partners to fulfill your orders, you can opt to upgrade your account to see rates from non-partner carriers and ensure you always get the best rate.
- Custom order fulfillment: Add an email for a custom fulfillment service that fulfills orders for you.
For some guidance on standard operating procedures for ecommerce shipping and handling (including inventory tracking), download our step-by-step guide:
Moving to the last important part of your checkout settings, head over to your settings menu and then select “Taxes and Duties.” Select where you collect taxes and duties both for inventory and customer orders.
In this section, you can create settings for:
- Countries and regions: Create shipping zones for where you collect taxes and duties and where you don’t. If you are stuck on what to do here, Shopify has a tax information form to help you.
- Duties and import tax: Upgrade to Advanced Shopify to collect duties and import taxes at checkout for countries/regions you ship to.
- Tax calculations: Connect Shopify to apps that provide sales tax services.
Step 9: Add a Payment Processor
To start making sales, you will need to add a payment processor to your Shopify account—and Shopify makes it super easy. Simply head over to your settings and select “Payments” from the menu.
You will then be able to adjust your payment settings. By default, Shopify will automatically have Shopify Payments as your processor. All you need to do to get it up and running is click “Complete Account Setup,” where you will fill out the rest of your business’s information, like your business ID, bank account information, and taxes.
While you can continue using Shopify Payments, you also have the option to integrate with dozens of other merchant accounts, including buy-now-pay-later (BNPL) apps like Affirm, Afterpay, Zip, and Klarna. This means you can offer different payment options to your customers at checkout, and have the option to find a processor with the best rates or that can handle high-risk transactions with no additional integration fee.
To get started, simply select the “Add payment methods” button in the “Additional payment methods” section.
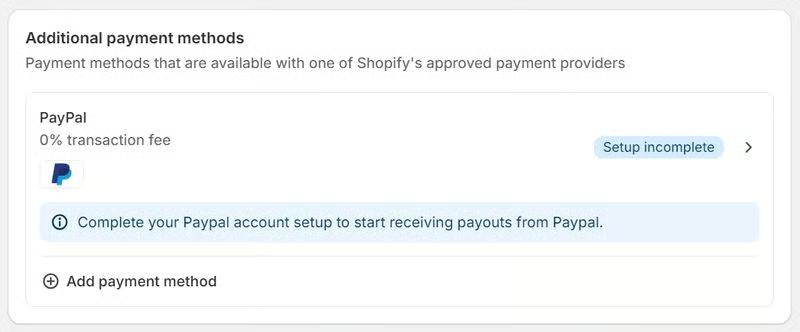
Set up Shopify Payments to start running sales with any payment method.
Step 10: Integrate Marketing Campaigns
Another notable Shopify POS tool at your disposal is its marketing campaigns, which will let you continue to reach customers even when they are outside of your store.
To start using Shopify’s marketing tools, return to your Shopify account home screen and select “Marketing” from your sidebar menu. You will be taken to a page where you can view how your marketing campaigns are performing, and whether they are inspiring store visits and sales.
On this same page, you will also notice the “Create Campaign” button in the top right corner. Select that, and you will get a form that will prompt you to select the type of campaign you want to create. You can create SMS, email, online ads, or social post campaigns that your Shopify account will track and analyze.
Shopify lets you create many different types of marketing campaigns from your account.
From there, all you need to do is select the campaign you want to run, and Shopify will take you to different forms where you can customize how they appear and what they say. Many campaign options even have templates you can work from, so no specialized knowledge is required to create something great.
Once your campaigns are created and ready to go, you can release them at your discretion and track their individual performances to learn what resonates with your customer base.
Step 11: Set Up the Shopify POS App
Once you have things set up on the back end, it’s time to open your Shopify POS mobile app. To get started, either head over to the Google Play Store or the App Store and search for the Shopify POS app (not Shopify ecommerce). Once you find the app and download it to your device, you will then want to sign in using the same sign-in information you used for your Shopify account to connect the app to your store.
Once logged in, select your store and give Shopify access permissions. Then, set your individual 4-digit PIN, and you are in!
Customizing Your Checkout
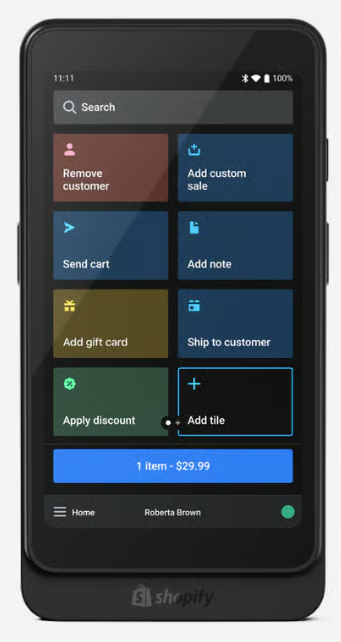
Once you are in the Shopify POS app, you will see your home screen, which is also your checkout. Here, you will want to start by selecting the “add tile” icon to begin customizing your checkout screen.
You can add tiles for things like your most popular items, frequent actions (like adding discounts or customers), and even third-party apps (like a loyalty program). Simply select the items you want to use as tiles, and Shopify will add them to your checkout screen. Best of all? Each employee with their own PIN can customize their checkout tiles however they like.
Once set up, checkout is a breeze. Simply add items to the order either by scanning their barcodes or searching for the items and adding them manually via the search bar. Once you have added the items you need, select “Go to cart.” In your cart, select the “more actions” button to add a customer or a gift card purchase to the sale. Then select “Checkout” at the bottom of the screen and process your customer’s payment.
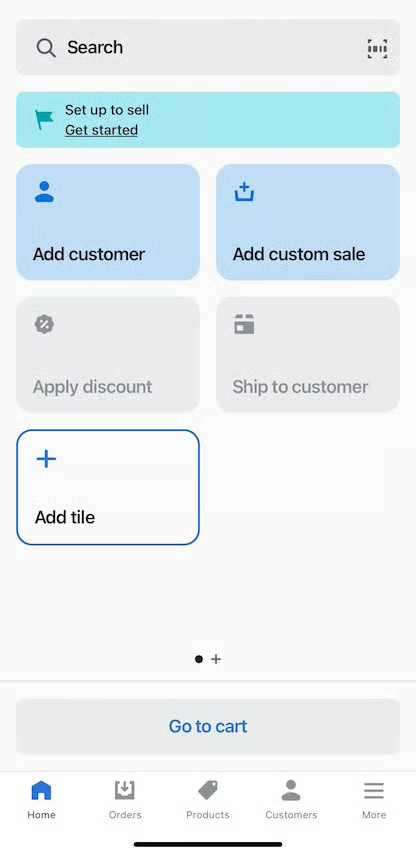
The Shopify POS home screen is your checkout page. It will be blank when you first log in, but you can customize the tiles to your liking with the “Add Tile” button.
Step 12: Start Managing Your Register
As with your checkout, all your cash register management will occur on the Shopify POS app. Note, however, that register management is only available with the upgraded Shopify POS Pro subscription ($89 per month). Here, we will take a look at a few key register features.
One of the main things you will do with your register each day is record opening and closing cash counts. To do this, simply enter your Shopify checkout screen, click the “More” option in the lower right-hand corner, and you will come to a menu screen where you can select “register.”
Select the register button and you will see the Payment Tracking menu with your register(s) listed beneath. Select the register you want to open and select “Start Tracking Session.” Then, fill in the amount of cash you have at the beginning of the day and begin tracking and recording any added or removed cash throughout the day.
Then, when the day is done and it’s time to close out, simply return to your open tracking session, click “end tracking session,” and enter your end-of-day cash totals.
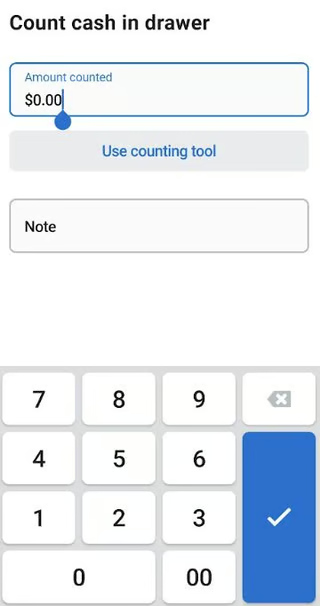
Add your starting cash quantities and press the check to start the tracking session. 
End your session at the end of the day and reconcile your actual amounts with what you should have in your cash drawer.


For many businesses, you will want to give your customers the option to tip you and your staff. Shopify makes it easy to collect tips by giving you the option to add a customer-facing tipping page to your checkout so that customers have the option to add gratuity during every transaction.
Customers are only able to add tips with credit card transactions processed on The Tap & Chip reader, The Swipe (audio-jack) reader, The Chip & Swipe reader, or the Chipper 2X BT reader.
To set up your tipping page, head to your Shopify POS app > select the “more” icon in the bottom right, select “Settings,” and then “Tips.” Then, toggle the Enable Tips option to ON and you can set your tip percentage options.
Here, you can also allow customers to leave custom tips by toggling the “Custom tip amount” option and setting a minimum tip amount. Once you have added your tipping settings, a tipping page will appear during every transaction so you can present it to your customers.
Select the “Tips” option from the Shopify settings page. 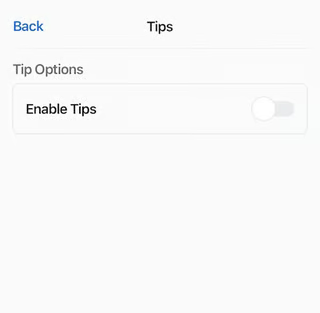
Toggle “Enable Tips” to ON in order to add tipping options during checkout. 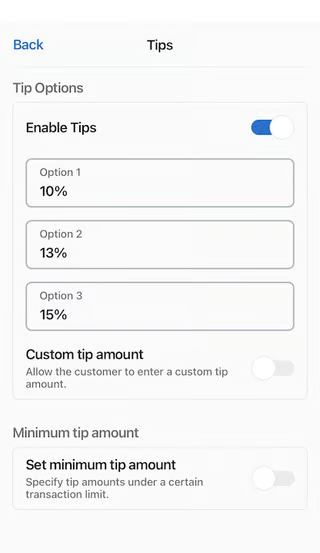
Select your tipping settings.


Frequently Asked Questions (FAQs)
Click through the following sections to learn more about how to use Shopify POS, and what you can and can’t do with this software.
How do I set up my Shopify POS?
In summary: Sign up and log into your account; set up your sales channels and locations; add your inventory; add customer information; add staff information and set permissions; add a payment processor; set up marketing campaigns; and familiarize yourself with the register.
Do I need a card reader to use Shopify POS?
Not necessarily. If you have an iPhone, you can use Shopify’s Tap to Pay feature, which allows you to process customers’ card payments using just your smartphone. If you don’t have an iPhone or prefer not to use it for this purpose, Shopify card readers are available for $49.
Can I use Shopify POS without a physical store?
Yes! Shopify excels at online sales, and you can run an ecommerce business using this software, even if you have no physical store locations. You can sell from a new or existing online store, plus various social media platforms.
Bottom Line
Shopify is the best POS option for many small businesses, especially those with a Shopify online store. With its rich inventory management tools, user-friendly checkout app, and tons of management features, it’s no wonder it is consistently one of our best retail POS systems and best POS systems for small businesses.
With this guide, you are equipped with all the knowledge you need to set up Shopify POS and continue to reap the rewards of your Shopify account.