


Selling on WordPress starts with setting up a domain, choosing a web host, installing a shopping cart plugin, listing products to sell, and managing orders and shipments. Then, grow your WordPress ecommerce business with plugins and marketing tools.
This guide shows you how to set up WooCommerce since it is the best and most popular WordPress ecommerce solution. Although the WooCommerce plugin is free, expect to spend several hundred dollars upfront on hosting and other plugins to get your WordPress store up and running.
Learn how to set up WooCommerce by following our guide below.
- Step 1: Choose a Domain Name & Website Hosting
- Step 2: Install WordPress & Activate the WooCommerce Plugin
- Step 3: Set Up Payment Processing & Store Settings
- Step 4: Establish Shipping Policies
- Step 5: Add Products
- Step 6: Personalize Your Store & Select a Theme
- Step 7: Process & Ship Orders
- Step 8: Grow Your Ecommerce Store With Plugins
- How to Set Up WooCommerce Frequently Asked Questions (FAQs)
- Bottom Line
Step 1: Choose a Domain Name & Website Hosting
Before selling on a WordPress website, choose a domain name (such as YourBusiness.com) and website hosting. Your website host is where your business website will live—it’s also where you purchase the domain name. Bluehost is one of the most popular options for WordPress websites, especially ecommerce sites.
When choosing a name and host:
- Select your name carefully. You can change your domain name down the road, but learning how to redirect traffic to your new name can be difficult.
- Try to use a .com domain name instead of something like .net, as the latter can seem low quality.
- Use a host that allows one-click installation for easy setup.
- Pick a host that will grow with you. By anticipating your future needs, you’ll save yourself the hassle of switching hosts later.
Step 2: Install WordPress & Activate the WooCommerce Plugin
After you have your domain and WordPress hosting, installing WordPress and adding the WooCommerce plugin are quick steps.
Install WordPress
Most hosting providers have a one-click installation feature for WordPress. If you are using a hosting service that does not have a one-click installation, you will need to download WordPress (from WordPress.org, not WordPress.com) and install the bundle on your site. Alternatively, reach out to their support team and ask them to install it for you.
Install WooCommerce to Add Shopping Cart Functionality
With WordPress installed on your domain, it’s time to add ecommerce functionality with the WooCommerce shopping cart plugin.
To install WooCommerce, navigate to your WordPress dashboard and Plugins > Add New. Type in the plugin name in the search bar (in this case, WooCommerce) and click Install Now.
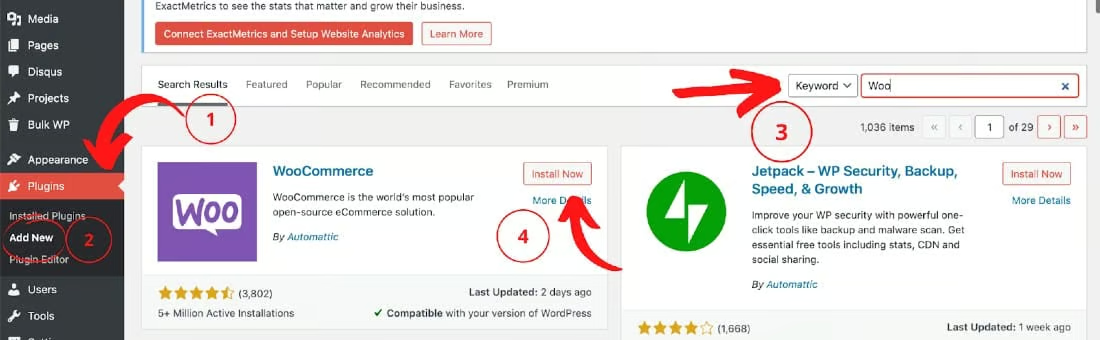
Once installed, the button will change from Install Now to Activate. Just click the Activate button, and the plugin will be ready for your website.
Configure the Setup Wizard
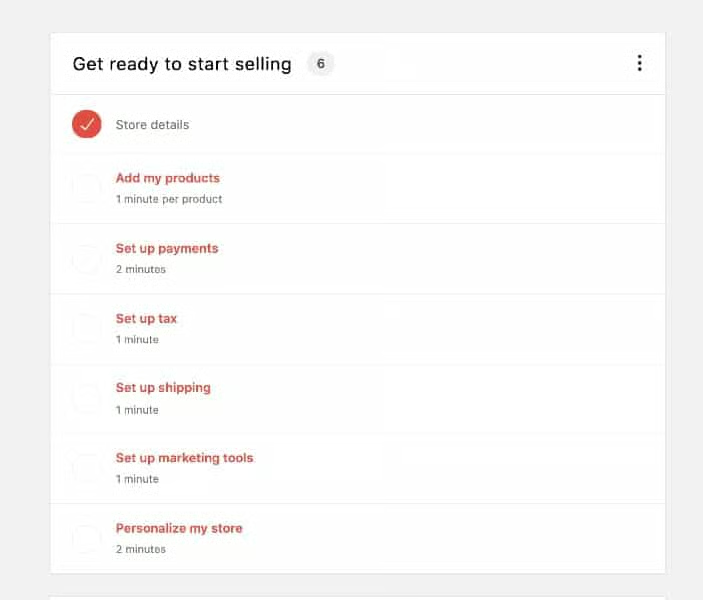
Once installed, WooCommerce will direct you to the setup wizard. We recommend going through it so that you can configure some key settings. However, you can edit your settings anytime from your WooCommerce dashboard (in your WordPress navigation).
Once you’ve gone through the setup wizard, you’ll see a store checklist. Use this as a template for setting up the rest of your store. You’ll be taken directly to the appropriate settings page if you click on any item on the list. Once a setting is configured, you will see a check mark on the item.
Step 3: Set Up Payment Processing & Store Settings
After installing your shopping cart plugin, set up the back-end procedures, including payment processing and sales tax settings. Many states also require specific customer service, privacy, and shipping pages outlining policies and procedures.
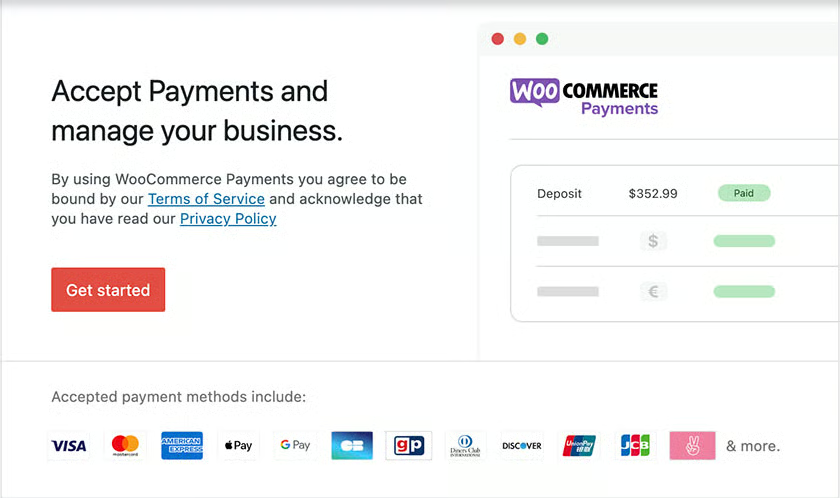
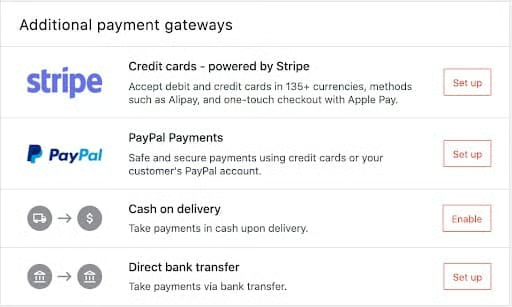
Set Up Payment Methods
WooCommerce comes with WooCommerce Payments. However, you are not tied to using its default method, which supports PayPal and Stripe.
Adding more user-friendly options can increase your online store’s conversion rate.
- PayPal: A PayPal study showed a 28% higher conversion on sites that accepted PayPal, as many shoppers already have a PayPal account. In addition to being a 1-click checkout, many shoppers view PayPal as a more secure payment option than typing in card information.
- eWallet checkouts: These 1-click checkout options, like Apple Pay and Google Pay, make it easy for customers to purchase without typing in card numbers or shipping addresses. Most online payment processors, including Stripe and Square, have options to enable eWallet payments.
- Installment options: Payment plans allow customers to pay for goods over time, which typically translates to higher average orders and increased conversion rates. WooCommerce has a Deposits plugin for creating custom plans. Other plugins like Splitit let retailers collect the total sale amount upfront.
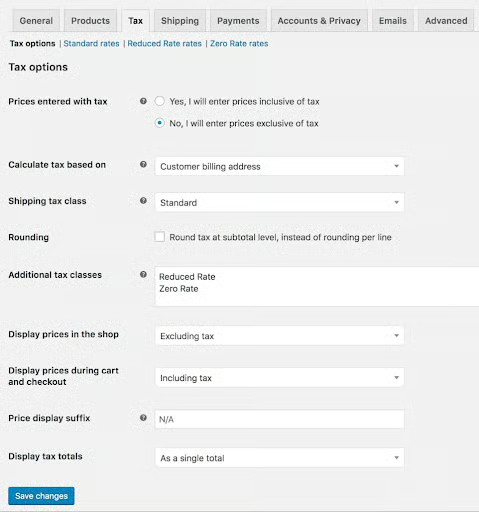
Set Up Tax Rates
To set up your store’s taxes, click on the setup wizard if you still see it in your dashboard, or go to WooCommerce > Settings > Tax. Research tax rates based on where you are located and where you are selling. We recommend consulting with a tax professional to ensure your tax rates are set up correctly. Alternatively, you can install WooCommerce Tax to calculate your sales taxes automatically.
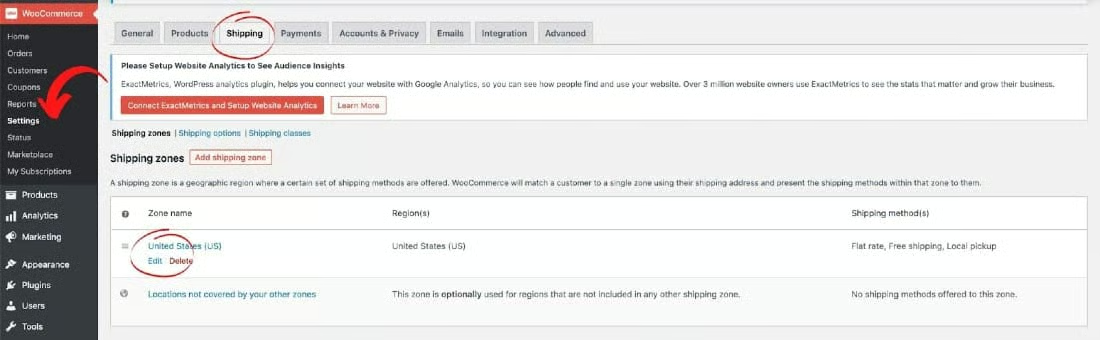
Step 4: Establish Shipping Policies
After payment processing, set up shipping functions. Navigate to your ecommerce plugin, and there should be a tab or option for “shipping” under general settings or order management. The best method of shipping depends on your particular business needs and what your competition is doing.
Shipping charges apply to orders in one of three ways:
- Flat-fee shipping: The same shipping fee applies to every order or is added on a per-item basis.
- Table-based shipping rates: Shipping rates apply based on the total order value. Free Shipping can easily apply for orders over a specific value using table rates.
- Actual or real-time shipping rates: Shipping rates are calculated in real time using UPS, FedEx, and USPS rates.
Shipping Rates & Sales
If you’re in a highly competitive market and shipping bulky or heavy items, charging customers the actual shipping rates may hurt sales. Shipping is expensive, and many customers have no idea of the actual costs. Flat-fee or table-based rates are the most customer-friendly choice if your profit margin can absorb the shipping costs. You can also learn how to offer free shipping. However, charging actual rates can still be a good choice if you sell unique, one-of-a-kind, or upscale items with little competition.
Step 5: Add Products
Once you’ve completed your WordPress store setup, you will enter your product information. Most shopping cart plugins include basic fields in the product entry screen. These fields include product ID, stock-keeping unit (SKU), item name, price, product variables (color and size), description, and images.
Product entry can be time-consuming, so it’s helpful to get organized before tackling this task. Assembling product information in a spreadsheet or Word document beforehand is useful, as is having product images sized, cropped, and organized in files for easy upload.
There are a few considerations to keep in mind when inputting product data:
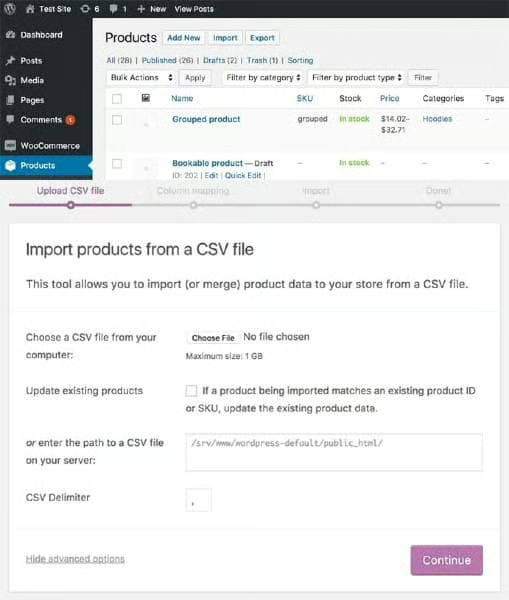
- Product data importing: You can use an import function if you need to add many products to your site. Most WordPress shopping cart plugins have an import feature that allows you to bulk import product data from a comma-separated values (CSV) file, which you can create in most spreadsheet programs.
- Product weights and inventory: Many shopping cart plugins include optional product data fields, such as item weight and size for shipping purposes and product counts for inventory tracking. Your business may or may not need to use these fields. If you charge shoppers flat-rate shipping fees or offer free shipping, then these fields probably won’t matter to you. If you use actual or real-time shipping rates to determine shipping charges, you need to fill in weight and size data for accurate shipping charges to apply.
- Inventory: Make sure to turn on stock tracking so your inventory counts are automatically updated as products sell. Automated stock tracking helps prevent out-of-stock sales and know when to re-order or make new products.
Adding Products Manually
If you run a small store, you can add products manually to set up shipping and pricing options separately.
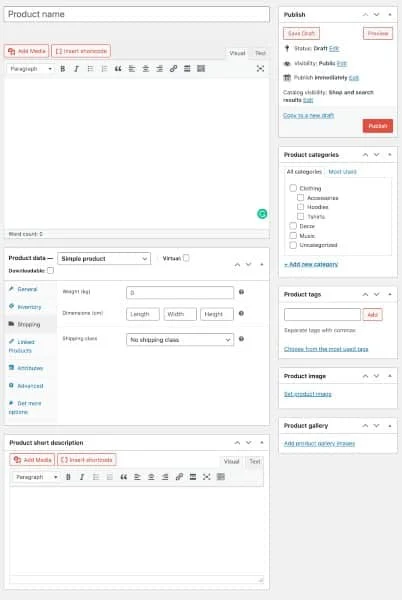
To add a product manually, go to Products > Add Product in the WooCommerce dashboard. From here, you can add a product title, description, and photos and set up pricing, shipping, and more.

Standard product fields you need to fill out include:
- Name: This is what your customers will see in your store.
- Description: This is your product’s main body of content—describe your product in detail. Learn how to write product descriptions that sell.
- Type
- Simple: Suitable for most physical goods and services (default)
- Variable: Ideal for more complex products such as t-shirts with multiple sizes
- Grouped products: Suited for bundles or packages—grouping several simple products into one
- Virtual: If you are selling a non-physical item, such as a service, and will not need to ship items
- Downloadable: If you are selling products that gives a customer access to a downloadable file, such as an ebook or software
- Price: Set a product price (learn how to price competitively)
- Short description: A quick summary for your product that appears on the product page under the product name
- Images: Upload multiple images and use high-quality images as much as possible (learn how to take better product photos)
- Tags: Used as product labels so that customers easily find them in your online store
- Categories: Group products so customers can browse similar items in your store easily
Adding Products in Bulk
If you run a larger store, we recommend importing your products all at once via a CSV file. Most ecommerce plugins provide a format you can use to map out your products to their existing product fields.
Step 6: Personalize Your Store & Select a Theme
A WordPress theme or template sets the overall look and functionality of your small business website. WooCommerce works and looks best with a compatible theme like Storefront. It also offers themes, which makes setting up a new store quick and easy. Or you can find a vast selection of themes on ThemeForest, the largest marketplace for WordPress themes.
A popular theme that works with WooCommerce is Divi by Elegant Themes. It’s not free, but Divi offers unlimited customization opportunities through both a drag-and-drop builder and CSS control. So, it’s great for businesses looking for an attractive ecommerce store no matter what their team’s programming skills are.
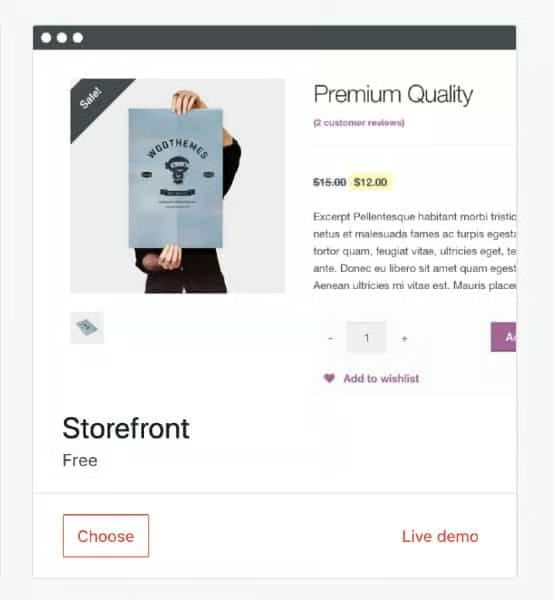
The free Storefront theme is popular and recommended among WooCommerce users because it’s
straightforward and can be easily customized.
Step 7: Process & Ship Orders
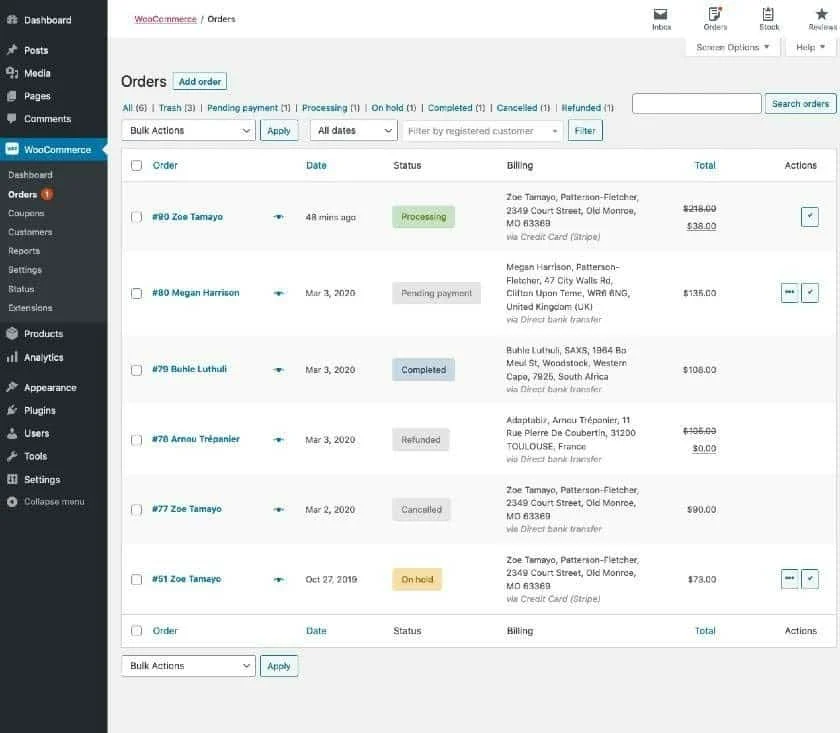
WooCommerce collects and stores your customer order information. You can easily see the status of orders such as “Processing,” “Completed,” or “Refunded.” All orders marked as “Processing” or “In Progress” need to be fulfilled.
Fulfilling an order includes:
- Printing the invoice and packing slip
- Packaging the product securely in a box or padded envelope with cushioning (choose cost-effective packaging materials)
- Setting up order tracking to notify the customer their order is on the way
- Printing the shipping label (read our article on best sources of cheap shipping supplies)
- Shipping the product
- Marking the order as “Completed”
WooCommerce Shipping lets you print shipping labels straight from your dashboard and provides discounts on USPS and DHL shipping labels. You can also install a shipping plugin like ShipStation that streamlines operations with auto-generated shipping labels, deep USPS discounts, tools to set up email notifications for customers, and a branded tracking system.
Step 8: Grow Your Ecommerce Store With Plugins
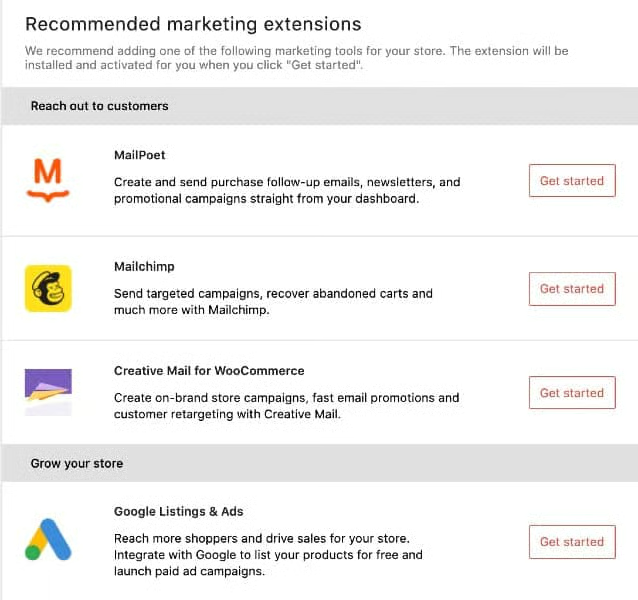
To grow an ecommerce site, you need a multipronged approach to marketing that includes search engine optimization (SEO) strategies, email marketing, excellent customer service, a social media presence, and a snappy website.
Achieve a multipronged marketing and growth strategy with help from free and inexpensive plugins.
- Store features: Improve the shopping experience for your customers with features like product search, wish lists, waitlists, and photo reviews. WooCommerce offers many of these add-ons for one-time fees ranging from $29 to $129.
- Performance boosters: Add plugins such as Yoast to manage your site’s SEO so customers can find your store more efficiently. Cache static elements of your site using plugins like WP Super Cache for faster load times and compress images to boost site performance.
- Analytics: Use a Google Analytics plugin like MonsterInsights to see how customers find your ecommerce site, what they click on, and other helpful insights.
- Email marketing: Mailchimp is a free plugin for WooCommerce and WordPress that lets you set up automated campaigns for abandoned carts, product recommendations, and post-purchase follow-ups.
- Live chat: Add plugins like LiveChat or Freshdesk to connect with customers via live chat on your website to engage shoppers and provide faster service.
How to Set Up WooCommerce Frequently Asked Questions (FAQs)
Is it easy to set up WooCommerce?
WooCommerce is relatively easy to set up and install. However, since WooCommerce has a lot of room for customization, it can be overwhelming for those that do not know a thing about WordPress. WooCommerce also doesn’t offer 24/7 customer support, although it has an active and helpful community forum and partner experts you can consult with for a fee.
How much does it cost to set up a WooCommerce store?
WooCommerce is technically free, but you need to pay for the rest of what a basic ecommerce store needs—domain name, hosting, SSL certificate, and plugins you might want to install. Expect to spend several hundred dollars upfront on these things to get your WordPress store up and running.
Does WooCommerce take a percentage of a WordPress store’s sales?
No, it doesn’t. Credit card processing rates are standard—2.9% + 30 cents for each transaction made with US-issued credit cards. Its built-in processor, WooCommerce Payments, has no setup charge and monthly fees.
Bottom Line
Establishing an online store is a part of one’s growth path when starting a retail business, and WordPress ecommerce stores offer a versatile and low-cost online selling solution for businesses. WooCommerce is a free ecommerce plugin that is very customizable and scalable, which is why it is included in our list of best free ecommerce website builders. It is easy enough to integrate into your WordPress site to start accepting payments and be scalable as your online store grows. You can quickly expand functionality using plugin extensions from its marketplace.