

In this guide, we’ll show you how to complete a bank reconciliation in QuickBooks Online, which can help verify that all the activities in your bank account are recorded accurately. To successfully reconcile your transactions against your bank statement, the difference between the ending balance and cleared balance should be zero. If the difference isn’t zero, we have troubleshooting tips to help you locate the discrepancies.
- Step 1: Navigate To the Reconciliation Window
- Step 2: Select the Bank Account to Reconcile
- Step 3: Begin Matching Transactions
- Step 4: Confirm the Bank Reconciliation Has a Difference of Zero
- Step 5: Review and Save QuickBooks Bank Reconciliation Reports
- 8 Troubleshooting Tips for Bank Reconciliation in QuickBooks Online
- Why Bank Reconciliation in QuickBooks Is Important
- Frequently Asked Questions (FAQs)
- Wrap Up
Step 1: Navigate To the Reconciliation Window
From the left menu bar, hover over Accounting, then click on Reconcile, as shown below.
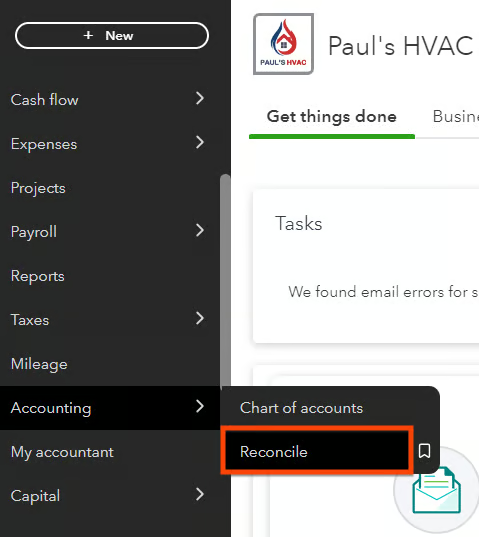
Navigate to the reconciliation window in QuickBooks Online
Seeing a different left-side navigation menu?
QuickBooks has two user views: Business View and Accountant View. Your left-side navigation menu may look different depending on the user view you are in.
If your sidebar menu is not what is shown in our tutorial, it means that you are on Business View. We prefer and recommend using the Accountant View because it shows a full range of business accounting features and tools that you can use in QuickBooks.
To verify whether you’re using the Business View, click on the cog wheel at the top right-hand corner of your QuickBooks dashboard, and check whether the button on the lower right-hand says Switch to Accountant view, as shown below. If so, then it means you are on Business View.
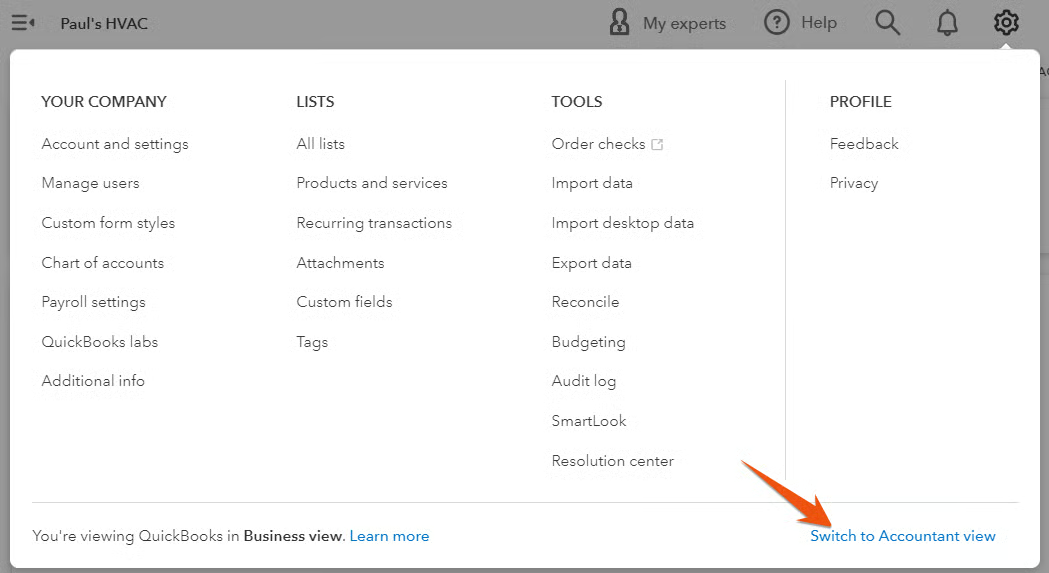
Verify whether you are using Business View or Accountant View in QuickBooks
Step 2: Select the Bank Account to Reconcile
Choose the bank account you want to reconcile in QuickBooks, then enter the ending account balance and date from your bank statement. You can also add the service charge and interest earned—if they aren’t already in QuickBooks.
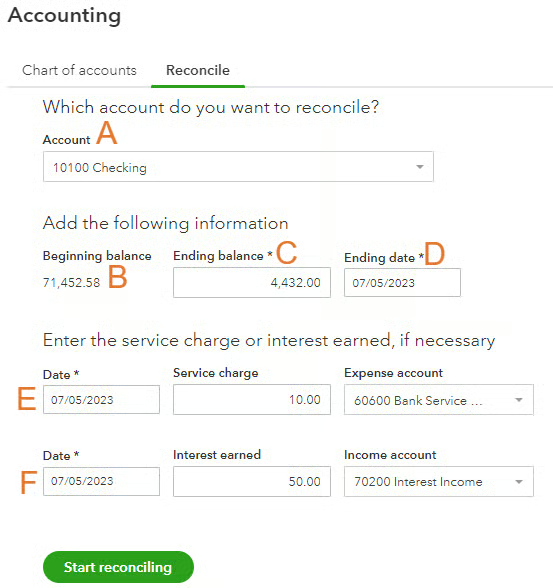
Enter information for bank reconciliation in QuickBooks
A. Account: Choose the bank account you wish to reconcile from the drop-down menu.
B. Beginning balance: This is the beginning balance of your bank account, and it must agree with your bank statement. In subsequent months, it’ll roll over automatically from the prior month’s ending balance.
C. Ending balance: Enter the ending balance from your bank statement.
D. Ending date: Indicate the ending date of your statement period.
E. Service charge fields: You may need to input a service charge amount if your bank imposes service charges for maintaining your account or processing transactions. Enter the service charge’s date, the amount, and the expense account to be charged if it isn’t in the system. You may use an expense account like “Bank Service Charges.”
F. Interest earned fields: Fill in these fields if your bank pays you interest on your account balance. If it hasn’t been recorded in QuickBooks, specify the date, interest earned, and the account where you want to record the interest earned, such as interest income.
When you’ve entered all the information from your bank statement, click the green Start reconciling button to continue.
Step 3: Begin Matching Transactions
The QuickBooks reconciliation screen contains a summary of cleared transactions at the top and a detailed list of transactions at the bottom.
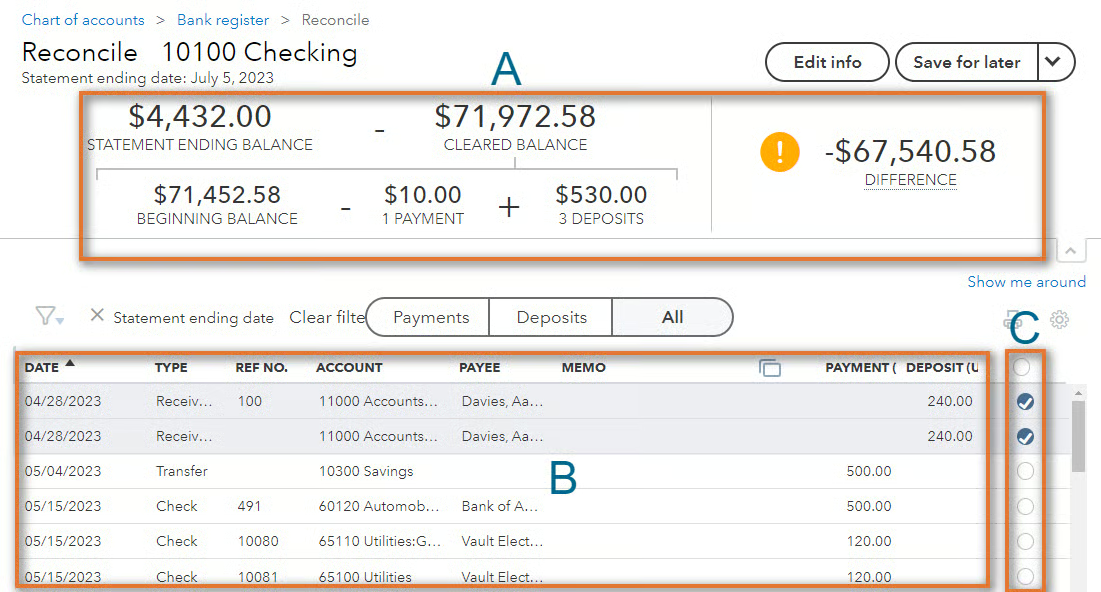
QuickBooks bank reconciliation screen before reconciliation
- A. Cleared transactions summary:
- The statement ending balance and beginning balance are populated automatically based on the information entered in Step 2.
- The cleared balance in item A is calculated as the beginning balance minus payments cleared plus deposits cleared.
- The sum of the cleared transactions—which are selected using the radial button (item C)—is reflected in payments + deposits (the entries beneath cleared balance).
- The difference between the statement ending balance and the cleared balance is shown on the rightmost of the summary.
- B. List of transactions: This includes all of the account’s QuickBooks transactions that haven’t cleared the bank prior to this statement period; thus, they should be reconciled. Note that some transactions might not be cleared due to several reasons, such as a duplicate entry or a check that hasn’t been cashed. Any transactions that won’t be cleared this month will appear again next month.
- C. Radial buttons: Click the radial button on the right side of a transaction that cleared the bank on this period’s statement.
Trace the transactions from the detailed list to your bank statement. When you have a match, click the radial button next to the transaction and place a checkmark next to the transaction on your bank statement. When you click a radial button, the transaction will be reflected in the summary of cleared transactions at the top of the screen.
Step 4: Confirm the Bank Reconciliation Has a Difference of Zero
To complete the reconciliation process, you must verify that the difference is zero. If it is, then click the green Finish now button in the upper right-hand corner of the screen, as seen in the sample completed reconciliation below.
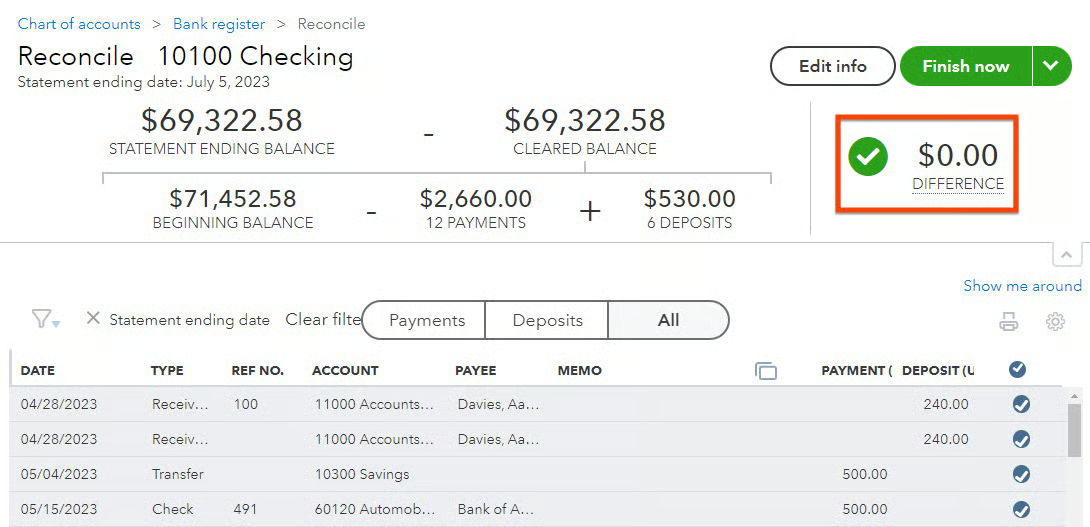
Completed reconciliation in QuickBooks Online
If the difference is not zero, we recommend that you try to locate transactions that aren’t recorded in QuickBooks. If you still can’t fix the discrepancy, we cover troubleshooting tips on finding the difference later on, after Step 5.
Step 5: Review and Save QuickBooks Bank Reconciliation Reports
After clicking Finish now, QuickBooks will display a confirmation with a link to view the reconciliation report.
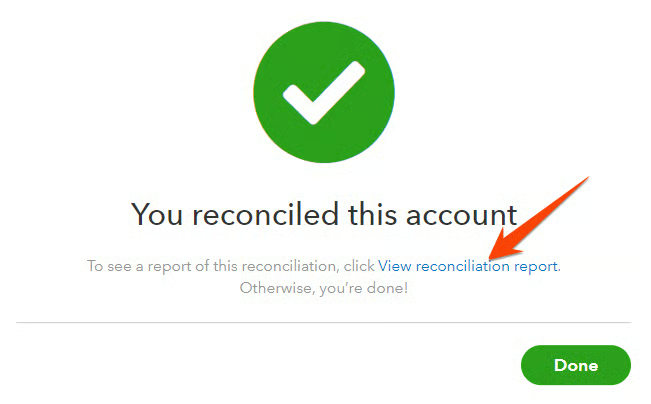
QuickBooks bank reconciliation confirmation message
Click View reconciliation report to view the report. The top of the report will display summary information similar to the top of the reconciliation screen. Perhaps the most useful information on the report is the list of uncleared, or outstanding, checks and deposits, which you’ll find at the bottom.
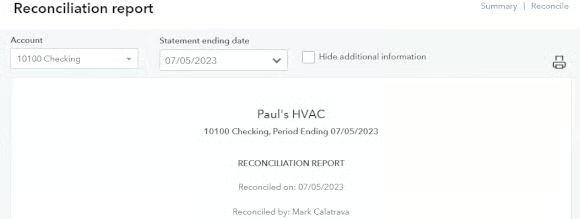
Reconciliation report in QuickBooks Online
Alternatively, if you want to access and review reconciliation reports without going through the reconciliation screen, you can navigate to the Reports tab in QuickBooks. Locate “Reconciliation Reports” in the report center, and QuickBooks will take you to the History by account screen. Here, you can track reconciliation history and access reports at any time.
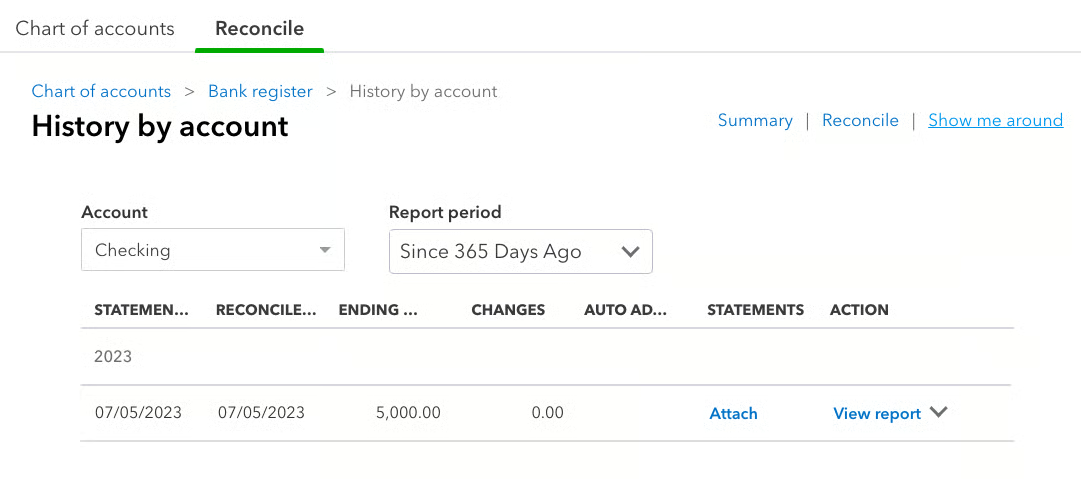
Track reconciliation history in QuickBooks Online
8 Troubleshooting Tips for Bank Reconciliation in QuickBooks Online
The beginning balance in the summary at the top of the QuickBooks reconciliation screen must equal the beginning balance on your bank statement. If you reconciled the account successfully in the prior month, yet your beginning balance doesn’t match your bank statement, then a previously cleared transaction has changed. QuickBooks will provide a link on the screen where you input the statement summary to help you find the changed transaction.
If this is the first time you’re reconciling this account, the beginning balance in QuickBooks will be zero. Make sure you’re using the very first bank statement for that account. You may have to go back many months and then move forward, reconciling one month at a time. If it’s impossible to start your reconciliation in the first month of the bank account, you might need an experienced bookkeeper to help with your first reconciliation to get you on track.
Triple-check the statement balance, service charge, and interest income you entered from the bank statement. Make sure the service charge and interest income are only entered during the reconciliation if they aren’t already in QuickBooks.
If your difference is, for example, $21.50, then look for a transaction for this amount on either your bank statement or the QuickBooks list of transactions. You can click on the amount column in the QuickBooks reconciliation screen to sort the transaction by amount.
Many bank statements will separately summarize deposits and withdrawals as does the summary at the top of the QuickBooks reconciliation screen. First, try to match total bank deposits to total QuickBooks deposits by reviewing only deposit transactions. Then, match total withdrawals from QuickBooks and the bank statement.
Double-check that all the unmarked transactions in the reconciliation window don’t appear on the bank statement. If the transaction is on your bank statement, then the radio button should be marked in the reconcile window.
Verify that all transactions on your statement have been matched to QuickBooks. Add any transactions that are missing from QuickBooks by clicking the green Finish later button and entering the transactions as normal.
If you have been at it for a while and you need a break, QuickBooks allows you to pick up where you left off. Click the Finish later button to save the work you have done so far. Sometimes, taking a breather can help you spot what’s causing the difference.
The most important thing you can do to keep your reconciliations simple is to do them monthly, shortly after receiving your bank statements. The longer you wait to reconcile your accounts, the more difficult it will be.
Why Bank Reconciliation in QuickBooks Is Important
QuickBooks Online, our best small business accounting software, can help you ensure the accuracy of your bank transactions with its excellent bank reconciliation feature. You’ll be able to identify discrepancies, such as bookkeeping errors or omissions.
For instance, forgetting to record automatic withdrawals in QuickBooks is a common mistake, and banks occasionally make mistakes as well. Additionally, QuickBooks Online’s bank reconciliation feature can catch any fraudulent transactions in your account.
Reconciling your bank accounts in QuickBooks accomplishes three main things:
- All bank transactions are recorded: Reconciling your bank account to QuickBooks ensures that all transactions listed in your bank account are recorded in QuickBooks.
- All QuickBooks transactions occurred: Sometimes, a transaction in QuickBooks can be created inadvertently. If this transaction involves a bank account, a bank reconciliation will identify the bogus transaction.
- All transaction amounts are correct: A bank reconciliation ensures transactions exist on both the bank statement and within QuickBooks, so you should find the same amounts.
Frequently Asked Questions (FAQs)
If you can’t find a matching transaction, you can mark it as an outstanding transaction or create a new transaction in QuickBooks.
Yes, you can. The process is the same as bank reconciliation. The main difference is that you’ll be reconciling credit card transactions instead of bank transactions.
Yes, you can generate bank reconciliation reports in QuickBooks Online. These reports provide a summary of the reconciled transactions and help you review the reconciliation process and its results.
Wrap Up
You now know how to process bank reconciliation in QuickBooks Online. The next lesson in our tutorial series is on managing downloaded credit card transactions in QuickBooks Online. It will teach you how to review, classify, and accept or exclude transactions that are imported automatically from your connected credit card accounts.