

As we move towards a cashless economy, being able to accept credit card payments is crucial for businesses to stay competitive. And while there are now a wide range of credit card payment methods, your business type (brick-and-mortar, online, or mobile) will still determine the services you need to process credit card payments.
However, the first thing every business needs in order to accept credit card payments is to get a merchant account. Once you have this, you can begin working with a payment processor to set up your preferred payment methods.
This guide breaks down the steps on how to accept credit cards in-store, via mobile device, online, over the phone, and via invoice, then take a closer look at our recommended payment processors.
- How to accept credit card payments in-store
- How to accept credit cards using a mobile phone
- How to accept credit cards online (from a website)
- How to accept credit cards on an online invoice
- How to accept credit cards over the phone
- Best all-around payment processors
- Why emerging payment methods matter
- Frequently asked questions (FAQs)
- Bottom Line
How to accept credit card payments in-store
Average transaction cost: 2.2% to 2.6%
If your small business has a fixed physical location, you will need a countertop setup (the kind you see at checkout lanes) to accept credit card payments. This will include a point-of-sale (POS) system with a built-in card reader or attached card payment terminal where customers can present their credit cards to swipe, tap, or dip to process the payment. The checkout counter may accommodate alternative payment methods like contactless and digital wallets.
To start accepting payments in-store, you will need to sign up with a POS provider, purchase the necessary hardware, set up your POS system, and then test it.
Step 1: Sign up with a POS provider
Modern POS systems include integrated payment processors. This is an advantage, particularly for small businesses looking for fast and easy setups, because it won’t require a separate merchant account application. Choose a provider that offers competitive pricing, excellent customer service, and a user-friendly interface.
I have been reviewing and testing POS systems for more than seven years, and here are my top recommendations:
- For budget-friendly options: Here are the best free POS software.
- For industry-specific solutions: Check out our guide to the best retail POS systems.
- For businesses on the go: Choose from these best mobile POS solutions.
- For businesses selling on multiple platforms: Consider these multichannel POS systems.
Step 2: Purchase your payment hardware
If the POS system you chose supports an integrated payment processor, then you will already have access to a payment terminal. Square, for example, offers an iPad stand with a built-in card reader to accept EMV chip and contactless payments, so there’s no need to attach a separate device. Read our Square review to learn more.
Otherwise, you will have to shop around for a payment processor that will provide you with its own set of payment terminal options. To help you get started, check out my list of the best credit card readers.

An all-in-one POS and payment system is the most small- and new-business-friendly option because it’s convenient and easy to set up. However, POS software that works with more than one payment processor can provide you with more flexibility. This makes it possible for you to keep your current payment processor and payment terminal even if you upgrade to a different POS system.
Step 3: Set up and test your terminal
Following the instructions from your payment processor, make sure that your system is set up correctly. If you are using a POS system with an integrated payment processor, all you will need to do is perform test transactions. Otherwise, follow your payment processor’s instructions on how to add the service to your POS system, most of which are also relatively easy to install.
Once you’ve completed the set-up process, you can begin processing credit card payments from your payment terminal.
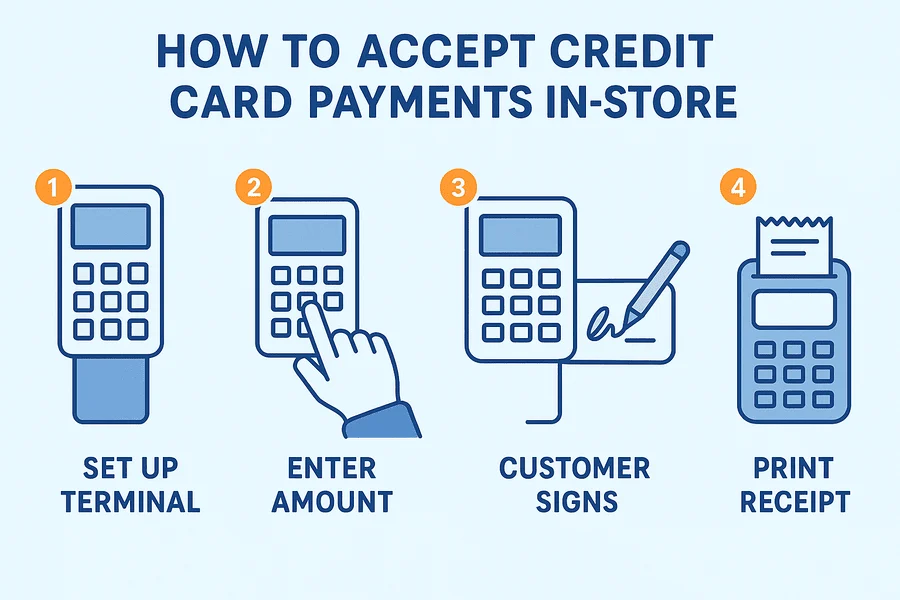
Here’s how the in-store credit card payment process works:
- Step 1: Activate the card reader (you either turn on a card terminal or hit the “Pay” button)
- Step 2: Enter the transaction amount.
- Step 3: The customer chooses their preferred way to use the credit card and prompts the customer to swipe, tap, or dip the card to complete the transaction. (Sign the charge slip if needed.)
- Step 4: Print the receipt.
In a Payments study released in January of this year, the Federal Reserve reported that nearly 60% of US consumers have been using their mobile wallets to make purchases as early as 2022. Yet, surprisingly, nearly 40% of businesses have not adopted mobile wallet payments according to the latest report by Research and Markets.
Contactless payments via smartphones are powered by the same near-field communication (NFC) technology used for tapping credit cards to a payment terminal. They allow customers to pay with their credit cards in-person by presenting their smartphone instead.
These mobile wallets are convenient, secure (with tokenization), and widely supported by modern POS systems, including affordable options like Square and Clover. With consumers, especially Gen Z and millennials, increasingly using mobile wallets like Apple Pay, Google Pay, and Samsung Pay, businesses would be remiss not to include this payment method at their checkouts.
Learn how to add a mobile wallet payment method in this guide.
How to accept credit cards using a mobile phone
Average transaction cost: 2.2% to 2.6%
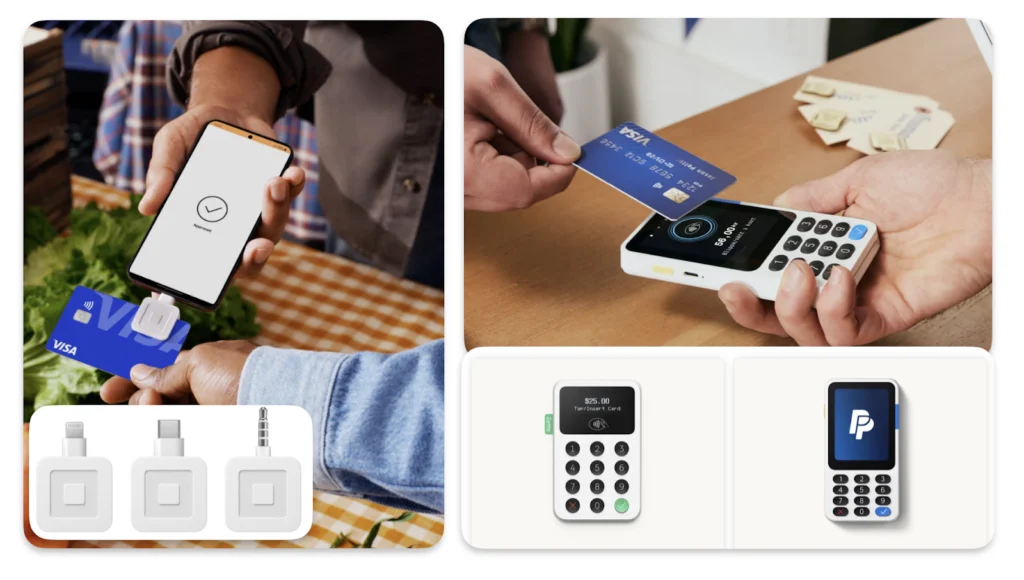
Mobile terminals are popular for small businesses selling at farmers’ markets and restaurants processing tableside or curbside orders and payments. Or, if you want to accept payments outside of a physical storefront location, you will also need mobile payment tools such as a payment app and a mobile credit card reader to connect to your smartphone.
To do this, your first task is to choose a mobile payment processor. Here are my most recommended mobile credit card processors to help you get started.
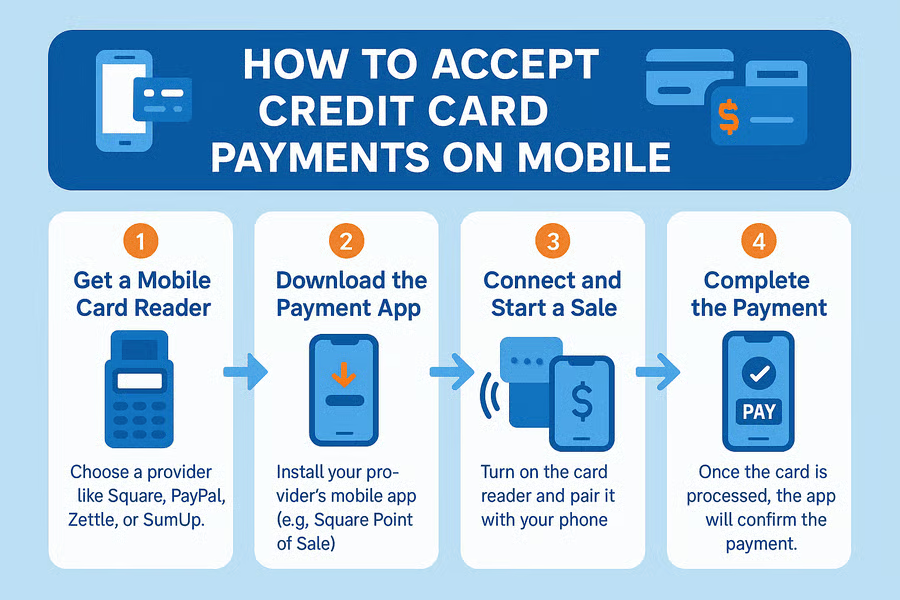
Step 1: Purchase a card reader
To accept credit card payments using your mobile phone, you will need either a connected card reader or a tap-to-pay feature. Mobile credit card processors have card readers that can connect to your phone to transmit the card information to your mobile POS app. These could be as small as a dongle that syncs to your smartphone or as elaborate as an entire POS system.
Check out the following guides to make sure the card reader you purchase is compatible with your mobile phone:
Note that most processors with tap-to-pay features only have it available on iPhones, so check the compatibility with your mobile phone before signing up.
Step 2: Download the payment app
Follow the provider’s instructions on how to download the mobile payment app on your smartphone. You will be asked to create an account, link your business bank account, and then customize product listings. Finally, pair your mobile card reader with your payment app via Bluetooth or another connection.
I recommend conducting a thorough test of both the card reader and app to ensure that everything is in working order. This step may involve running several test transactions, checking sales records, and ensuring your receipts are correctly generated.
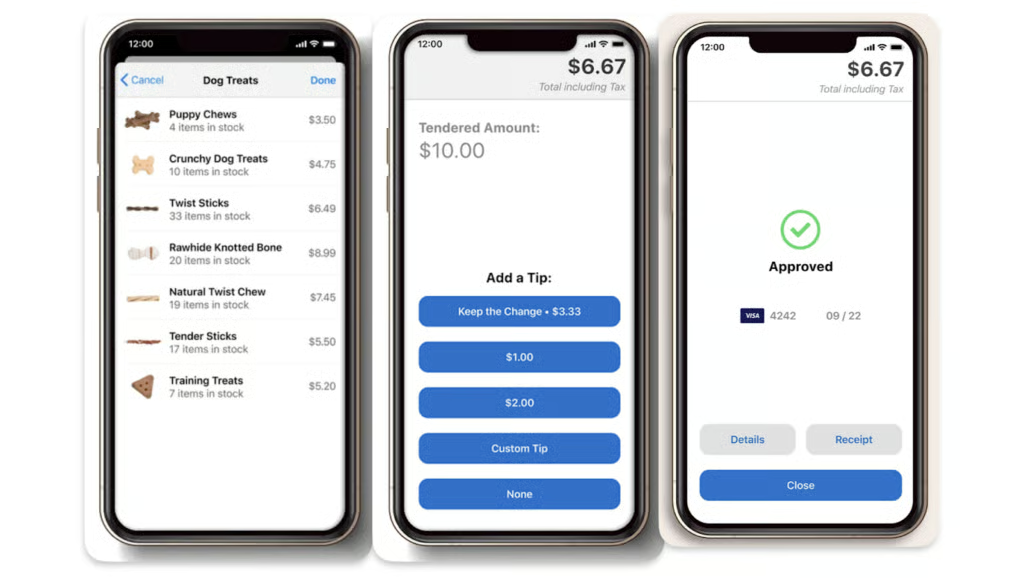
Step 3: Connect and start a sale
To start a mobile transaction, open the app, choose the items from the catalog, and proceed to payment. Make sure that the mobile credit card reader is properly connected, then enter the payment amount and choose the credit card option for payment.
Once you click on “Charge”, the next screen will display a prompt for the customer to tap, dip, or swipe their card on the card reader.
Step 4: Complete the sale
Wait for the display to show that the transaction is approved, then offer to send a digital receipt via text or email. Once the process is complete, a record of your sales will be kept in the app and will be available for reports. Expect funds to be sent to your merchant account anywhere from the same day up to 2 business days.
These days, customers are no longer surprised by payments happening away from the checkout counter. In fact, this type of convenience is often looked for by modern-day in-person shoppers.
For example: I worked with a friend who participated in a month-long local food bazaar since she was concerned that her sales were not meeting expectations after the first week. At the event, I noticed that while customers were lining up to buy, the order and payment process was taking too long. Some customers at the back would move to a different stall. A considerable number of customers paying in cash could not get change and just left.
I suggested an alternative payment processing service whose app can be downloaded for free on multiple smartphones and even track cash payments. This helped to quickly clear the queue, and customers were visibly happy that they could grab a seat, order, and pay tableside.
Related: What is a digital wallet & how does it work for small businesses?
How to accept credit cards online (from a website)
Average transaction cost: 2.7% to 2.9%
As with in-person transactions, your customer’s payment request will not reach the card issuing bank for approval without the online payment processor.
The online payment processor:
- Helps you set up your own merchant account.
- Connects your online checkout and payment gateway to the card network and card issuing bank.
- Securely transmits the encrypted transaction and credit card information to and from the payment gateway.
- Initiates the fund transfer from the customer’s bank once the transaction is approved.
However, one key decision to start accepting payments from your ecommerce website is your choice of payment gateway.
Step 1: Connect to a payment gateway
The online payment gateway is the system attached to your checkout page that:
- Performs the verification steps to authenticate the credit card information and the user’s identity
- Encrypts the transaction and credit card payment information
- Creates the authorization request and sends it to the payment processor
Why is this important? Unlike with in-store transactions, an online payment gateway is customer-facing. So, while store employees at the checkout counter will certainly complete the transaction process, online customers can decide to abandon their purchases entirely.
If you already have an online ecommerce platform, you should be able to find a list of compatible payment gateways with instructions on how to integrate them.
Most payment gateways are compatible with top online payment processors and ecommerce platforms. Some providers like Square already have a dedicated payment gateway AND an ecommerce platform built into their payment processing service.
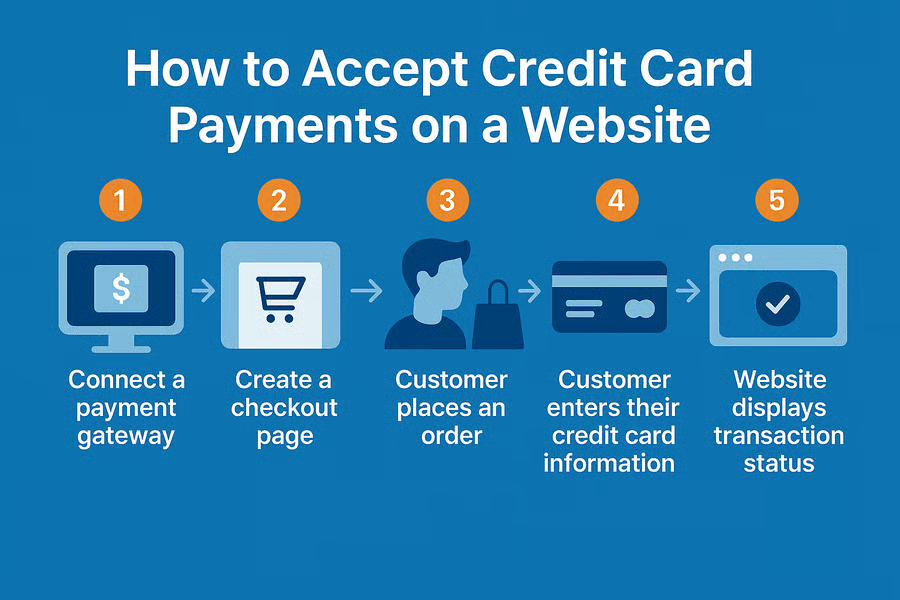
Step 2: Create a checkout page
Your payment gateway will enable you to create a checkout page which shows your customer’s online purchases. More configurations can be added, such as delivery and shipping details, terms and return policies, and more. What’s most important to note, for the purpose of this topic, is that this is where your customers will see the credit card payment method options you signed up for with your payment processor.
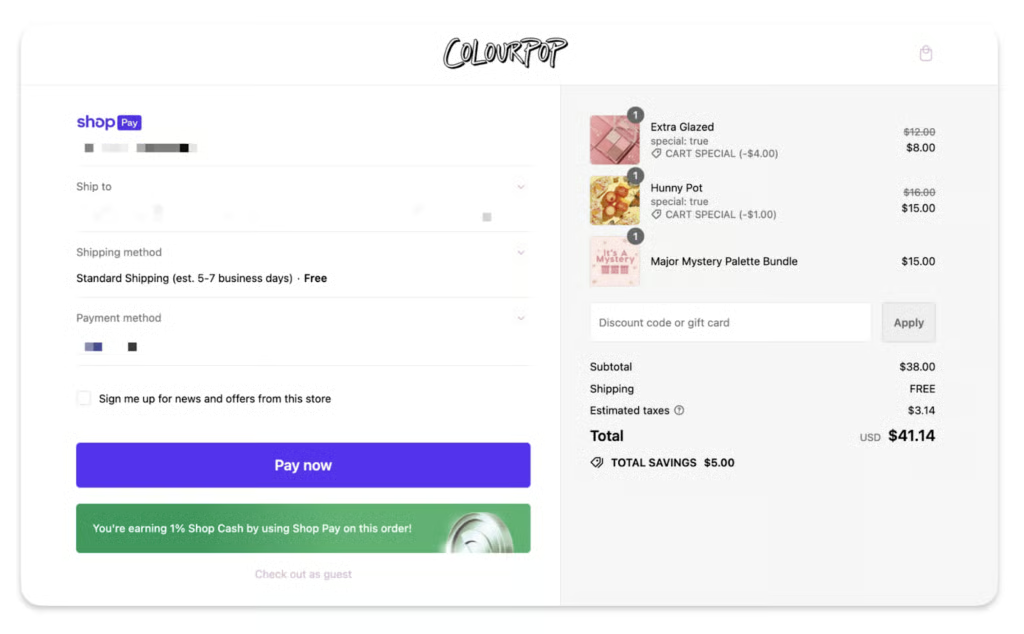
In the example below, the merchant chose to add Shop Pay’s one-click checkout, Google Pay (mobile wallet), and PayPal checkout to process credit card payments.

Payment gateway providers support different levels of customization options for small businesses. Stripe, for example, gives you access to high-level checkout customization options regardless of your business size, while others offer some degree of customization features for small businesses.
Once you’ve designed an online checkout, you’re ready to start accepting online payments from your website.
Not sure where to look? Here are 7 Best Payment Gateways for Small Business you can choose from.
Step 3: Customer places an order
Customers will come to your ecommerce store to shop and will place their purchases in a virtual shopping cart, also known as your online checkout form. When they’re done, the customers review the products in their shopping cart and the total cost before clicking on one of the available payment methods.
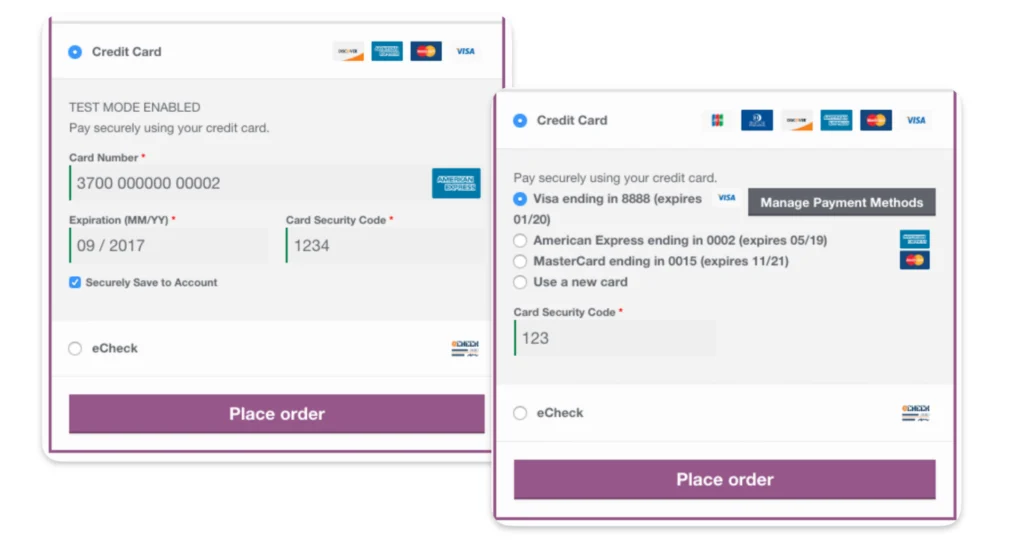
Step 4: Customer enters their credit card information
As soon as the customer provides their credit card information and clicks on the “Pay” button, the payment gateway process is initiated. Aside from asking the customer to provide their card verification value (CVV), this is also where the system conducts integrity checks on the customer’s information. This includes any security features in place, such as IP check, two-factor authentication, or biometric scan (if they use a mobile wallet for payments).
Afterwards, the payment gateway encrypts the transaction and credit card information, then sends it to the payment processor along with a payment approval request.
Step 5: Website displays transaction status
Once the payment request is approved, the payment gateway displays the result on the website to notify the customer. The system then sends a receipt via email to the customer to confirm their purchase.
Learn more: Ecommerce Payment Processing Guide for Small Business.
Research from SellerCommerce revealed that 70.19% of online shopping carts were abandoned in 2024. One-click checkout is a streamlined online payment process that allows users to complete a purchase with a single click, using pre-saved payment and shipping information.
This method allows businesses to address some of consumers’ biggest considerations when shopping online:
- Convenience: It eliminates the need to repeatedly enter billing and shipping details, saving time and effort for the customers
- Improved user experience: Shoppers enjoy a faster, smoother buying journey, which can enhance brand loyalty.
- Mobile optimization: Particularly valuable for mobile users, where typing can be cumbersome.
By reducing friction at checkout, it minimizes cart abandonment and boosts sales for retailers.
Choose your one-click checkout service in this guide: What is a One-Click Checkout?
How to accept credit cards on an online invoice
Average transaction cost: 2.7% to 3.5%
The required tools for accepting credit card payments via a digital invoice are similar to when processing transactions from an online store.
Aside from an ecommerce checkout, both online payment processors and payment gateways also support payment links. These payment links are added to a digital invoice, allowing customers to settle their outstanding balance seamlessly, without the need to navigate to a merchant website.
Once you sign up with a payment processor that offers a digital invoicing feature, you can follow the steps below to start collecting credit card payments.
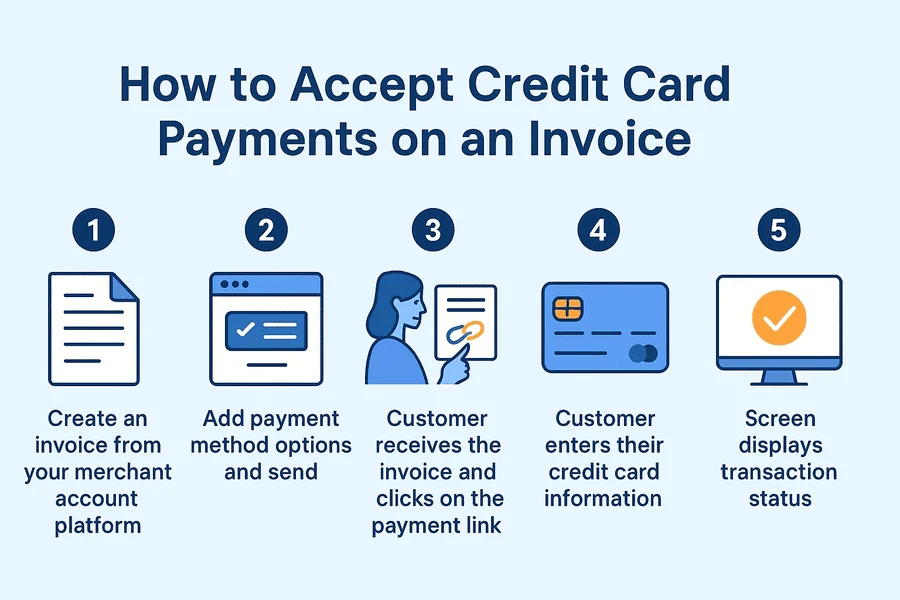
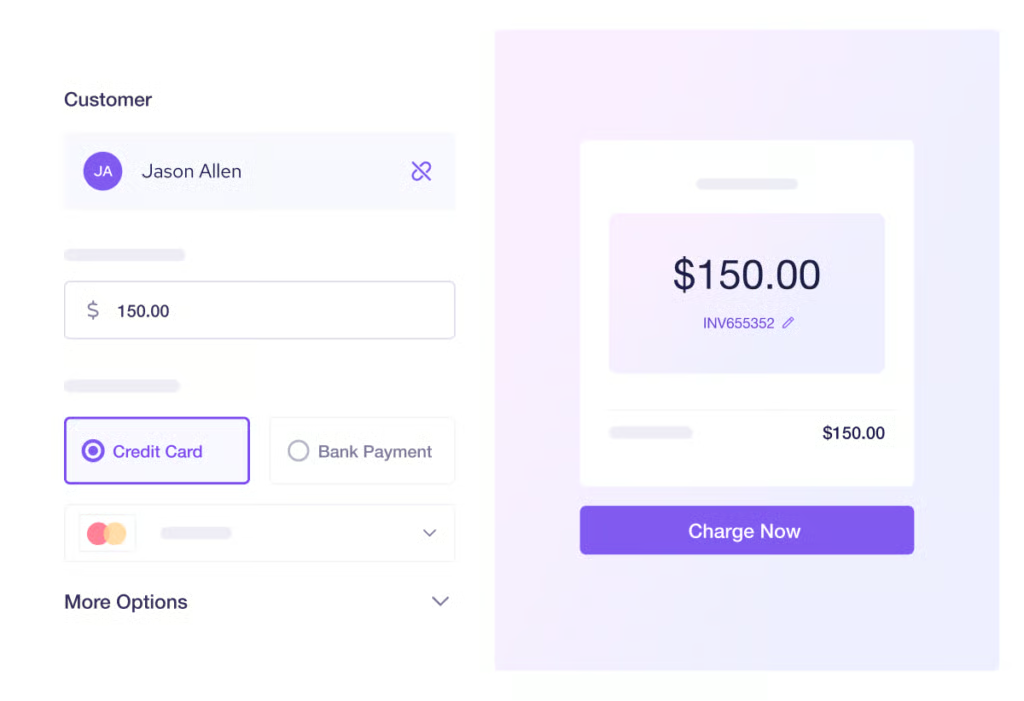
Step 1: Create an invoice from your merchant account platform
Depending on your chosen payment processor, you can get the digital invoicing service as an add-on. Others offer the basic feature for free while the more advanced functions (such as billing) will require an additional monthly fee.
You can create a digital invoice from your merchant account platform, add the transaction information, and fill in the customer’s contact details from your sales records.

Step 2: Add payment method options and send
Then, you can start modifying the payment terms and payment methods from the settings. Credit card payment is available by default, but other modern methods, such as bank transfers and digital wallets are also possible if you signed up for these options with your payment processor.
Review the details, and once the invoice is ready, click “Send.”
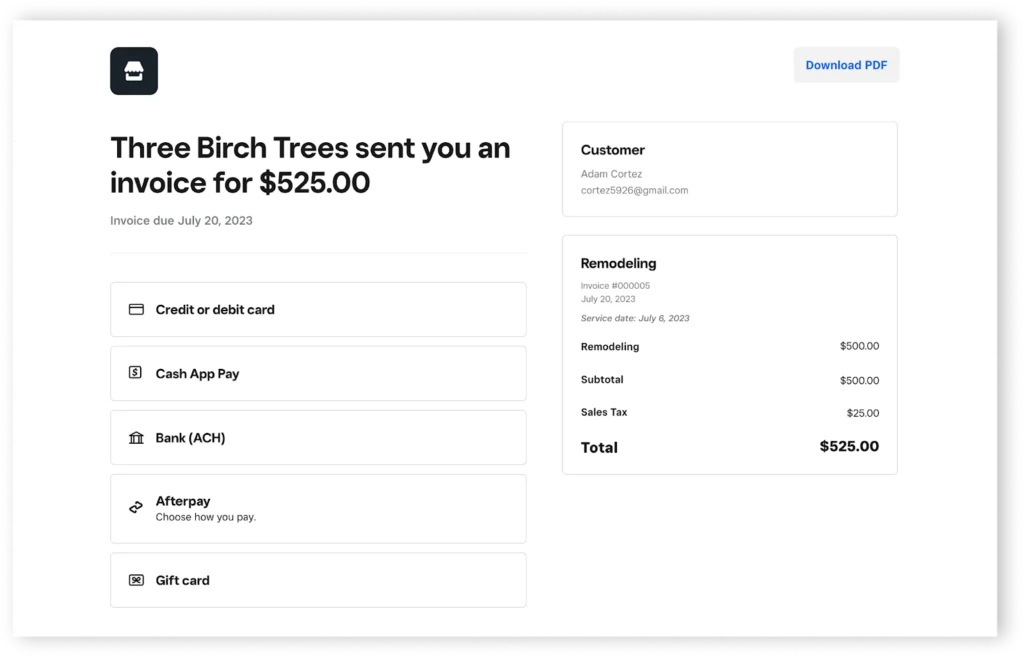
Step 3: Customer receives the invoice and clicks on the payment link
The invoice is sent to the customer’s email address. This is where the customer can review the transaction details and the outstanding amount. Ideally, the more transaction information available on your invoice, the more the customer will be encouraged to pay.
Customization tools differ with each payment processor. Some are more feature-rich than others at no extra cost, some offer more user-friendly tools, while others provide developer-based customization.
Here are some of the best invoicing software options to consider.
Step 4: Customer enters their credit card information
At this point, the customer can click on their preferred way to use their credit card. Usual options include direct manual entry of their credit card information, use of a banking app, or use of a digital wallet.
A payment form should pop up where the customer can enter their credit card details, plus their CVV (often found at the back of the card) to confirm the transaction. If they choose a banking app or digital wallet, the pop-up screen will show the next steps to complete the transaction, which usually involves two-factor authentication.
In the back end, the payment gateway confirms the user’s identity based on the authentication tools. After which, the transaction information is encrypted and sent to the payment processor, which in turn, communicates with the relevant banks and networks to approve the payment.
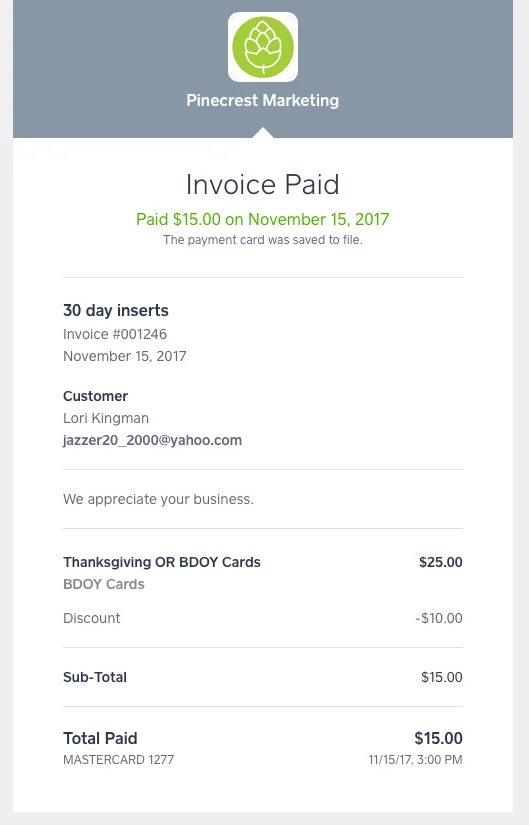
Step 5: Screen displays transaction status
Once the transaction is approved, the pop-up screen will be updated to display a confirmation. The digital invoice will also be embedded with the payment confirmation, and a digital receipt will be automatically sent to the customer. If you’re working with subscriptions, the invoice will display additional information such as payment progress, terms, and more. You can track and manage all your invoices from your merchant account platform.
Like other credit card transactions, the funds usually arrive at your merchant account in two business days.
For a more detailed explanation on the process of accepting payments for subscriptions, check out my guide on how to accept recurring payments.
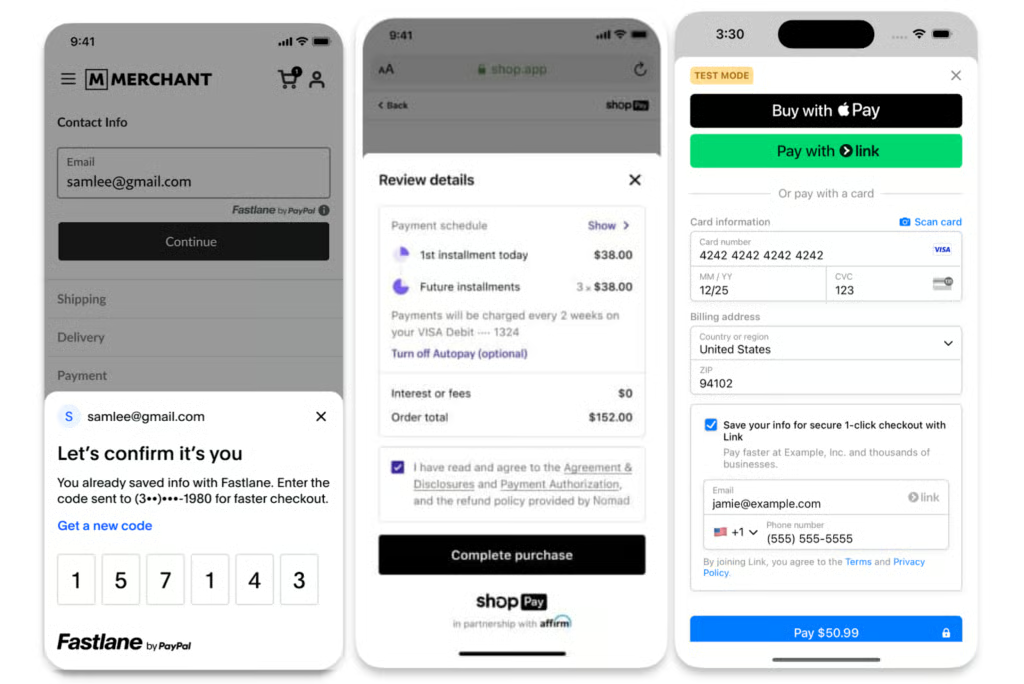
BNPL platforms like Affirm, Klarna, and Afterpay are transforming the checkout experience, offering flexible installment plans with minimal friction. While more common in ecommerce, in-store adoption is growing rapidly. That said, adding BNPL is also a great way to encourage customers to settle their outstanding invoice.
💰How BNPL benefits your business
- Increased conversions: Reduces cart abandonment by lowering immediate cost barriers.
- Higher average order value: Customers are more likely to spend more when offered flexible payment terms.
- Attracts new customers: Particularly appealing to younger consumers who avoid traditional credit.
- Improves cash flow: Merchants typically receive full payment upfront from the BNPL provider.
- Competitive edge: Offering BNPL can differentiate a brand in crowded ecommerce markets.
⚠️Common issues to consider around BNPL transactions
- Merchant fees: BNPL providers typically charge merchants fees between 2%-6% per transaction
- Integration complexity: Implementing BNPL systems may require technical integration, staff training, and updates to return/refund policies
- Customer disputes and chargebacks: Businesses may face increased risks of disputes or chargebacks if customers fail to understand or follow BNPL terms.
Want to know your options? Here are 6 best BNPL apps to consider.
How to accept credit cards over the phone
Average transaction cost: 3.3% to 3.9%
A virtual terminal is a payment service that allows businesses to process payments on their customers’ behalf. Unlike a payment gateway, a virtual terminal is exclusively merchant-facing and is accessible from the merchant account platform where the customer’s credit card information is manually entered.
Most popular payment processors offer a virtual terminal service. However, some are accessible for free while others charge an additional monthly fee. Also, note how transaction fees for this option are the highest, corresponding to the higher risk of chargeback claims.
Browse our recommended virtual terminals if you don’t have one yet or are looking for better options.
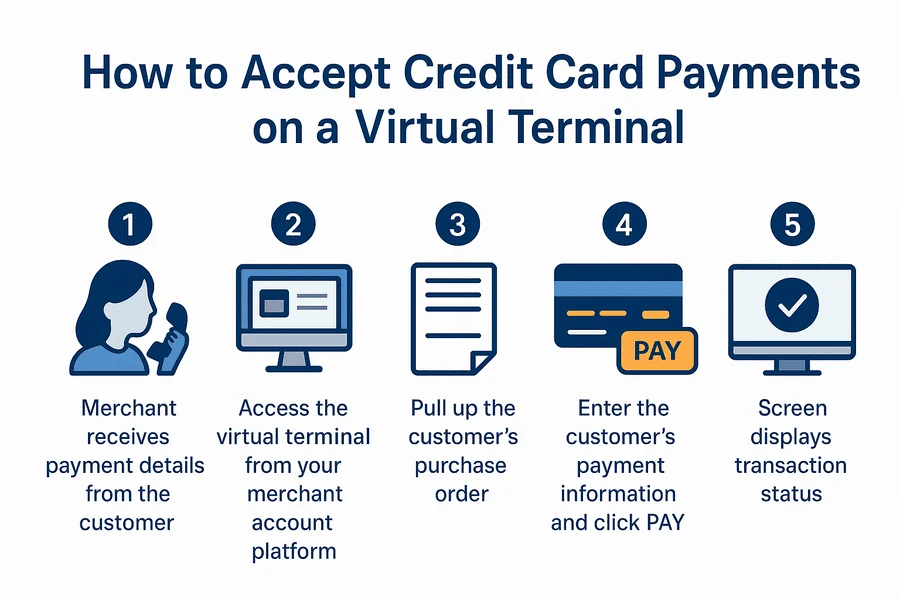
Step 1: Merchant receives payment details from the customer
Originally, this transaction starts with the merchant creating an invoice while the customer is over the phone. Then, the customer provides their credit card details to pay for their purchase. An alternative would be creating an invoice after receiving a purchase request via email, hence the term mail order/ telephone order (MOTO) payments.
However, nowadays, the customer can be speaking to the merchant on a call or chat via live messenger, or even text messaging.
Step 2: Access the virtual terminal from your merchant account platform
After creating the invoice and receiving the customer’s credit card data, navigate to the virtual terminal platform. The screen will display blank fields where you can enter the customer’s payment details.
Step 3: Open the customer’s purchase order
Click on the invoice field and enter the customer’s outstanding invoice reference number. This will also auto-populate the customer contact information (which you should double-check). Review the invoice details such as the purchased items, product cost, and any taxes or shipping charges.
In case there are any discrepancies on the invoice details vs the customer’s actual purchase request, you will need to go back to the invoice and correct the error. Once this is done, you can start over with the virtual terminal. Clear the invoice field and reload the invoice reference number to refresh the information.
Step 4: Enter the customer’s payment information and click “Pay”
Begin by carefully entering your customer’s credit card information in the provided fields. Pay particular attention to the card number and CVV, then Click the “Pay” or “Charge” button to complete the payment. If you have a secure card vault service, the system will ask if you would like to save the customer’s credit card information in their profile.
Note that this payment method is ideal for one-time transactions. However, if you expect recurring payments, having a secure card vault is the better option.
Step 5: Screen displays transaction status
After a few seconds, the system will display the status of the transaction. This will also trigger the system to email a digital receipt to the customer if the payment goes through. The last step, and one of the most important of all, would be to delete any record of the customer’s credit card details from your email or live messaging service.
Best all-around payment processors
| Best for | Monthly account fee | Card-present (in-store, mobile) | Card-not-present (ecommerce, invoice) | Keyed-in (virtual terminal) | |
|---|---|---|---|---|---|
| All-in-one POS | From $0 | 2.6% + 15 centst | 2.9% + 30 cents | 3.5% + 15 cents | |
| Minimizing processing cost | $0 | From interchange plus 0.15% + 6 cents | From interchange plus 0.15% + 15 cents | From interchange plus 0.15% + 15 cents | |
| POS Software and hardware flexibility | $0 | Custom rates | Custom rates | Custom rates | |
| Custom online checkouts | From $0 | 2.7% + 5 cents | 2.9% + 30 cents | 3.4% plus 30 cents | |
| Mobile payments | From $0 | From 2.29% plus 9 cents | From 2.59% + 49 cents | From 2.89% + 29 cents | |
| High risk industries | From $10 | Custom rates | Custom rates | Custom rates | |
Find out how credit card transactions are assessed with our guide to credit card processing fees.
What to consider before choosing a credit card processor
Choosing the right credit card processor is one of the most critical financial decisions a small business can make. The right choice ensures smooth transactions, satisfied customers, and healthy cash flow, while the wrong decision can mean hidden fees, delayed deposits, and limited flexibility as your business grows.
With so many options on the market, from traditional banks to tech-forward platforms, here are key considerations you should focus on to cut through the noise.
1. Look beyond the headline rate
One of the largest concerns when taking credit card payments for small businesses is the cost. Many processors advertise “low rates,” but fees can be complex and vary based on your transaction volume, method (in-person vs online), and industry type. Common costs include transaction fees, monthly fees, equipment costs, and chargebacks.
2. Pay attention to the fine print
Not all processors offer month-to-month flexibility. Some require multi-year commitments with auto-renew clauses, which can be expensive to break.
Make sure to ask these questions:
- Is there a long-term contract?
- Are there early termination fees?
- Are equipment rentals bundled into a service agreement?
- What is your PCI compliance policy?
3. Funding times: When will you get paid?
Cash flow is king for small businesses, and knowing when funds will hit your account matters. Most processors offer standard funding of 1–2 business days and same-day funding with a fee. Ask about batch cut-off times, as deposits processed after a certain hour may be delayed.
4. Customer support: When you need help, who answers?
You don’t want to be stuck in a support vortex when your terminal crashes mid-rush. Look for providers that offer 24/7 support, especially important if you run a restaurant or an event-based business, or if you are a retailer attending trade shows. The best credit card processor also offers responsive multi-channel support.
5. Scalability and integration: Will it grow with your business?
Your processor should support your business now and in the future. When choosing the best way to accept credit cards for small businesses, it should consider:
- Omnichannel capabilities: Can you sell in-person and online?
- Integrations: With accounting software, inventory systems, or CRM tools.
- Multiple locations: Can the system scale to multiple stores or mobile teams?
Also read: What are omnichannel payments?
Why emerging payment methods matter
For years, accepting credit cards has been the benchmark of modern business operations. But today’s small businesses are no longer just competing on convenience — they’re adapting to an evolving payment landscape shaped by customer expectations, new technologies, and changing regulations.
According to KPMG’s 2025 Modernizing Payments report, 87% of retailers are either currently modernizing their payments infrastructure or planning to do so in the next six to eight months. So, if you’re still relying solely on traditional terminals, you may be missing out on revenue (and relevance).
Is your business keeping up? Here are key trends shaping the future of small business payments
- Contactless payments and NFC technology: Contactless payments via smartphones or tap-enabled cards offer speed and convenience. Near-field communication (NFC) technology is now widely supported by modern POS systems, including affordable options like Square and Clover.
- Mobile wallets and embedded payments: Consumers are increasingly using mobile wallets like Apple Pay, Google Pay, and Samsung Pay. These digital wallets are convenient, secure (with tokenization), and widely trusted, especially among Gen Z and millennial customers. Also read about biometric payments.
- Customer financing: Pay Later platforms like Affirm, Klarna, and Afterpay are transforming the checkout experience, offering flexible installment plans with minimal friction. While more common in ecommerce, in-store adoption is growing rapidly. Learn how to offer customer financing in this guide.
- QR code payments and remote invoicing: QR code-enabled payments allow businesses to take payments without physical hardware. Especially useful for pop-ups, service providers, or curbside operations, this method requires minimal tech setup and integrates well with mobile POS apps.
- Cryptocurrency acceptance: While still niche, some small businesses are beginning to accept Bitcoin and Ethereum. Platforms like Coinbase Commerce or BitPay enable crypto payments with auto-conversion into fiat currency. Adopt it only if you serve a tech-savvy or global audience.
Frequently asked questions (FAQs)
What do I need to accept credit cards at my business?
To accept credit card payments, you will need a merchant account. A merchant account is regulated by your acquiring bank (a financial institution that accepts the risk of allowing you to process credit card transactions) and is where the proceeds of your credit card sales go before you can transfer them to your business bank account.
Once you have a merchant account, you can sign up for a payment processor and a payment gateway that manages your credit card transactions.
How do small businesses receive credit card payments?
Small businesses can accept credit card payments in-person (card-present transactions) or remotely (card-not-present transactions). Those with a storefront can process card payments with a swap, EMV chip, or contactless methods. Online businesses can create online checkout pages where customers can enter their credit card information.
How much does it cost to accept credit card payments?
The actual processing fees you pay will depend on your business type, sales volume, and the types of cards you accept. So, there is no one-size-fits-all fee. But, if you budget from 1% to 4% for processing fees, you’ll rarely be surprised.
Can I accept credit card payments online for free?
You can typically accept online credit card payments with no upfront cost via a payment services provider like Square or Stripe. The provider will retain their processing fees from the transaction and send the remaining funds to your business bank account.
What is the cheapest way to accept credit card payments?
The cheapest way for your business to accept credit card payments will depend on your business type. For example, if you process less than $10,000 a month, then flat-rate processors with no monthly fees that give you free POS software, like Square, may prove the most cost-effective.
If you process over $10,000 a month, then look for interchange-plus pricing. Interchange-rate processors charge only the specific rate plus a small per-transaction markup. This makes a big difference when you have larger transactions. In our table, Helcim and Payment Depot provide this pricing.
Bottom Line
From mobile wallets to cryptocurrency, the way consumers pay is rapidly transforming. Customers today expect more than just chip-and-swipe. They want fast, secure, and flexible payment experiences.
However, knowing how to take credit card payments for small businesses means understanding that there is no one-size-fits-all solution. Only by evaluating your needs across cost, contract terms, funding speed, support, and scalability, will you be better positioned to choose a processor that fits your business—not the other way around.
If you’re a new business, Square offers an affordable and immediate way to accept credit card payments in-person through Square’s POS app, online through Square Online’s free store, or through Square Invoices. Square’s flat-rate fees are transparent and offer good value for new businesses or occasional sellers. Create a free account today.