


I’ll show you how to set up company information in QuickBooks Online in three simple steps. I’ll cover how to navigate to the Company tab where you can enter or adjust basic company details, including your business type and physical and email addresses, how to enter information to be printed on tax forms, such as Form 1099 and payroll tax returns, and set up marketing preferences with QuickBooks if needed.
Step 1: Gather Company Info & Sign in to QuickBooks
Before I began setting up my company in QuickBooks Online, I compiled basic company information. It’s best to have as many items from this list as possible, but you can always make changes later:
- Business name
- Address
- Website
- Digital copy my your company logo
- Federal employer identification number (EIN)
- Business structure, such as sole proprietor or partnership
- Accounting method (cash or accrual)
Now that you have the information needed, log in to your QuickBooks Online account. From the dashboard, I clicked on the cogwheel icon (⚙︎) in the upper right corner of your screen and then chose Account and settings, as shown below.
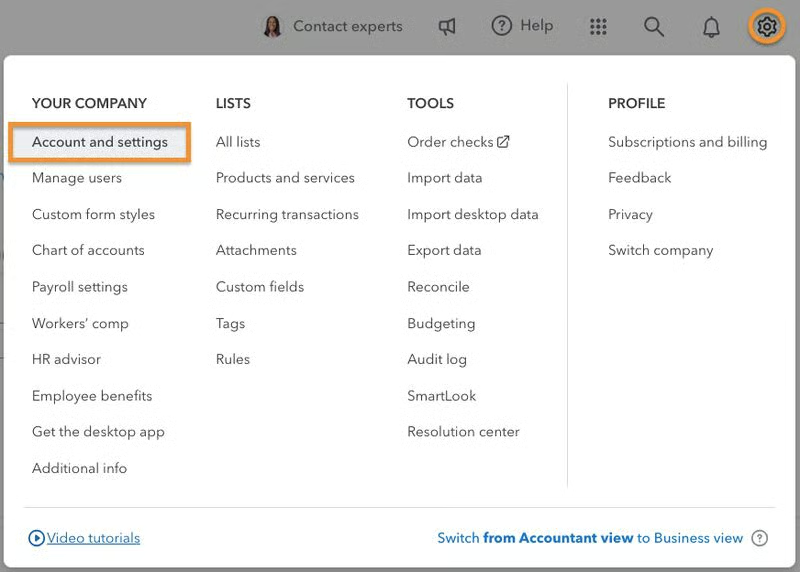
Step 2: Select the Company Tab
Next, click on the Company tab under Account and settings. This tab allowed me to set up company information in QuickBooks Online in five areas: company name, company type, contact info, address, and marketing preferences.

Step 3: Adjust Company Settings
I’ll go over each of the five sections under the Company tab. To do this, click on the pencil icon or anywhere in the company section. After making the changes, click Save.
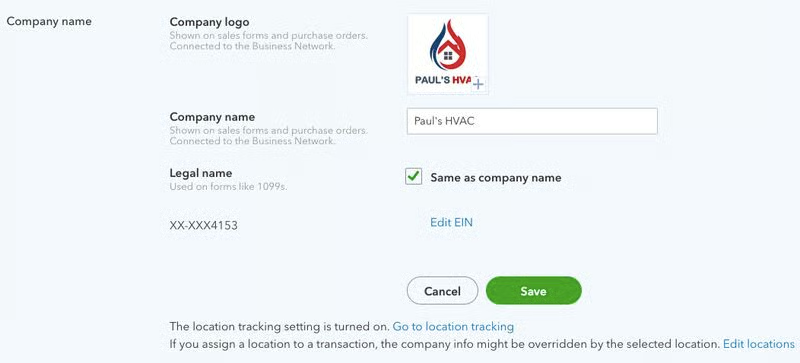
1. Company Name
This is where you can enter or update the official name of your business and upload a logo. These will appear on important documents like invoices and sales receipts.
- Company logo: I clicked anywhere on the gray square to upload my company logo. In the screenshot below, I already uploaded a company logo. If you wish to upload another logo, click the blue plus sign, select the file, and then click Save.
- Company and legal name: I entered my company name as I would like it to appear on my invoices and other forms. Your legal company name should match the name the IRS has for your company. The legal name will appear on tax forms, such as Form 1099, and payroll tax returns. If your legal name is different from the company name you want on invoices, uncheck the box and input the legal name.
- Employer Identification Number (EIN): This should match the number assigned to you by the IRS. If you’re self-employed, you may use my Social Security number. Because of the sensitive nature of EINs, QuickBooks may require you to authenticate your login before viewing or changing the EIN.
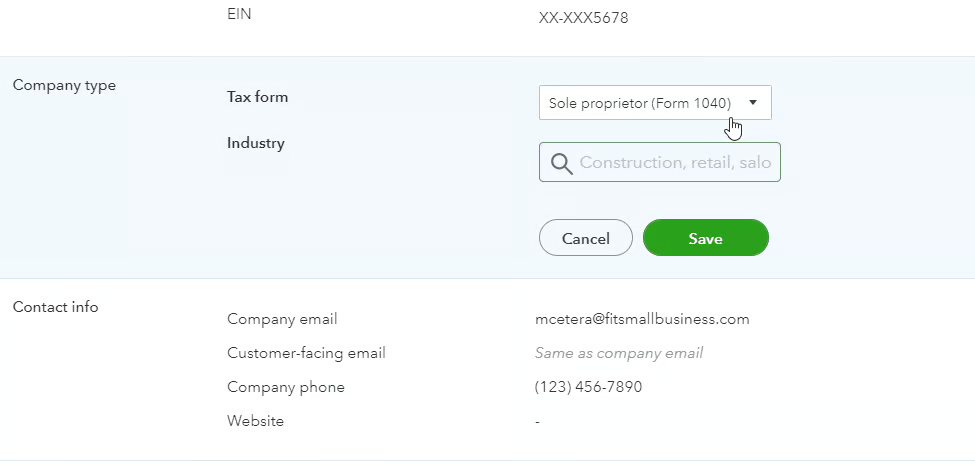
2. Company Type
This section allows you to change your company type in QuickBooks; you can leave the field blank if you’re unsure. I clicked on the drop-down menu next to the Tax form field and selected my taxable entity type.
- Sole proprietor: You’re a sole proprietor if you’re the only one who runs the business. To report income or loss, you should use Schedule C (Form 1040). For this, we have a guide on how to complete Schedule C.
- Business partnership: Choose this business type if you’re carrying out business with two or more partners. Partnerships use Form 1065 to report their business income and loss; read our Form 1065 step-by-step instructions for guidance.
- S Corporation (S-corp): This refers to a corporation that elects to be an S-corp, which passes corporate income, loss, and taxes through to its shareholders and reports on Form 1120S.
- C Corporation (C-corp): A corporation that qualifies as a C-corp is taxed separately from its owners, rather than passing through to owners. C-corps report on Form 1120.
- Nonprofit organization: Nonprofits are tax-exempt corporations that are focused on social causes rather than generating income. They use Form 990 to report their annual activity.
- Limited liability company (LLC): Select this business type if you’re unsure whether to file taxes as a sole proprietor, partnership, or S-corp.
In the Industry field, type your industry name, then QuickBooks will provide suggestions. You can also leave this blank and adjust it later if needed.
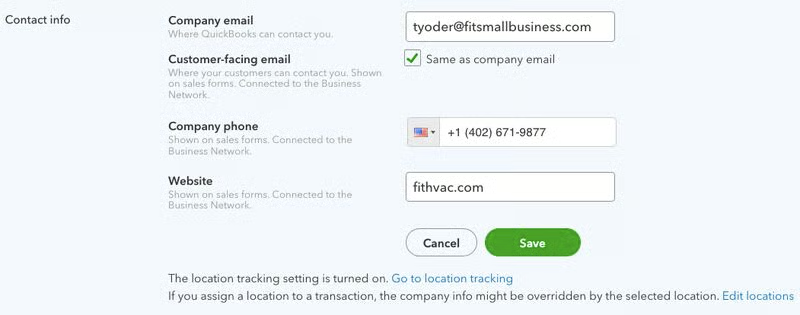
3. Contact Info
This section allowed me to provide contact information for both QuickBooks and my customers.
- Company email: This is the address QuickBooks will use to contact the QuickBooks administrator.
- Customer-facing email: This email will appear on sales forms sent to your customers, such as invoices. If this differs from the QuickBooks administrator’s email address, then uncheck the box and input the correct address.
- Company phone: Enter the phone number that should appear on sales forms sent to customers.
- Website: Indicate the website address to appear on all sales forms.
4. Company Address
This tab provides three separate sections to update your company, customer-facing, and legal address.
- Company address is the physical location of the business and is used for your payments to QuickBooks.
- Customer-facing address appears on invoices and other sales forms and should be the address to which you want customers to mail their payments. If it’s different from your company address, uncheck the box and enter the correct customer-facing address.
- Legal address is used for your tax filings and should match your address on file with the IRS. Again, if this differs from the company address, uncheck the box and input the legal address.

5. Communications With Intuit
The final section let me set my marketing preferences with Intuit, the company behind QuickBooks. If you click on Marketing Preferences, you’ll be taken to Intuit’s website, where you’ll be asked a series of questions regarding the ways Intuit can contact you. By having completed the survey, I was able to opt out of all mail, phone calls, and emails from Intuit.
Frequently Asked Questions (FAQs)
What company information do I need to set up in QuickBooks?
You need to compile and set up important information about your business, such as business name, email, address, website, a digital copy of your company logo, and tax-related information, such as Form 1099 and payroll tax.
Can I make changes to my company information at any time?
Yes, you can make changes by going to Company Information under Account and settings.
Can I update my company's fiscal year in QuickBooks Online?
Yes, you can. It’s illustrated in my tutorial on how to set up advanced settings in QuickBooks Online.
Wrap Up
I just showed you how to change company information in QuickBooks Online, which is the first tutorial in our free Fit Small Business QuickBooks Online Training Course. The next one is how to customize the look and feel of invoices. There, I’ll walk you through how to customize the style and appearance of your invoices, sales receipts, and estimates to give them a more professional look.
QuickBooks TutorialsNext Tutorial →