QuickBooks Online Plus has a built-in basic time tracking tool that allows you to capture billable hours worked by your employees. You can track time spent on one-off or ad hoc tasks using single-time activity timesheets or ongoing or repetitive tasks using weekly timesheets.
In this article, we’ll show you how to use time tracking in QuickBooks Online, including setting up an employee or contractor as a time tracking user so that they can record their own time. We’ll also show you how to bill clients for time tracked.
You cannot track time in QuickBooks Online Simple Start. You’ll need the Essentials, Plus, or Advanced plan.
Step 1: Turn on Time Tracking in QuickBooks Online
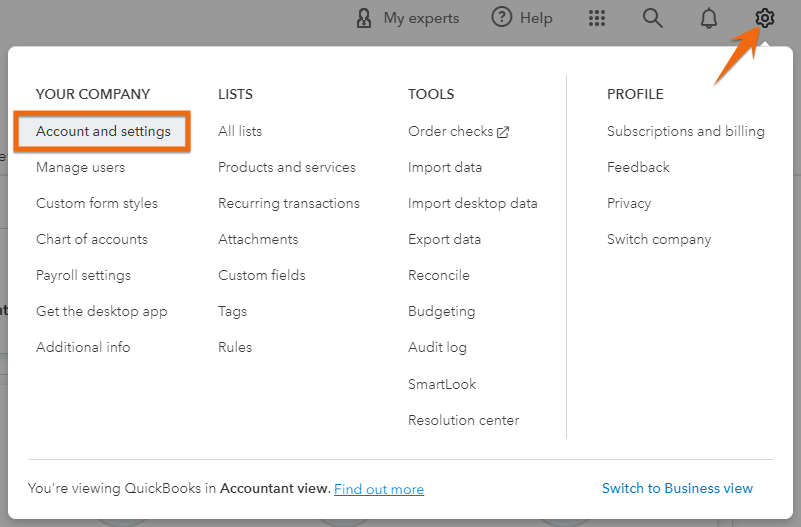
To enable time tracking in QuickBooks Online, click on the cog wheel icon (⚙) in the upper right corner of your dashboard and then select Account and settings, as shown in the image below.
Navigate to Account and settings in QuickBooks Online
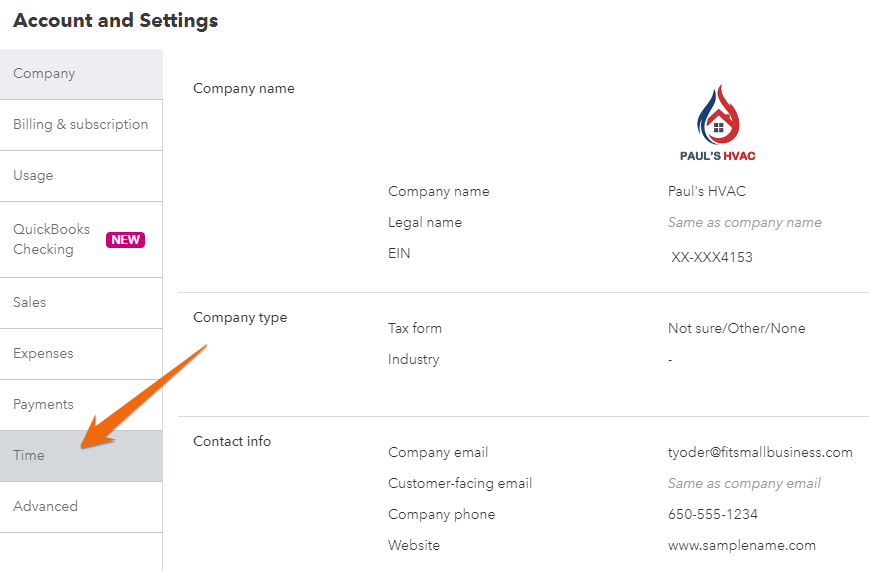
From the Account and Settings page, select Time in the left navigation menu to access the time tracking settings.
Select ‘Time’ from the Account and Settings page
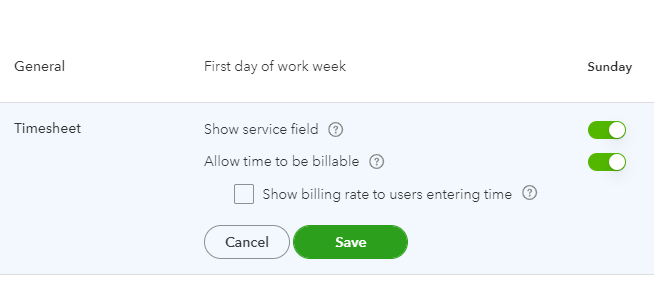
Next, click on the pencil icon in the far right corner, and then adjust your time tracking preferences. You’ll see two preferences in the Time tab:
- General (First day of work week): This allows you to set up the starting day of the workweek of your team. If you select Monday, then all your weekly time reports and calendars in QuickBooks Online will start on Monday.
- Timesheet
- Show service field: When you turn this on, you’ll be able to specify services performed when creating timesheets. We recommend turning this on so that you can specify what service is billed easily and pull the appropriate billable rate automatically.
- Allow time to be billable: This lets you specify whether activities should be billed to the customer and will allow you to add the billable time automatically to customer invoices.
- Showing billing rate to users entering time: When toggled on, the employee entering time will see the rate you bill to your customer. Keep this turned off if you bill your customers at a different hourly rate than you pay your employees or subcontractors.
Once you set up your time tracking preferences, click the Save button.
Setting up time tracking preferences in QuickBooks Online
Step 2: Specify Billable Rates For Service Items
To avoid the need to enter billable rates manually every time you track time, specify them when setting up your service items.
To do this, navigate to the Products and Services screen by clicking on Sales in the left menu bar and then selecting Products and services. Click New, select “Service” as the type, and then set the sales price or rate.
In the screenshot below, we created a service item for ductwork installation and specified a rate of $50.
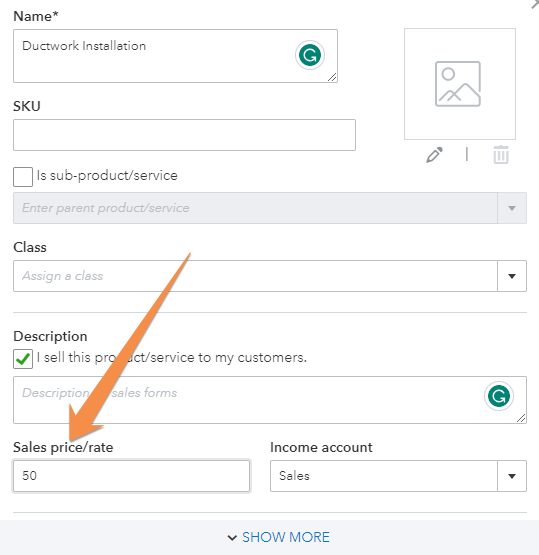
Entering sales price/rate for a service item to be used as a billable rate for time tracking
When an employee records their hours, they can simply select the service from the list and the Billable (/hr) will populate automatically based on the sales price/rate you specified for that service.
Step 3: Add a Time Tracking User
If you want a team member to track their own billable hours, then you can invite them as a time tracking user to your account.
QuickBooks Online allows you to add unlimited time tracking users—and they don’t count toward the total user limit under each plan.
To set up a time tracking user, click on the cog wheel icon and select Manage users, as shown below.
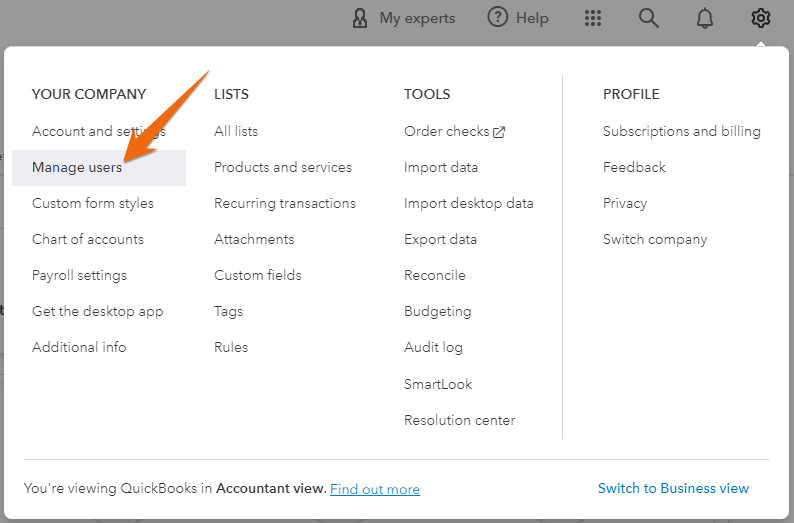
Preparing to add a time tracking user in QuickBooks
In the user setup screen, provide the required details, including the name of the employee or contractor and their email address (in the screenshot below, we added Dan Miller as a time tracking user). Under the Roles section, select Track time only.
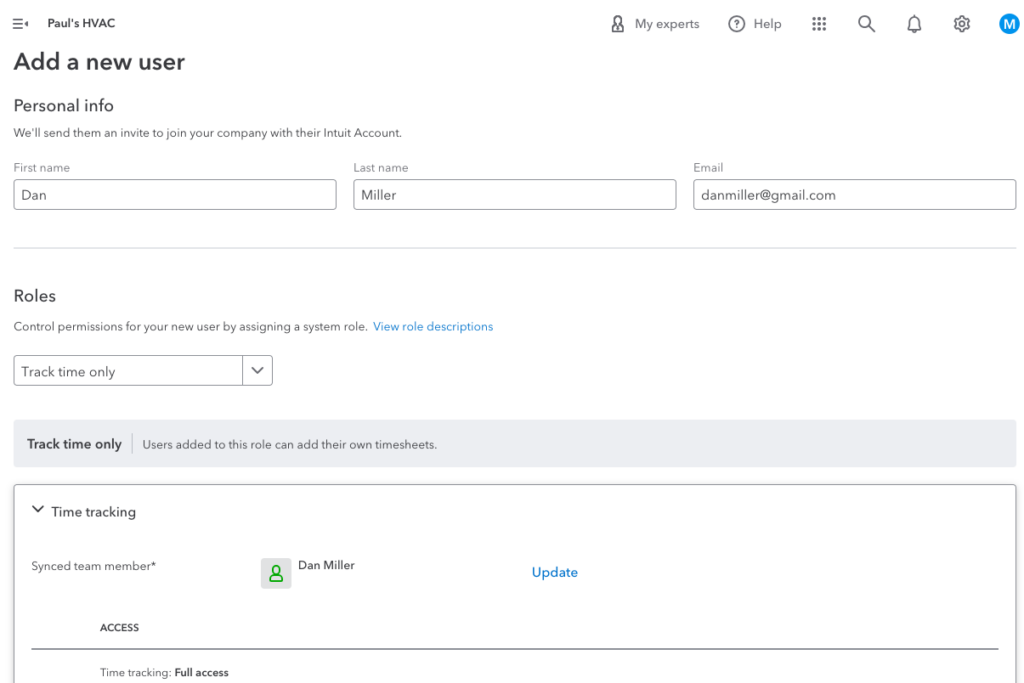
Adding a new time tracking user in QuickBooks
Once you complete the user setup, click the Send invitation button at the lower left side of the screen (not shown in the image above). Once the invitation is sent, that user will receive an email to set up their QuickBooks account.
If the user previously used the email address associated with the invite for any Intuit product, such as QuickBooks or TurboTax, then they must use their existing account credentials to log in.
Step 4: Track Time Using Timesheets
You or your team member can track time in QuickBooks using single-time activity or weekly timesheets. Single-time activity timesheets are used for one-off or ad hoc tasks while weekly timesheets are used by teams that follow a weekly schedule or manage recurring daily tasks.
To access timesheets, click on the +New button in your dashboard and then select Single time activity or weekly timesheet.
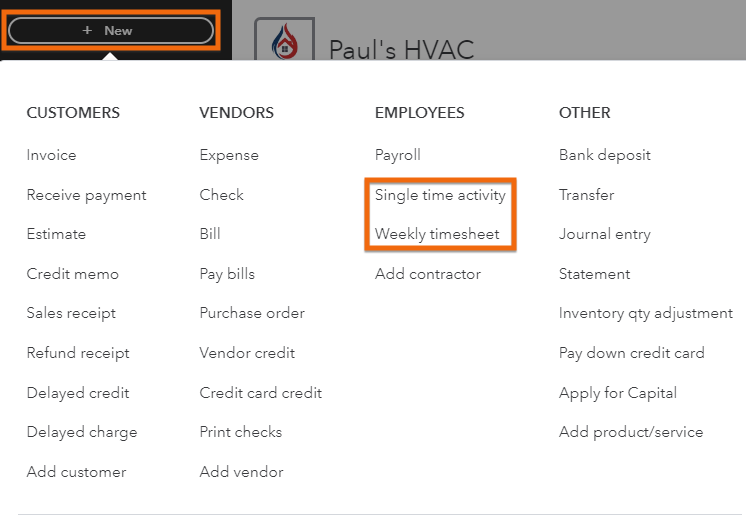
Accessing single-time activity and weekly timesheets in QuickBooks Online
Fill in the details of the single-time activity timesheet.
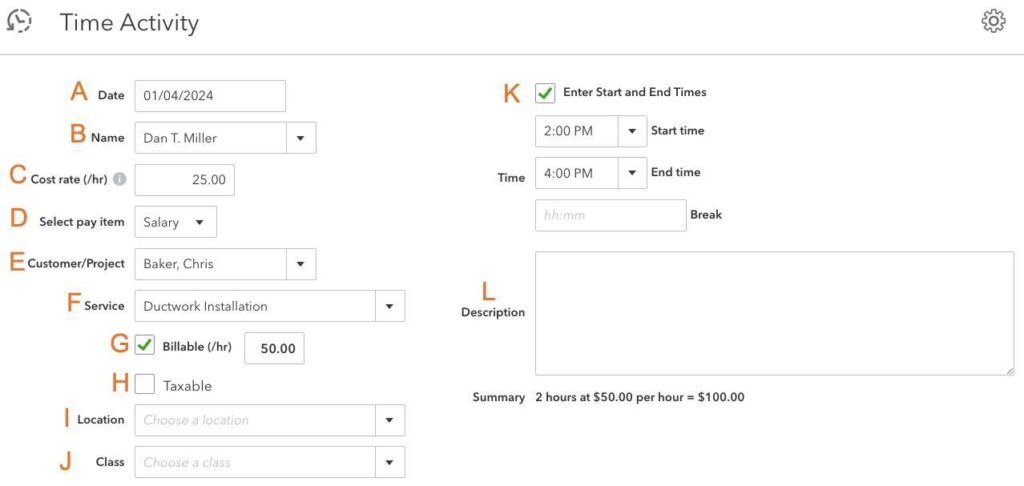
Adding a single-time activity in QuickBooks
- Date: Enter the date on which the activity occurred.
- Name: Select the name of the employee or contractor entering the time. In the example, we are tracking time for an employee named Dan Miller.
- Cost rate (/hr): This rate may be the hourly wage or the cost to the company for that individual’s time. It’s optional if you’re running payroll out of QuickBooks unless you need it for internal tracking purposes (e.g., tracking labor costs). However, if you run payroll in QuickBooks, this field will automatically populate based on the employee’s information.
- Select pay item: Choose the pay item associated with the activity (e.g., salary, vacation pay, or sick pay).
- Customer/Project: Choose the customer to whom the service is performed or the project related to the activity. In our screenshot, we are tracking time for a customer named Chris Baker.
- Service: Select the type of service or task performed (e.g., ductwork installation).
- Billable (/hr): This field will automatically populate based on the billable rate specified when you set up your service item, as discussed in Step 2. However, it can be changed here if needed.
- Taxable: Indicate whether the service is taxable.
- Location: If applicable, select the location where the service took place. This might be relevant for businesses with multiple service locations
- Class: Choose the class associated with the activity. Classes are often used for tracking different types of work or projects within an organization.
- Enter Start and End Times: Specify what time the task or service started and ended. This provides a duration for the time spent on the task. When you untick the box, you’ll be prompted to manually enter the duration of the task.
- Description: You may add details about the specific task or service performed.
Once done, click Save or Save and new (not shown in the image above) to create the single activity timesheet.
The weekly timesheet allows you or your employee to record billable hours for multiple customers and services performed. You’ll see separate line entries for each customer with specified billing rates and recorded time spent entries.
To complete the weekly timesheet, you need to provide important details.
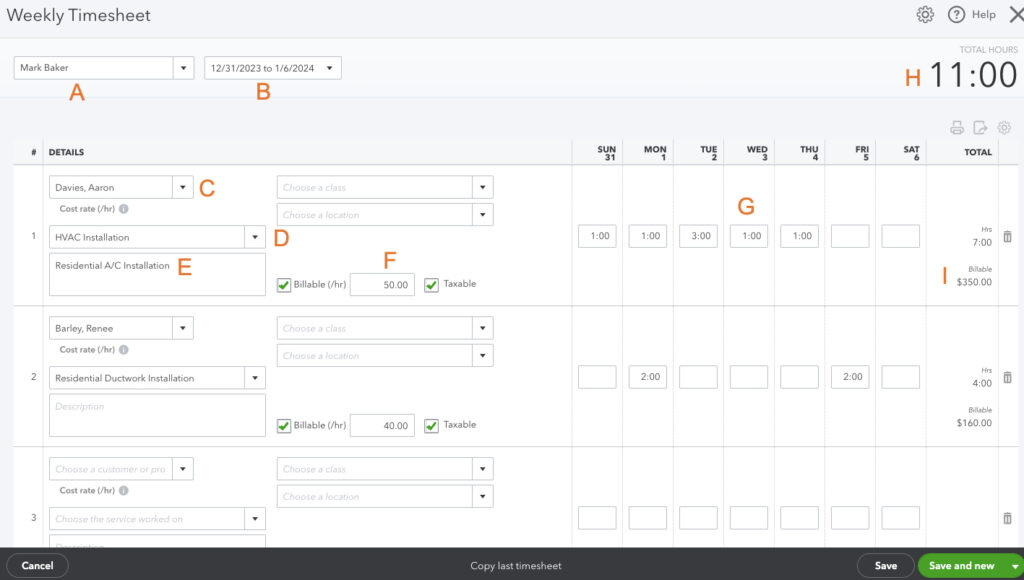
Adding a single-time activity in QuickBooks
- Whose time you are tracking: Indicate the name of the employee or contractor whose time is being tracked. In our example below, we are tracking time for Mark Baker.
- Tracking period: Specify the time frame for which you are tracking hours. This includes the start and end dates of the week.
Customer or project: Select the customer or project associated with the work. The image above shows that we are tracking time for a customer named Aaron Davies. - Service: Select the specific service or task performed (e.g., A/C installation).
- Description: Add details about the task or service.
- Billable rate: Just like with the single-time entry timesheet, this field automatically populates based on the rate you entered when setting up the service item.
- Time spent: Specify the duration or hours spent on each activity for each day.
- Total hours: This section sums up the total hours worked by the employee or contractor. This is based on the time entries recorded for each day during that week.
- Total billable: This shows the calculated total billable rates for all the services included in the timesheet. It’s based on the number of hours worked (item G) and the specified billable rate for the service item (item F).
Once you complete and verify that all information is correct, click Save or Save and new.
Step 5: Bill Clients for Time Tracked
If you’re ready to bill your clients for the time tracked, then click on +New and then select Invoice.
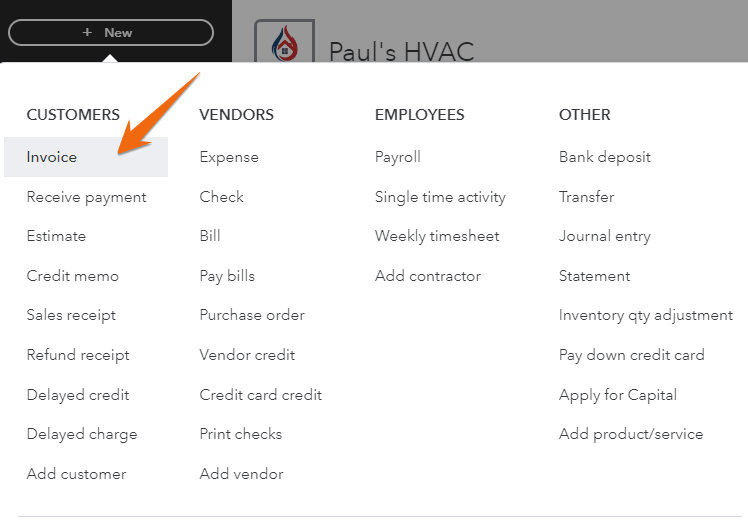
Preparing to create an invoice to bill a client for time tracked
In the Invoicing screen, select the customer you’re billing, and on the right-hand side of the screen, you’ll see a list of the billable hours that you’ve worked for that customer.
If the billable time is not showing up, then return to the time entry and ensure you checked the box for “billable” and included the correct customer name.
In the screenshot below, we can see the billable time entry we recorded for Chris Baker related to the ductwork installation. Select Add to include the billable time to the invoice, review and adjust the details as needed, and then click Save or Save and send.
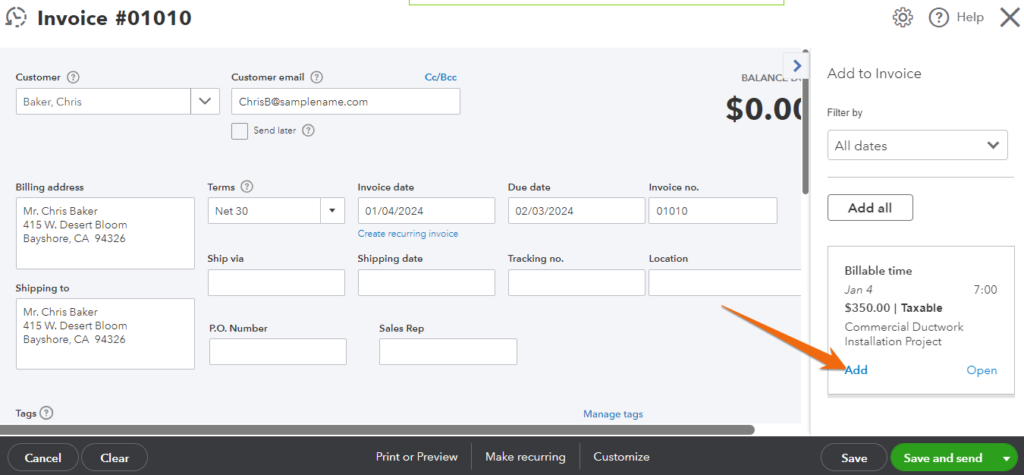
Adding a billable time to an invoice
If you need detailed invoicing instructions, head to our tutorial on how to create and send invoices in QuickBooks Online.
Step 6: Run Reports
To ensure all billable hours are billed to customers, you can run time tracking reports. Click on Reports in the left menu bar, and in the Reports screen, enter “time” in the search bar. You’ll see four suggested reports.
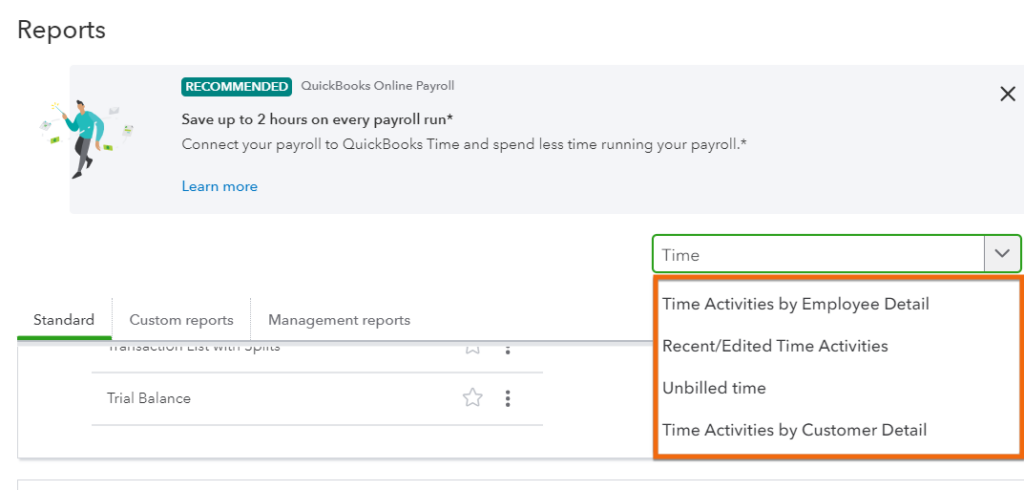
Time-related reports in QuickBooks Online
- Time Activities by Employee Detail: This report provides a detailed breakdown of time activities logged by each employee.
- Recent/Edited Time Activities: This shows the list of time entries that have been recently created or modified, allowing you to see the most recent time-related activities.
- Unbilled Time: This report helps identify time entries that have not yet been included in an invoice.
- Time Activities by Customer Detail: This report provides a detailed breakdown of time activities based on customers.
Access More Time Tracking Features With QuickBooks Time
If you need enhanced time tracking features, such as the ability to clock in and out for employees, create schedules by shift, job, or task, manage multiple timesheets, and track time on the go, you will need to purchase QuickBooks Time (formerly known as TSheets). It’s time tracking software that integrates directly with your QuickBooks Online account.
For more information about the program, read our detailed review of QuickBooks Time. If you need a step-by-step guide on how to set up your account and use its time tracking features, then you’ll appreciate our guide on how to use QuickBooks Time.
Frequently Asked Questions (FAQs)
No, as QuickBooks Online Essentials and higher plans include basic time tracking features. However, you’ll have to get QuickBooks Time if you have advanced time tracking requirements, like job and shift scheduling, time-off management, and geofencing.
Yes, you can designate time entries as billable or nonbillable when entering time in QuickBooks Online.
No, the QuickBooks Online mobile app doesn’t let you track time. You need to purchase QuickBooks Time, which gives you access to the QuickBooks Workforce (formerly QuickBooks Time) mobile app.
Wrap Up
You’ve just learned how to use basic time tracking in QuickBooks Online using single-activity and weekly timesheets. While QuickBooks’ timesheets are enough for simple time tracking, consider getting QuickBooks Time for more enhanced features.
For more free resources on learning QuickBooks, check out our QuickBooks Online training courses.
