


In this tutorial, you’ll learn how to set up and customize sales form content and preferences that will flow to invoices, estimates, and sales receipts in QuickBooks Online. Customizing your sales forms in QuickBooks lets you create professional-looking invoices and receipts that reflect your brand and provide all the necessary information for your customer.
Prepare the following information to complete the setup of your sales form content.
- Payment terms: Decide how long you want to give customers to pay their invoices. Common payment terms are Net 10 or Net 30, which provide 10 or 30 days, respectively, to pay. For more information, read our article on common invoice payment terms and tips on setting them.
- Discount: Some companies offer an early payment discount for customers who pay within a certain number of days. We prepared a guide on using early payment discounts to help you use them strategically.
- Invoice delivery method: Determine whether you want the default delivery method to be printed invoices or emailed invoices.
- Track inventory: If you purchase goods for resale, you should use QuickBooks Online to track the cost and quantity of your inventory.
- Late fees: If you wish to charge a fee for late payments, decide when you want to apply the late fee and how to calculate the late fee.
- Progress invoicing: Determine if you need the capability to issue progress invoices for jobs that are in progress. Contractors often perform progress billing.
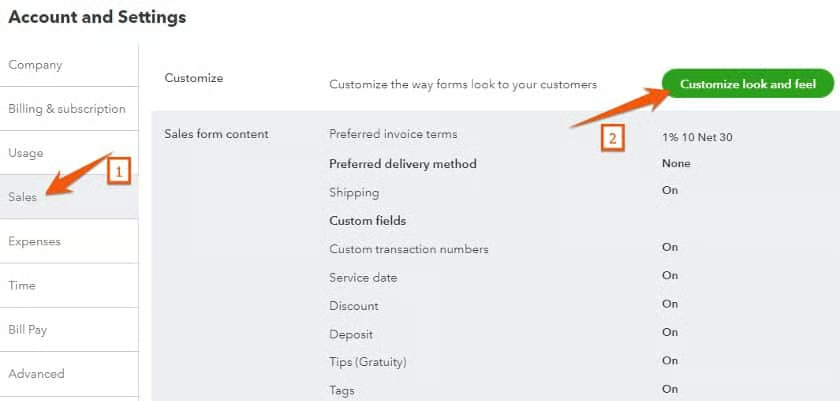
Click on the cogwheel in the upper right corner of the screen and then select Account and settings in the first column.
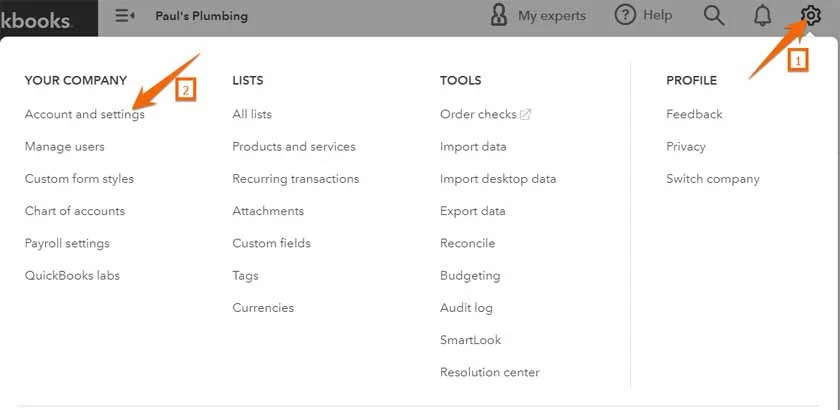
Next, click Sales on the left menu bar to view the sales options.
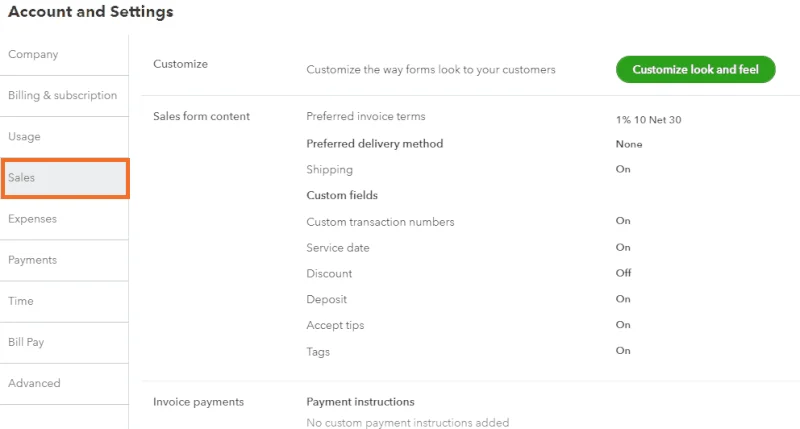
This will cover the following options under the Sales tab: Sales form content, Late fees, Progress Invoicing, Reminders, and Online delivery.
The options under Customize (not highlighted in the GIF in Step 2) are covered in our guide on how to customize invoices in QuickBooks Online, which should be completed before this tutorial as we will build on the sales forms you start there.
The sales form content options allow you to specify which fields will be available within QuickBooks when you generate a customer sales form. Whether these fields are displayed on the customer’s copy of a sales form is determined when you design your custom sales form template, which we will discuss later in this tutorial.
Click anywhere on Sales form content to open additional details.
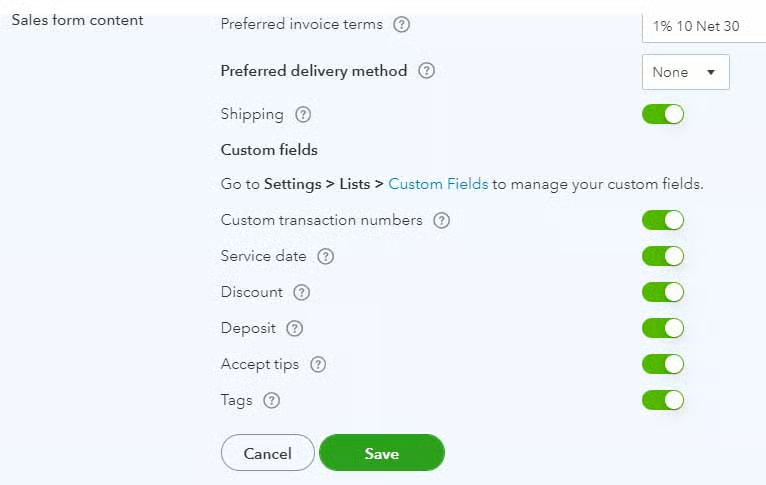
Fields can be turned on and off by clicking on the checkbox next to the name of the field.
- Preferred invoice terms: Select your preferred invoice terms, such as Net 10 or Net 30. If your payment term is Net 30, the customer has 30 days from the invoice date to make payment.
- Preferred delivery method: You can choose either email or print as the default delivery method for your invoices. The delivery method is assigned customer by customer, so the default chosen here will be assigned to newly created customers. The method can be changed for a particular customer by editing the customer information.
- Shipping: If shipping is turned on, then fields for shipping address, carrier, shipping date, and tracking number will be available to add to sales form templates.
- Custom Fields: Set up custom fields when you need to track additional information that is excluded from the default fields. For instance, legal firms may add a custom field for matter or case number to their sales forms. You can create up to three custom fields on invoices, estimates, sales receipts, credit memos, and refund receipts.
- Custom transaction numbers: Custom transaction numbers allow you to change the invoice, estimate, or sales receipt number assigned automatically by QuickBooks. This might be helpful if you want to match QuickBooks transaction numbers to numbers from a separate workflow system so that transactions can be traced easily across systems.
- Service date: Including a service date allows you to show the customer the exact date a service was performed, which will often be different than the invoice date. You can include multiple service dates on a single invoice. This is an important option for service-based businesses so that repeat customers can track which service call is being billed.
- Discount: If you offer customers payment terms with a discount for early payments, such as “1% 10 Net 30,” then it’s best to include a discount field on the sales form so that customers know the exact amount of the discount.
- Deposit: The deposit field allows you to subtract a customer’s deposit, or prepayment, from the amount due on the sales form. This is an important field to include on sales forms if you have customers that prepay for services or materials.
- Tips: The tips field provides your customers with the ability to add a gratuity to your invoice. We recommend only including this field if you are in an industry where customers traditionally are expected to tip. Otherwise, customers could be irritated with a request to tip your employees.
When you’re finished selecting the fields to make available for creating sales forms, click on the green Save button at the bottom of the Sales form content options. Next, we’ll set your company’s option for assessing late fees.
If you wish to add late fees automatically to invoices that are overdue, click on the Late fees section and toggle Default charge applied to overdue invoices on to display the options available for late fees:
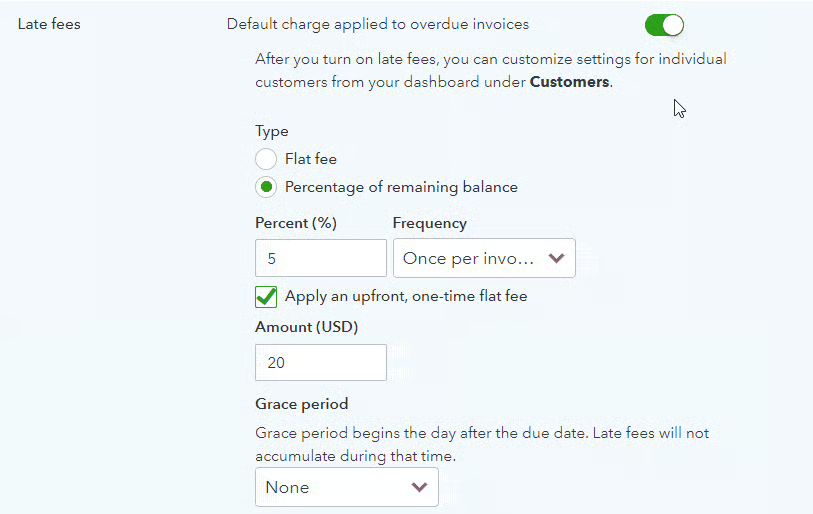
These options determine the company-wide default for adding late fees to invoices. You can adjust the late fee options for particular customers within the customer information screen.
- Type: Late fees can either be a flat amount, a percentage of the unpaid balance, or a one-time flat fee followed by a percentage.
- Grace period: Unless you specify a grace period, the late fee will apply based on your specified invoice terms. If you set the invoice term to “Due upon receipt,” be sure to specify a grace period so that a late fee isn’t assessed on every invoice.
- Apply sales tax: Some states may require that you apply sales tax to late fees if the late fee is assessed on a taxable item. You may need to check with a local tax professional to determine the sales tax requirements for your location.
When you are done setting your late fee options, click the green Save button at the bottom of the late fee section. A late fee should now automatically be assessed when you reprint or resend an invoice that is overdue.
Construction companies often send multiple invoices for a single job as the work is completed. This is known as progress invoicing, and QuickBooks Online makes progress invoicing easy by allowing you to create an invoice for only a portion of an estimate. The unbilled estimate can be converted to an invoice later when more work has been completed.
Toggle Create multiple partial invoices from a single estimate on if you want to activate this feature. Then, click Save.

You have now specified which fields are available internally when you create a sales form within QuickBooks Online. Next, we’ll discuss how to set up reminder emails to be sent to customers to alert them of overdue payments.
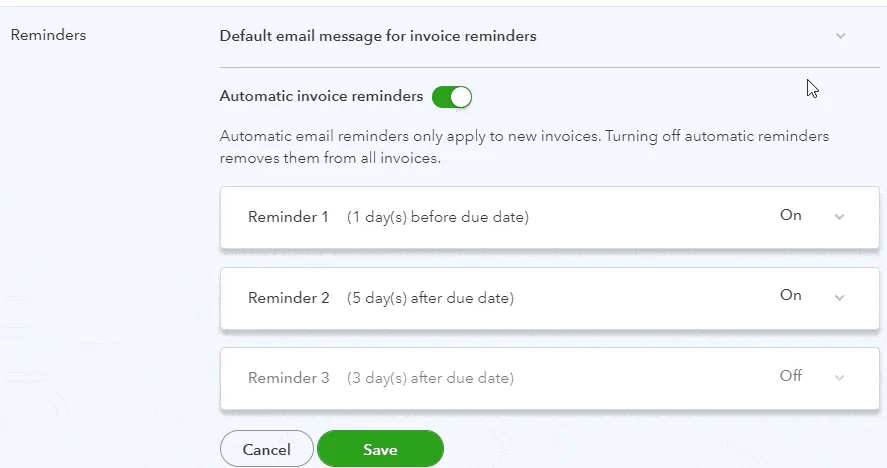
QuickBooks Online will send reminder emails automatically to customers with overdue invoices. To set your automatic reminders options, click anywhere on the Reminders section. Click on Default email message for invoice reminders to reveal additional options.
You can set the following options:
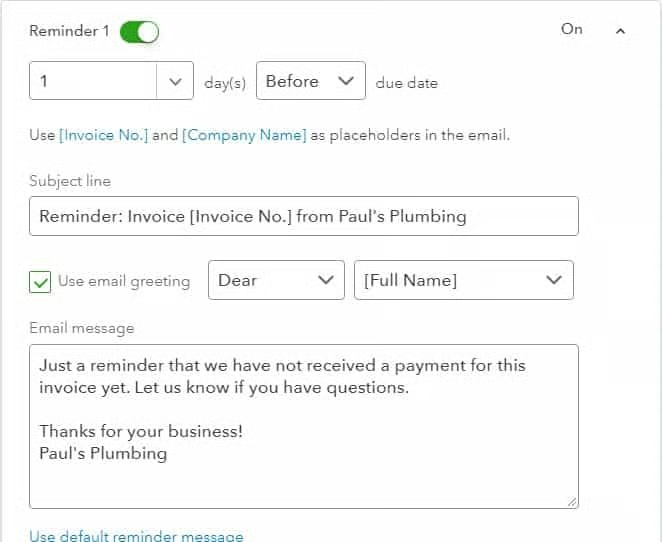
- Create email template: You can create a template for your reminder emails, including the subject line, greeting, and text of the message. Unfortunately, you cannot create a separate email template for each reminder. In the above example, customers will receive the same email both one day prior and five days after the due date.
- Send a copy: Check the box to have a copy of every reminder email to be sent to the QuickBooks Online administrator.
- Activate reminders: Flip the switch to green to activate automatic invoice reminders.
- Specify reminders: QuickBooks allows up to three reminder emails. Click on the drop-down arrow for each reminder to specify the day to send the reminder and to create a custom email message for that reminder.
Hit the green Save button at the bottom of the section when you are satisfied with your reminder settings and email. Click on the reminder section to create your customized email reminder, as shown in the image below.
Click anywhere on the Online delivery section to reveal the last few company sales form options.
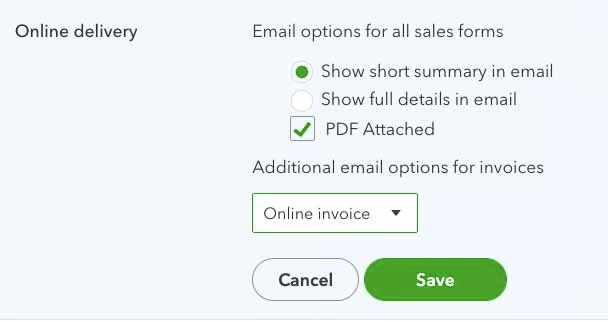
Select whether you want a summary or the full detail of the sales form included in the body of the email. You can also attach a PDF copy of the sales form. I recommend including only a summary in the email and then attaching a PDF that customers can view to see details.
The final option applies only to invoices and allows you to format the emailed invoice as an Online invoice, HTML, or Plain text. I recommend keeping this option set to Online invoice.
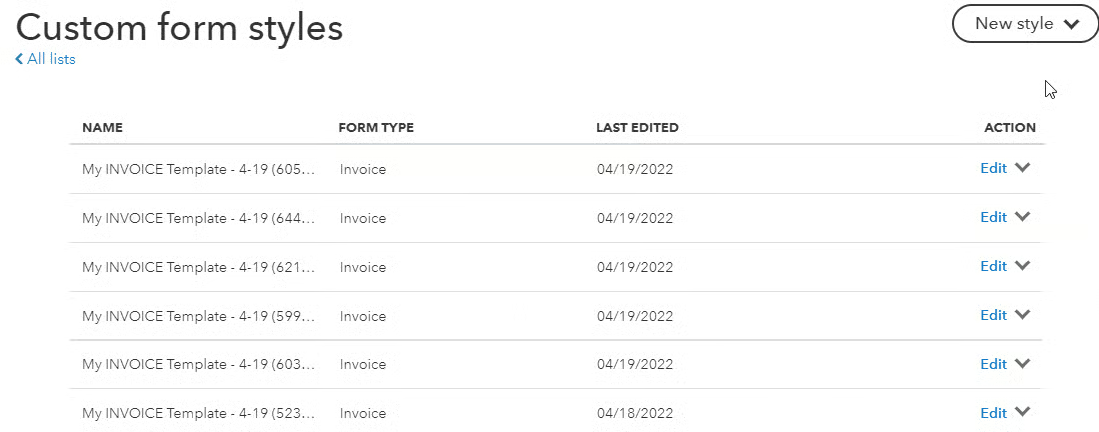
You designed a customized invoice in our prior tutorial on how to customize invoices in QuickBooks Online. We’ll now discuss how to select which sales content fields to include on your customized invoice. To view your available sales form templates, navigate to the Sales tab of the Account and Settings screen, and click the green Customize look and feel button in the top right corner.
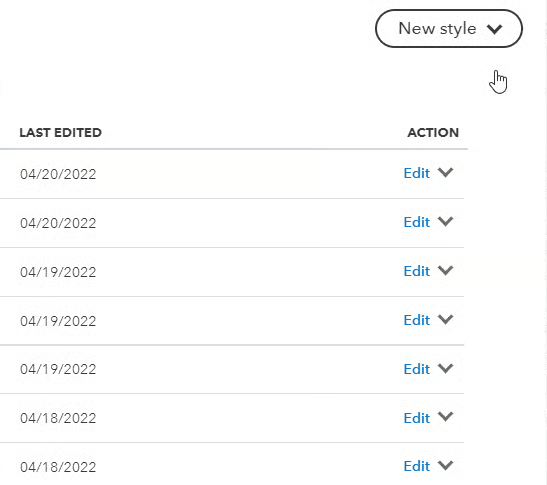
The Custom form styles screen should display the custom invoice you created in the prior tutorial. Click Edit to the right of the customized form you wish to choose. If you prefer, you can create a new invoice template by clicking on New style in the upper right corner and then selecting Invoice.
The screen to create a customized invoice contains three tabs: Design, Emails, and Content.
The Design tab allows you to customize the style, logo, color, and font of your invoice and was covered in our tutorial on how to customize invoices in QuickBooks Online. The Emails tab is also discussed in a separate tutorial, which is how to set up messages in QuickBooks Online. The remainder of this tutorial focuses on the options available in the Content tab.
When you click on the Content tab, you’ll be given a grayed-out preview of your invoice split into three sections. To edit the information displayed in each section, click the pencil icon in the upper-right corner of that section.
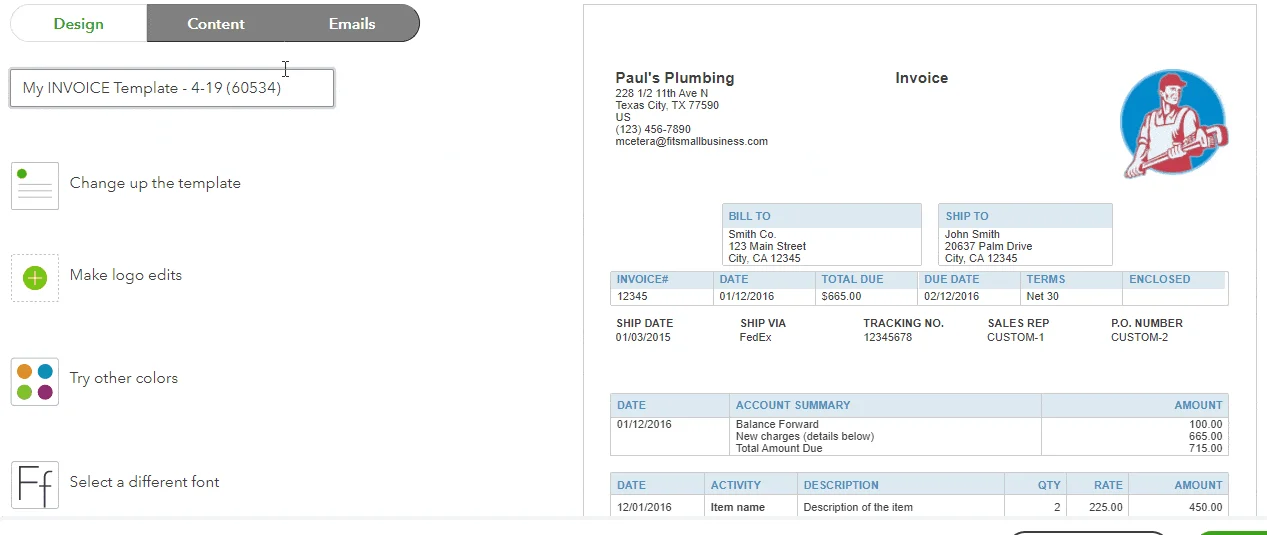
Let’s review the information that is available in each of the three sections of your QuickBooks invoice.
Step 4.1: Select the Information to Appear in the Header Section of Your Invoice
Click on the pencil icon in the upper right corner of the header section to view the information that can be shown in this section.
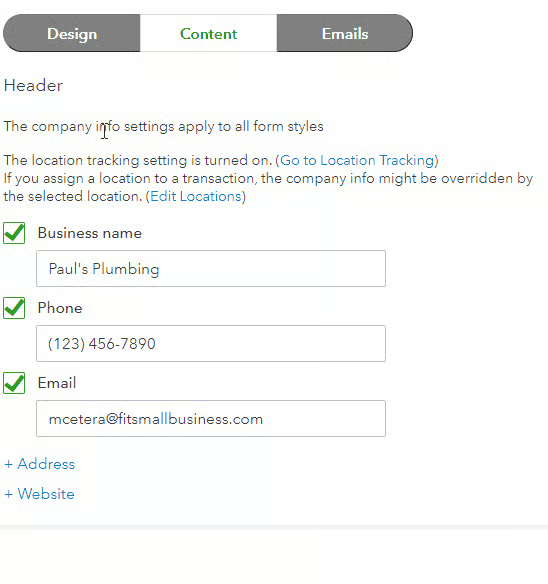
Place a checkmark next to any fields you would like to appear in the header of your invoice. The blue fields can be expanded by clicking on the “+” in front of the words. Any changes you make to the default information pulled from your company setup, such as providing a different phone number, will only affect this particular invoice template and not other areas of QuickBooks Online. All changes are reflected in the preview of the invoice on the right half of the screen.
Most of the fields are straightforward, but here are a few that need a little explanation.
- Form names: You can specify a custom name to appear at the top of your form instead of “Invoice.” This is helpful if your industry traditionally has a different name for bills sent to customers. Don’t use this field to change the purpose of the form. For instance, don’t revise it to “Estimate” because when the form is generated, QuickBooks will record the form as an invoice automatically.
- Form numbers: Check this box to print the invoice number on the form, which I highly recommend. Many customers, especially businesses, appreciate the invoice number to keep track of multiple outstanding invoices.
- Use custom transaction numbers: This box allows you to input a custom transaction number―not generated by QuickBooks―at the time you generate an invoice. This is helpful if you are using a workflow system outside of QuickBooks and would like to be able to trace a QuickBooks invoice to a transaction in the other system.
- Billing address: The billing address is required to be displayed on the QuickBooks invoice and is pulled from the customer information screen.
- Shipping: By checking Shipping, the shipping address, ship date, carrier, and the tracking number will all be included on the invoice. If only certain invoices require this information, I recommend customizing two invoice templates. You can choose which template to apply when generating a customer invoice.
- Terms: The terms set in the customer information screen will display on your invoice. This is an absolute must if you are offering terms with a discount. For instance, “2% 10 Net 30” means you offer a 2% discount if paid within 10 days and all payments are due in 30 days. If there is no discount offered, then showing the payment terms is unnecessary if the due date is shown.
- Due date: The due date is not needed if the payment terms are shown, but you can choose to show both if you prefer. If your customers are individuals rather than businesses, you might want to include the due date since they may not be familiar with payment terms.
- Custom fields: You can choose to display three custom fields on your invoice.
Now that you’ve selected the information to appear in the header, let’s look at the information available for the middle section of the invoice.
Step 4.2: Select the Information to Appear in the Table Section of Your Invoice
Click on the pencil icon in the upper right corner of the middle section of your invoice preview to display the fields and options available for your invoice table. You can customize the columns that will appear in the invoice table. Place a green checkmark next to any field you would like to appear on your invoice.
The order of the columns can be changed by clicking and dragging on the series of nine dots to the left of the green checkmark. The columns can be further customized by clicking Edit Labels and Widths:
The column widths can be adjusted with the blue sliders. QuickBooks keeps the table the same width automatically, so increasing the width of one column will decrease the width of another column.
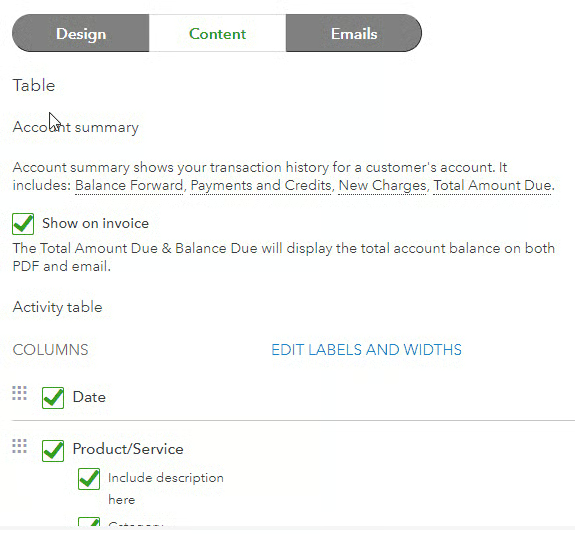
Click on the box next to Show on invoice under the Account summary heading to include a miniature statement on the customer’s invoice. We highly recommend including this summary statement on your invoice so that customers know the total amount they owe if they have more than one unpaid invoice.
The default for the activity column of the invoice is to show only the name of the item being billed. This could be the name of the inventory item or service item. You can choose to show more activity detail by clicking on Show more activity options under the column options:

You can group activity by day, week, month, or item. If the invoice is for a service that was provided over a period of days or weeks, the invoice can be shortened greatly by grouping the activity by days or weeks.
Step 4.3: Select the Information to Appear in the Footer Section of Your Invoice
Click on the pencil icon or anywhere on the lowest section of the invoice preview to select the content to be included in the footer of your invoice.
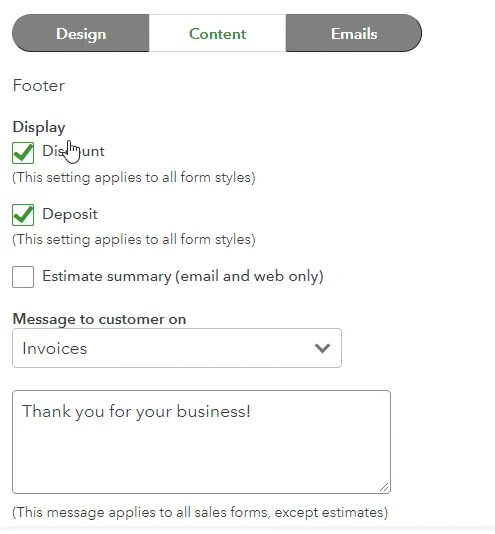
Place a checkmark next to any of the fields you would like to include in your footer.
- Discount: If you offer payment terms that include a discount for early payments, then include this field so that customers know the exact amount of the discount.
- Deposit: If your customers often prepay a portion of their invoice, you should include the deposit field so that they can easily see the unpaid balance they owe.
- Estimate summary: If an invoice is generated from an estimate, you can provide a summary of that estimate in the emailed invoice.
- Message to customer on: You can enter a standard message to your customers that will appear on all invoices. You’ll also be able to enter personal messages to customers when you generate their invoices.
- Add footer text: Footer text is often used to add information about late fees or other contract terms the customer should know.
When you have selected all the content for your customized invoice, click the Preview PDF button in the bottom right corner of the screen. When you are satisfied with your invoice, close the PDF and click the green Done button in the lower right corner of the screen. This will return you to the custom form styles screen with a list of your customized forms.
As our over best small business accounting software, QuickBooks Online provides great invoicing flexibility by allowing you to create multiple customized templates. For instance, you may want one invoice template for customers being billed for services and another for customers being sold merchandise. Alternatively, you might want one invoice template for business customers and another for individuals.
Create Custom Estimates and Sales Receipts
In addition to invoices, sales forms include estimates and sales receipts. From the custom forms style screen, select New style and then either Estimate or Sales receipt.
After creating a new estimate or sales receipt template, you’ll find the familiar three tabs for Design, Content, and Emails. The process for creating custom estimates and sales receipts is nearly identical to customizing invoices. As with invoices, you can create as many custom templates for estimates and sales receipts as you desire.
Frequently Asked Questions (FAQs)
Why is setting sales form content in QuickBooks Online important?
Setting up your sales form content and preferences allows you to add and remove information quickly to create multiple sales form templates for different purposes. It’s crucial you provide customers with information concerning the due date of their payment and relevant details of their purchase.
Can I add custom fields to my sales forms in QuickBooks?
Yes, you can add custom fields to your sales forms to capture additional information that is specific to your business.
Wrap Up
You can now create custom invoices, estimates, and sales receipts in QuickBooks Online. The next guide in our QuickBooks Online training course is how to set up products and services in QuickBooks Online. It will cover a few of the options that are available for billing services to customers and tracking inventory.