


Our guide covers how to record credit card sales in QuickBooks Online using a third-party credit card processor. We’ll explain how to record the sale as a payment for an outstanding invoice or as a sales receipt if no invoice has been issued.
Step 1: Record Receipt of the Credit Card Payment
In QuickBooks Online, customer payments can be recorded in two ways: as payments on outstanding invoices or as sales receipts if an invoice was never issued. These options were tackled separately in detail in our guides on how to receive payments in QuickBooks Online and how to create and send QuickBooks Online sales receipts.
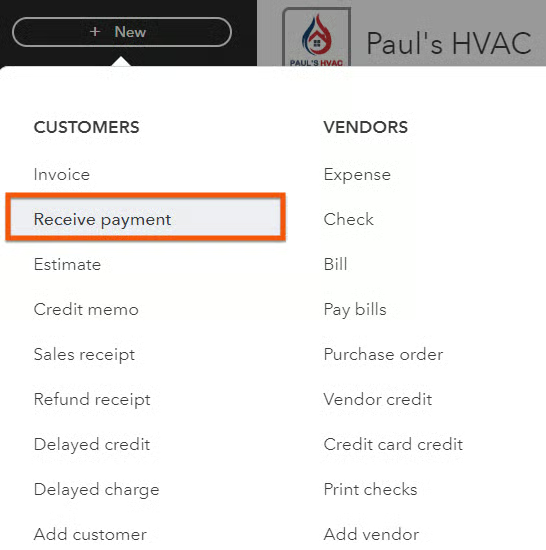
To record a credit card payment on an outstanding invoice, open the “Receive payment” screen by clicking + New above the left menu bar and then selecting Receive payment in the first column, Customers, as shown below.
QuickBooks will take you to the “Receive payment” screen, where you can record the credit card payment on an outstanding invoice. Complete the screen by adding the necessary information.
To help you better understand how to record customer credit card payments in QuickBooks using the “Receive payment” screen, let’s follow a sample scenario. Let’s say customer Aaron E. Berhanu made a payment for an issued invoice on an A/C repair service worth $120.
Here’s how the screen is completed based on the sample scenario:
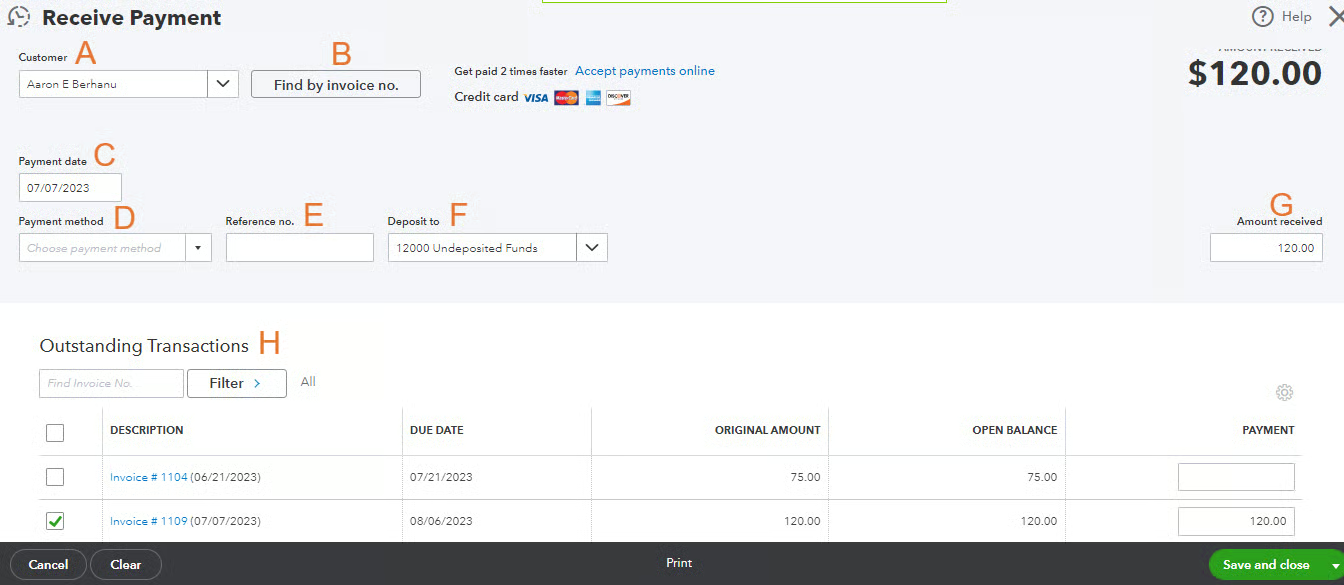
A. Customer: Select the customer for whom you are recording the payment. You can search for an existing customer from the drop-down list or create a new one if needed by clicking on the + Add New from the drop-down menu. Following our sample scenario, we selected Aaron E. Berhanu from the list.
B. Find by invoice no.: This is where you can quickly locate a specific invoice using its number.
C. Payment date: Indicate the date you charged your customer’s credit card.
D. Payment method: Choose the customer’s credit card payment processor.
E. Reference no.: Enter the transaction number assigned by your credit card processor so that this transaction can be traced from QuickBooks to your processing account in the future (if needed).
F. Deposit to: Ensure the credit card payment is initially deposited to your Undeposited Funds account and not directly to your bank account.
G. Amount received: This will automatically populate based on the invoice or invoices you select in item H.
H. Outstanding Transactions: This is a list of open or outstanding transactions for the selected customer. Check the invoice that the payment applies to, and the payment amount will be automatically allocated against that invoice. You can see here that we checked the $120 outstanding invoice for the A/C repair service.
If you haven’t already issued this customer an invoice, you’ll want to create a sales receipt instead of recording a payment received. To create a sales receipt, click + New at the top of the left menu bar and then click Sales receipt under the Customers column.
The “Sales Receipt” screen requires the same essential information needed to complete the “Receive Payment” screen, such as the customer and payment method. You will need to complete the item fields in the middle part of the screen, including the service date, product purchased or service completed, and the amount. In the GIF below, we selected A/C repair in the Product/Service column.
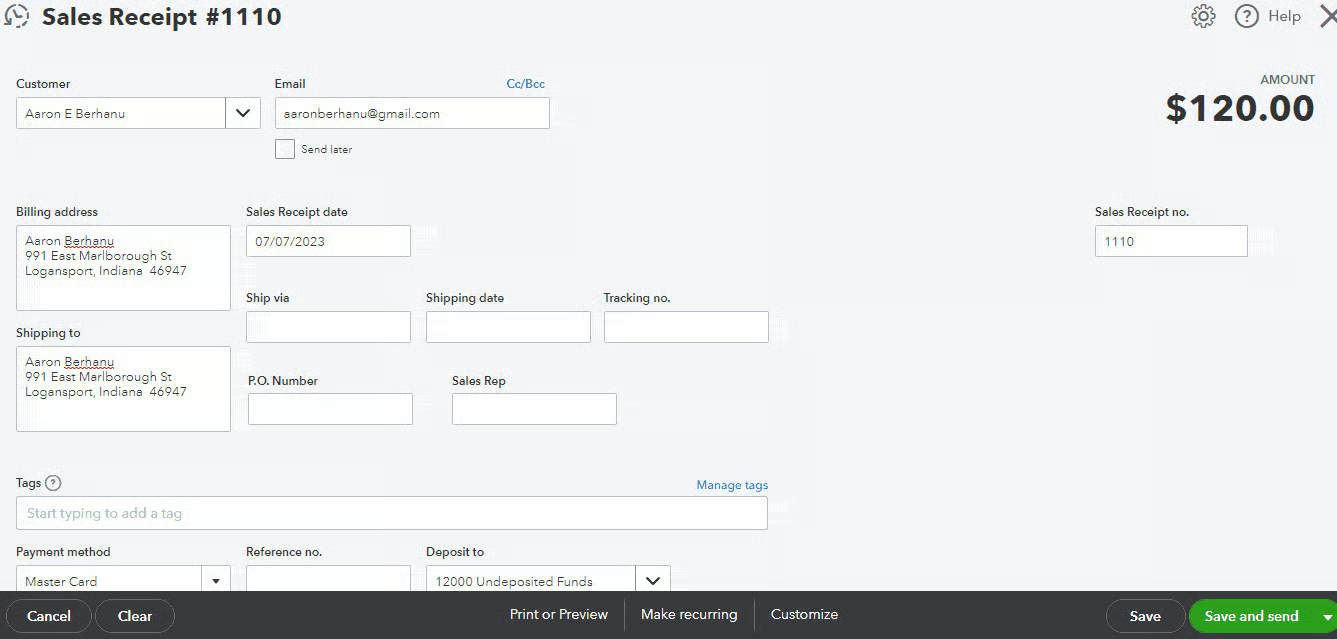
Click the Save or Save and send button when you have entered all the necessary information.
Step 2: Record Deposits & Fees From Your Credit Card Processor
Most credit card processors will group multiple charges into a single deposit in your checking account. After your credit card processor transfers the funds to your bank account, you need to mirror the deposit by transferring the same credit card charges from Undeposited Funds to your bank account.
Start the transfer from Undeposited Funds by clicking on the + New button at the top of the left menu bar and then selecting Bank Deposit in the far-right column. This will open up the Bank Deposit screen, which prompts you to complete important fields.
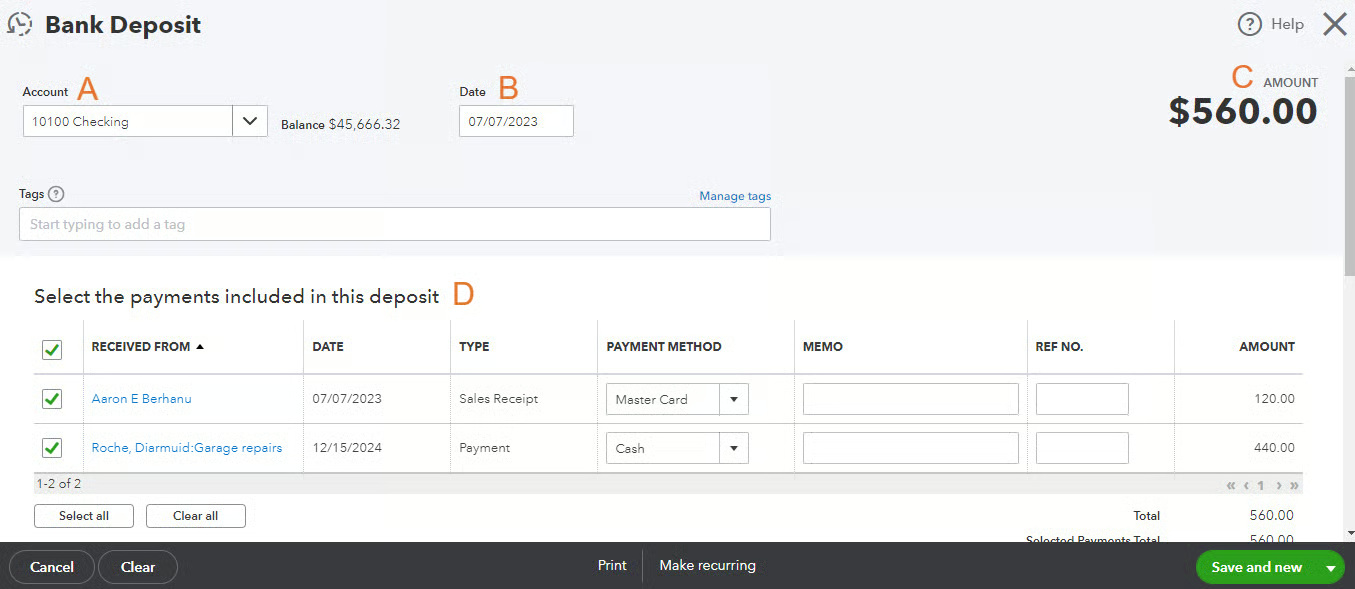
Complete the Bank Deposit form with the required information.
A. Account: Click the drop-down box and select the checking account where the credit card processor deposited your funds.
B. Date: Enter the date your credit card processor deposited the funds.
C. Amount: Verify that the total amount of the deposit matches the deposit on your credit card processor.
D. Payments included: Select the credit card payments your processor included in the current deposit. Not all payments charged on the same day will be deposited into your checking account on the same day.
Scroll toward the bottom of the Bank Deposit form to complete the “Add funds to this deposit’” section.
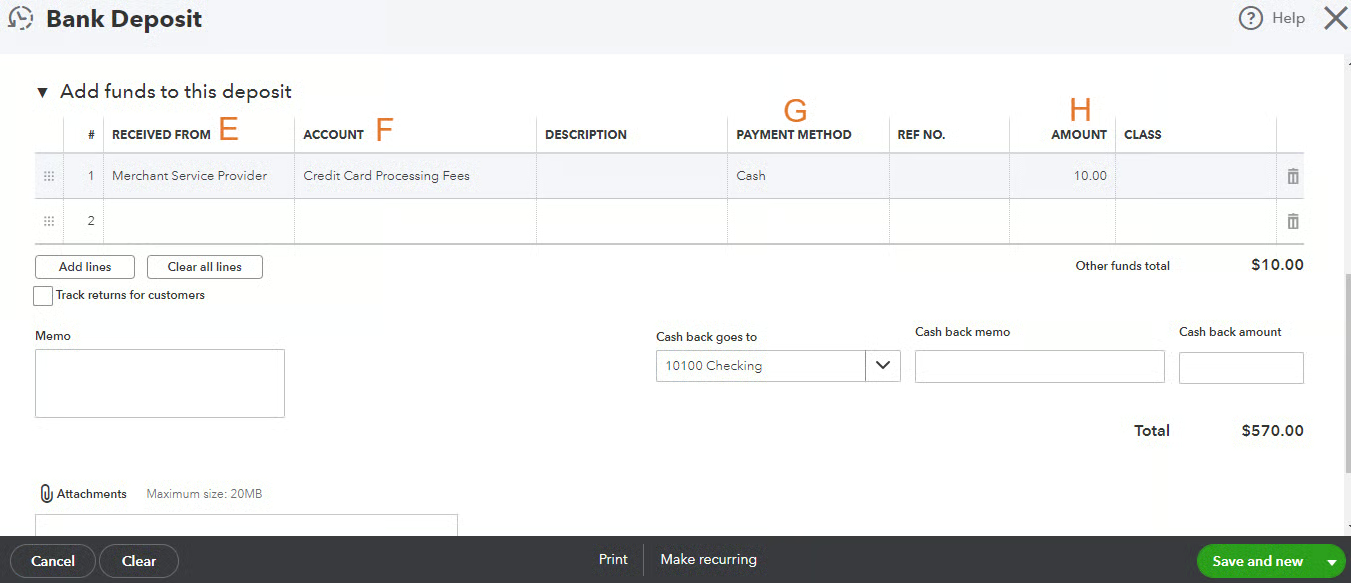
E. Received from: Select the name of your credit card processor withholding a fee. If it’s a new merchant, click on + Add New from the drop-down menu.
F. Account: Choose an expense account, such as “Credit Card Processing Fees.” You can click +Add new to set up a new expense account.
G. Payment method: Select Cash as the payment method.
H. Amount: Enter the amount of the fee as a negative number. If your credit card processor subtracts a processing fee from the deposit, record the fee using a negative amount in this section.
Click the green Save and new button to record your changes.
Step 3: Record Other Credit Card Fees
If your credit card processor charges fees other than those subtracted directly from a deposit, record an expense by clicking on + New from the left menu bar and then selecting Expense in the Vendors column. To complete the expense form, you need to enter the required information, as seen below.
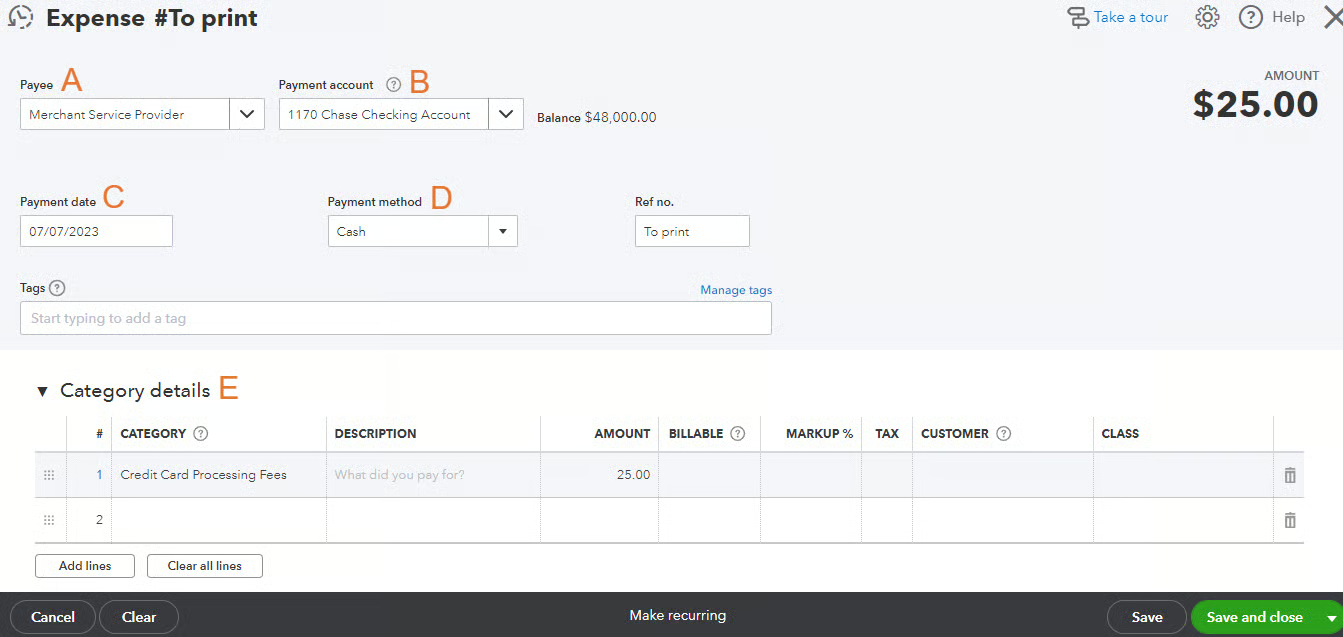
A. Payee: Select the name of your credit card processor.
B. Payment account: Choose the bank account from where the expense was withdrawn.
C. Payment date: Enter the date the expense was withdrawn.
D. Payment method: Indicate Cash as the payment method.
E. Category: Select an expense account to charge the credit card processing fees.
Hit the green Save and close button when you’re done completing the expense window.
Integrated vs Nonintegrated Credit Card Processors
QuickBooks Online, our overall best small business accounting software, enables you to use both integrated and non-integrated credit card processors.
- Integrated payment processors are directly connected to your point-of-sale (POS) system. There’s no need to enter your customer’s credit card details manually as they’re populated automatically, saving you and your customers valuable time.
- Nonintegrated credit card processors don’t have the terminal and POS synced, so you have to enter credit card details manually when charging your customers. The lack of connection makes the checkout process significantly longer than integrated payment solutions.
While the right processing method depends on your needs, you should consider integrated credit card processors, such as QuickBooks Payments, if you want a quick and efficient checkout process. As we illustrated in our guide on how to process credit card payments, the platform is already in QuickBooks Online—you only need to activate the service. To learn more about it, read our detailed QuickBooks Online review.
Alternatively, you can install a third-party app from another credit card processor that integrates seamlessly with QuickBooks Online.
Frequently Asked Questions (FAQs)
How do I record customer credit card payments in QuickBooks Online?
To record credit card sales, you can use the “Receive payment” screen when you have issued an invoice to the customer or the “Sales receipt” screen when you receive immediate payment from the customer without an invoice issued.
How do I manage credit card fees charged by my credit card processor?
Credit card fees are typically deducted by the processor before depositing the funds into your bank account. You must create an expense transaction for the credit card fees in QuickBooks Online.
Are there transaction fees associated with using a third-party credit card processor?
Yes, third-party credit card processors typically charge transaction fees for each payment processed.
Wrap Up
You’ve just learned how to record credit card sales in QuickBooks Online. To automate the steps we went over, we hope you consider an integrated credit card processor like QuickBooks Payments, which lets you record the payment received on either an invoice or sales receipt and takes care of the rest. Our series of free QuickBooks courses will now focus on preparing financial reports, beginning with how to prepare a profit and loss (P&L) statement.