


In this tutorial, we’re going to teach you how to set up vendors in QuickBooks Online. We’ll show you how to add vendors manually and import vendor information from an Excel, comma-separated values (CSV), or Google Sheets file. You will also learn how to inactivate a vendor if you’re no longer doing business with them.
When setting up vendors in QuickBooks Online, you only need to enter their names to save their records. However, it’s best to gather as much information as possible about your new vendors, including the following:
- Company name
- Contact name
- Address
- Email address
- Phone numbers
- The rate you pay to service vendors
- The rate you charge your clients for service vendors’ work
- The amount you owe the vendor prior to the start of using QuickBooks
- Employer identification number (EIN)
Ensure that your vendor list is either in an Excel, CSV, or Google Sheets file. If you’re currently using a different program to manage your vendors, you can save a lot of time by exporting your vendor information from that program, which we will discuss in the later part of this tutorial.
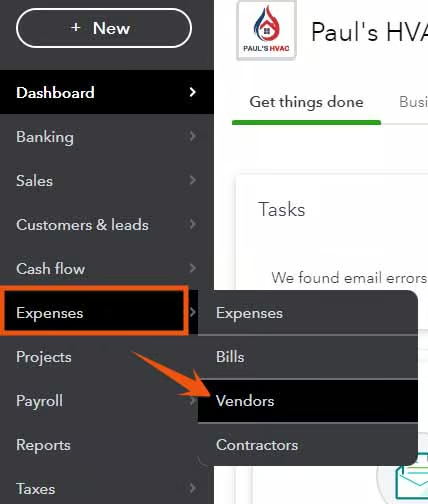
Navigate to the Vendor Center by clicking on Expenses and then Vendors from the left menu bar, as shown below.
Seeing a different left-side navigation menu?
1. Check User View
QuickBooks has two user views: Business View and Accountant View. Your left-side navigation menu may look different depending on the user view you are in.
If your sidebar menu is not what is shown in our tutorial, it means that you are on Business View. We prefer and recommend using the Accountant View because it shows a full range of business accounting features and tools that you can use in QuickBooks.
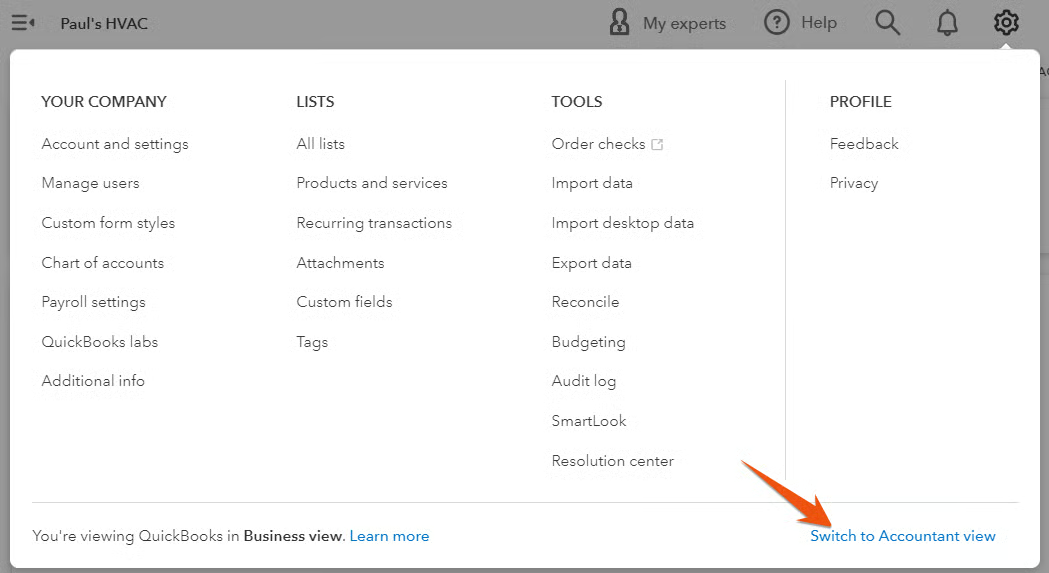
To verify whether you’re using the Business View, click on the cog wheel at the top right-hand corner of your QuickBooks dashboard, and check whether the button on the lower right-hand says Switch to Accountant view, as shown below. If so, then it means you are on Business View.
2. Switch to Accountant view
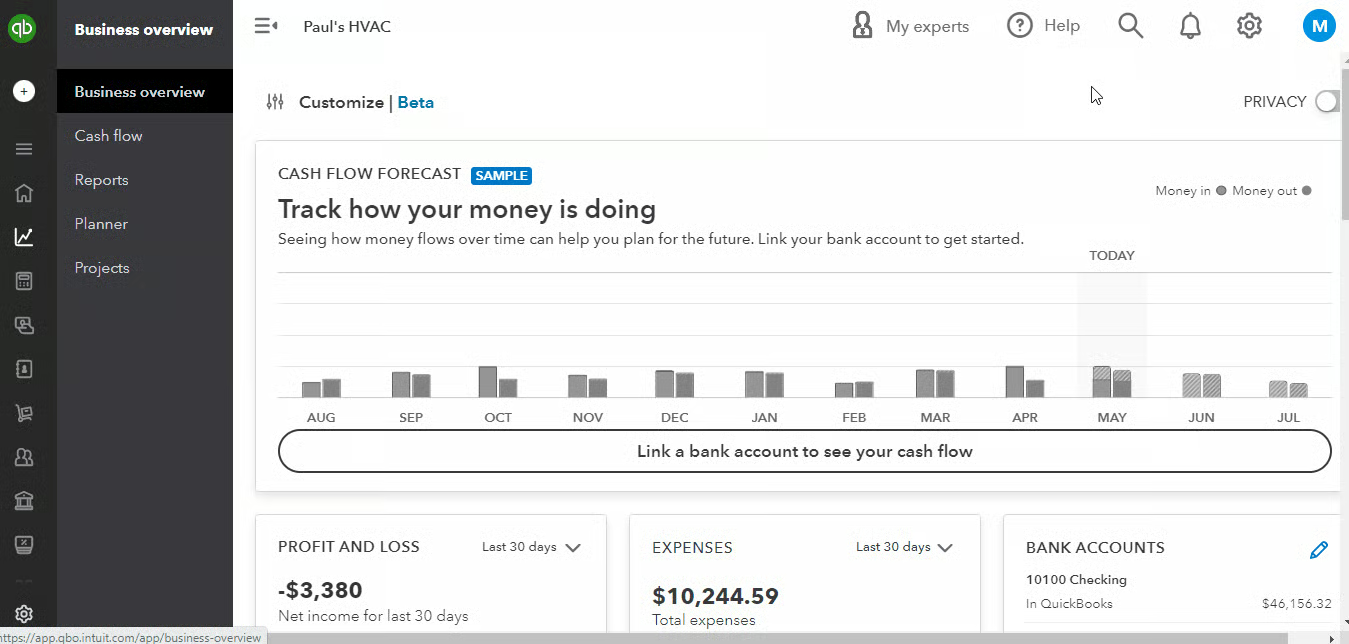
Once you verify that you are on Business View, click on Switch to Accountant view to update the appearance of your sidebar menu. In a few seconds, you should see the same left-side menu bar illustrated in this tutorial.
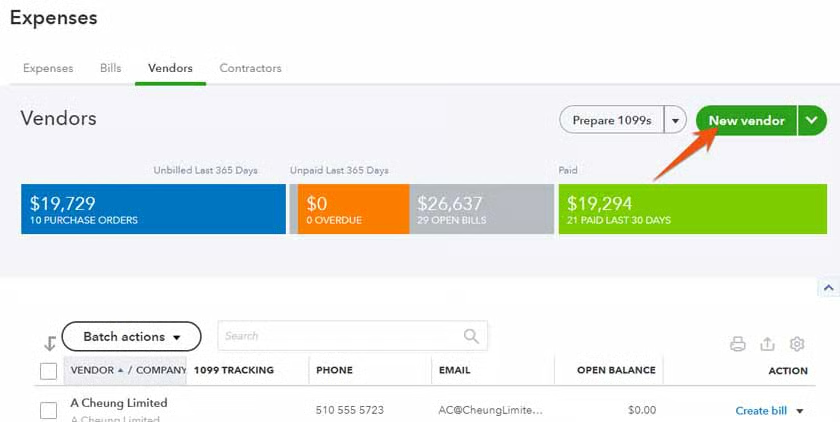
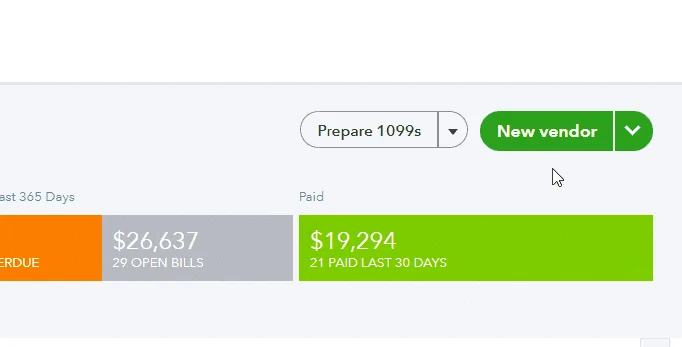
Click the green New vendor button in the upper right-hand corner of the Vendor Center to enter vendor information manually.
On the new vendor screen, enter as much information as possible for your vendor. To help you understand how to complete the new vendor form better, let’s use a sample scenario.
Paul’s HVAC works with a new vendor, Spiral HVAC Pipes & Supplies, a company that supplies pipes and duct products. The company gathered all the vendor information ahead of time and wants to add the new vendor in QuickBooks.
The GIF below shows how the vendor form is completed based on our example.
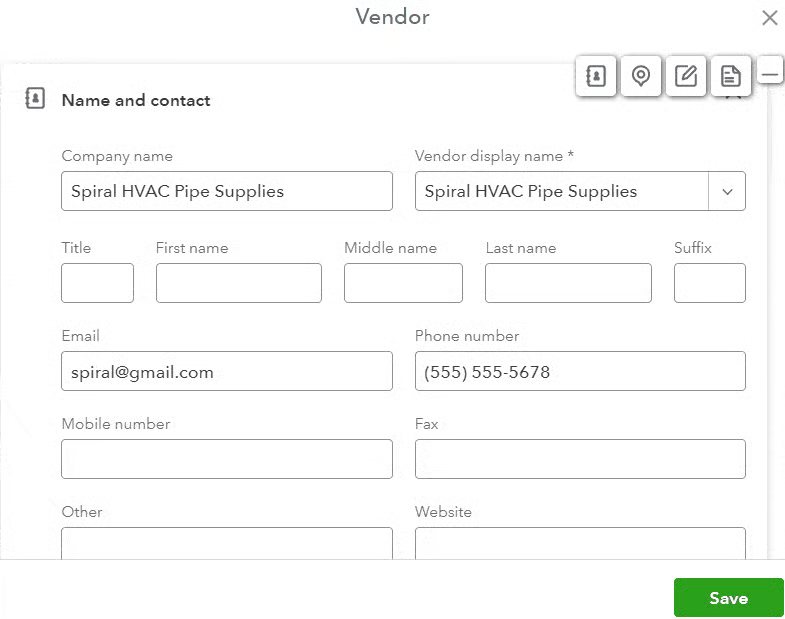
Below are some of the important fields in the new vendor setup form:
Name and Contact
- Name: Provide the company name and the name of your contact person. In our example, the new vendor is recorded as Spiral HVAC Pipes & Supplies.
- Vendor display name: This field will populate automatically based on the information entered in the company name field but can be changed if you wish. This is how your vendor will show up on your vendor list in QuickBooks.
- Contact information: You can enter all the vendor’s contact information for easy future reference. You may add their email address, phone and mobile numbers, and even their website address.
- Name to print on checks: When you write checks to pay vendor bills, the payee information will come from here. Type the payee name here if it’s different from the vendor name.
Address
This should be the address where you need to mail your vendor payments. You’ll be asked to enter the street name, city, state, ZIP code, and country.
Notes and Attachments
- Notes: You can add notes to enter additional information in your vendor reports.
- Attachments: Vendor documents, such as contracts, Form W-9, or proof of insurance, can be dragged and dropped to this screen to attach them to the vendor information screen for easy reference.
Additional Information
- Taxes: Enter the vendor’s business ID number or Social Security number and check the box for Track payments for 1099 to indicate you must provide this vendor with a Form 1099. If needed, you can check out our guide on how to prepare and file Form 1099.
- Expense rates: This is the amount that the vendor charges you for their services on an hourly basis. Not all vendors will have an hourly billing rate. If a vendor charges a flat fee for their services, or if you have negotiated a different billing arrangement with them, you can leave this field blank.
- Payment terms: This is where you can specify the payment terms that you have agreed to with the vendor. For example, if you agreed to pay the vendor within 30 days of receiving their invoice, you should select Net 30. In our guide on how to set up expenses in QuickBooks Online, we cover setting up default payment terms for all vendors. Here, you can change the default payment term for any vendor.
- Account number: Input your account number with the vendor to print it on all checks automatically.
- Default expense category: This is where you can specify the default expense category that should be used when entering transactions for this vendor. For instance, in our example, since it’s a pipe supplier, you can assign a default expense category like “Materials & Supply.”
- Opening balance: A vendor’s opening balance is the amount you owe the vendor for periods prior to your QuickBooks Online start date for which you won’t be entering invoices. This is common if you’re transferring from different bookkeeping software. You’ll be able to apply future payments to the vendor against this opening balance.
Click the green Save button to record the new vendor.
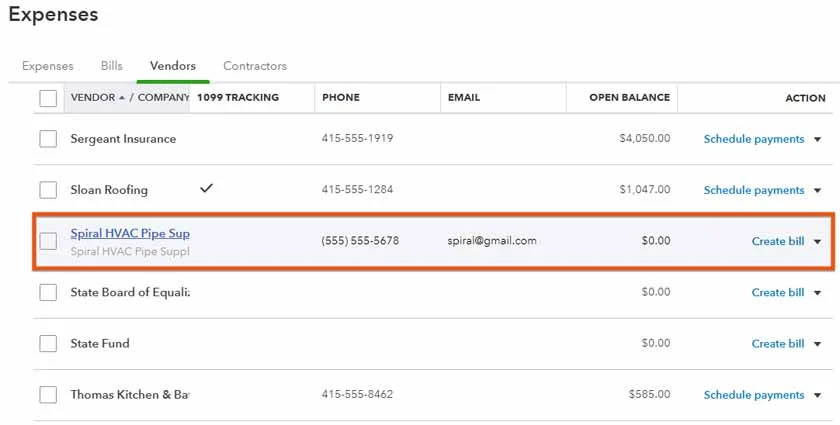
The new vendor will now appear in the Vendors Center. Click on the vendor’s name to go to the vendor information screen. In the screenshot below, we can see the new vendor that we just set up is now in the Vendors Center. Click on the vendor’s name to open the transactions list and vendor details.
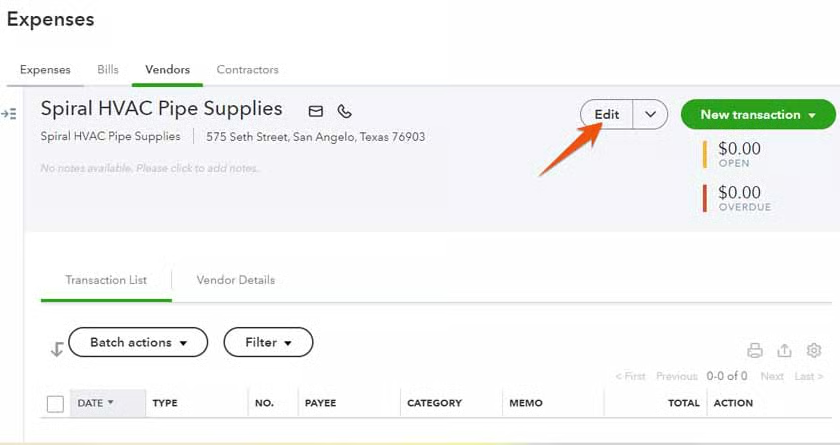
Within the vendor information screen, click the Edit button in the upper right corner if you wish to make any changes to the vendor information.
The new vendor setup form you previously used will show up, and you can make any changes you wish to make. Click the Save button once done.
How To Import Vendor Information Into QuickBooks Online
Step 1: Prepare Your Spreadsheet
First, make sure your file is in the correct format. You can use an Excel, CSV, or Google Sheets file, but it must meet certain requirements. Your file should have a header row that lists the column names, such as vendor name, address, and phone. Each column represents a field that you wish to import into QuickBooks Online, and each subsequent row should contain the vendor information for one vendor.
The following fields are available for import, but you may choose to import only a few of them:
- Company name
- Contact name
- Email address
- Phone number
- Mobile number
- Fax number
- Website
- Street
- City
- State
- ZIP code
- Country
- Opening balance
- Opening balance date
- Tax identification number (TIN)
The first row in your spreadsheet should be a label for each column, but the labels don’t have to correspond to the exact field names in QuickBooks Online. You’ll have the opportunity to map each of your columns to one of the fields listed above during the import process. It’s OK if you’re missing columns for fields that you don’t want to import.
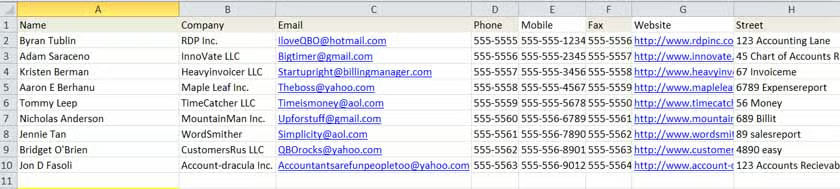
Here is a worksheet with some of the basic fields included:
Step 2: Navigate to the Import Screen
Navigate to the Vendor Center by clicking on Expenses and then Vendors in the left menu bar. Select the drop-down menu next to New vendor and select Import vendors.
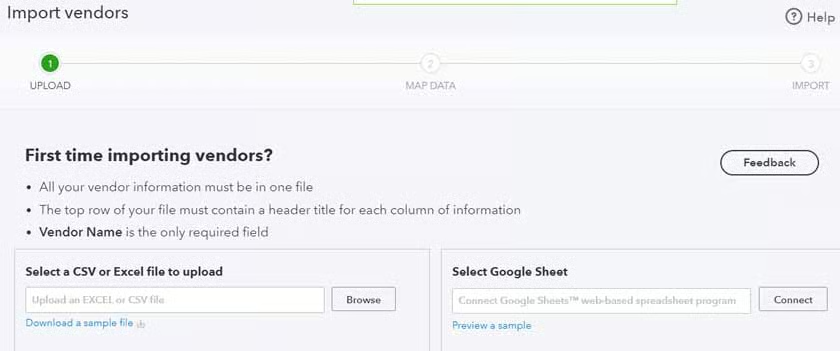
Step 3: Select the File to Upload
If your vendor list is in an Excel or CSV format, click on the Browse button under the Select a CSV or Excel file to upload section. If you’re uploading a Google Sheets file, click on the Connect button under Select Google Sheet.
Step 4: Map Your Data
In this screen, you must assign each column in your spreadsheet to the correct QuickBooks Online field.
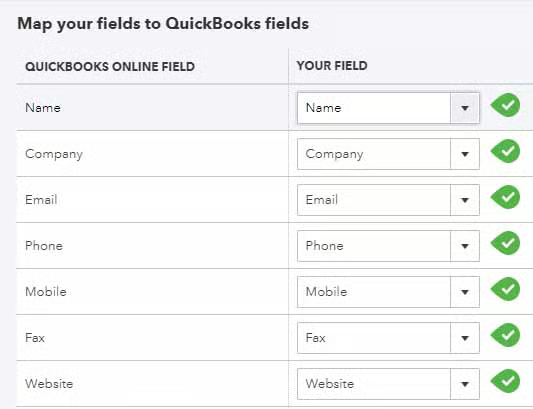
The left column is the QuickBooks Online fields available for import. The right column provides a drop-down box to select the column from your spreadsheet to assign to the corresponding QuickBooks Online field. QuickBooks Online will make a selection automatically if one of your column headers matches the QuickBooks Online field. However, these are only suggestions, and you can change them as needed.
It’s OK if your spreadsheet has extra columns. The only columns that will import into QuickBooks are the columns you match to a QuickBooks field. You also don’t have to have a column for each QuickBooks field. You can indicate No Match for the fields that you don’t have a matching column.
Step 5: Review and Import Your Data
This is where you can perform a final review of the data that will be imported into QuickBooks Online. Be sure to verify that the number of records agrees with the number of rows in your spreadsheet, minus one for your header row.
If the mapping isn’t right, click the Back button to go back and make any necessary changes. You can change any vendor information on this screen if you wish. Deselect any records that you don’t want to be imported.
Select Import in the lower right-hand corner once you’re ready to proceed.

Once the import is complete, you’ll receive a message that the import is successful. You can now view the imported vendors in the Vendor Center.
How To Delete a Vendor in QuickBooks Online
You cannot delete a vendor once you have used them in a transaction. For example, once you have created a check to pay a vendor, that vendor cannot be deleted. However, the vendor can be made inactive so that they don’t appear in the Vendor Center.
Navigate to the Vendor Center by clicking on Expenses then Vendors in the left menu bar. Locate the vendor you wish to make inactive, and then click on the vendor’s name. Next, click on the small dropdown arrow next to Edit, and then select Make inactive.

Why Setting Up Vendors in QuickBooks Is Important
QuickBooks Online, our leading small business accounting software, makes it easy to enter a bill when you have vendors set up within the platform. Instead of inputting all the details of a bill, you can select the vendor from a drop-down list, and many of the fields will auto-populate.
Also, setting up vendors in QuickBooks can help you better manage and track your expenses. When you enter transactions for a vendor, QuickBooks automatically categorizes them based on the vendor’s default expense account, which can help you keep track of your spending. Additionally, you can run reports showing both the total amount spent and the items purchased from each vendor, helping you manage your cash flow more effectively.
Frequently Asked Questions (FAQs)
What information do I need to set up a new vendor in QuickBooks?
At the very least, you only need to enter the name of the vendor. However, it’s best to complete as many fields as possible to ensure that you have accurate and complete information about the vendor. Also, it can help you generate detailed reports about your expenses and cash flow.
Can I import a list of vendors into QuickBooks Online?
Yes, you can import a list of vendors into QuickBooks from an Excel, CSV, or Google Sheets file. We recommend importing your vendor list if you have a large number of vendors to add in QuickBooks.
Can I delete a vendor in QuickBooks Online?
No, but you can inactivate a vendor if you no longer do business with them. This will remove the vendor from your active vendor list, but you can still view their information and transactions in your account.
What is the difference between a vendor and a supplier in QuickBooks?
A vendor and a supplier in QuickBooks are essentially the same thing. They refer to a person who or company that provides goods or services to your business.
Wrap Up
You now know how to set up vendors in QuickBooks Online. The next tutorial in our training course is how to create estimates in QuickBooks Online, which will cover how to create quotes and bids to send to customers.