

This guide will teach you how to reconcile credit card accounts in QuickBooks Online to ensure that the credit card activity in the platform matches your credit card statements. We’ll also share some of the common errors that you may encounter, along with some tips to locate discrepancies.
- Step 1: Navigate to the ‘Reconcile’ Window
- Step 2: Select the Account & Enter Your Statement Information
- Step 3: Match Credit Card Transactions
- Step 4: Confirm the Difference Is Zero
- Step 5 (Optional): Make a Payment on the Credit Card Balance
- Benefits of QuickBooks Credit Card Reconciliation
- Frequently Asked Questions (FAQs)
- Wrap Up
Step 1: Navigate to the ‘Reconcile’ Window
Hover your cursor over Accounting in the left menu bar, and then select Reconcile.
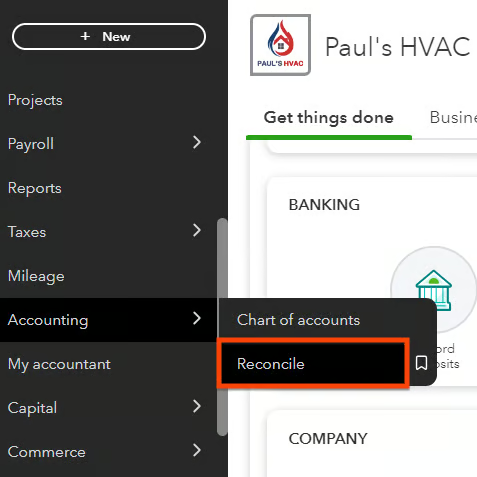
Open the credit card reconciliation screen
Seeing a different left-side navigation menu?
QuickBooks has two user views: Business View and Accountant View. Your left-side navigation menu may look different depending on the user view you are in.
If your sidebar menu is not what is shown in our tutorial, it means that you are on Business View. We prefer and recommend using the Accountant View because it shows a full range of business accounting features and tools that you can use in QuickBooks.
To verify whether you’re using the Business View, click on the cog wheel at the top right-hand corner of your QuickBooks dashboard, and check whether the button on the lower right-hand says Switch to Accountant view, as shown below. If so, then it means you are on Business View.
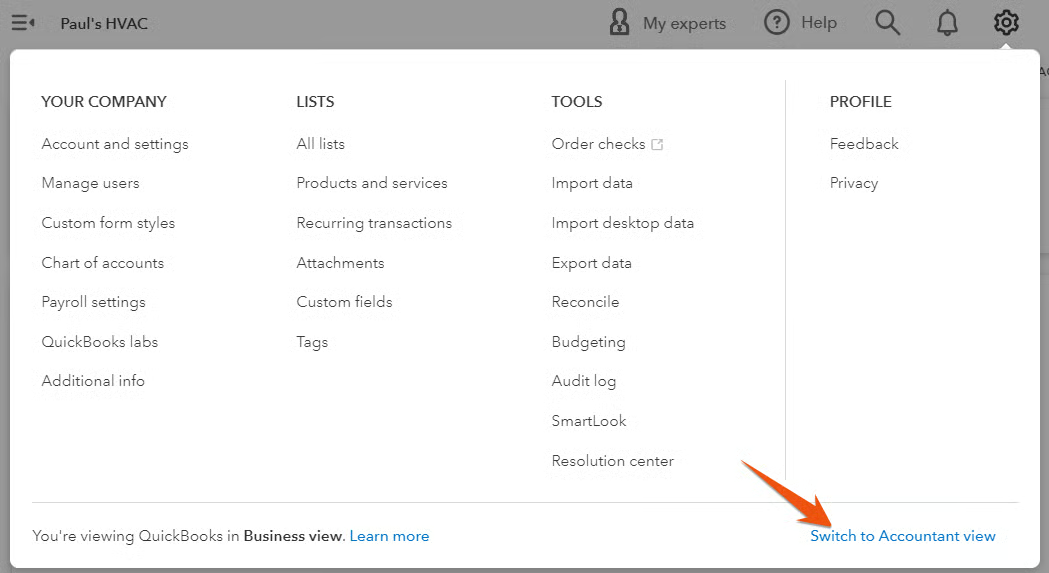
Verify whether you are using Business View or Accountant View in QuickBooks
Step 2: Select the Account & Enter Your Statement Information
In the reconcile window, select the credit card account you wish to reconcile and enter the ending date and ending balance shown on your credit card statement. If you have finance charges on your credit card statement that are not listed in QuickBooks Online, then you need to add them manually.
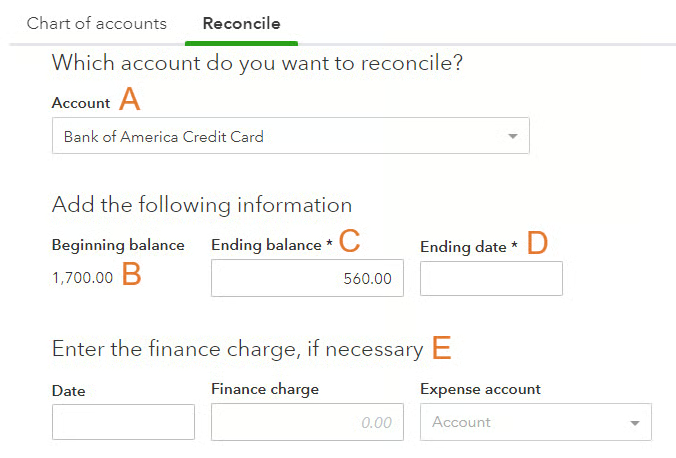
Enter information to process QuickBooks credit card reconciliation
A. Account: Select the credit card account that you’re reconciling. In the screenshot above, we selected Bank of America Credit Card.
B. Beginning balance: QuickBooks shows the ending balance of the prior statement reconciled, which must be the beginning balance of the current statement. This amount will be zero if this is the first time the credit card is being reconciled.
C. Ending balance: Input the ending balance from your credit card statement. In the sample above, the ending balance is $560.
D. Ending date: Enter the last day of the statement period from your credit card statement.
E. Finance charge: Input the finance charge (if any) from your credit card statement if you haven’t already done so in a separate transaction. Indicate the date the charge was assessed and the expense account, or category, to track the expense. QuickBooks will record this expense automatically when the reconciliation is complete.
After entering all your statement information, click the green Start reconciling button.
Step 3: Match Credit Card Transactions
After completing the previous step, QuickBooks will display a screen with a summary of the reconciliation in the top half and detailed transactions in the bottom half.
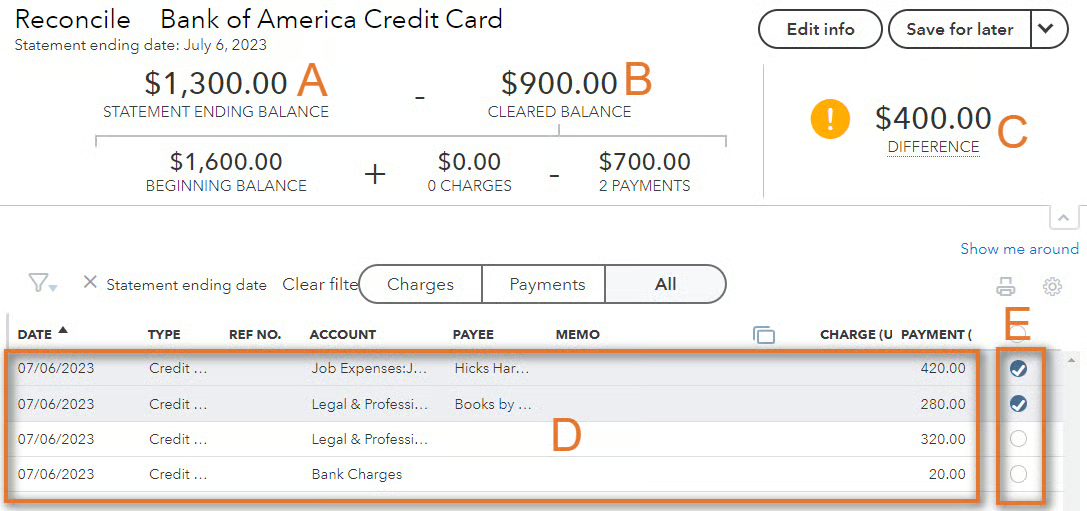
Match credit card transactions to your credit card statement
A. Statement ending balance: The statement balance carries over from your input in the prior screen and should match the ending balance on your credit card statement.
B. Cleared balance: QuickBooks calculates the cleared balance as the beginning balance from the prior screen plus charges you mark as cleared, minus payments you mark as cleared.
C. Difference: The difference between the statement ending balance and cleared balance must be zero before you can finalize a reconciliation. You’ll see an exclamation point if the difference isn’t zero, meaning you’ll have to reconcile those entries.
D. Uncleared transactions: These are the transactions that you need to review and compare with your credit card statement.
E. Radial buttons for cleared transactions: Click the radial button in the right-most column for each transaction if that transaction appears on your credit card statement. After you click the radial button, the transaction will be included in the cleared balance (item B).
Step 1: Trace Transactions From QuickBooks to Your Statement
Start by looking at each transaction listed in the QuickBooks screen above and finding it on your credit card statement. If you find it, click the radial button for the transaction (item D) and place a checkmark next to the transaction on your statement.
You need to investigate any transaction in QuickBooks that isn’t on your bank statement. While the most likely cause is an error in your QuickBooks accounting, don’t delete the transaction because it may affect other accounts or periods.
Here are some of the most common errors that will cause incorrect QuickBooks credit card transactions to appear:
- Duplicate transactions: You may have inadvertently created a duplicate transaction and while the original transaction will be shown on the statement, the duplicate won’t. For instance, if the credit card activity is imported from the bank, you may have added a new transaction instead of matching it to an existing transaction. If so, you should delete the duplicate transaction.
- Wrong account: The suspect transaction may have been a charge on a different credit card and incorrectly recorded on this account. If so, edit the transaction and assign it to the correct account.
- Wrong date: If you enter the wrong statement date, you may run into some issues during reconciliation. For instance, if the statement date is too early, some necessary transactions might be missing; and if it’s too late, some additional transactions might be included in your statement. Always ensure that the statement date you enter in QuickBooks matches your bank statement.
Step 2: Investigate Unmarked Transactions on Your Statement
When tracing from QuickBooks to your statement, you placed a mark next to each transaction on your statement that was shown in QuickBooks. Now, look for any transactions on your statement that don’t have a mark. If unmarked transactions are legitimate, they need to be added to QuickBooks. Once added, mark the transaction as cleared by clicking the radial button in the right-most column.
Step 4: Confirm the Difference Is Zero
Once all the selected transactions in QuickBooks match the transactions on your credit card statement, the difference between your statement ending balance and cleared balance should be zero. If it isn’t, then you can head to our guide on how to process bank reconciliation in QuickBooks Online, which covers some troubleshooting tips to help you locate discrepancies.
Here’s a sample reconciliation with all of the transactions matched to a credit card statement. You can see that the difference is zero, which means that the statement ending balance and cleared balance also matches.
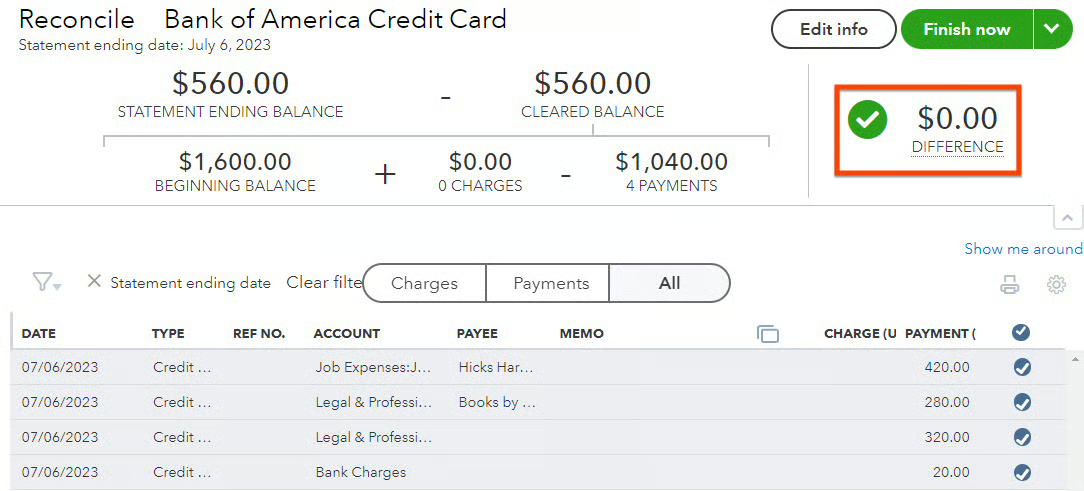
Completed credit card reconciliation in QuickBooks Online
When your reconciliation is complete, click the green Finish now button in the upper-right corner of the screen.
Step 5 (Optional): Make a Payment on the Credit Card Balance
QuickBooks will display a message to confirm the reconciliation is complete and to ask if you want to make a payment towards this credit card balance.
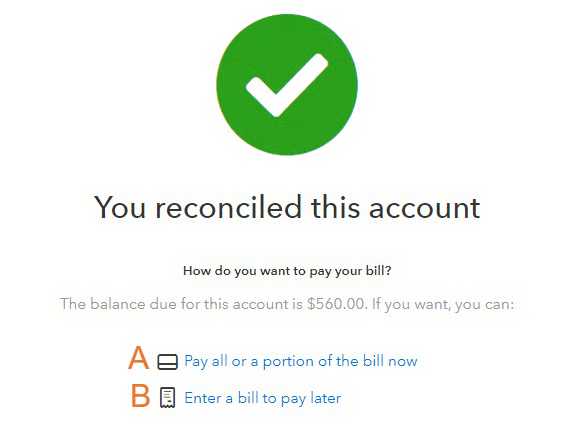
Choose how to pay a reconciled credit card in QuickBooks Online
You don’t have to select an option at this point, as you can write a check or enter a bill later by going to the Write Check or Create Bill screens directly. But if you want to make a payment now, then do one of the following:
A. Click Pay all or a portion of the bill now to go to the Write Check screen, where you can create a check for the credit card balance you wish to pay. The category should default to the credit card account you just reconciled, and you shouldn’t change it. For more information, see our tutorial on how to write and print checks in QuickBooks Online.
B. Click on Enter a bill to pay later to go to the Create Bill screen, where you can enter a bill for the balance you wish to pay by the due date shown on the credit card statement. Make sure the category is the credit card you just reconciled, the bill date is the statement date, and the due date agrees with the due date on the credit card statement. This is explained in detail in our guide on how to enter bills in QuickBooks Online.
When you’re finished setting up your payment or have decided to wait until later, hit the green Done button (not shown in the image above).
Benefits of QuickBooks Credit Card Reconciliation
- Finds missing transactions: If transactions on your statement haven’t been entered in QuickBooks, you’ll have to add them so that the account will reconcile.
- Identifies incorrect amounts: If the same transaction has different amounts in QuickBooks and the bank statement, the account won’t reconcile.
- Locates duplicate transactions: By reviewing transactions that didn’t appear on your bank statement for the month, you can identify transactions that shouldn’t be in QuickBooks.
- Shows erroneous or fraudulent charges: Any charges on your bank statement that aren’t in QuickBooks should be examined so that you can determine whether they’re legitimate charges. Once deemed authorized, enter them on the platform.
- Detects fraud: By comparing your credit card statement to your QuickBooks records, you can quickly identify any charges that are unaccounted for in the system. You can then report these unauthorized charges to your credit card provider.
Frequently Asked Questions (FAQs)
Navigate to the Reconcile tab under Accounting, select the appropriate credit card account, and enter the statement date and ending balance from your credit card statement. Then, match the transactions in your statement to those in QuickBooks.
You should enter the missing transactions manually in QuickBooks. Ensure that all the details—including the dates, amounts, and descriptions—match your credit card statement.
Yes, as the statement serves as a reference to compare with the transactions in QuickBooks.
Wrap Up
Congratulations on finishing another tutorial and learning how to reconcile credit card accounts in QuickBooks Online. The next tutorial in our series is how to manage credit card sales through QuickBooks Payments.