FitSmallBusiness
  • HR
  • Retail
  • Sales
  • Marketing
  • Accounting
  • Real Estate
  • More Categories
    • Starting a Business
    • Banking
    • Credit Cards
    • Financing
    • Insurance
    • Office Technology
    • Online Business
    • Taxes
  • BE A PARTNER
  • WORK AT FSB
  • About
  • HR
  • Retail
  • Sales
  • Marketing
  • Accounting
  • Real Estate
  • More Categories
    • Starting a Business
    • Banking
    • Credit Cards
    • Financing
    • Insurance
    • Office Technology
    • Online Business
    • Taxes

Human Resources | How To

How to Add Historical Data to QuickBooks Payroll in 5 Steps

Charlette Beasley

REVIEWED BY: Charlette Beasley

Charlette has over 10 years of experience in accounting and finance and 2 years of partnering with HR leaders on freelance projects. She uses this extensive experience to answer your questions about payroll.


WRITTEN BY: Heather Landau

Published January 12, 2022

Heather is a staff writer and payroll specialist with several years of experience working directly with small business owners. Her expertise allows her to deliver the best answers to your questions about payroll.

Published January 12, 2022

This article is part of a larger series on Payroll Services.

Learn More With Our QuickBooks Online Course
Explore the chapters in the guide.
  1. How to Set Up QuickBooks Online
  2. Part 1: Setting Up QuickBooks
    1. How to Set Up Company Information
    2. How to Customize Invoices, Sales Receipts & Estimates
    3. How to Set Up Invoices, Sales Receipts & Estimates
    4. How to Set Up Products and Services
    5. How to Set Up Messages
    6. How to Set Up Statements
    7. How to Set Up Expenses
    8. How to Set Up Advanced Settings
  3. Part 1: Setting Up QuickBooks (Cont.)
    1. How to Import Bank Transactions
    2. How to Import Credit Card Transactions
    3. How to Set Up Multiple Users
    4. How to Set Up the Chart of Accounts
    5. How to Set Up the Products and Services List
    6. How to Set Up Customers
    7. How to Set Up Vendors
  4. Part 2: Managing Sales and Income
    1. How to Create Estimates (Quotes or Bids)
    2. How to Create and Send Invoices
    3. How to Receive Payments
    4. How to Create & Send Sales Receipts
  5. Part 3: Managing Bills and Expenses
    1. How to Write & Print Checks
    2. How to Enter Bills
    3. How to Pay Bills
  6. Part 4: Managing Banking Transactions
    1. How to Enter Banking Transactions Manually
    2. How to Manage Downloaded Banking Transactions
    3. How to Record Bank Deposits
    4. How to Transfer Funds Between Bank Accounts
    5. How to Handle Bounced Checks From Customers
    6. How to Process Bank Reconciliation
  7. Part 5: Managing Business Credit Card Transactions
    1. How to Enter Business Credit Card Transactions Manually
    2. How to Manage Downloaded Business Credit Card Transactions
    3. How to Enter a Credit Card Refund
    4. How to Reconcile Business Credit Card Accounts
  8. Part 6: Managing Credit Card Sales
    1. How to Manage Credit Card Sales With QuickBooks Payments
    2. How to Manage Credit Card Sales With a Third-party Credit Card Processor
  9. Part 7: Set Up and Manage Payroll
    1. How Set Up and Run Payroll
    2. How to Manage Payroll Tax
    3. How to Add Historical Payroll Data
    4. How to Set Up Automatic Deposits
    5. How to Print Payroll Checks
    6. How to Run Payroll Reports
    7. How to Reconcile Payroll Liabilities
  10. Part 8: Reporting in QuickBooks Online
    1. How to Run a Profit and Loss Statement
    2. How to Run a Balance Sheet Report
    3. How to Run a Statement of Cash Flows
    4. How to Run an A/R Aging Report
    5. How to Run an A/P Aging Report

If you’re transitioning to Intuit after having used a different payroll service, you may need to enter historical data into QuickBooks Payroll. This will help ensure your payroll and tax reports are accurate and not missing any information. If you owe taxes accumulated before using QuickBooks, this will be a vital step to ensure QuickBooks pays applicable tax agencies in full and that you won’t get penalized for late or inaccurate tax payments.

Once you’ve successfully added all prior period payroll information into QuickBooks Payroll, you can use it to manage employee benefits, file taxes, and print checks and take advantage of same- or next-day direct deposit. If you need help with bookkeeping, you can opt to automatically integrate it with QuickBooks Online accounting software, and save yourself time from having to transfer payroll data manually. Sign up for a free trial today.

Visit QuickBooks Payroll

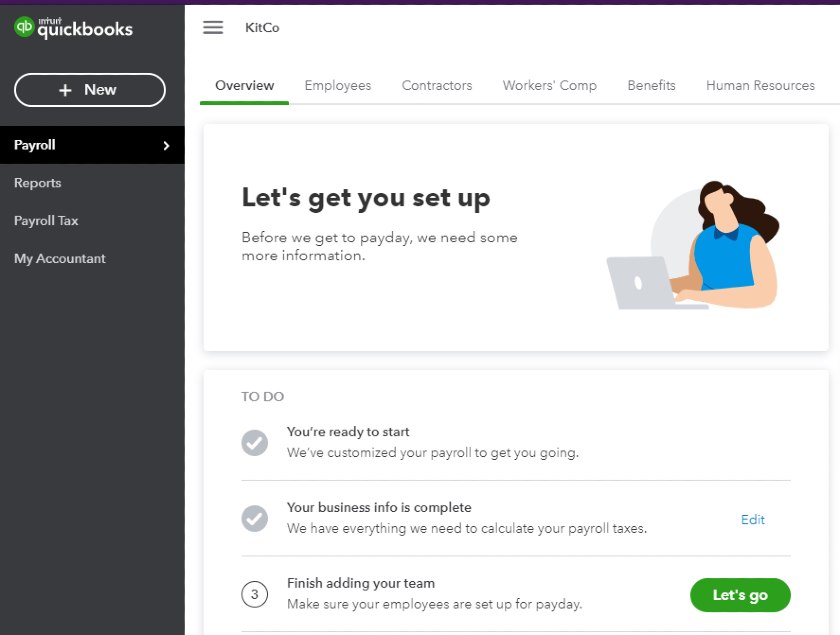
Adding historical payroll data to QuickBooks Payroll typically happens during the setup process. Follow along with our video on how to set up your payroll account (entering historical data starts at the 3:00 mark) and get some quick tips on things to consider when you’re entering historical data.

1. Gather Data

You can only add past payroll data as summary information. Therefore, you will need the data found on each employee’s last pay stub. You may also have this information in a payroll report.

You need the following information:

  • Last time you paid your employee. It will ask by quarters, months, or pay periods, so you may answer several of these in a Yes/No fashion.
  • Regular wages: This is the full wages your employee earned in the year-to-date, as shown in the last pay stub.
  • Overtime: This is all the overtime earned, year-to-date, as shown in the last pay stub.
  • Deductions (employees pay): There may be several lines, depending on the specific deductions, such as medical insurance, 401(k), etc.
  • Deductions (company pays): There may be several lines, depending on the specific deductions, such as medical insurance, 401(k), etc.
  • Federal income taxes withheld: This tax should show on every employee’s pay stub unless they are exempt.
  • Social Security taxes withheld: Also known as FICA.
  • Medicare withheld: Also known as FICA.
  • State income taxes withheld: Also known as state withholding or PIT/SIT.
  • State disability insurance: If applicable to your state. If not, it will not show up on the QuickBooks form.
  • Net pay: This is optional, and QuickBooks uses it to check for the accuracy of calculations. If you do not add it, it will make this calculation for you.

Note: You can only enter historical payroll data under two conditions. Otherwise, you will need to contact the Payroll Support team for assistance.

  1. The data is for the current calendar year.
  2. You have not run any payrolls for the employee for whom you need to add data.

You cannot bulk upload historical data into the software and enter past years on your own.

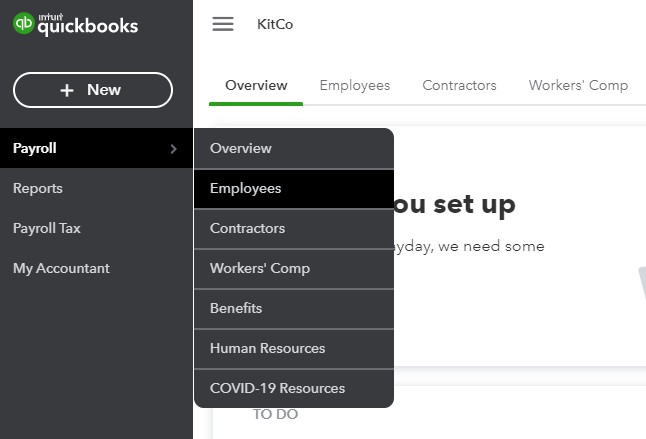
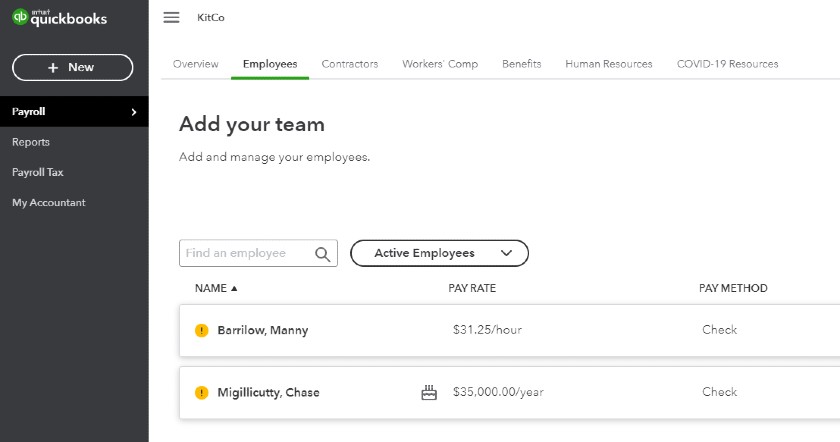
2. Find Your Employee

Showing QuickBooks overview page.

If adding an employee. Go to Payroll, then click on Overview. You may already be on that tab. You will see a task in your To-Do for completion. Click on Let’s Go to add your employee.


Showing QuickBooks Payroll Employees tab.

If coming back to an employee. Hover your cursor over Payroll, then click on Employees.


Showing how to add employees on QuickBooks.

Next, select the employee you wish to complete.


3. Input Totals From Your Payroll Reports or Employee Pay Stubs

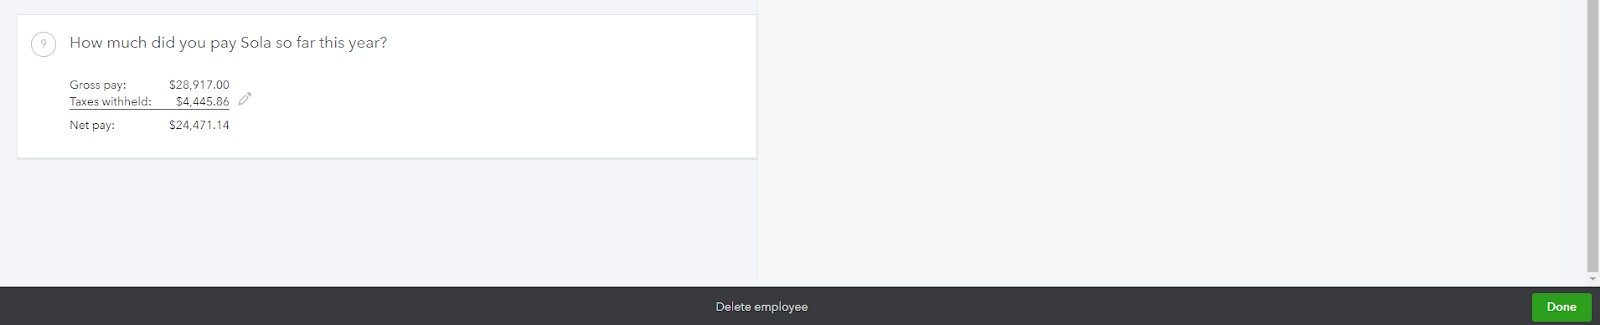
The Employee screen opens with all the information you need to input for payroll. It will ask, in step 9, for historical data.

Showing how much did you pay an employee so far this year. Showing other payroll employee questions on QuickBooks.

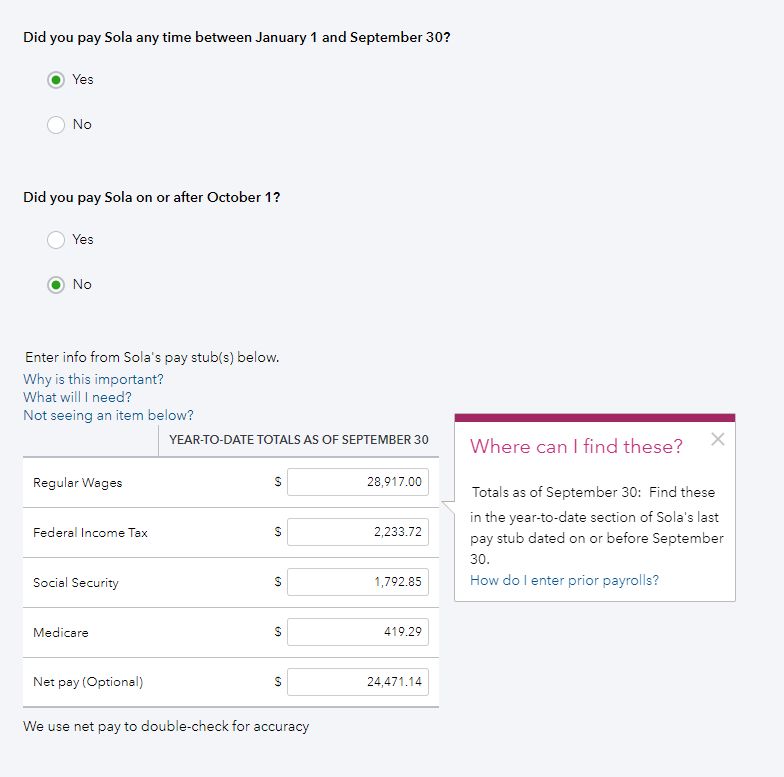
If these numbers do not match what QuickBooks expects, it will not proceed until these are correct.

4. Complete the Input

When you finish, press Done in the lower right corner. QuickBooks will then update, showing you the gross pay, taxes withheld, and net pay to date. Click Done again to complete this employee.

Showing complete input of payroll on QuickBooks.

5. Go to Next Employee

When you press Done, it takes you back to the Overview page. Click on Let’s Go to set up your next employee.

Showing QuickBooks overview page.

Bottom Line

Once all your employee data is set up in QuickBooks Online Payroll, you’ll be ready to run your payroll. You can also learn more about how to do payroll yourself here.

QuickBooks Payroll makes paying your team simple and painless, especially if you’re already a QuickBooks Online User. QuickBooks Payroll offers an easy to use interface, speedy direct deposits, and great reporting that makes tracking expenses easier than ever before. New users get 50% off payroll for the first three months.

Visit QuickBooks Payroll

🠜 Previous Tutorial

Free QuickBooks Online Tutorials

Next Tutorial 🠞

Although having payroll software makes paying your employees the right way much easier, you still need to know the basics. Check out our tips on how to get the best payroll training to help.

About the Author

Heather Landau
Heather Landau

Throughout her career, Heather has worked to help hundreds of small business owners in managing many aspects of their business, from bookkeeping to accounting to HR. Before joining Fit Small Business, Heather was the Payroll/HRS Manager for a top cloud accounting firm in the industry. Her experience has allowed her to learn first hand what the payroll needs are for small business owners.

Sign Up For Our HR Newsletter!
Sign up to receive more well-researched human resources articles and topics in your inbox, personalized for you.
This email address is invalid.
Sign Up For Our HR Newsletter!
(Only if you want to get insider advice and tips)
This email address is invalid.
Fit Small Business

Facebook Twitter LinkedIn YouTube

Company

  • About Us
  • Editorial Policy
  • Careers

Partners

  • Work With Us

Contact Us

228 Park Ave S # 20702
New York, NY 10003-1502

info@fitsmallbusiness.com

Fit Small Business BBB Business Review

Facebook Twitter LinkedIn YouTube

© Fit Small Business 2023

California Privacy Rights | Privacy | Terms | Sitemap

Was this article helpful?

Feedback

Join Fit Small Business

Sign up to receive more well-researched small business articles and topics in your inbox, personalized for you. Select the newsletters you’re interested in below.

Please select at least one newsletter.