


In situations where an invoice is not issued, such as when a customer pays for goods or services immediately, a sales receipt is necessary to record the payment in QuickBooks. As such, we’ll show you how to generate a QuickBooks Online sales receipt while recording a customer payment. We’ll also teach you how to email the receipt to your customer within the platform.
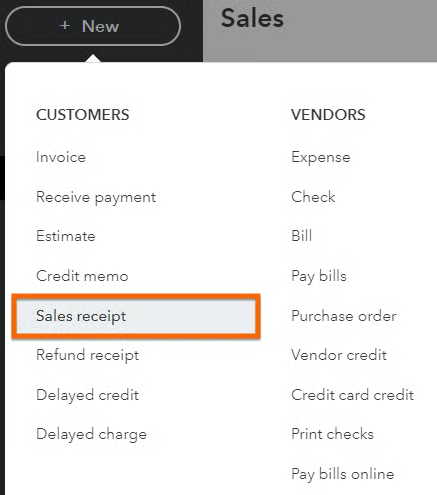
Step 1: Navigate to Sales Receipt
Click + New at the top of the left menu bar and then select Sales receipt in the first column under Customers, as shown below.
Step 2: Create the Sales Receipt
QuickBooks Online will then display the sales receipt screen. The fields that appear on the screen will depend upon the settings you specified in our QuickBooks Online tutorials on how to set up sales form content and how to set up advanced settings.
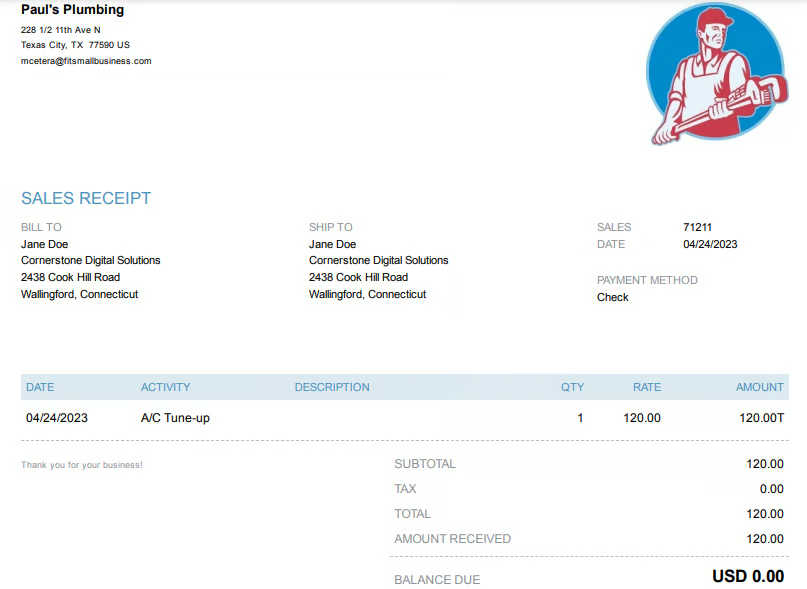
To help you understand how to complete the sales receipt form better, let’s use this sample scenario: a customer named Jane Doe calls your company and requests an air conditioning tune-up. The total amount for the service is $120, and Jane pays you by check at the time of service. In this case, you need to create a sales receipt in QuickBooks to record Jane’s payment.
The GIF below shows the sales receipt form used for creating a receipt for our example.

Below is a list of some of the fields you need to complete when creating a sales receipt in QuickBooks Online.
- Customer: Select the customer’s name from the drop-down list or select Add New to create a new customer. Once you select a customer, the email and address fields should populate automatically, provided the customer information is complete. In our sample scenario, we have to select Jane Doe from the customer list. If Jane Doe is a new customer, then you can add her on the fly by clicking on +Add New from the drop-down list.
- Sales receipt date: Typically, QuickBooks will default to the current date, but you can change this date if the sale is on a different date.
- Payment method: Select either check, cash, or credit card for the payment method. If the payment is by credit card, you may need to skip ahead to our tutorial on how to manage credit card sales. In our sample scenario, Jane paid us in check, so we selected “check” as the payment method.
- Reference no.: If the customer paid by check, enter the check number in this field.
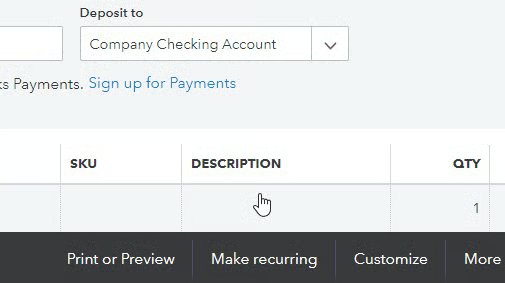
- Deposit to: Select Undeposited Funds from the drop-down box (in newer QuickBooks Online accounts, the undeposited funds account is named “Payments to Deposit” by default). This will place the check or cash in the Undeposited Funds account until the next bank deposit is recorded; we have a tutorial on how to record bank deposits in QuickBooks Online if you need a guide.
- Service date: The service date will default to the sales receipt date, but it can be adjusted if you provided the service or product on an earlier date.
- Product/Service: Select the product or service from the drop-down list or add a new product/service by selecting Add New. Once a new product or service item is selected, the description and rates fields should be populated automatically, but you can adjust them if needed. To illustrate our sample scenario, let’s select A/C tune-up from the Product/service list.
- Qty: Enter the quantity for each product or service provided. Once you enter the quantity, the Amount column should populate automatically.
There are additional fields to complete based on the prior options you have assigned. For instance, if you selected to track information by class and location in the advanced options, then you should complete the Class field for each Product/Service and the Location field for each receipt.
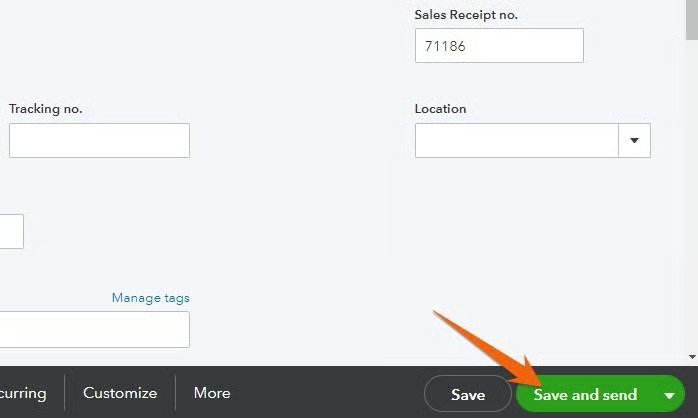
Step 3: Click ‘Save’ or ‘Save and Send’
Before you save your sales receipt, you can see what it looks like when emailed or printed by clicking on the Print or Preview button at the bottom of the screen and then selecting the Print or Preview drop-down. If needed, you can print or download the invoice after previewing. If you need to make changes, close the preview to return to the previous screen.
If you want to record the receipt without emailing it to your customer, click the Save button on the lower right side of the screen. If you want to send the receipt to your customer, click Save and Send.
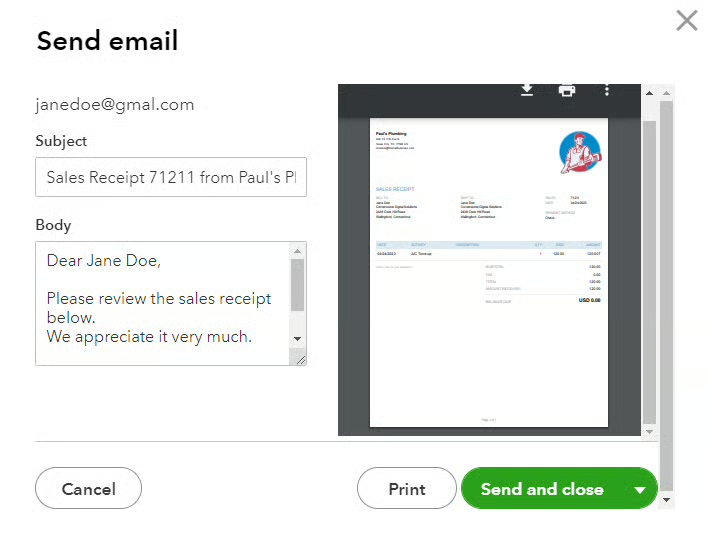
When you click Save and Send, QuickBooks will provide a preview of the text that will appear in the body of the email. All of the information will populate automatically based on the information you provided in our tutorial on how to set up sales form content in QuickBooks Online. You can make changes, but they won’t be reflected in future sales receipt emails. When you’re satisfied with your email, click the green Send and close button.
Below is a preview of a sample sales receipt we created in this tutorial.
What a QuickBooks Sales Receipt Is
Similar to an invoice, a sales receipt provides customers with a detailed description of the products or services that they have purchased. Invoices are issued to request payment from the customer. In contrast, sales receipts are used when the customer pays for services or products without being issued an invoice. QuickBooks sales receipts record both the revenue from the sale and the cash received.
Importance of Creating a QuickBooks Online Sales Receipt
Creating a QuickBooks Online sales receipt serves several purposes. It provides your customer with the details of exactly what they purchased along with proof of payment. Creating the sales receipt also records the revenue for your income statement. Finally, the sales receipt records the customer payment and places it in undeposited funds until the next bank deposit is made.
Customizing Sales Receipts in QuickBooks
One reason QuickBooks Online is our overall best small business accounting software is that it lets you create professional-looking sales forms, including sales receipts and invoices. You can add your company logo, change the font style and colors, and customize the layout and design of the sales receipt to match your branding. If you wish to customize your sales receipts, head to our tutorial on how to customize invoices in QuickBooks, which also covers customizing sales receipts.
Frequently Asked Questions (FAQs)
When do I need to create a sales receipt in QuickBooks?
You need to create a sales receipt in QuickBooks when you receive payment from a customer at the time of the sale and no prior invoice was issued. An example is when you provide a service to a customer on the spot, and they pay you immediately with a credit card.
Can I email sales receipts to customers in QuickBooks?
Yes, you can email sales receipts to customers in QuickBooks by clicking on the Save and send button at the bottom of the sales receipt form.
Can I apply a discount to a sales receipt in QuickBooks?
Yes, you can. To do this, select Discount percent on the Sales receipt form to enter the discount as a percentage or Discount value to record the discount as a dollar amount.
Wrap Up
Congratulations on completing our tutorial on how to create and send a sales receipt in QuickBooks Online. The next lesson in our training course is how to write & print checks in QuickBooks Online.