







In this tutorial, we’ll explain how to set up customers in QuickBooks Online. We’ll show you how to add customers manually in QuickBooks and import customer data from a comma-separated values (CSV), Excel, or Google Sheets file.
Step 1: Gather Customer Information
First, gather the information you need to set up your new customers, including the following:
- Company name
- Contact name
- Address
- Email address
- Website address
- Telephone numbers
- Opening balance (if applicable)
Unless you’re only adding a few customers, we recommend that you use a spreadsheet so that you can import your information easily into QuickBooks. If you already have client information in another software, determine if that information can be exported to a spreadsheet.
If you’re gathering the information in a spreadsheet, then you can skip ahead to our discussion on how to add customers in QuickBooks using an Excel, CSV, or Google Sheets file. However, we recommend learning how to add the information manually so that you have a good understanding of the fields available for client information.
Step 2: Navigate To the Customer Center
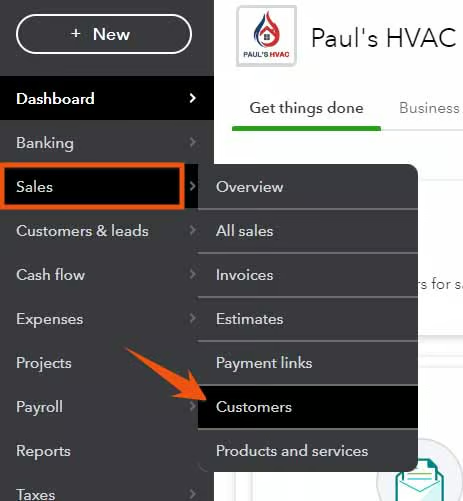
To set up customers in your company file, navigate to the customer center by hovering over Sales and then Customers on the left menu bar, as shown below.
Seeing a different left-side navigation menu?
1. Check User View
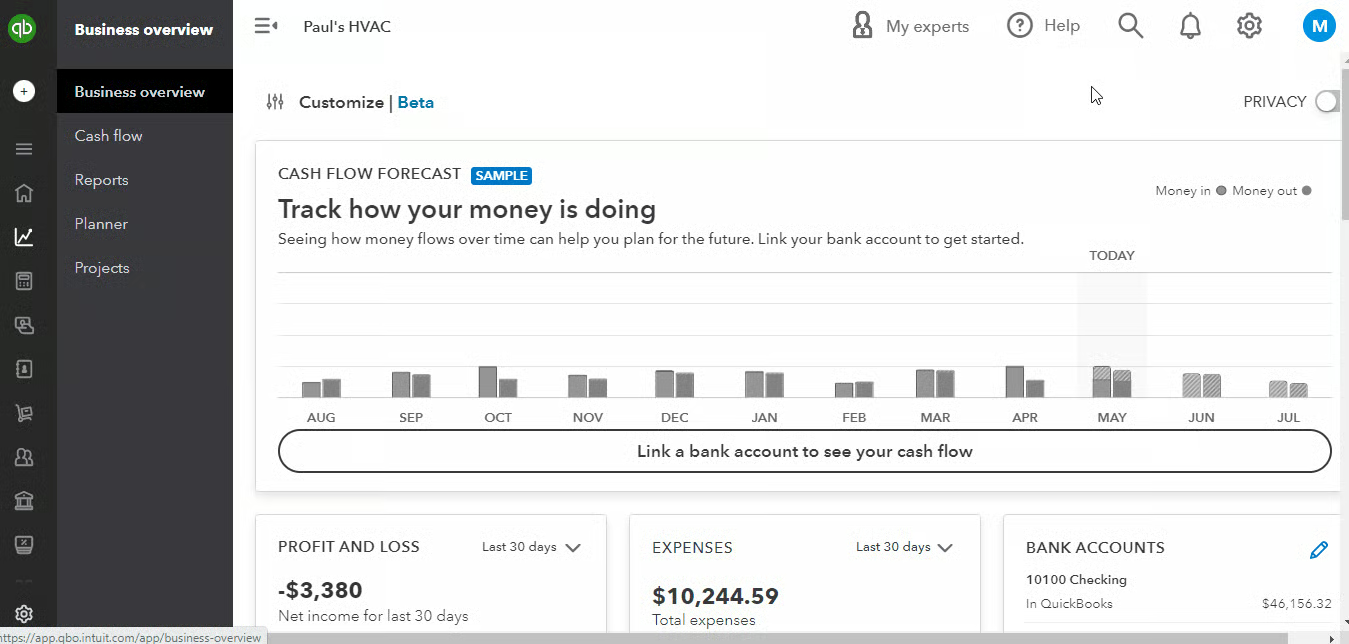
QuickBooks has two user views: Business View and Accountant View. Your left-side navigation menu may look different depending on the user view you are in.
If your sidebar menu is not what is shown in our tutorial, it means that you are on Business View. We prefer and recommend using the Accountant View because it shows a full range of business accounting features and tools that you can use in QuickBooks.
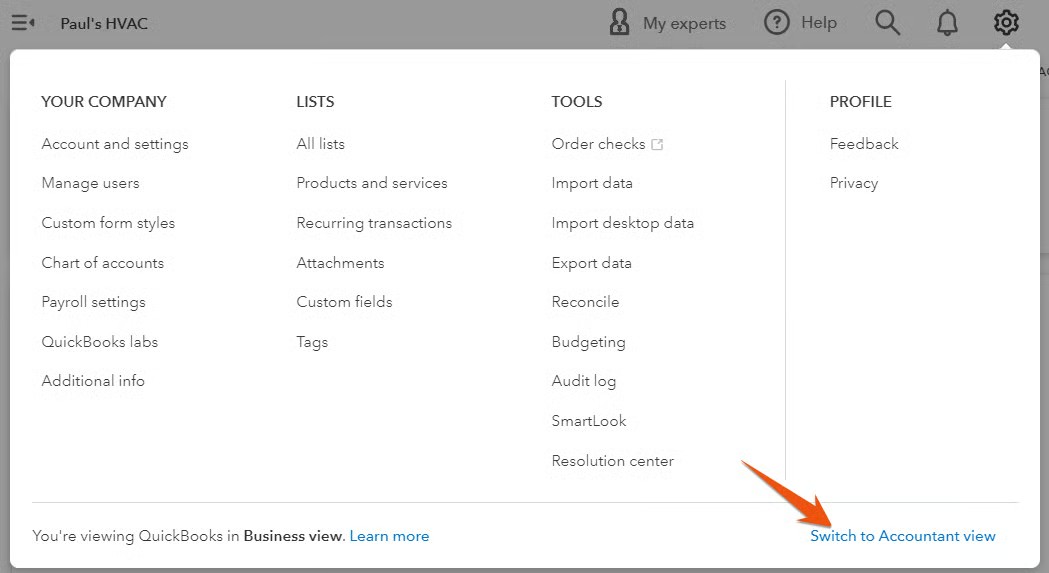
To verify whether you’re using the Business View, click on the cog wheel at the top right-hand corner of your QuickBooks dashboard, and check whether the button on the lower right-hand says Switch to Accountant view, as shown below. If so, then it means you are on Business View.
2. Switch to Accountant view
Once you verify that you are on Business View, click on Switch to Accountant view to update the appearance of your sidebar menu. In a few seconds, you should see the same left-side menu bar illustrated in this tutorial.
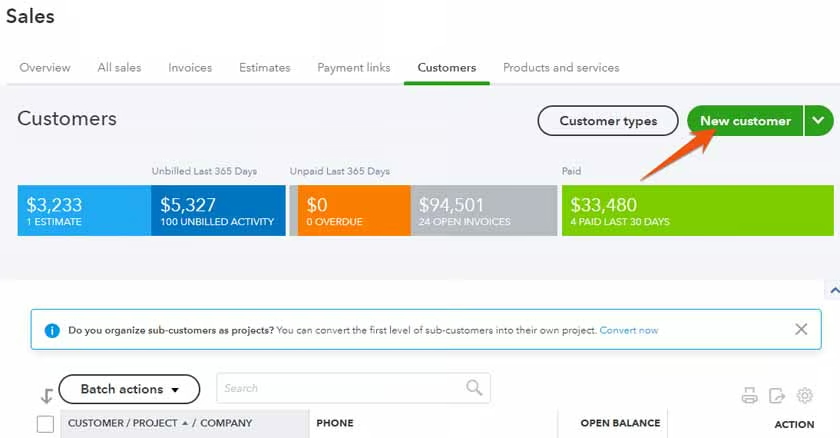
From the customer center, click on the green New customer button in the upper right-hand corner.
Step 3: Enter Customer Information
At a minimum, you need to enter basic contact information for your customers. This includes contact name, business name, billing address, email address, and telephone number. To help you better understand how to add a new customer in QuickBooks, let’s use a sample scenario.
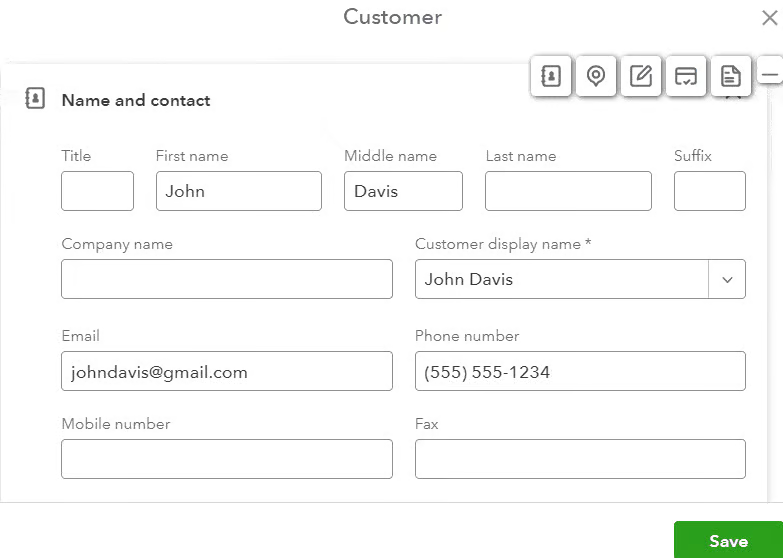
Let’s say you recently acquired a new customer named John Davis. You were able to gather information about John, including contact details, billing address, and payment terms.
The GIF below shows how the customer information screen is completed using our sample scenario.
Below, we discuss some of the important fields and information requested in the customer information screen.
Name and Contact
- First and last name: Provide the name of the client or the name of the contact person if the customer is a company. In our sample scenario above, we added a new customer named John Davis.
- Customer display name: This field will auto-populate based on the information entered in the customer name field but can be changed if you wish. This is how your customer will appear on your customer list in QuickBooks.
- Company: Enter the company name or leave it blank if the customer is an individual.
- Contact details: Enter contact information, including email address and phone number.
- Name to print on checks: You must specify how to print the customer’s name on checks. You may check the box to use the “Display name as” field or type in a different name.
Addresses
- Billing address: The billing address specifies the address to print on invoices you send to your customers.
- Shipping address: This is the address that will be used to ship products to your customers. The default setting is to use the same as the billing address.
Notes and Attachments
- Notes: Use the Notes tab to store any helpful information about the customer, such as who referred them or their relationship with other customers.
- Attachments: Attach documents to keep on file for this customer, such as signed contracts or a copy of email correspondence.
Payments
- Preferred primary method: The preferred payment method determines the default payment method applied when you receive a payment from the customer, such as check, cash, or credit card. In our example, our new customer prefers to pay in check, so we selected “check.” This setting can be changed to another form of payment easily, if needed, when payments are received.
- Sales form delivery options: This allows you to specify how you want to deliver sales forms, such as invoices, estimates, sales receipts, to your new customer. This means you can override the default delivery method that we set up for all customers in our course on how to set up sales form content in QuickBooks Online.
- Payment terms: This field lets you select the conditions under which the customer is expected to pay an invoice, such as 1%10 Net 30, 2%10 Net 30, or Due on receipt. For instance, if you select 1% 10 Net 30, it means the customer will receive a 1% discount off the total amount due if they pay the invoice within 10 days. If they do not pay within 10 days, the full amount is due within 30 days. If you don’t specify the payment terms, the default payment term you have set up for all customers will be used for this new customer.
- Language: Select from six different languages for each customer’s invoices:
- English
- French
- Spanish
- Italian
- Chinese (traditional)
- Portuguese (Brazil)
Additional Information
The remaining tabs are optional but can store some very helpful information:
- Customer type: Specify whether the customer is categorized as residential or commercial.
- Tax info: Indicates whether the customer is subject to sales tax and stores their exemption number if applicable.
- Opening balance: This field is used to record any outstanding balance that a customer owes you at the time you create the customer record. This field is typically used when you are transitioning to QuickBooks from another accounting system and you need to record any unpaid invoices or other transactions that the customer still owes you for. For instance, if your new customer has an outstanding invoice of $500 that hasn’t been paid yet, you need to enter $500 in the open balance field.
Click the green Save button on the lower right corner of the customer information screen to save the information you’ve input.
Step 4: Review the Customer Information and Edit If Needed
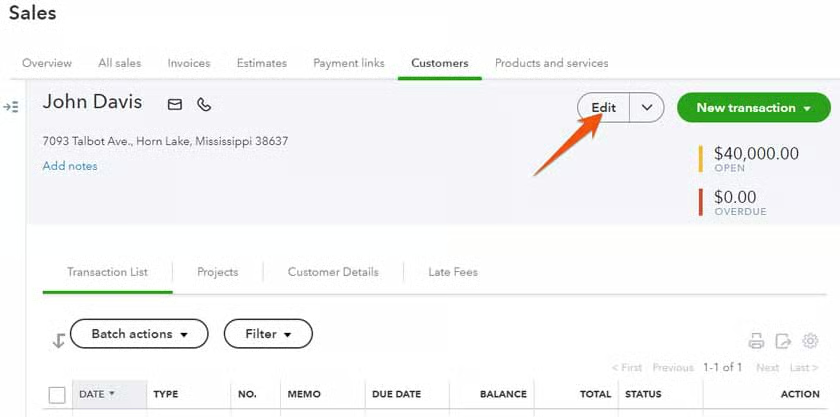
Once the new customer is created, QuickBooks will take you to the customer detail screen where you can review the information you just entered. If you wish to change any information, click the Edit button under the Customers tab. The customer information screen you originally used to record the new customer will appear, and you can make any changes needed.
How To Add Customers in QuickBooks Using an Excel or CSV File
Step 1: Prepare Your Spreadsheet
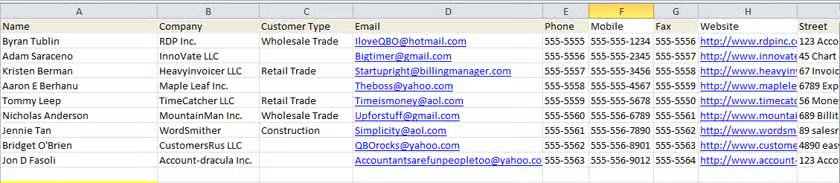
Each row in your Excel, CSV, or Google Sheets file should contain one customer. Likewise, each column should contain a piece of information you would like to import. Here are the customer information, or fields, which can be imported into QuickBooks Online for customers:
- Name
- Company
- Customer type
- Email address
- Phone number
- Mobile number
- Fax number
- Website
- Street
- City
- State
- ZIP code
- Country
- Opening balance
- Date of opening balance
It’s OK if some of the fields are left blank or columns are omitted. Additional columns are also OK, but they won’t be imported into QuickBooks. The specific titles of your columns don’t matter because you’ll be able to assign each column to the appropriate field during the import.
Here’s an example of a worksheet with just some of the basic fields included.
Step 2: Navigate To Import Screen
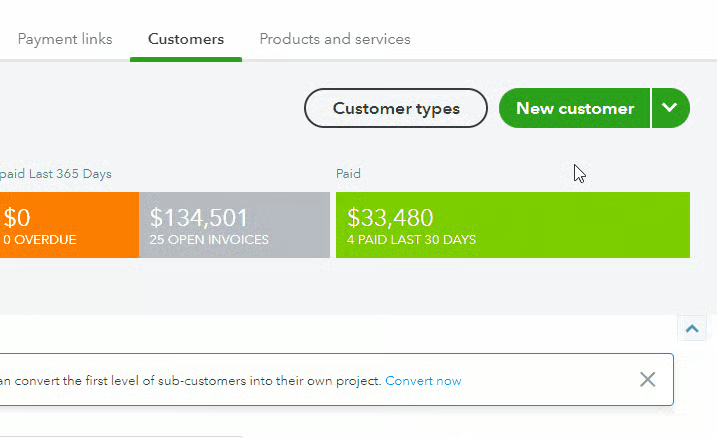
To import customers into QuickBooks Online from the Customer Center, click the drop-down arrow to the right of the New customer button and select Import customers, as illustrated below.
Step 3: Select the Excel, CSV, or Google Sheets File to Be Uploaded
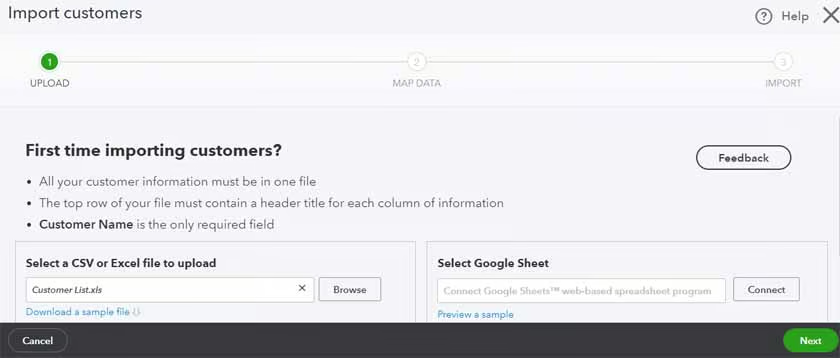
Click the Browse button to locate your Excel, CSV, or Google Sheets file, and then click Next on the bottom right corner of the screen.
Step 4: Map Your Data
Next, indicate which column in your spreadsheet should flow to which available QuickBooks Online field.
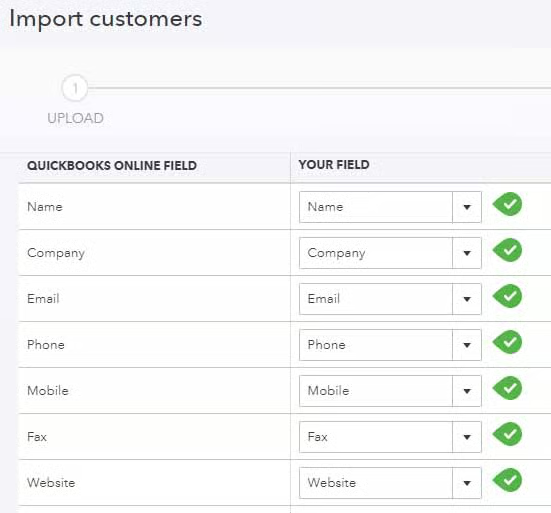
The left column provides all the available QuickBooks Online customer fields that may be imported. The right column provides the column in your spreadsheet that contains the information corresponding to the field in the first column.
Click on the drop-down menu in each row to select the appropriate column in your spreadsheet. QuickBooks Online will populate these fields automatically based on your column headers, but you can change these assignments as necessary. Any field in the first column that isn’t in your spreadsheet should be assigned to “No Match.”
Once you assign all your columns to QuickBooks Online customer fields, click Next on the bottom right corner of the screen.
Step 5: Review and Import Your Data
This is your final opportunity to review the customer data and how it’ll import into QuickBooks Online. The number of records being imported should agree with the rows in your spreadsheet―minus one for your header row. Also, make sure all the information appears in the correct field.
If something isn’t right, click the Back button to go back and make any necessary changes to the mapping. Select Import from the bottom right corner of the screen once you’re ready to proceed.
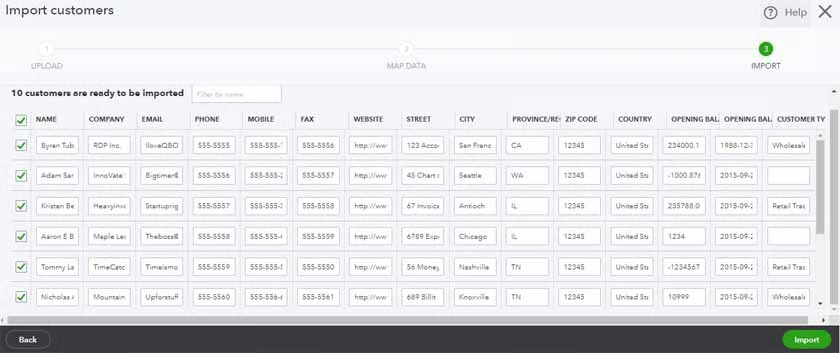
Once the import is complete, you’ll receive a message that the import was successful. You can now view the customers’ information in the Customer Center.
How To Delete a Customer in QuickBooks Online
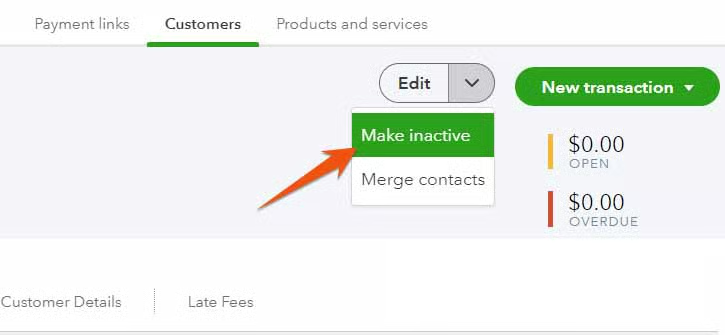
You cannot delete a customer once you have used them in a transaction because doing so would delete the transaction and create an error in your financial statements. However, you can inactivate a customer if you no longer plan to do business with them. Inactivated customers won’t appear in the Customer Center, but they’ll still appear in all financial records where there has been a transaction.
To inactivate a customer from the Customer Center, select the customer, click on the drop-down arrow next to Create Invoice, and select Make Inactive, as indicated below.
The Importance of Setting Up Customers in QuickBooks Online
QuickBooks Online, our overall best small business accounting software, allows you to set up and manage customer data efficiently to expedite customer billing. Once a customer profile has been created, their information will be automatically populated into invoices, removing the need for manual data entry.
Additionally, setting up customer profiles in QuickBooks Online allows you to track sales and customer activity. QuickBooks allows you to generate reports that show your sales by customer, allowing you to identify your top customers and track their purchasing patterns, helping you personalize your marketing strategy.
Frequently Asked Questions (FAQs)
What information do I need to set up a new customer in QuickBooks Online?
You will need the customer’s name, billing and shipping addresses, phone number, and email address. It’s also a good idea to include any additional information, such as their preferred payment method and payment terms.
Can I import customer data into QuickBooks Online?
Yes, you can import customer data into QuickBooks Online from a CSV, Excel, or Google Sheets file. To do so, go to the Customers tab and click on Import Customers.
Wrap Up
That wraps up the tutorial on how to set up customers in QuickBooks Online. The next lesson in our training course is how to set up vendors in QuickBooks Online. This will cover how to add or import vendor information manually to your account.
