


This tutorial covers how to customize the expense settings in QuickBooks Online to match your company’s needs. These settings let you activate important features and disable those you don’t need, as well as set up custom options, such as adding a markup to expenses billed to customers.
Step 1: Navigate To Account and Settings
Click on the cog wheel in the upper right corner of your QuickBooks Online screen and select Account and settings under Your Company in the first column, as shown below.

Step 2: Select ‘Expenses’
Next, click on Expenses in the left menu bar to reveal the three categories of expense settings: bills and expenses, purchase orders (POs), and messages.

Step 3: Customize Bills and Expenses
Let’s start by customizing your bills and expenses by clicking anywhere in the Bills and expenses section. The Bills and expenses section includes the following fields:
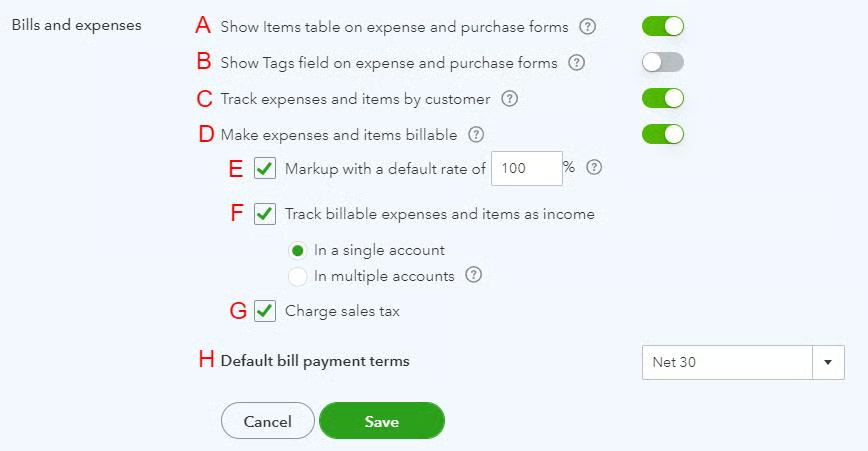
A. Show items table on expense and purchase forms: This setting must be turned on to assign expenses and purchases to “items” instead of directly to expense accounts. Items include the products and services that you sell to customers, so this option must be turned on if you have inventory. The use of items is a powerful feature of QuickBooks, so we highly recommend this option be activated.
B. Show Tags fields on expense and purchase forms: Tags are customizable labels that you can assign to transactions. Turn this setting on if you wish to categorize your expenses in a way that is not covered by the other fields available. For example, you might use tags to categorize expenses by department, project, or location or to identify expenses that are tax-deductible.
C. Track expenses and items by customer: This should be turned on so that you can assign expenses and items purchased to specific clients, and if you want to bill customers for expenses incurred on their behalf.
D. Make expenses and items billable: You should turn this setting on when you want to charge your customers for expenses you incurred on their behalf. For instance, if you are a consultant who travels to a client’s site and incurs expenses, such as hotel and meals, you can use this setting to bill your client for those expenses in addition to your consulting fees.
E. Markup with a default rate of: If you’ve decided to provide an option to bill expenses and items to clients, you can choose a default markup rate. If you leave this box unchecked, the expense or item will be billed to the customer at the actual cost. You can change the markup when creating an invoice.
F. Track billable expenses as income: There are two methods of accounting for the reimbursement of billable expenses. If you leave this box unchecked, the reimbursement will directly offset the original expense. If you check the box, the reimbursement will be recorded as income. Any markup of expenses will always be shown as income.
If you decide to track billable expenses as income, you must choose whether you want all billable expenses to be tracked in a single account or multiple accounts:
- In a single account: All billable expenses will be tracked in an income account named “Billable Expense Income.”
- In multiple accounts: A checkbox will be added to every income account information screen, so you can indicate which income accounts should be available to use for billable expense income.
G. Charge sales tax: If you’re required to collect sales tax from customers on billable expenses, check this box. Invoices for billable expenses will then include a field for sales tax.
H. Default bill payment terms: Most vendors will provide you with the payment terms for their invoices, which can be entered either in the vendor information screen or as the bill is input. The default payment term entered here will apply to bills for which the vendor hasn’t specified payment terms. By setting up payment terms in QuickBooks, you’ll receive reminders when a bill is coming due.
When you have customized all of your options under Bills and expenses, click the green Save button.
Step 4: Customize PO Settings
Click on Purchase orders to open the various options available.
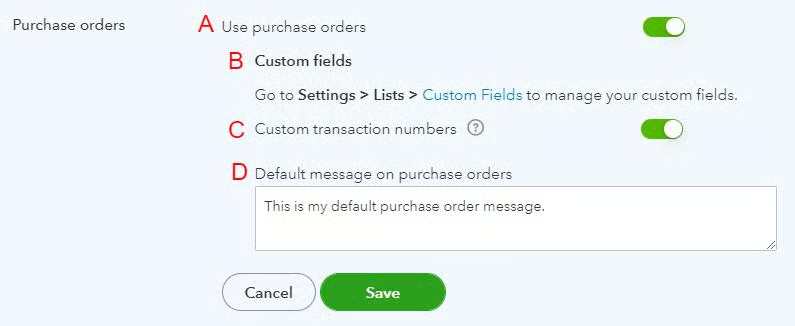
A. Use purchase orders: POs can be generated in QuickBooks and then emailed to vendors or printed. They can be converted to bills once the order is received. Toggle Use purchase orders to enable POs for your company.
B. Custom fields: You can add up to three custom fields to print on your POs. This option is great if your vendors request specific information excluded from the QuickBooks PO. If you purchase products with unique attributes or specifications, such as size, color, or style, you may want to add custom fields to your POs to capture this information.
C. Custom transaction numbers: If this box is unchecked, QuickBooks will automatically generate PO numbers. By checking the box, you can manually input PO numbers when they’re created. This option is nice if you want to match your PO to a vendor’s system.
D. Default message on purchase orders: You can provide a default message that will print on all POs. This message can be changed and customized when you create a PO.
When you’re satisfied with your choices, click the green Save button.
Step 5: Customize the PO Email
The last section of expense settings allows you to design a default email message to accompany POs emailed to vendors. Click on Messages to get started.
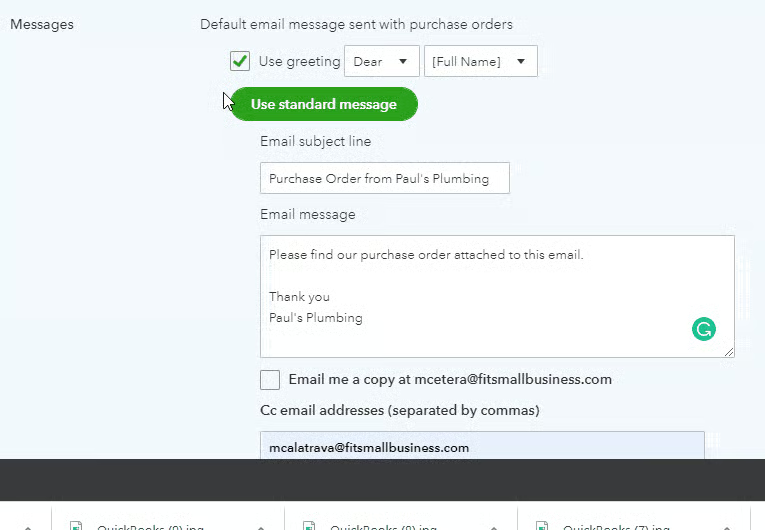
Customize the greeting, subject line, and message you wish to send with all POs. You can always change the email message when you send a PO. For instance, you might add a personal note when you send a PO to a long-time vendor. If you don’t like the changes you’ve made, click the green Use standard message button to return to the original settings. The last option is to have a copy of the email sent to the QuickBooks master administrator.
When you’re done customizing your PO email, click the green Save button.
The Importance of Customizing Expense Settings in QuickBooks Online
As our overall best small business accounting software, QuickBooks Online offers a wide range of expense customization options, allowing you to tailor your expense settings to your specific business needs. By customizing your expense settings, you can create a more accurate picture of your business expenses and track them more effectively.
For example, by using custom tags, you can categorize expenses according to different projects or departments and generate reports that provide a detailed breakdown of expenses by category. You can also set a default markup rate for expenses and ensure that your pricing is consistent across all products.
Frequently Asked Questions (FAQs)
How do I customize settings in QuickBooks Online?
To customize expense settings in QuickBooks, click the cog wheel and select “Account and Settings.” Then, choose “Expenses” and make any desired changes, such as adding or deleting expense categories and enabling custom fields for purchase orders.
Can I add custom fields to POs in QuickBooks Online?
Yes, you can add custom fields to POs in QuickBooks Online to capture additional information about purchases.
Can I set default markup rates for expenses in QuickBooks Online?
Yes, you can set default markup rates for expenses in QuickBooks Online by using the “Markup with a default rate of” setting.
Wrap Up
You have now learned how to customize your expense settings in QuickBooks Online. The next tutorial in our QuickBooks Online Training Course is how to set up advanced settings in QuickBooks Online, which will cover a wide array of options that will fine-tune your company file.