


This tutorial looks at how to enter a credit card refund in QuickBooks Online so that you can reduce your credit card balance by the vendor credit when a charge is reversed or reduced. We’ll also show you how to find the credit in the register, review the details, and make changes if needed.
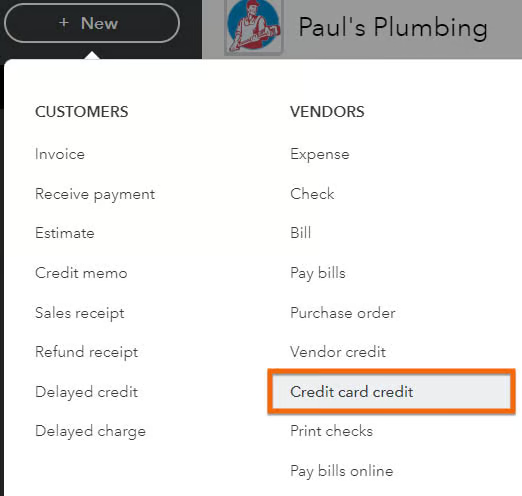
Step 1: Navigate to the Credit Card Credit Screen
From the QuickBooks Online dashboard, click + New at the top of the left menu bar, and then select Credit card credit in the second column, Vendors as shown below.
Step 2: Enter Transaction Information
The credit card credit screen is nearly identical to the expense screen as discussed in our tutorial on how to input credit card transactions in QuickBooks manually.
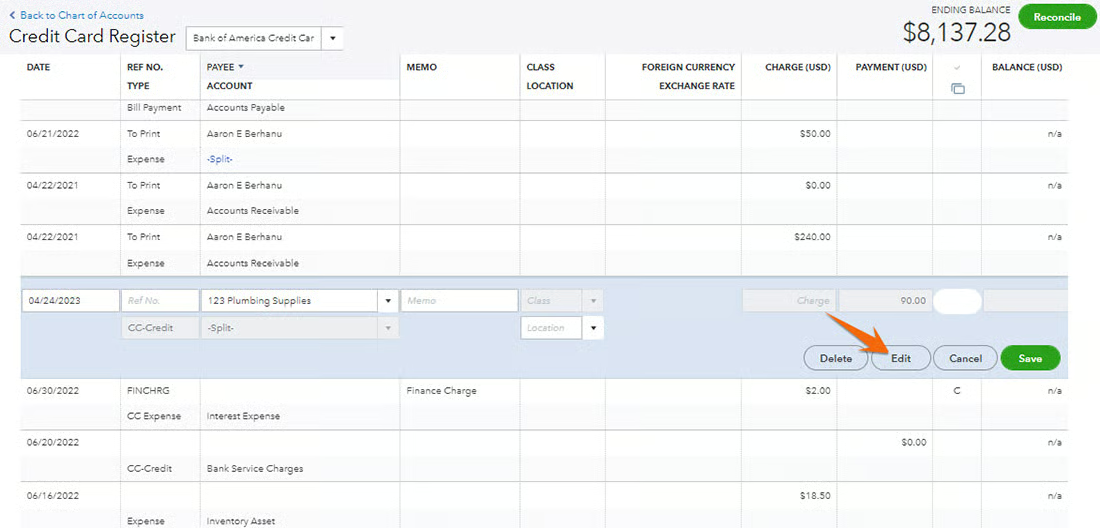
To better understand how to enter a credit card refund from a vendor in QuickBooks, we will use a sample scenario. Let’s say you are a small plumbing business and recently purchased a 30-foot pipe from 123 Plumbing Supplies for $90 using your company credit card with Bank of America. However, upon receiving the product, you discovered that it was defective and needed to be returned. You contacted the vendor, and it agreed to issue a refund of $90 to your credit card for the defective pipe.
Let’s use the scenario to complete the required fields on the credit card credit form.
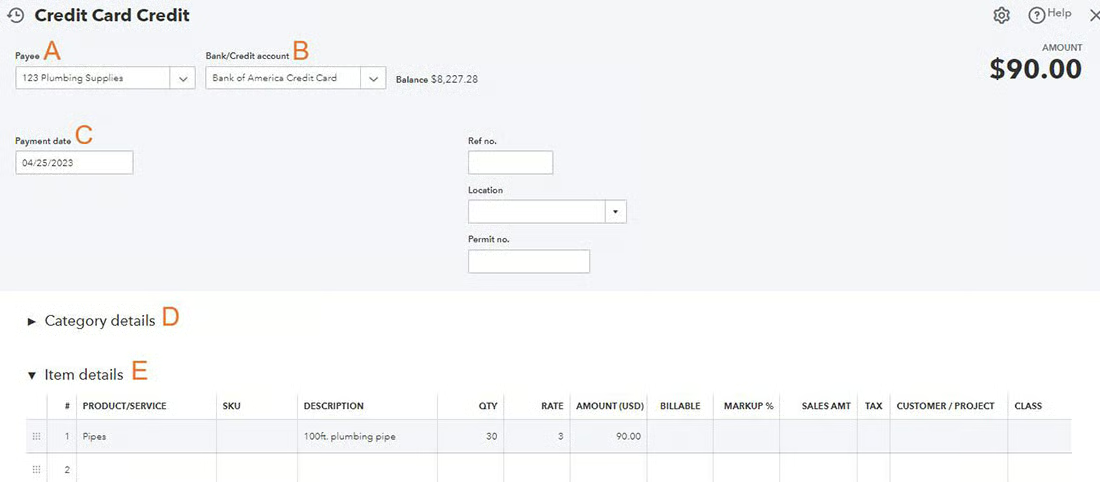
A. Payee: Enter the name of the vendor who issued the refund. Given our sample, we selected 123 Plumbing Supplies as the vendor.
B. Bank/Credit account: Select the credit card account that will accept the refund. In our case, we chose Bank of America Credit Card.
C. Payment date: Enter the date the credit was issued.
D. Category details: Refer to the original credit card expense entry to determine which category or expense account should be reduced by the credit. In our example, we may use an expense account called “Supplies.”
E. Item details: Use the same items on the original expense entry. If you’re entering credit because you are returning inventory items purchased, include the number of items returned in the QTY field so that your units of inventory owned are reduced. To follow our example, we selected “Pipes” in the Product/Service field, 30 in the QTY field, and the rate, which is $3 per linear foot. QuickBooks will automatically calculate the total amount, which you will see in the Amount field on the upper right side of the screen.
When you have entered the credit information that reverses the appropriate portions of the original expense, click the green Save and close button in the bottom-right corner of the screen.
How To Review and Edit Credit Card Charges and Credits in QuickBooks Online
After a credit card credit has been entered, it should appear in the credit card register. The following steps will show you how to find the credit in the register, review the details, and make any adjustments.
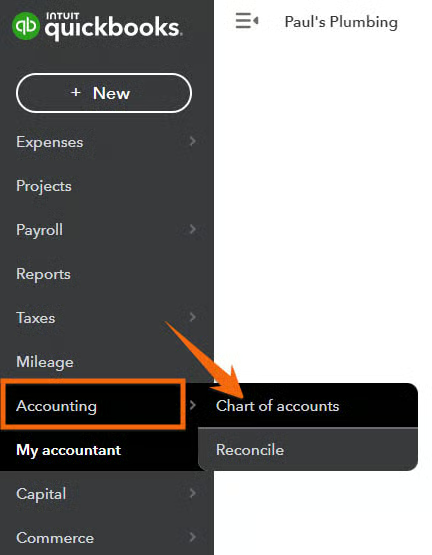
Step 1: Navigate to the Credit Card Register
Hover over Accounting in the left menu bar, and then select Chart of accounts from the pop-up menu.
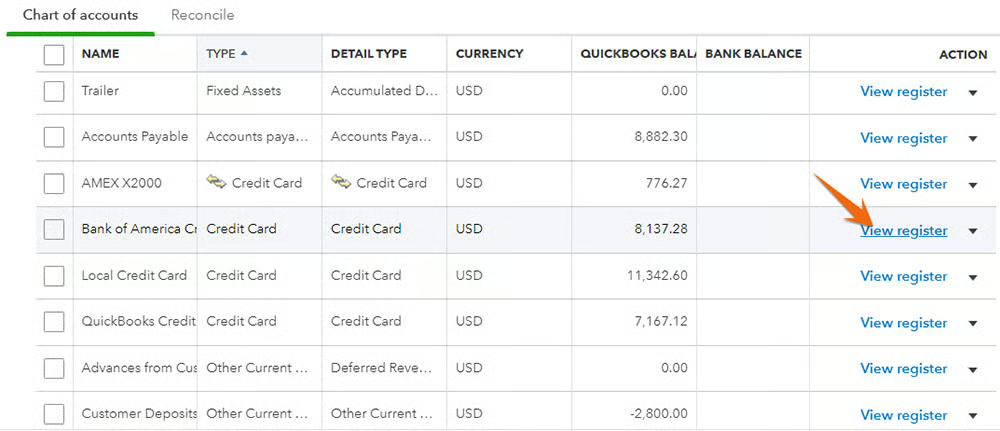
Step 2: Find the Credit Card Account
Scroll through the Chart of accounts to find the credit card account you want to review. In the example above, we want to review Bank of America Credit Card’s transactions. Click View register in the far right column to open the transactions for that credit card account.
Step 3: Select a Credit Card Transaction
From the credit card register, find the credit card charge or credit you want to review, and then click anywhere on the transaction to open more details. We recommend making any necessary corrections to the original input screen, which you can open by clicking the Edit button under the transaction.
The credit card screen, which was discussed in Step 2, shows up so that you can make the necessary changes. When you are satisfied with your review or corrections, click the Save & close button.
When To Enter a QuickBooks Credit Card Refund
When a charge is reversed or reduced, it is essential to enter a credit card refund in QuickBooks Online to reduce the credit card balance by the vendor credit. You should enter a credit card refund as soon as you determine a purchase was damaged or unnecessary. The vendor will usually process the return using the same credit card you used to make the purchase.
This refund will appear on your credit card statement as a reduction in your balance, and you need to enter it on QuickBooks so that your QuickBooks credit card balance is correct. With QuickBooks, our best small business accounting software, you can enter a credit card refund easily to ensure that your financial records are up-to-date and accurate.
Frequently Asked Questions (FAQs)
How do I ensure that my credit card balance is accurate after entering a credit card refund in QuickBooks?
After entering a credit card refund, you can verify that your balance is accurate by reconciling your credit card account. This will help ensure that all transactions are accounted for and that your account balance matches your bank statement.
If I enter a credit card refund in QuickBooks, will my credit card balance be reduced by the refunded amount?
Yes, it will. When you enter a credit card refund, it is recorded as a negative amount in QuickBooks, which reduces the balance of the credit card account. This means that the credit card balance will decrease by the amount of the refund.
Wrap Up
You’ve just learned how to enter a credit card refund in QuickBooks Online. If you’re completing our QuickBooks Online tutorials in order, you’ve probably noticed the lessons are getting quicker as you get comfortable with the platform and how transactions are laid out. The next guide in our training course is how to reconcile credit card accounts.