


In this tutorial, you’ll learn how to record a bounced check in QuickBooks Online. There are multiple ways to do this, but we present what we believe is the most efficient while still maintaining a paper trail and making reconciling your QuickBooks banking activity as simple as possible.
To teach you how to record a bounced check in QuickBooks Online, we’ll use a sample scenario:
Paul’s HVAC issued Aaron Davis Invoice #71166 for $240, and he paid the full invoice with check #100. Paul’s HVAC recorded the check as received and placed it in undeposited funds, and then deposited check #100, along with other customer checks, in its Chase Bank checking account. Chase notified Paul’s HVAC that check #100 was returned for nonsufficient funds (NSF) and charged an NSF fee of $25.
Step 1: Record the Decrease in Bank Balance
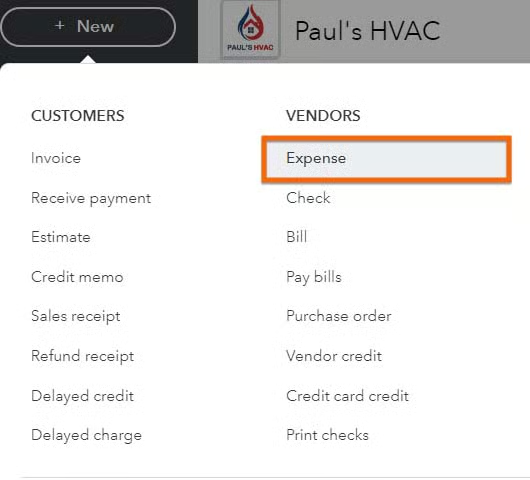
With the scenario above, let’s decrease the Chase checking balance since the $240 check from Aaron Davis bounced. We’ll do this by recording an expense out of the Chase account—click the + New button at the top of the left menu bar and then select Expense in the second column, Vendors, as shown below.
The expense entry should decrease the bank account balance and increase accounts receivable (A/R) since the customer, Aaron, now owes Paul’s HVAC for the check that bounced. Here’s the expense entry to decrease the Chase checking account for our example:
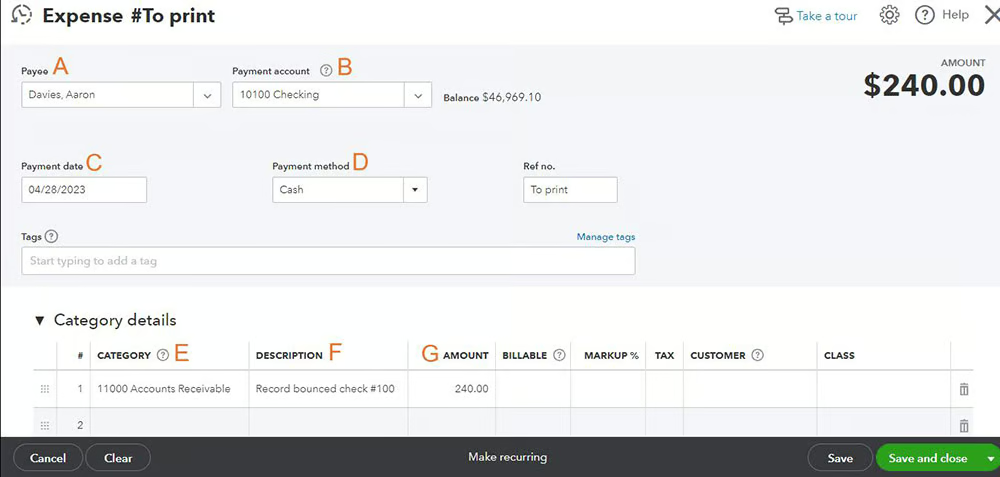
A. Payee: Select the customer whose check bounced.
B. Payment account: Choose the bank account where the bounced check was deposited.
C. Payment date: Enter the date the bank notified you of the bounced check.
D. Payment method: Select cash as the payment method.
E. Category: Set the category to Accounts Receivable, which is an asset account and records the amount owed to you by the customer.
F. Description: Provide a description indicating that this entry is being made to record a bounced check.
G. Amount: Enter the amount of the bounced check.
Click the green Save and close button when you have entered all the information.
Step 2: Reopen the Original Invoice
The customer invoice was marked as paid when the original check was received. However, now that the check has bounced, the invoice needs to be reopened and sent to the customer.
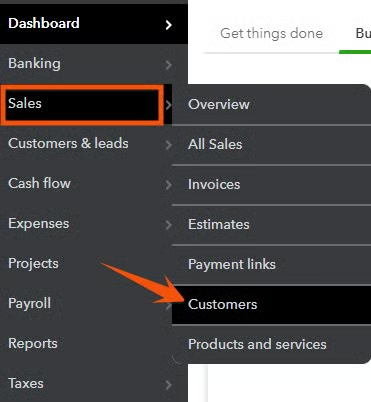
Navigate to customers by hovering over Sales in the left menu bar and then clicking on Customers.
Seeing a different left-side navigation menu?
QuickBooks has two user views: Business View and Accountant View. Your left-side navigation menu may look different depending on the user view you are in.
If your sidebar menu is not what is shown in our tutorial, it means that you are on Business View. We prefer and recommend using the Accountant View because it shows a full range of business accounting features and tools that you can use in QuickBooks.
To verify whether you’re using the Business View, click on the cogwheel at the top right-hand corner of your QuickBooks dashboard, and check whether the button on the lower right hand says Switch to Accountant view, as shown below. If so, then it means you are on Business View.
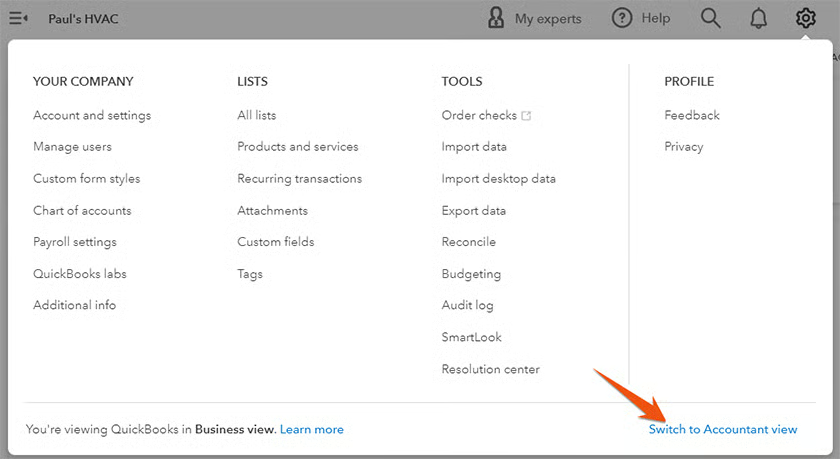
Once you verify that you are on Business view, click on Switch to Accountant view to update the appearance of your sidebar menu. In a few seconds, you should see the same left-side menu bar illustrated in this tutorial.
Once you’ve selected Customers, scroll down to find the customer whose check bounced and click on their name to open a list of their transactions. In the list of the customer’s transactions, locate the original invoice and the original payment received.

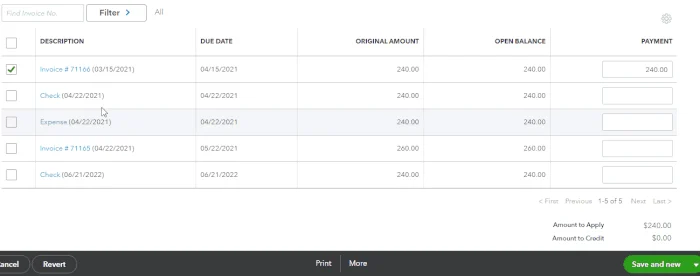
Click Closed (highlighted in the screenshot above) on the right side of the payment line to open the receive payment screen. The Receive Payment screen applies check #100 to invoice #71166, which is no longer correct since the payment bounced.
To reopen the invoice, uncheck the box to the left of the invoice and check the box to the left of the check that was created in step one. Now, click the green Save and new button, and the invoice in the transaction list should show a status of Open or Overdue.
You can now email or print and mail the invoice to the customer, as discussed in our tutorial on how to create and send invoices in QuickBooks Online.
Step 3: Record the NSF Fee
Next, record the NSF fee charged by your bank. This fee represents the cost to the bank for processing the bounced check, and it is a cost that customers mostly have to bear as account holders. If this is the first time you’re recording an NSF fee, you should first create a service item so that the fee can be marked up and billed to the customer.
The details of adding service items are covered in our guide on how to set up products and services in QuickBooks Online, but we’ll go over them here so that we can talk about the specifics applicable to setting up the NSF Fee.
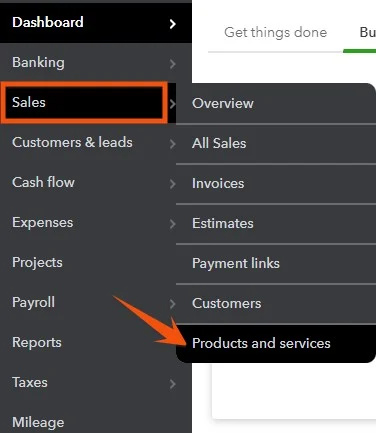
Hover over Sales in the left menu bar and then click Products and services.
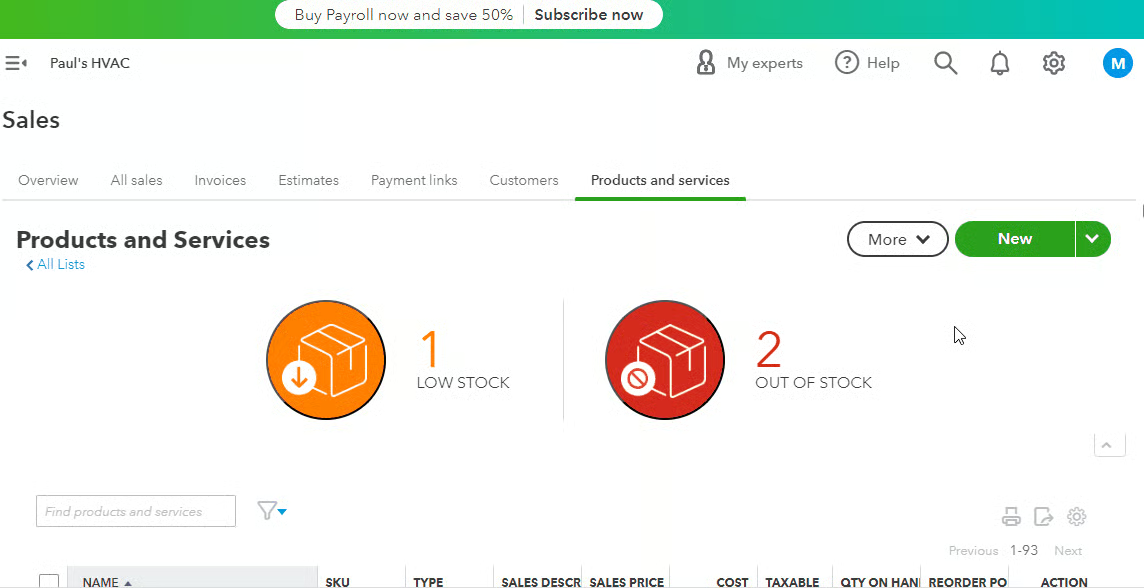
From the Products and services screen, click the green New button in the upper right corner to create a new product or service item. The Product/Service information screen that appears after clicking New provides the four item types that can be created for products and services. Click on the third item, Service.
Here’s an example of how to complete the Product/Service information screen:
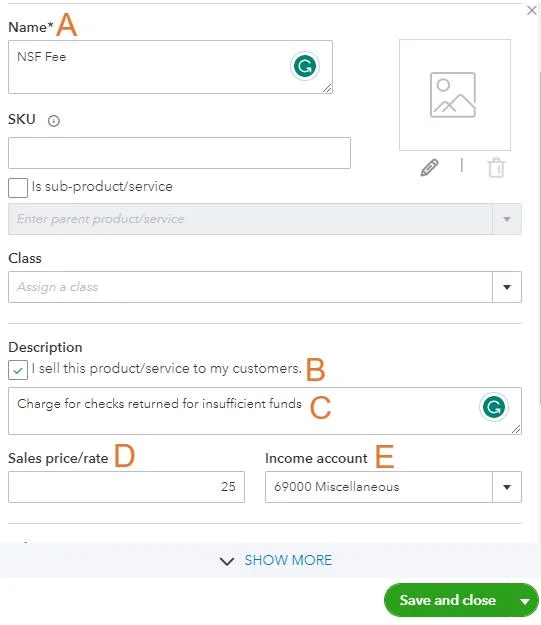
A. Name: Name the Service Item “NSF Fee” or something similar.
B. Sell this product/service tick box: Check the box indicating that you are selling this service to your customer. This will make it easier to add an NSF Fee to your customer’s invoice.
C. Description field: Enter a description of the charge you would like to appear on your customer’s invoice.
D. Sales price/rate: Input the amount you would like to charge your customers for a bounced check. This doesn’t necessarily have to be the same amount as the bank charges you. There’s nothing wrong with charging the customer for your inconvenience, but it’s a good idea to state your charge for returned checks at the bottom of all your invoices.
E. Income account: Select the income account where you want to record the fees collected from your customers.
F. Sales tax: Select nontaxable if NSF fees charged to clients aren’t subject to sales tax in your state.
Scroll down to complete the purchasing information for the NSF free service item.
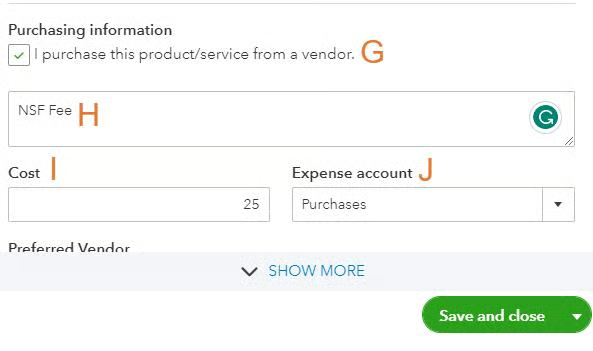
G. Purchasing information tick box: Check the box to indicate that you purchase this product or service from a vendor.
H. Description field: Provide a description to appear on your internal purchase and expense forms.
I. Cost: Enter the amount of your bank’s NSF fee.
J. Expense account: Select the expense account where you want to record the NSF fee charged to you by your bank.
When you’re finished, click the green Save and close button.
Now that we have created a service item for the NSF fee, recording the expense of the fee will be easy. Open a new expense screen by clicking on + New at the top of the left menu bar and then selecting Expense, as done in Step 1.
Here’s an example of how to record the NSF fee for the sample scenario with Paul’s HVAC:
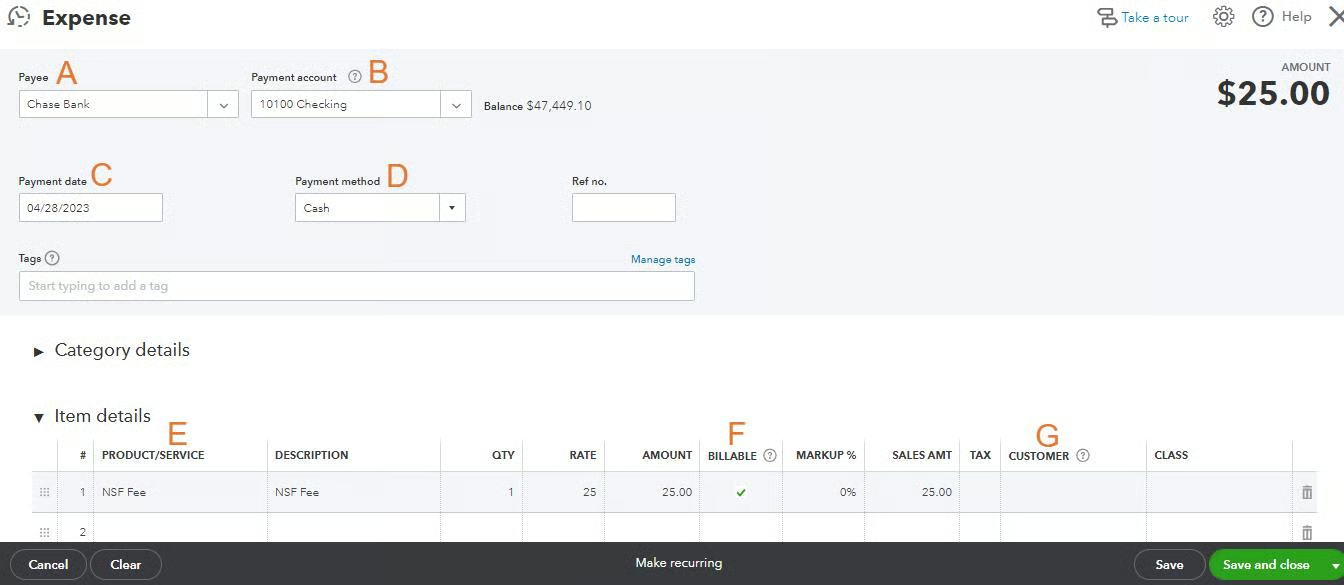
A. Payee: Select the bank that charged you an NSF fee as the payee. If the bank isn’t yet set up as a customer, select Add New and provide the bank’s information.
B. Payment account: Select the account where the NSF fee was charged.
C. Payment date: Enter the date the NSF fee was charged to you.
D. Payment method: Select cash for the payment method.
E. Product/Service: Under Item details (not Category details), select the NSF Fee item you set up in the first part of this step. Once you select the item, the Description, Qty, Rate, and Amount will populate automatically based on the information you provided when you set up the item.
F. Billable: If you want to charge your client a fee for the bounced check, place a checkmark under Billable. This will populate the sales amount field automatically. This box must be checked for the charge to be available when you create a customer invoice in the next step.
G. Customer/Project: If you’ve marked the expense as billable, you must select the customer whose check bounced.
When you’ve finished entering the data, click the green Save and close button. If you want to bill your client for an NSF fee, then continue to Step 4. Otherwise, you’re done recording the bounced check activity.
Step 4: Bill an NSF Fee (Optional)
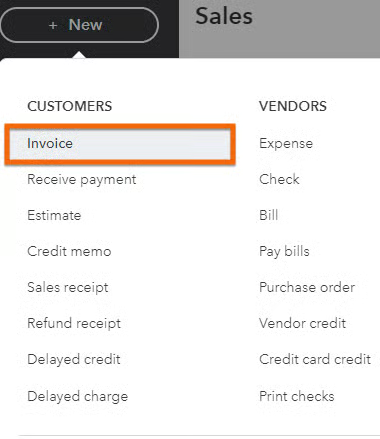
The last step is to bill your customer an NSF fee, which is optional. Click on + New on the top of the left menu bar and then select Invoice under Customers in the first column.
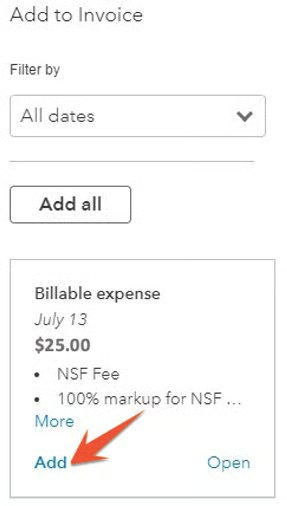
A new invoice screen will appear. In the customer field, select the customer whose check bounced. A list of billable expenses will then appear to the right of the invoice. Locate the billable NSF fee you created in the prior step and then click Add.
The billable expense will populate the billing detail of the invoice automatically. Here’s the completed invoice screen for our example with Paul’s HVAC:
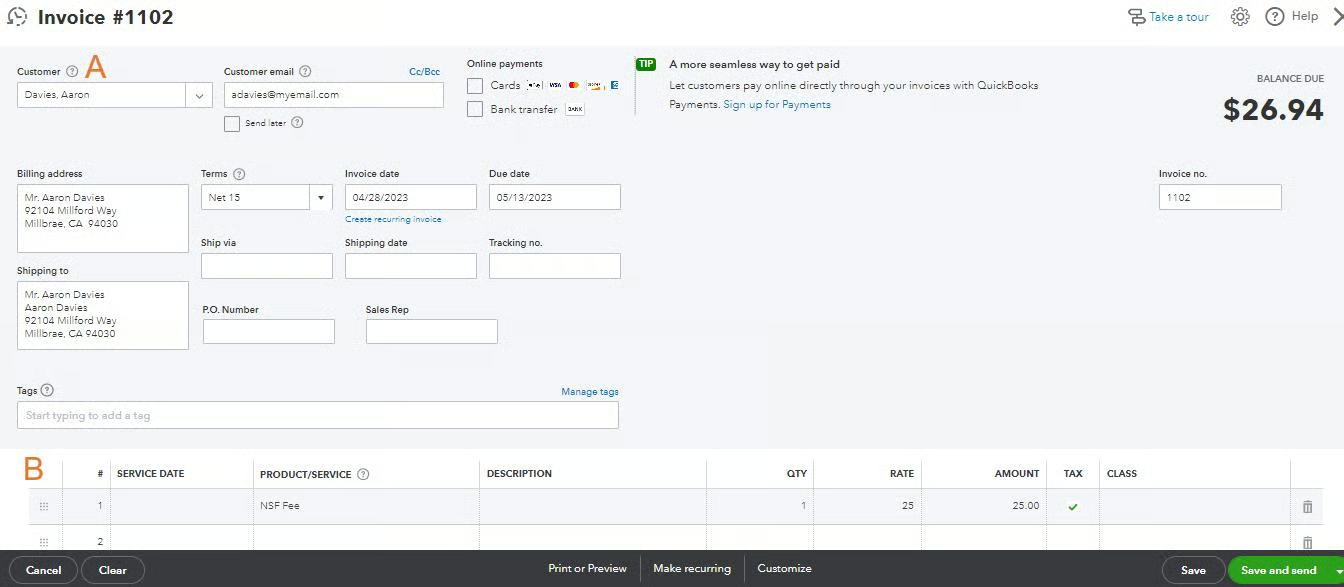
A. Customer: Select the customer whose check bounced. After selecting the customer, all the other customer information fields will auto-populate. Of course, you can change them if needed.
B. Service information: This entire section gets populated automatically when you added the billable expense in the previous screenshot.
Click Save and send to finish the process. For additional information on saving, printing, and emailing invoices, review our previous tutorial on how to create and send invoices in QuickBooks Online.
The Importance of Recording a Bounced Check in QuickBooks Online
One key feature of QuickBooks Online, our best small business accounting software, is bounced check management—which is helpful for businesses that receive payments by check.
When a check bounces, the bank balance that’s shown in QuickBooks Online is overstated since the bounced check is shown as a deposit. It’s important to adjust your QuickBooks bank balance immediately so that the correct amount is displayed.
Also, recording a bounced check in QuickBooks Online allows you to track the fees and charges associated with the bounced check. When a check bounces, your bank may charge you a fee, and you may also need to bill the customer who wrote the bad check.
Frequently Asked Questions (FAQs)
What account should I use to record a bounced check fee?
You should use an expense account, such as bank service charges, to record a bounced check fee.
Can I bill a customer for NSF fees in QuickBooks Online?
Yes, you can. It’s common to pass the NSF fee to them since it’s a direct result of their insufficient funds.
Wrap Up
Congratulations on finishing what could be the most complex tutorial in our QuickBooks Online Training Course. Hopefully, you won’t have to do it often, but you now know all the steps needed to record a bounced check in QuickBooks Online and bill the customer an NSF fee. Our next guide looks at how to process bank reconciliations in QuickBooks Online, and it covers reconciling your banking activity with your bank statement to ensure you recorded all the activity.