The bank reconciliation process involves matching the balance in your books for a cash account to your bank statement. Bank reconciliation is important because if there is a discrepancy, you need to find the cause and make an adjustment to your books so that your financial statements are accurate.
In this article, we will explain how bank reconciliation works and show you how to do a bank reconciliation using QuickBooks Online and Zoho Books. If you don’t have accounting software, we will show you how to create one manually using our free bank reconciliation template.
Using an accounting software like QuickBooks Online makes bank reconciliation reports easy and fast. Sign up today and save up to 50 percent off.
What a Bank Reconciliation Is
To ensure that all deposits and withdrawals from your bank account have been recorded in your accounting records, you must compare each transaction that appears on your bank statement to what has been recorded in your accounting software. If you find a discrepancy, you must make the adjustment to your accounting records or notify the bank if the error is on its end.
Benefits of Bank Reconciliation
There are a number of benefits to reconciling your bank accounts. Whether you review your banking transactions while having that first cup of coffee each day or carve out 30 to 45 minutes each week or month, investing that time will pay off.
Here are some of the benefits of reconciling your bank accounts regularly.
1. Bank Reconciliations Make Tax Time a Breeze
By reconciling your bank account on a regular basis, you will ensure that all of your day-to-day business expenses paid with a debit card or check have been recorded in your accounting software. Instead of dreading tax time because you have 12 months worth of transactions to reconcile, your financial statements will be completely up to date.
With accounting software like QuickBooks Online and Zoho Books, you can give your accountant access to your data so that he or she can run financial statements and access any other information that they need to prepare your tax return without having to bother you.
2. Bank Reconciliation Helps Detect Fraud or Discover Other Issues Sooner
We spoke with Heather Robinson, Director, Online Banking Product Manager Digital Channels at Union Bank, who shared the following with us:
“Business owners generally have in their head an expected balance of their account. Doing a quick daily check on the actual balance is a great way to detect fraud or identify check clearing or deposit issues. Doing this makes the monthly reconciliation process a breeze because issues are usually discovered right away.
Small businesses that use online accounting software have the benefit of data from their online bank accounts loading into their software automatically. In their daily balance checks, they can not only monitor for fraud but also clear transactions so that the end of month reconciliation is a breeze.”
3. Bank Reconciliations Give Insight into Your Spending Habits
Believe it or not, reviewing your bank statements will tell you a lot about your spending habits. Whether it’s looking at how much money you spend on shipping products to customers or the occasional coffee-and-donut run for the office, it all adds up.
Reconciling your bank account will give you access to detailed income and expense reports so that you can keep an eye on these type of expenses before they get out of hand. In the long run, having this information will allow you to make better business decisions that can have a positive impact on your bottom line.
Compare Receipts to Your Bank Statement
Before we discuss the step-by-step approach to reconciling your bank account, there is a “manual” reconciliation that needs to take place first. This process involves that wad of receipts that you’ve got hidden in the glove box of your car or maybe even a shoebox. It’s very important for you to compare your paper receipts with the charges that appear on your bank statements.
To compare your receipts to your bank statement easily, you should organize your receipts by:
- Using a receipt scanner app, which allows you to take snapshots of receipts and toss the paper; later on, you can sync the app with your accounting software
- Signing up for a QuickBooks Online account and manage all of your income, expenses and receipts using the QuickBooks Online app on your mobile device
- Using Zoho’s auto-scan feature which allows you to upload, drag and drop or email documents like receipts, bills and deposit slips to Zoho Books
By implementing an organized process like one of these listed above, you can ensure that the amount you authorized for payment (per your receipt) is actually what you paid (the amount that was deducted from your bank account). It also makes tax time simpler since your receipts are organized all in one place.
Bank Reconciliation Checklist
Reconciling your bank accounts will go a lot faster if you are prepared. There are a few documents that you will need to gather, and a few tasks you will need to complete prior to reconciling your bank account.
Bank Account Access Information
Make sure you have your user id and password handy for the bank account(s) that you plan to reconcile. You will need to access bank statements, canceled checks and copies of deposit slips, unless you have paper copies.
Bank Statements
An electronic or hard copy of bank statements for the time period you are reconciling. Most banks allow you to download your statements as PDF documents so that you can refer to them as needed.
Canceled Checks
This is an electronic or hard copy of all canceled checks. Similar to bank statements, most banks allow you to access a copy of checks that have cleared the bank online. This will help you to determine payee, amount and items purchased so that you can categorize expenses easily.
Receipts
This is an electronic or hard copy of all receipts. As discussed, if you have your receipts organized in a business receipt scanner or accounting software like QuickBooks or Zoho Books it makes it much easier to review them while you are reconciling.
While you can technically enter them as you reconcile, you should make sure that you enter all transactions that affect the bank account prior to starting your bank reconciliation.
Record the following transactions in your books prior to reconciling your bank account.
Customer Deposits
Review all deposit slips to ensure that they have been recorded in your books. If you don’t typically keep copies of deposit slips, log into your bank account and access a copy of the deposit slips so that you have the information that you need to record them.
Payments to Suppliers and Creditors
Make sure all checks written to pay suppliers, creditors, contractors and employees have been recorded in your books. If you print checks directly from your accounting software, then this step is done for you. However, if you issue handwritten checks, go through your check register and enter any payments that are missing in your accounting software.
Transfers to & from Business Savings or Other Business Bank Accounts
Transfers to and from business savings accounts and other checking accounts are common. Make sure that you have recorded all transfers in your accounting records.
Automatic Payments Withdrawn from Bank Account
Nowadays, many of us have recurring payments automatically withdrawn from our bank accounts. Make sure that you have recorded all automatic withdrawals made from your bank account.
ATM Deposits and Withdrawals
All deposits and withdrawals made at the ATM should be recorded in your books. If you don’t make a habit of keeping these receipts, log into your bank account to obtain this information so you can enter it into your accounting records before you start the bank reconciliation.
Download Bank Reconciliation Checklist
Bank Reconciliation Example Using Accounting Software
Traditionally, bank reconciliations are done on a monthly basis once statements have been issued by the bank. However, most cloud accounting software programs like QuickBooks and Zoho Books allow you to connect your bank accounts so that you can download your banking transactions automatically to your accounting software on a daily basis.
Whether you reconcile daily or once a month, using accounting software like QuickBooks or Zoho Books is much easier than doing it manually. In this section, we will walk you through how to prepare a bank reconciliation in QuickBooks Online and Zoho Books. However, if you use a software like FreshBooks that doesn’t have a bank reconciliation statement tool we’ve got you covered. In the next section, we will show you how to prepare a manual bank reconciliation.
How to Do a Bank Reconciliation in 5 Easy Steps Using QuickBooks Online
Before you can reconcile your bank account in QuickBooks, you need to connect your bank accounts. If you have not done this yet, check out our how to import banking transactions video tutorial first.
Below is a video along with step-by-step instructions on how to reconcile your bank account using QuickBooks Online in five easy steps.
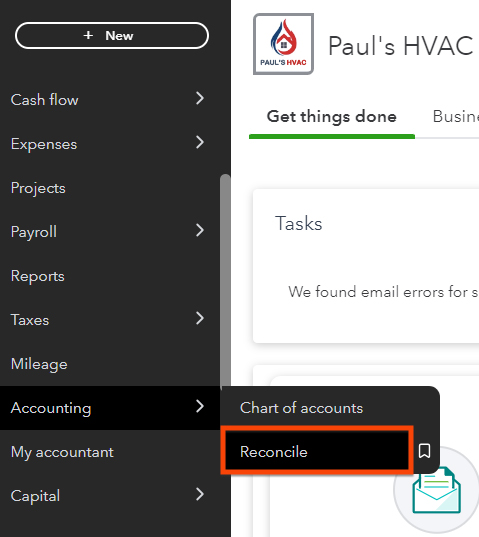
1. Navigate to the Reconciliation Tool
Navigate to the reconciliation tool in QuickBooks Online.
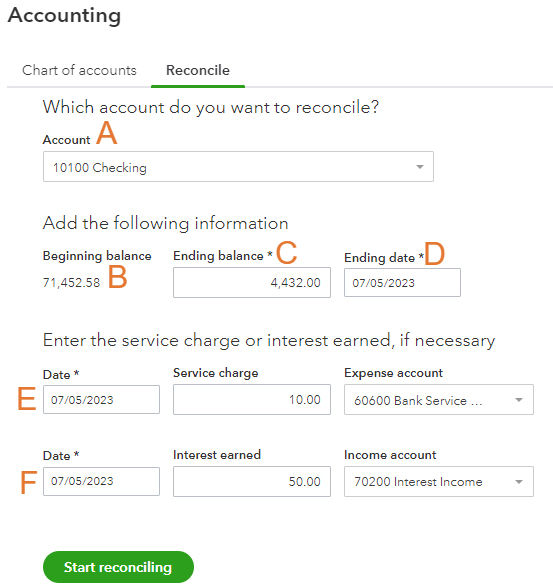
2. Select the Bank Account You Would like to Reconcile and Complete the Fields as Indicated Below
Enter bank account details Into QuickBooks Online.
2. Beginning balance: This field will be auto-populated with the ending balance from the previous month’s statement.
Tip: If your beginning balance does not match, more than likely the reconciliation that was completed for the previous month did not balance. If you do see a notification similar to the one below, click on the “We can help you fix it.” link and follow the steps to resolve the difference before you proceed with the current reconciliation:
Notification regarding an issue with the beginning balance in QuickBooks Online.
4. Ending date: Enter the ending date of your bank statement in this field.
5. Start reconciling: Click the “Start reconciling” button to proceed to the next step.
3. Begin Matching Transactions
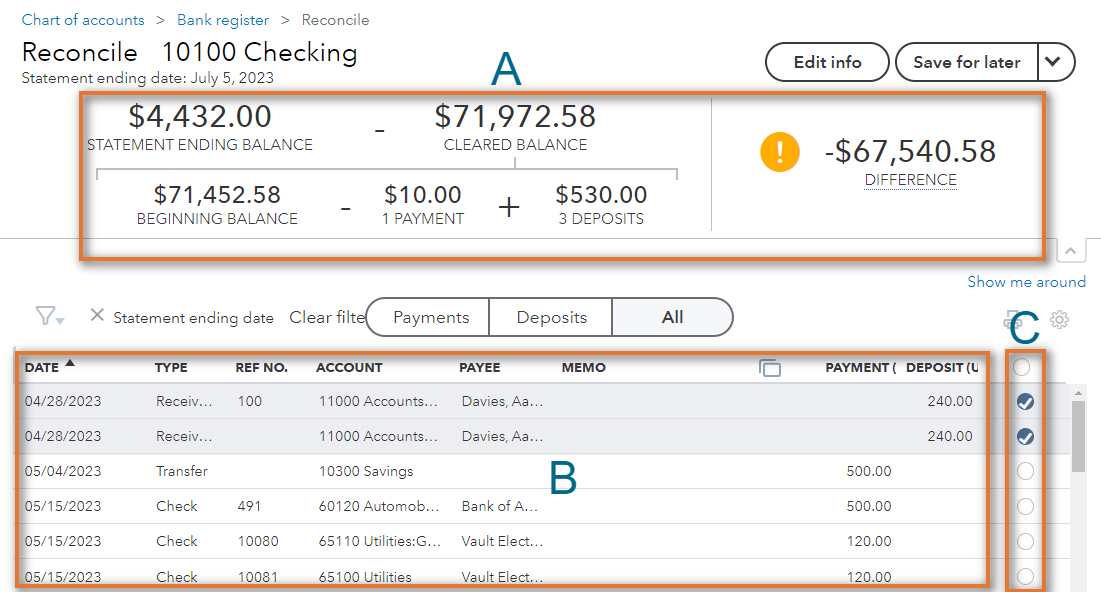
Matching transactions in QuickBooks Online bank reconciliation tool.
1. Statement ending balance: This is the amount you entered from your bank statement.
2. Beginning balance: This amount is the ending balance from last month’s statement. QuickBooks will automatically populate this field for you.
3. Cleared balance: As you begin to reconcile each item, this amount will change depending on whether you have selected a payment or a deposit transaction.
4. Payments: This amount will increase as you select payments to reconcile from the detailed transactions section below.
5. Deposits: This amount will increase as you select deposits to reconcile from the detailed transactions section below.
6. Difference: This field is calculated by QuickBooks. It is the difference between your statement balance and the cleared balance. Your goal is to get to a difference of zero.
7. Transactions: In this section, you will see all of the payments and deposits that have been recorded in QuickBooks as of your statement ending date. As you can see in the screenshot above, you can filter this section to just show Payments, Deposits or all transactions by clicking on each of the tabs.
There are a number of ways to tackle a bank reconciliation. My suggestion is that you reconcile the area with the least number of transactions first. The goal is to make sure that every deposit and withdrawal listed on the bank statement is marked as “cleared” in this reconciliation window.
Marking items cleared in the QuickBooks Online bank reconciliation tool.
Let’s say that you decide to start with deposits first. Once you have marked all of the deposits in this window that appear on your bank statement, verify that the total deposits cleared matches the total deposit amount on your bank statement.
In the example below, total deposits on our sample bank statement ($5,017.17) match the total deposits we have “cleared” in QuickBooks ($5,017.17). If these match, you can move onto reconcile payments. However, if your deposits are not in balance, head to our troubleshooting tips to learn how to fix an out of balance.
Sample Bank Statement
Sample bank statement for QuickBooks Online bank reconciliation.
Deposits Cleared in QuickBooks
Deposits cleared in QuickBooks Online bank reconciliation.
In the example below, total withdrawals and payments on our sample bank statement ($2,496.53) match the total withdrawals we have “cleared” in QuickBooks ($2,496.53). If your figures match, you can move onto the next step; however, if your withdrawals and payments are not in balance, head to our troubleshooting tips.
Sample Bank Statement
Sample bank statement for QuickBooks Online bank reconciliation.
Withdrawals & Payments Cleared in QuickBooks
Withdrawals and payments cleared in QuickBooks Online bank reconciliation.
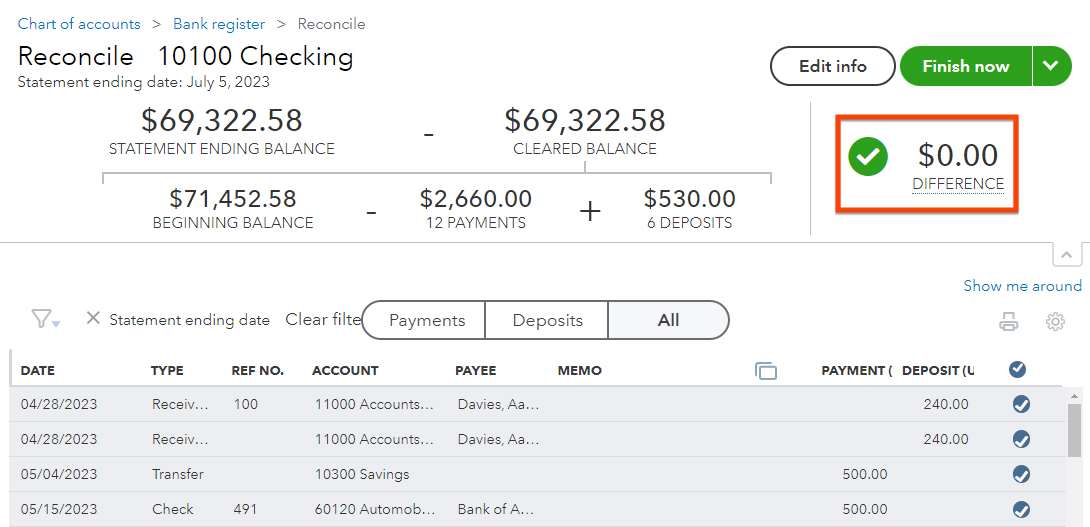
4. Confirm $0.00 Difference
Once all deposits and withdrawals/payments match the bank statement, you should have a difference of $0.00 as indicated in the screenshot below.
Confirm bank account has been reconciled in QuickBooks Online.
5. Review & Save Reconciliation Reports
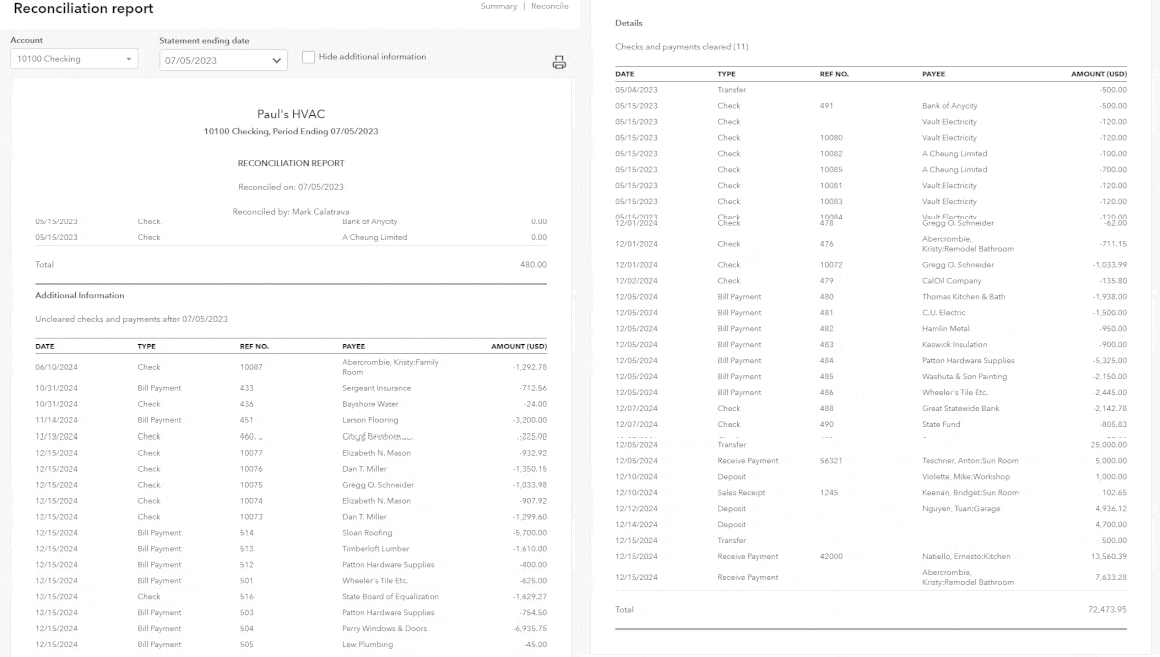
Below is a snapshot of the detailed bank reconciliation report that QuickBooks will generate.
Bank reconciliation example report generated in QuickBooks Online.
In our Small Business Bookkeeping, Accounting & Tax Guide, we have a section on how to keep your paperwork organized. It provides detailed instructions on how to keep track of bank statements, tax returns, vendor bills and other key documents. If you are ever audited, you should know that bank reconciliation reports are one of the top five reports that auditors will request.
How to Do a Bank Reconciliation in Zoho Books
There are three primary tasks that make up the bank reconciliation process in Zoho Books. First, you must connect your bank account to Zoho Books, so your transactions download into the software automatically; second, you need to categorize all downloaded transactions into the appropriate expense categories; finally, you need to know how to prepare a bank reconciliation using the bank statement.
Below is a video along with step-by-step instructions on how to reconcile your bank account in six easy steps using Zoho Books.
1. Establish a Bank Feed Between Your Bank Account and Zoho Books
Connect your bank account to Zoho Books.
1. From the drop-down above, type the name of your bank in this field and select it.
2. Select from the list of popular banks by clicking on the icon that represents your bank/financial institution as indicated above.
3. If you cannot locate your bank from the dropdown or in the list of popular banks, click on the “Enter your account manually” button and follow the on-screen instructions to import your bank statements.
2. Log into Your Bank Account
Log into your bank account to establish a connection with Zoho Books.
3. Select the Bank Accounts to Establish a Bank Feed
- Select your accounts: All of the bank accounts that you have at the financial institution you selected in step 1 will be listed here, so put a checkmark next to each account that you would like to establish a bank feed for
- Download transaction history: From the drop-down calendar, select the date that you would like to go back and download transactions for
- Note: You can go back 90 days in Zoho Books; if you need to go back further than that, you will need to import the bank statements for anything older than 90 days
Bank Reconciliation Example
Let’s assume that it’s April 16 and your tax professional has told you if you bring in a shoebox next year, the fee will be double. So, you vow to start using Zoho Books immediately. In order to get all of your banking transactions that have occurred since January 1 into Zoho Books, you can import your January bank statement and then use February 1 (plus the tax year) as the date you will download transaction history.
- Select currency: One of the benefits of using Zoho Books is you can track both foreign bank and credit card accounts easily; from the drop-down, select the appropriate currency for the bank account you are setting up
- Click the “Continue” button once you have made all of your selections
4. Banking Overview
Banking overview in Zoho Books.
1. Account details: In this column, you will see the following information:
- Name of the type of bank account, such as business checking
- Last four digits of the bank account number, which are not shown here to maintain privacy
- Date the latest transactions were downloaded, such as May 15, 2017
2. Uncategorized: In this column, you will find the number of transactions that you need to review and categorize to the appropriate income or expense account.
3. Pending checks: This column will reflect checks that you have created in Zoho Books but have not printed.
4. Amount in bank: This is the balance in the bank account as of the last update.
5. Amount in Zoho Books: This is the current balance in the bank account per Zoho Books.
If you have already entered some of your banking transactions in Zoho Books, then you will also have a column that says “Recognized.” This means that Zoho has matched a transaction that you entered manually with one downloaded from your bank. Remember, the goal of this reconciliation process is for the amount in the bank to equal the amount in Zoho Books.
5. Categorize Transactions
Follow the steps below to assign an account to the uncategorized transactions.
5.1 Display the Transactions
For the appropriate bank account, click on the uncategorized transactions as indicated below.
Uncategorized transactions in Zoho Books.
5.2 Determine the Number of Transactions per Page
Scroll down to the very bottom of the page, and you will see an option to select the number of transactions you would like to see per page as indicated below.
Select number of banking transactions per page in Zoho Books.
5.3 Start with the ‘Oldest’ Transactions First
Scroll down to the very bottom of the page and to the right of the number of transactions per page, you will see an arrow. Click that arrow until you cannot go any further. The most recent transactions appear first and, as you go to the next page, the transaction dates get older.
Select number of banking transactions per page in Zoho Books.
5.4 Click on the First Transaction You Want to Categorize and the Following Window Will Display
Categorize banking transactions in Zoho Books.
- Expense
- Vendor advance
- Vendor payment
- Transfer to another account
- Sales return
- Card payment
- Owner draw
- Credit note refund
- Payment refund
2. Expense account: From the drop-down, select the appropriate account. If the account is not set up, you can set it up by selecting “+New Account” from the drop-down.
3. Vendor (optional): Select the appropriate vendor from the dropdown, if the vendor is not set up you can set it up by selecting “+New Vendor” from the drop-down.
4. Date: Enter the date of the transaction.
5. Amount: This field will automatically populate with the amount downloaded from your bank.
6. Reference# (optional): Enter any additional info about this transaction, such as purchase order#.
7. Description: This field will automatically populate with the description downloaded from your bank. You can change the description or delete it altogether.
8. Attach receipt: Zoho Books allows you to attach receipts directly to the transactions they are associated with. Scan your receipt to your computer and attach it here.
9. Customer: If the transaction is related to a customer, select the customer from the drop-down. If the customer has not been set up, you can add a new customer by selecting “+Add New Customer” from the drop-down.
10. Save: Be sure to save your changes.
Once you have categorized all transactions downloaded from your bank, the amount in Zoho Books should match the amount in the bank account.
You can reconcile as often as you like since any new transactions will download daily. When you receive your bank statement at the end of the month, it will be simple to reconcile if you have already categorized your banking transactions throughout the month.
Below are the steps you should take to complete the monthly bank reconciliation.
A. From the Banking Overview, click on the account that you would like to reconcile as indicated in the screenshot below.
Reconcile your bank account in Zoho Books.
Reconciliation history in Zoho Books.
Complete bank reconciliation in Zoho Books.
Bank reconciliation in Zoho Books.
Note: If you are reconciling more than one month, then be sure to use the beginning date of the first month and the ending date of the last month that you are reconciling.
Example: Let’s say that you have gotten behind on completing your reconciliations, so you decide to reconcile three months at one time. If you are reconciling January, February and March, then your beginning/ending date will be as follows:
Start Date: January 1, 20XX
End Date: March 31, 20XX
2. Closing balance: Enter the ending balance from your statement. This will be the balance in the bank account as of the end date.
3. Start reconciliation: Once you have completed all of the fields, click the “Start Reconciliation” button.
E. In the next screen, you will see a list of all transactions that were downloaded and categorized in Zoho Books. Below is a screenshot and a brief explanation of the information here.
Bank reconciliation in Zoho Books.
2. Transaction details: This is the account that you categorized the transaction to.
3. Type: This is the type of account you selected for transaction details along with the name of the vendor if applicable.
4. Deposits: All deposits to the account will appear in this column.
5. Withdrawals: All withdrawals to the account will appear in this column.
6. Clear: This column represents items that were downloaded from the bank which means that they have essentially “cleared” your bank account.
F. Scroll down to the very bottom of the screen, and you will see the following key fields as indicated below.
Bank reconciliation in Zoho Books.
2. Cleared amount: As discussed previously, this is the total amount of all transactions that were downloaded to Zoho Books from your bank.
3. Difference: The difference between the closing balance and the cleared amount is calculated as the difference. The goal is to get to a difference of 0.00 as we have here.
Note: If you do not have a 0.00 balance here, refer to our tips for reconciling bank accounts section for assistance.
4. Add transaction: If you realize there are missing transactions that you need to enter, you can do so by clicking the “Add Transaction” button, which will allow you to add the missing transactions to Zoho Books.
5. Attach file(s): You can attach a copy of your bank statement, cleared checks, receipts or other supporting documents here for future reference.
G. Right below the comparison of the closing balance to the cleared amount fields are the following options as indicated below.
Bank reconciliation in Zoho Books.
2. Reconcile: You only want to click this button if your difference is 0.00. If your balance is not 0.00, refer to the tips on reconciling bank accounts for assistance.
Note: Zoho Books will not allow you to proceed with the reconciliation until the difference is 0.00.
3. Cancel: Click this button if you don’t want to save your work and you plan to start over from scratch.
H. Once you click the “Reconcile” button, you should see the following Reconciliation History screen as indicated below.
Bank reconciliation in Zoho Books.
Bank reconciliation history in Zoho Books.
How to Do a Bank Reconciliation Manually in 3 Steps
If you don’t currently use accounting software or your software does not have a bank reconciliation tool, you can still reconcile your bank accounts manually in three steps. We have created a free bank reconciliation template with instructions that you can download and modify as needed. This template includes detailed instructions on what information you need to enter into each field. We’ve also included an example of a completed manual bank reconciliation report.
1. Compare Cash Book to Bank Statement
Mark your cash book and bank statement for the deposits and withdrawals that appear in both the cash book and the bank statement. In our example, we have the bank statement on the left and the cash book for Paul’s Plumbing on the right. As you can see below, we have put a checkmark next to the items that appear in both the bank statement and the cash book.
2. Update Cash Book Balance to Match Bank Statement
Update the cash book for the unmarked items on the bank statement. In our example, we have a bank service charge of $20 and a withdrawal for $60 that do not appear in the cash book and need to be added to the cash book balance.
In addition, there is a check that was written for $30 that has not cleared the bank and a customer deposit of $150 that was not recorded in the cash book that should be deducted from the cash book balance.
3. Prepare Bank Reconciliation Report
Prepare the bank reconciliation report. In order to reconcile the bank statement to the cash book, we must prepare the bank reconciliation form and include all of the items that we made adjustments for in step 2 above.
Below is a completed bank reconciliation example for a fictitious business, Paul’s Plumbing, LLC:
1. Balance per bank as per cash book: Enter the current balance of your bank account per your accounting records.
2. Additions: In this section, you will list all of the items that appear in your accounting records but are not on the bank statement. For written checks, you will add them back to your balance as if they were never written (because they have not cleared the bank); and any deposits made at the bank will also need to be added to your cash book balance since they are missing.
Note: In our example, this includes check #1234 for $30 and a customer deposit for $150.
3. Deductions: Any charges that appear on the bank statement but have not been recorded in your accounting records will need to be deducted. In our example, we have a bank service charge of $20 and an automatic payment to an Insurance company for $60. Both of these items are on the bank statement but were not recorded in the accounting records and must be deducted from the cash book balance
4. Balance at bank as per bank statement: After all of the adjustments are made, the ending balance here should match the ending balance on your bank statement. If not, double-check your work and take a look at the next section for tips on how to troubleshoot differences.
Bank Reconciliation Statement Tips
If you’re having trouble getting to a $0.00 difference between what’s in your accounting records versus your bank statement, try some of these troubleshooting tips:
Look for a Transaction That Is the Exact Dollar Amount You Are Out of Balance
The difference could be one transaction so look for the exact dollar amount that you are off. For example, if your difference is $42, then look at your bank statement to see if there is one item for this amount and if not check the transactions recorded in your accounting software or cash book.
Make Sure that All Transactions Appear in Your Accounting Records and the Bank Statement
Make sure that every transaction on your bank statement has been recorded in your accounting software/cash book. Any transactions that are listed on your bank statement but do not appear in your accounting records will cause you to be out of balance and vice versa. You will need to add the transaction to your accounting software or cash book and then proceed with the reconciliation.
Reconcile One Month at a Time
Unless you don’t have many transactions, I would not recommend reconciling more than one month at a time. The more transactions you have to reconcile the higher the chances are that you will have a difference. Locating an out of balance will be that much harder to find if you have to look thru two or three months worth of transactions as opposed to just one.
If You Can’t Find the Difference, Start Over
If you have a difference greater than $1, and you have not been successful with figuring things out, I suggest that you start the reconciliation over. The primary reason is that it will take you more time to continue to locate this discrepancy that to start from scratch.
The Bottom Line
By now you should have a better understanding of how reconciling your bank accounts can help you to stay on top of the cash coming in and going out of your business and make tax time easier. If you are managing your books using Excel or pen and paper, you should make the switch to QuickBooks. You will not only save a lot of time but have up-to-date financials if you use QuickBooks to manage all of your income and expenses.
QuickBooks is the number one accounting software used by most small businesses, and we not only recommend it to small businesses, but we also use it to manage our books here at FitSmallBusiness. QuickBooks allows you to connect all of your checking, savings and credit card accounts so that transactions download automatically and are easy to reconcile each month. Sign up for your QuickBooks Online account, and you could save up to 50 percent off a paid subscription.
elivia sagov
thank you very useful.
Crystalynn Shelton
Hi Elivia, so glad you liked the article! Thank you for taking the time to provide your feedback.
All the Best-
Crystalynn