I’ll show you how to use the QuickBooks audit trail to track changes made to your company file. I’ll guide you on how to access the audit log and how you can use the filter options to locate specific entries you want to review. I’ll also provide some tips on how you can effectively review changes and share the benefits of using the audit trail in QuickBooks.
Step 1: Access the Audit Log
First, I click on the cogwheel icon (⚙︎) in the upper right corner of my dashboard and then select Audit log under the Tools menu, as shown below.
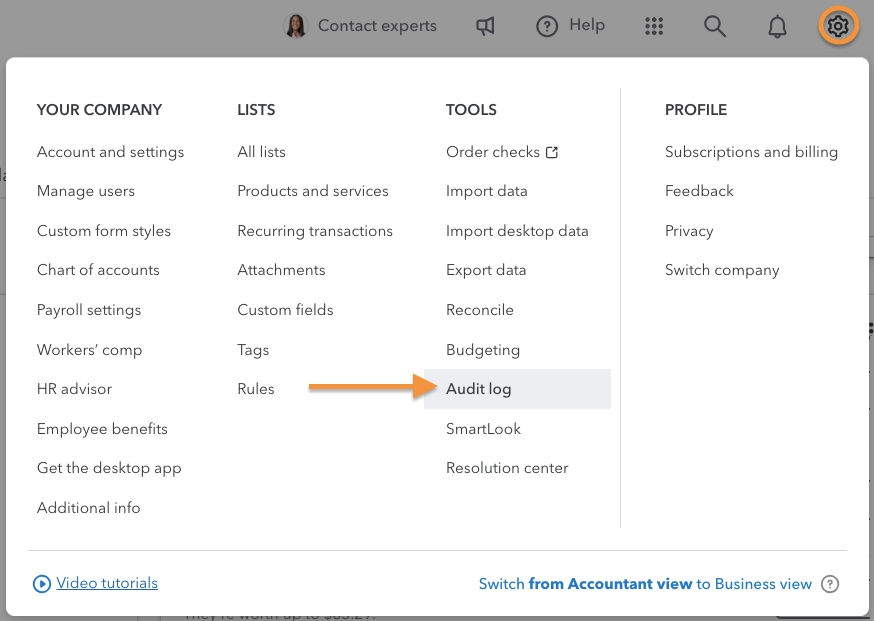
Navigate to Audit log in QuickBooks Online
Another way you can access the audit log is to go to the Reports section and locate the Audit log report from the drop-down menu.
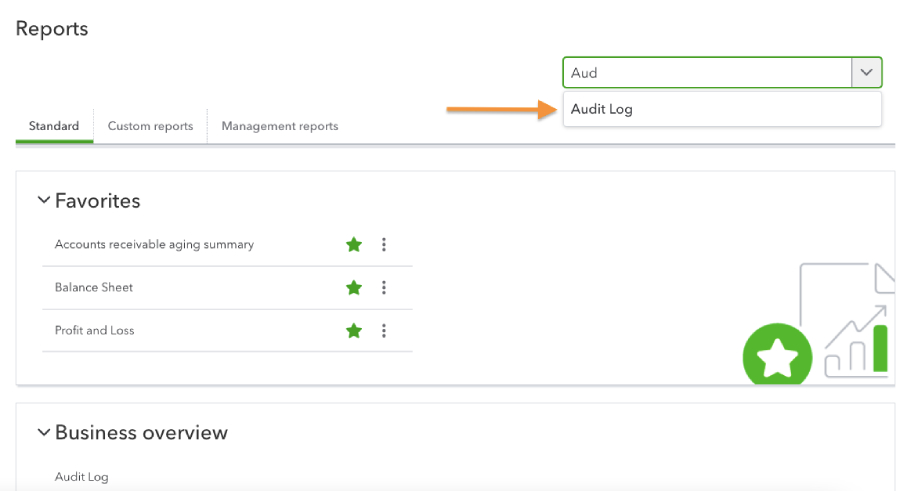
Access Audit log from the Reports section in QuickBooks
Step 2: Review the Audit Log Entries
The audit log provides you with a list of activities recorded in a QuickBooks Online account. This includes all activities made by users, including changes to transactions, updates to customer information, and modifications to accounts.
I scroll through the entries to review the changes that have been made in my company file. The entries are arranged in chronological order, so the most recent activities appear at the top. If I want to review older entries, then I simply click on the next page below the screen.
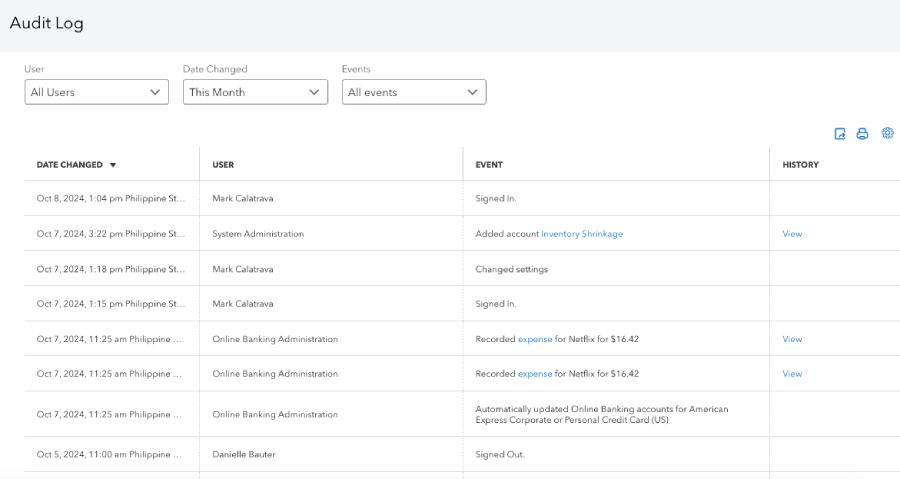
Audit log in QuickBooks Online
As you can see in the screenshot above, there are four columns in the audit log:
- Date changed shows the date and time the action occurred.
- User indicates the specific user who made the changes.
- Event specifies the type of action made (e.g., signed in and changed settings).
- History shows a View button that allows you to see more detailed information about the action. However, not all entries have this button as some actions don’t need additional details.
In some cases, you may see some automated user profiles that you don’t recognize, such as:
- Online Banking Administration: This refers to QuickBooks Online automatically making changes related to bank accounts, such as downloading transactions or updating account balances.
- Support Representative: This is a QuickBooks Online support consultant who made changes to your account. For example, if an agent helps you fix a transaction error, the changes will be recorded in the log under the Support Representative user profile.
- System Administration: This reflects changes made automatically by QuickBooks Online due to several reasons (e.g., you set up a third-party integration or created a recurring transaction).
- Import Administration: This logs any changes related to the conversion of data from QuickBooks Desktop to Online.
Step 3: Filter the Audit Log
To make it easier to find the information you need, use the filter options at the top of the audit log entries. In the screenshot below, I’ve filtered the results to show only the changes I made to any transactions during this quarter.
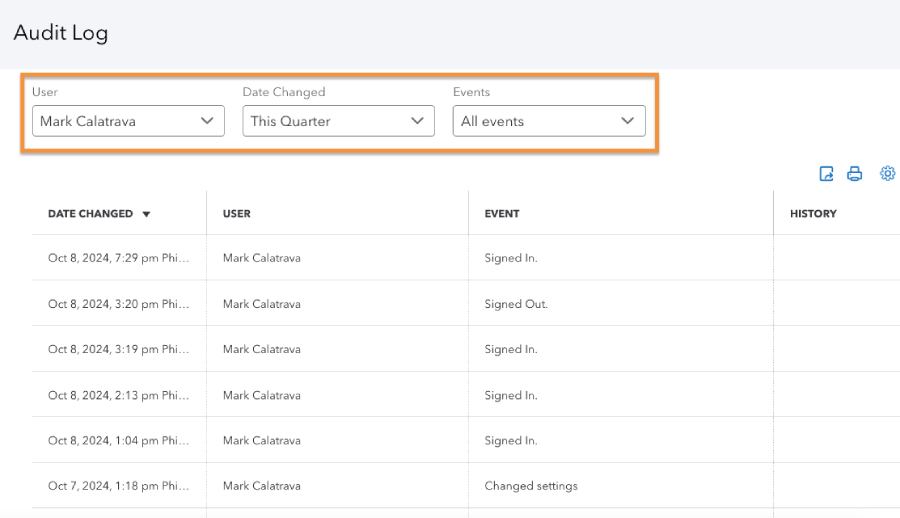
Using the audit log filters in QuickBooks Online
Step 4: Download and Print the Audit Log if Needed
If needed, download and print the audit log by clicking the respective buttons in the upper right corner of the audit log screen.
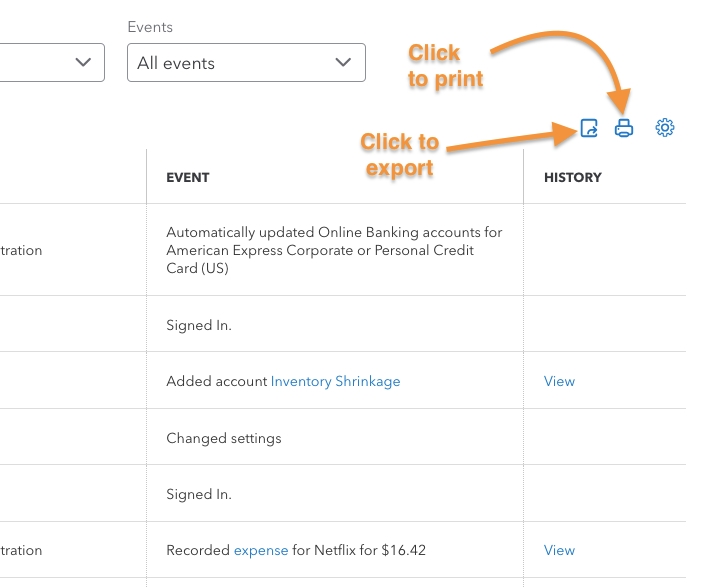
Exporting and printing an audit log in QuickBooks Online
When you click the export button, QuickBooks will instantly download the audit log in a CSV format, similar to the sample file below.
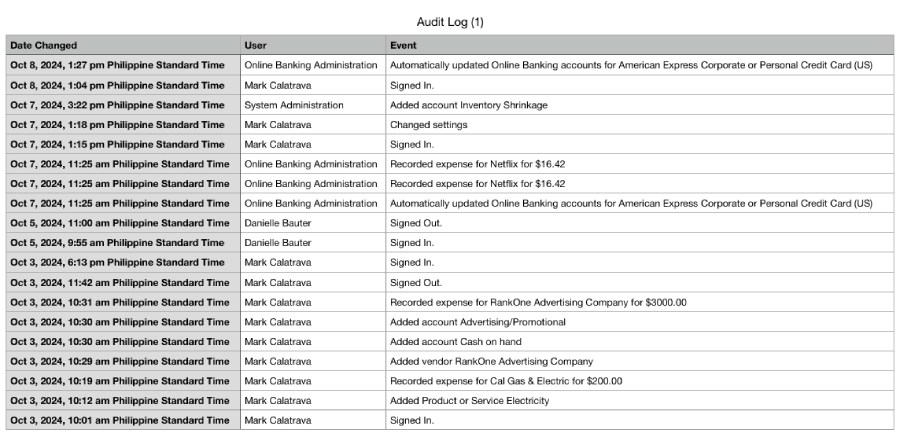
Downloaded audit log in QuickBooks Online
Meanwhile, when you click print, QuickBooks will display a printable version of the audit log and on-screen prompts to print the file. Once you have the copy, you can review the changes thoroughly or even share the copy with other team members.
Tips for Reviewing QuickBooks Audit Log Entries
Below, I’ll share a few strategies that will help you review your audit trail in QuickBooks Online effectively:
- Review the audit log regularly. Make it a habit to review your audit log regularly so that you don’t miss any important changes. I usually schedule it on a weekly or monthly basis.
- Use filters. If there’s a specific user activity you want to review, then use the filtering options to easily locate the entries needed.
- Investigate unusual activities. Look into any unusual changes that could be a sign of potential issues. For instance, if you notice unexpected payments to vendors or unusually high expenses, this could be a sign of fraudulent activity.
- Look for trends and patterns. For example, if you notice a team member making frequent changes to the same transaction, it may mean that they don’t fully understand the system’s features or proper procedures.
- Cross-reference with other records. To verify the accuracy of your records, cross-reference the changes with other records. For instance, I compare the entries with my bank statements to confirm that the transactions match the actual deposits and withdrawals from my bank.
QuickBooks Audit Log Benefits
Using the audit log in QuickBooks Online helps me:
Frequently Asked Questions (FAQs)
No, you can’t, as it’s designed to maintain a permanent record of transactions and changes made to your company file.
Yes, you can view deleted transactions through the audit log. It will show you any transactions that have been deleted, who deleted them, and when they were deleted.
To check logs in QuickBooks, navigate to the audit log by clicking the gear icon and selecting Audit Log under Tools. You can also access it through the Reports menu by locating the Audit log report.
Wrap Up
There you go—that’s how I effectively use the QuickBooks audit trail. If you want to learn more about the other features of QuickBooks Online, I recommend exploring our free QuickBooks Online tutorials.

