


In this tutorial, you’ll learn how to create estimates in QuickBooks Online, which you can use to provide quotes and bids to customers for proposed jobs. You’ll start by navigating to the Estimate section, then creating the estimate, and finally choosing either to save it as a draft or send it right away. We’ll also teach you how to send the estimate and track and change its status.
Step 1: Navigate to ‘Estimate’
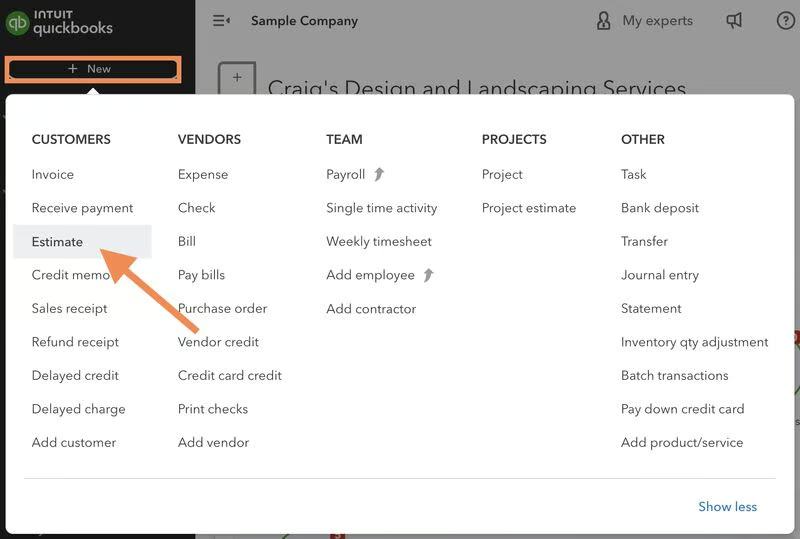
Click on the + New button at the top of the left menu bar and then select Estimate in the first column under Customers, as shown in the image below.
Step 2: Create Your Estimate on the Spot
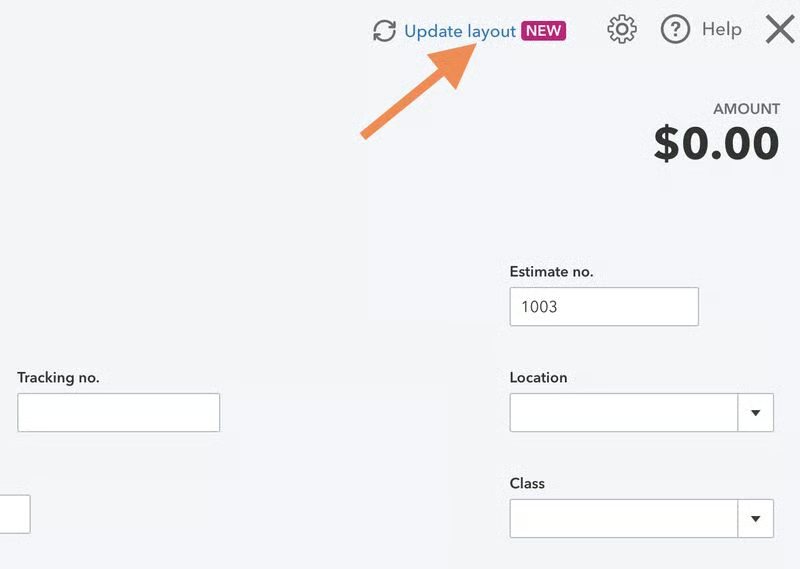
To create estimates in QuickBooks Online, ensure you’re using the new layout. If you’re still seeing the old layout, then click on the Update layout option at the upper right corner of the estimate form, as shown below.
Now, you can create estimates on the spot using the new layout. In the first half portion of the form, you need to provide the following information:
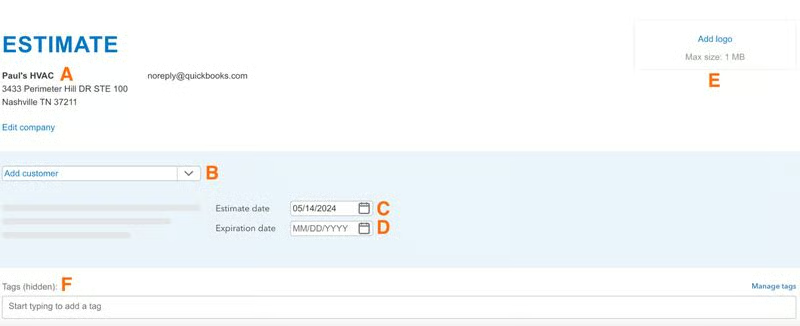
- Company information: This will automatically populate based on the information you entered when you set up your company file, as explained in our tutorial on setting up company information in QuickBooks Online.
- Customer: Select the customer you’re sending the estimate to. If this is a new customer, select Add new at the top of the customer drop-down list, and set up the customer, as shown in our guide on setting up customers in QuickBooks Online. When the customer is set up properly, the fields for email, billing address, and shipping should populate automatically.
- Estimate date: Enter the date you’re creating the estimate.
- Expiration date: You must include an expiration date on your estimate. This helps you avoid problems that may arise when a customer accepts an estimate months later when the cost of materials may have changed.
- Logo: Add your company logo to your estimate so that it looks more professional.
- Tags (Optional): You can add tags or customizable labels to transactions for detailed tracking.
Scroll down the estimate form and complete the rest of the required information, including:
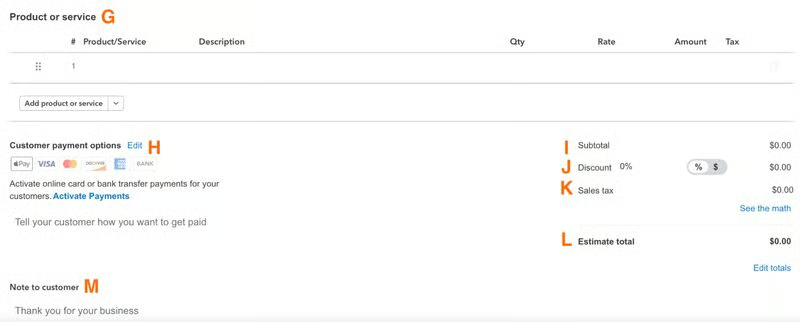
- G. Product or service: Select the product or service being proposed from the drop-down box. If this is a new product or service, select Add new at the top of the drop-down list and set up the product or service, as explained in our guide on setting up the products and services list in QuickBooks Online. When the product or service is set up properly, the Description, Rate, Tax, and Class fields should populate automatically. You may also enter these details manually if needed.
- H. Customer payment options: You can specify your preferred payment method (e.g., bank transfers and credit card payments).
- I. Subtotal: This refers to the estimate’s amount before discounts or taxes are applied.
- J. Discount: Add a discount to your estimate, if applicable.
- K. Sales tax: QuickBooks Online will automatically apply the applicable sales tax rates based on your customer’s location.
- L. Estimate total: This shows the total amount to be paid by the customer after all applicable discounts and taxes have been applied.
- M. Note to customer: You can include a personalized message for your customer.
- See Your Estimate in Two Different Views
You can see what your estimate will look like in an email and PDF view by clicking the respective view option next to Edit at the top of the estimate creation form.
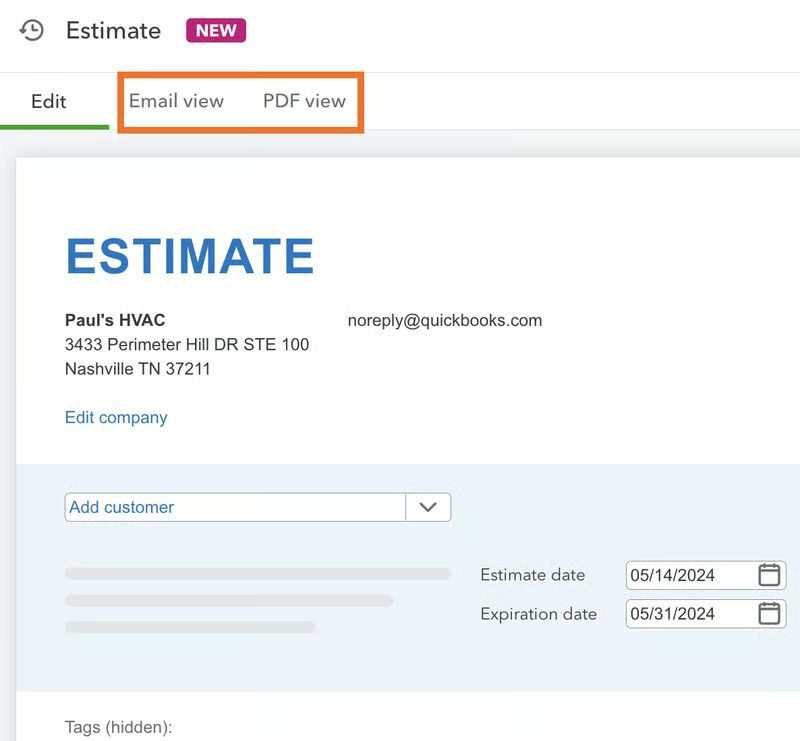
Here’s what your estimate will look like in email and PDF:
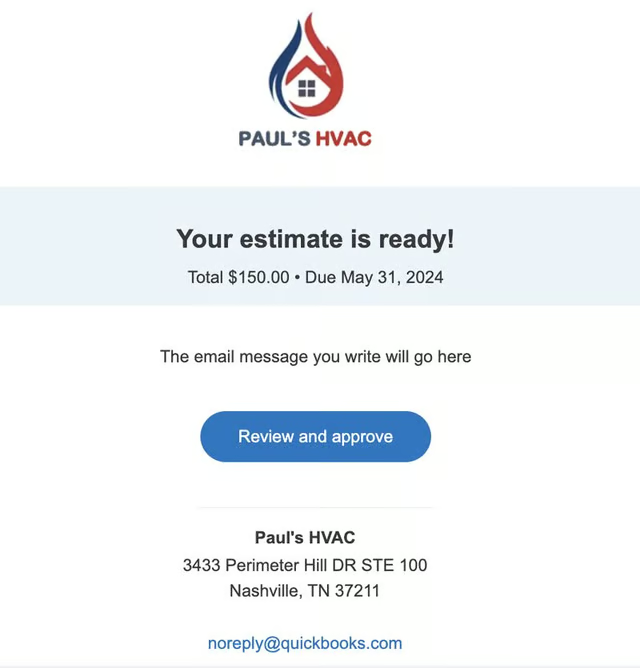
Email view: This is how your customer sees your estimate when you email it to them. Sample email view of an estimate in QuickBooks Online 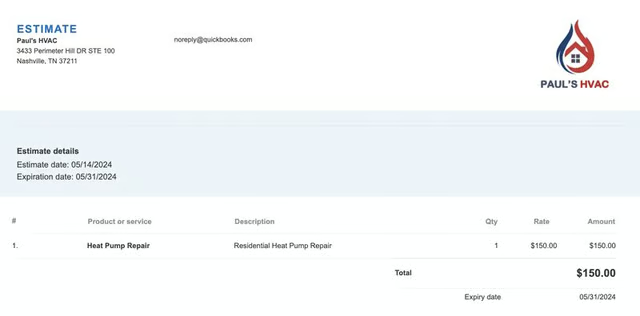
PDF View: This is what your estimate will look like when you save it in a PDF format. Sample PDF view of an estimate in QuickBooks Online


Step 3: Save as Draft or Send Right Away
Once you enter and verify all the information, click the green Review and send button if you want to send the estimate right away or Save to save the estimate as a draft.
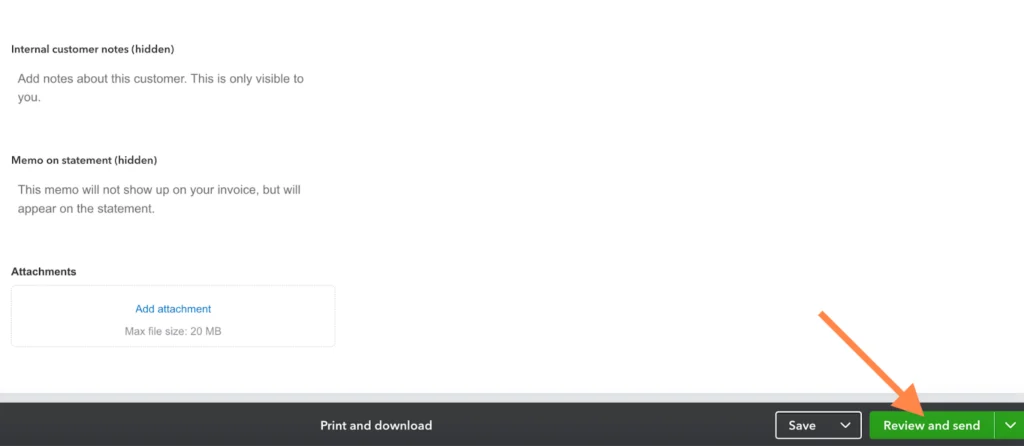
If needed, you may also print and export the estimate by clicking the Print and download button (shown in the screenshot above).
When you opt to click Review and send, an email template form will open. This is where you can accept the email defaults or update the details (e.g., subject and email body) if needed. Once you’re ready to email the estimate, simply click on the green Send estimate button at the lower left corner of the screen.
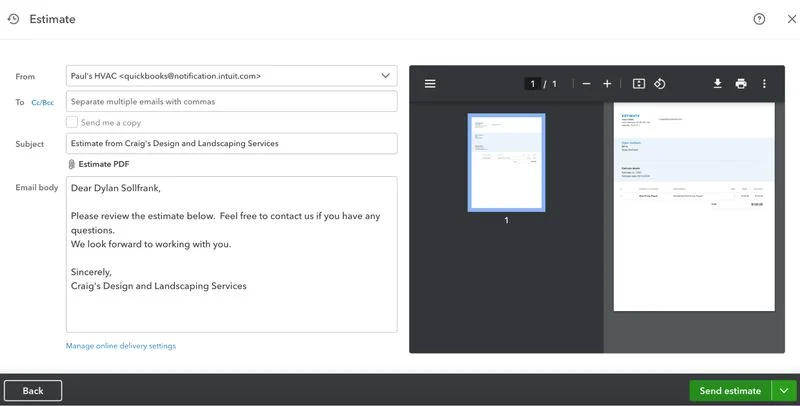
You will receive a confirmation once your estimate has been sent successfully.
Track & Change Estimate Status in QuickBooks Online
When you send the estimate to your customers via email, they can approve or decline it online. The status of the estimate will automatically update.
However, when you print the invoice in a PDF format and wish to mail it to your customer, you will need to update the status of the estimate manually. To do this, click Sales from the left navigation menu, then select Estimates.
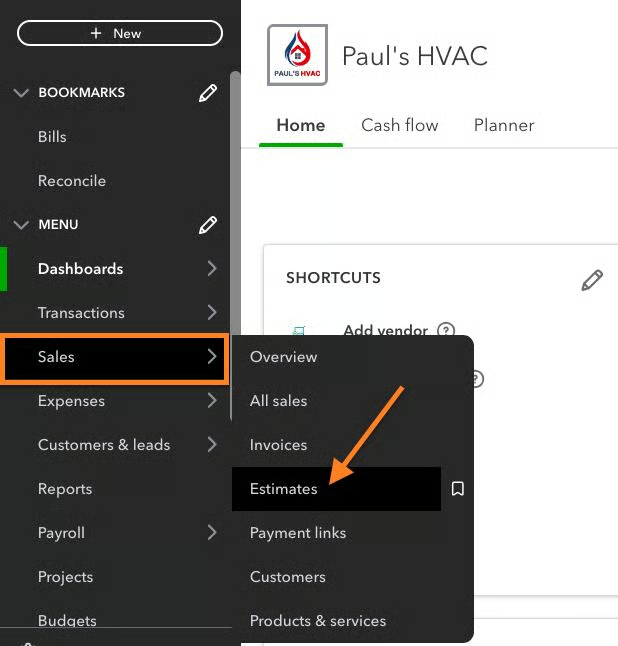
Locate the estimate you wish to update and click Mark accepted under the Action column. You may also click anywhere on the grayed entry line and tap the Edit button (not shown below) to open the estimate screen.
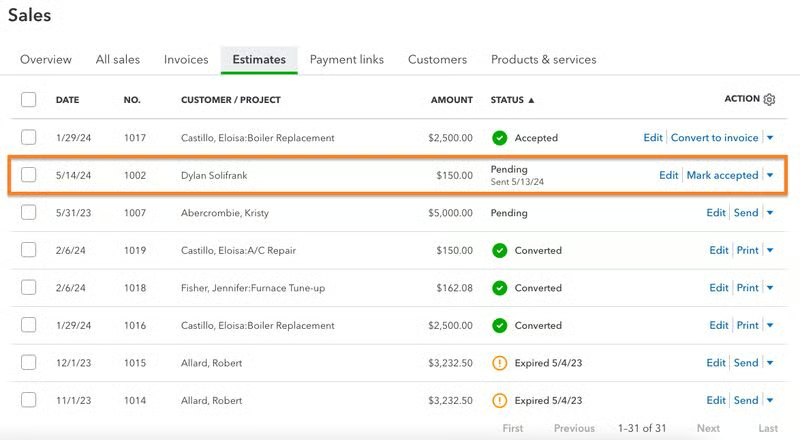
In the screenshot above, we can see that the estimate we created earlier has the status “Pending.” The customer has agreed to proceed with the service, so let’s update the estimate status. To do this, simply click on the small dropdown arrow next to Mark accepted in the far right corner and then select the appropriate status from the dropdown list.
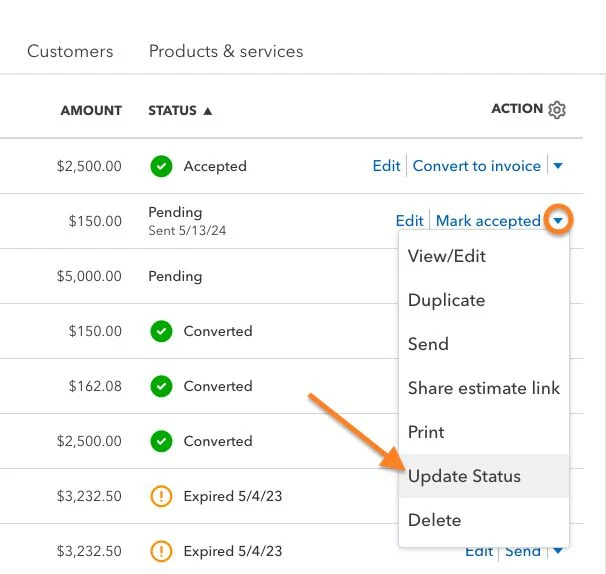
You can choose from four statuses to help track your outstanding estimates.
- Pending: An estimate is pending after it’s sent to a potential customer until the customer accepts or rejects the estimate or the estimate expires.
- Accepted: Accepted estimates have been approved by the customer, and a signed copy of the estimate has been received.
- Closed: QuickBooks will change the status of an estimate automatically to closed when the estimate is converted to an invoice.
- Rejected: If a client informs you that they aren’t accepting your estimate or the expiration date of the estimate expires, then you should change the status of the estimate to rejected.
When updating an estimate status, you will be prompted to enter the name of the person who accepted the estimate and the date it was accepted, closed, or rejected.
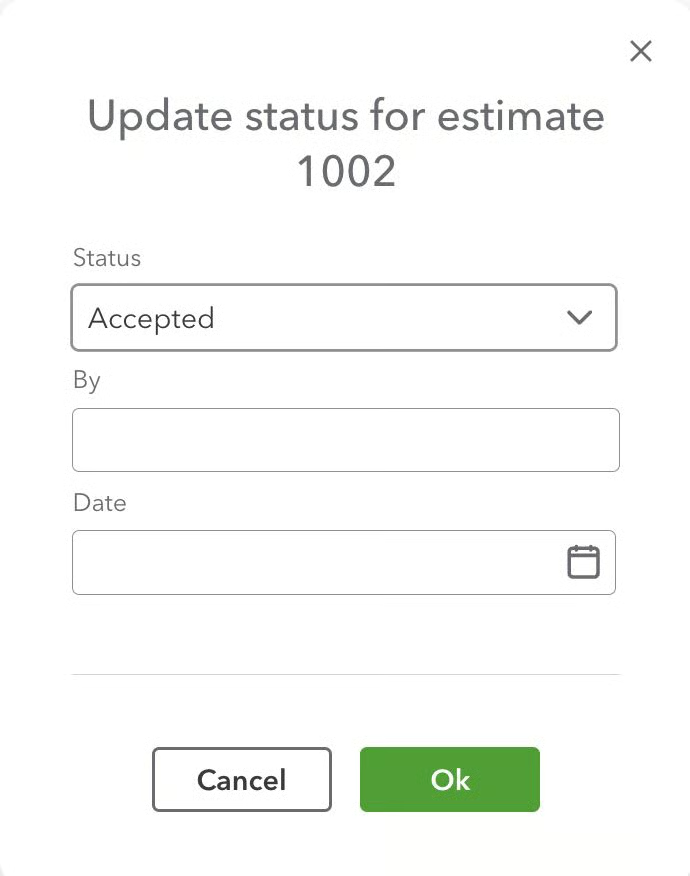
You need to update an estimate’s status in QuickBooks to:
- Promptly convert accepted estimates into invoices
- Ensure that your financial records are accurate
- Determine whether you have sufficient manpower and materials available to deliver the job
- Generate accurate reports excluding
- Analyze sales performance
For example, the new version of QuickBooks Advanced allows you to create a project estimate vs an actual report—and only estimates that are accepted or closed can be included in the report. Also, you can’t convert an estimate into an invoice unless it’s marked accepted or closed.
Frequently Asked Questions (FAQs)
Can I convert an estimate into an invoice?
Yes, and you can learn how through our guide on how to create and send invoices in QuickBooks, which also discusses how to convert estimates into invoices.
Do I need to learn how to create estimates using the new layout?
Yes, as the new layout will be implemented in all QuickBooks Online accounts.
Does QuickBooks Online offer excellent customization options?
Yes, and it’s one of the reasons it’s our overall best small business accounting software. You can customize estimates in different ways, such as by uploading your company logo and adding custom fields.
Wrap Up
You’ve now learned how to create a quote in QuickBooks Online. You can now also mail or email them to prospective customers. The next lesson in our training course is how to create and send invoices in QuickBooks Online.
