Today, I’ll show you how to close a finished year in QuickBooks Online, which locks your past transactions and protects them from unwanted changes. This includes reviewing your books (reconciling accounts, generating reports, verifying customer balances, etc.) and setting a close date. I’ll also share how to make adjustments to transactions if needed before you close a finished year.
First, I reviewed all my financial records to ensure that my books were in order. Below are some key tasks I focused on; many of them are similar to those you do regularly, but some may require the help of an accountant.
Start by confirming the first month of the fiscal year set in QuickBooks, as the software uses this setting as the default beginning date when calculating current year reports. To do this, click on the cogwheel icon (⚙︎), go to Account and settings, and then check the First month of fiscal year under the Advanced tab.
In the screenshot below, you’ll see that my fiscal year starts in January.
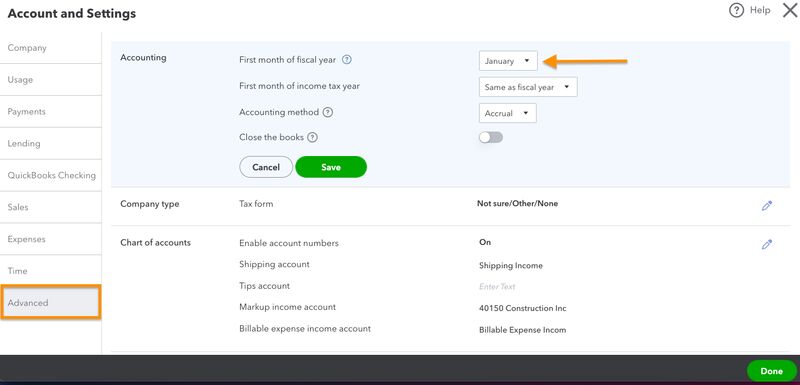
Confirming the first month of fiscal year in QuickBooks Online
Running year-end reports allows you to verify that all income, expenses, and balances are recorded accurately before closing out the period. It also shows you how well your company did for the year as well as spot and address any discrepancies if needed.
Three of the most important reports are the balance sheet, profit and loss statement, and cash flow statement. I can find and generate these reports directly from the Reports page in QuickBooks.
Our other QuickBooks Online guides:
I’ve been reconciling my accounts monthly, so I should be able to easily complete my year-end reconciliation. To reconcile accounts, first gather all the bank and credit card statements. Then, navigate to the reconciliation window and start the reconciliation processes. As you go through it, confirm that all transactions in QuickBooks match those in your statement.
Review customer balances to verify that all incoming payments for the period have been collected or accounted for before you close your books. This will help you determine whether there’s a need to follow up on overdue payments or write off bad debts in QuickBooks. To do this, run an A/R Aging Summary report.
As seen in the screenshot below, the A/R Aging Summary shows me a list of customers who still owe me money. It breaks down how long payments have been overdue, organizing them into categories, such as current, 1-30 days overdue, and 31-60 days overdue. Since I now know which customers have overdue payments, I can send them reminders to follow up on payments.
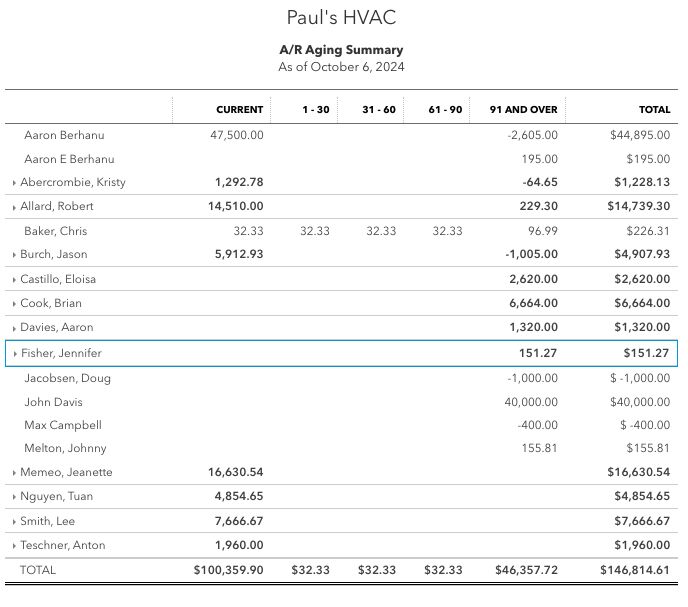
Sample A/R Aging Summary report in QuickBooks
Similar to customer balances, review all vendor account balances to ensure that no invoices are missed and that you have settled all payables. Do this by running an A/P Aging Summary report, which provides a list of all my unpaid bills to vendors, including how long those bills have been outstanding. The amounts are categories based on how overdue they are, such as current, 1-30 days, 31-60 days, 61-90 days, and 91+ days overdue.
The sample report below allows me to keep track of all outstanding vendor payments and help prioritize which bills to pay.
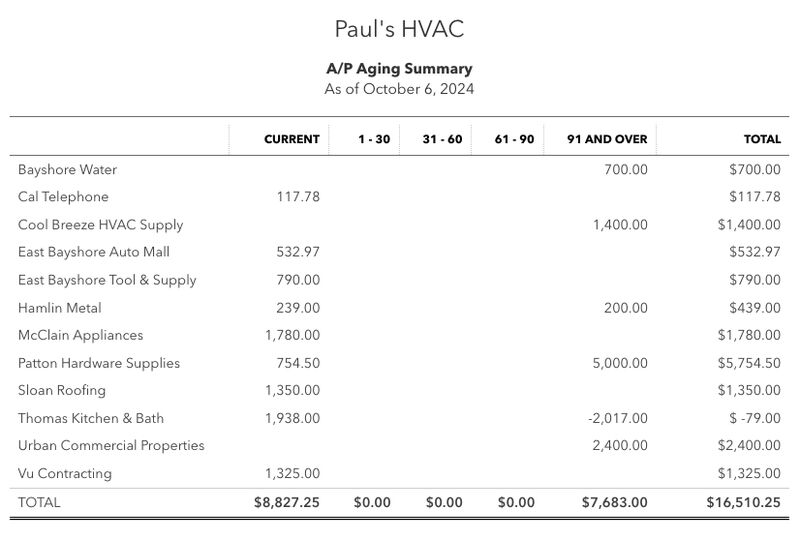
Sample A/R Aging Summary report in QuickBooks
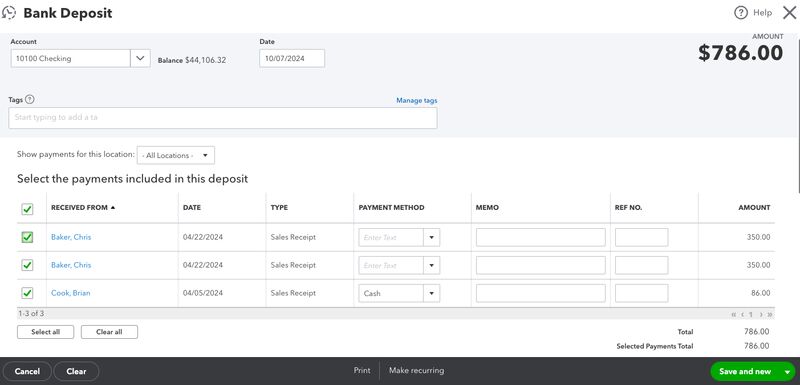
Ensure that any cash and checks sitting in the Undeposited Funds account agree with actual cash and checks that were intended to be deposited but were still on hand at the end of the year. For instance, perhaps amounts received from customers on the last day of the year weren’t actually deposited until the first day of the next year. These amounts should be shown in Undeposited Funds.
Use the bank deposit form in QuickBooks to see if any items are sitting in Undeposited Funds. It will show you all the payments and checks that have been recorded in QuickBooks but not yet deposited. From here, select all the transactions that will be combined into a single bank deposit.
Reviewing inventory quantities allows you to verify that the quantities on hand match what is recorded in QuickBooks. This will help you identify discrepancies that could be due to theft, loss, damage, or data entry mistakes. If adjustment is needed, go to the Inventory Quantity Adjustment form by clicking on New and then selecting Inventory qty adjustment.
From the Inventory Quantity Adjustment form, I identify the products that need adjustment by selecting them in the Product field. Then, for each product, I update the quantities and enter and add relevant details accordingly.
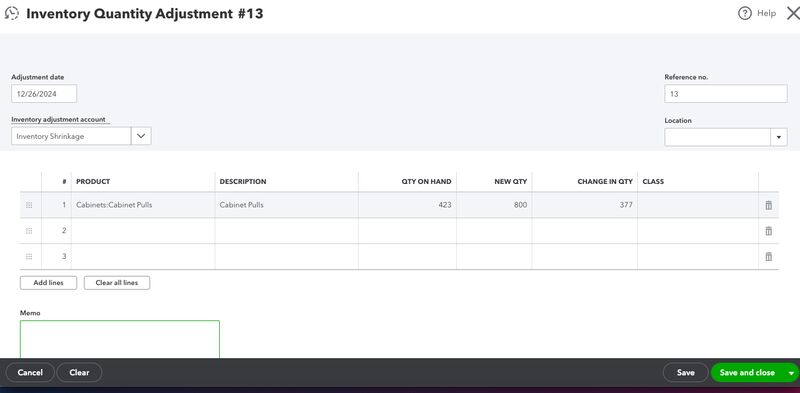
Recording inventory quantity adjustment in QuickBooks Online
Incorrect employee information, missing payments, and unpaid liabilities can affect your company’s financial statements, so it’s important to thoroughly review payroll information. To help verify that payroll data is correct, there are several key steps I follow:
- Run payroll reconciliation: Running payroll reconciliation before closing the books prevents mistakes in the profit and loss report and balance sheet. It helps verify that all payroll payments have been accurately recorded and paid and that there are no duplicate payments.
- Generate a Payroll Summary Report: This report provides an overview of wages, taxes, and deductions for each employee over a specific period. By reviewing this report, you can verify that all payroll entries have been correctly recorded and are accurate.
- Verify employee payroll details: Thoroughly check employee details to ensure that all information—including wages, hours worked, deductions, and net pay—is accurate.
- Review payroll liabilities: Run a payroll tax liability report to check payroll obligations, including federal, state, and local taxes and any unpaid employee deductions. If you find any unpaid liabilities, address them before closing the books.
I suggest that you work closely with your accountant to prepare and file your tax returns. Provide them with all the necessary financial documents and reports they need. This includes your financial reports, tax documents from previous years, bank statements and reconciliation reports, capital asset records, and payroll information. To help you easily collaborate with an accountant, invite them to your QuickBooks account.
Now that you have reviewed the books and made all the necessary adjustments, set a closing date, which will prevent users from making any changes to prior periods.
Navigate to the Account and settings page, just like what I did earlier when I confirmed the first month of the fiscal year. From here, toggle the Close the books option to on and then specify the closing date. In the screenshot below, the closing date is set to December 31, 2024.
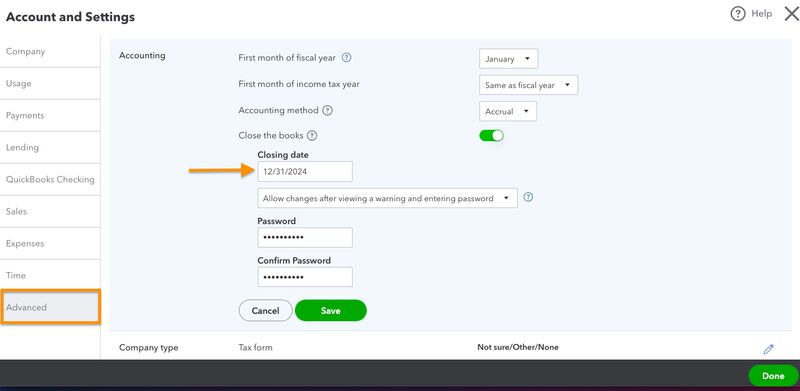
Closing books in QuickBooks Online
After setting the closing date, you have two options to manage closed transactions:
- Allow changes after viewing a warning: This option allows anyone on the team to make changes to transactions, but it shows a warning message first. The warning reminds the team member that the books are closed and that changes could affect reports. I generally don’t recommend this option unless you are the only QuickBooks user.
- Allow changes after viewing a warning and entering a password: This option provides a warning message and requires a password to be able to modify transactions within a closed period. Select this if you want to limit changes to your closed books but still allow authorized people to make important adjustments when needed.
Once the closing date is set, turn the Close the books setting on, and create a password if desired. Click Done to record the changes. By doing so, books will be locked so that no one can make changes to them before the closing date.
What Changes After Closing Your Books?
As I mentioned earlier, closing books in QuickBooks prevents unwanted changes to any transactions recorded within the closed period. If adjustments need to be made, only authorized users with the password (if set by the administrator) can make any edits to transactions. Any changes made are also recorded with an audit trail so that I can easily see who made the changes and when they occurred.
QuickBooks Online automatically transfers my previous year’s net income to the Retained Earnings account on my balance sheet based on the beginning date I provide when generating the report. Setting a close date in QuickBooks doesn’t affect this calculation or report, so setting a close date isn’t required to produce accurate financial statements. However, I still highly recommend setting a close date to prevent unwanted changes to prior year information.
Frequently Asked Questions (FAQs)
When making changes to a closed period, QuickBooks will provide a warning and might require a special password set by the administrator. While possible, never make changes to years in which a tax return or financial statement has been prepared unless you plan to amend the return or restate the financial statement.
Yes, and you can do so by simply toggling the Close the books option off.
No, it won’t. It only locks past transactions and has no effect on reports. Reports are based solely on the beginning and ending dates given when preparing the report.
Wrap Up
There you go! You just learned how to close a finished year in QuickBooks Online. To help you better understand QuickBooks’ other features, I recommend exploring our free QuickBooks Online tutorials.

