To set up recurring transactions in QuickBooks Online, you must first specify what type of recurring transaction you wish to create, such as recurring expenses and recurring invoices. You’ll then need to complete the recurring transaction form by providing the required details, including the transaction amount, customer or vendor, and recurrence settings.
We’ll go over how to create recurring transactions in QuickBooks Online; and to illustrate the process, we’ll set up recurring expenses and invoices as examples. We’ll also discuss the different types of recurring transactions in QuickBooks and when to use each.
Step 1: Navigate to ‘Recurring transactions’
Click on the cog wheel icon in the upper right corner of your QuickBooks Online dashboard and then select Recurring transactions under LISTS, as shown below.
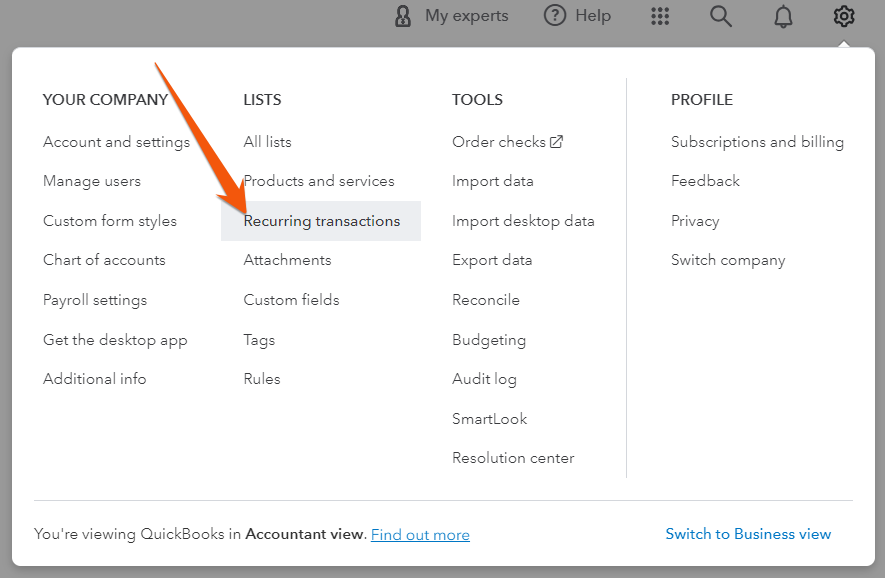
Navigate to ‘Recurring transactions’ under LISTS
Step 2: Select the Type of Recurring Transaction You Wish to Create
From the Recurring Transactions screen, click on the green New button and then select the transaction type you wish to create. You can create different types of recurring transactions, including bills, expenses, invoices, sales receipts, checks, deposits, and estimates.
After selecting the transaction type, such as expense, click OK, as shown below.
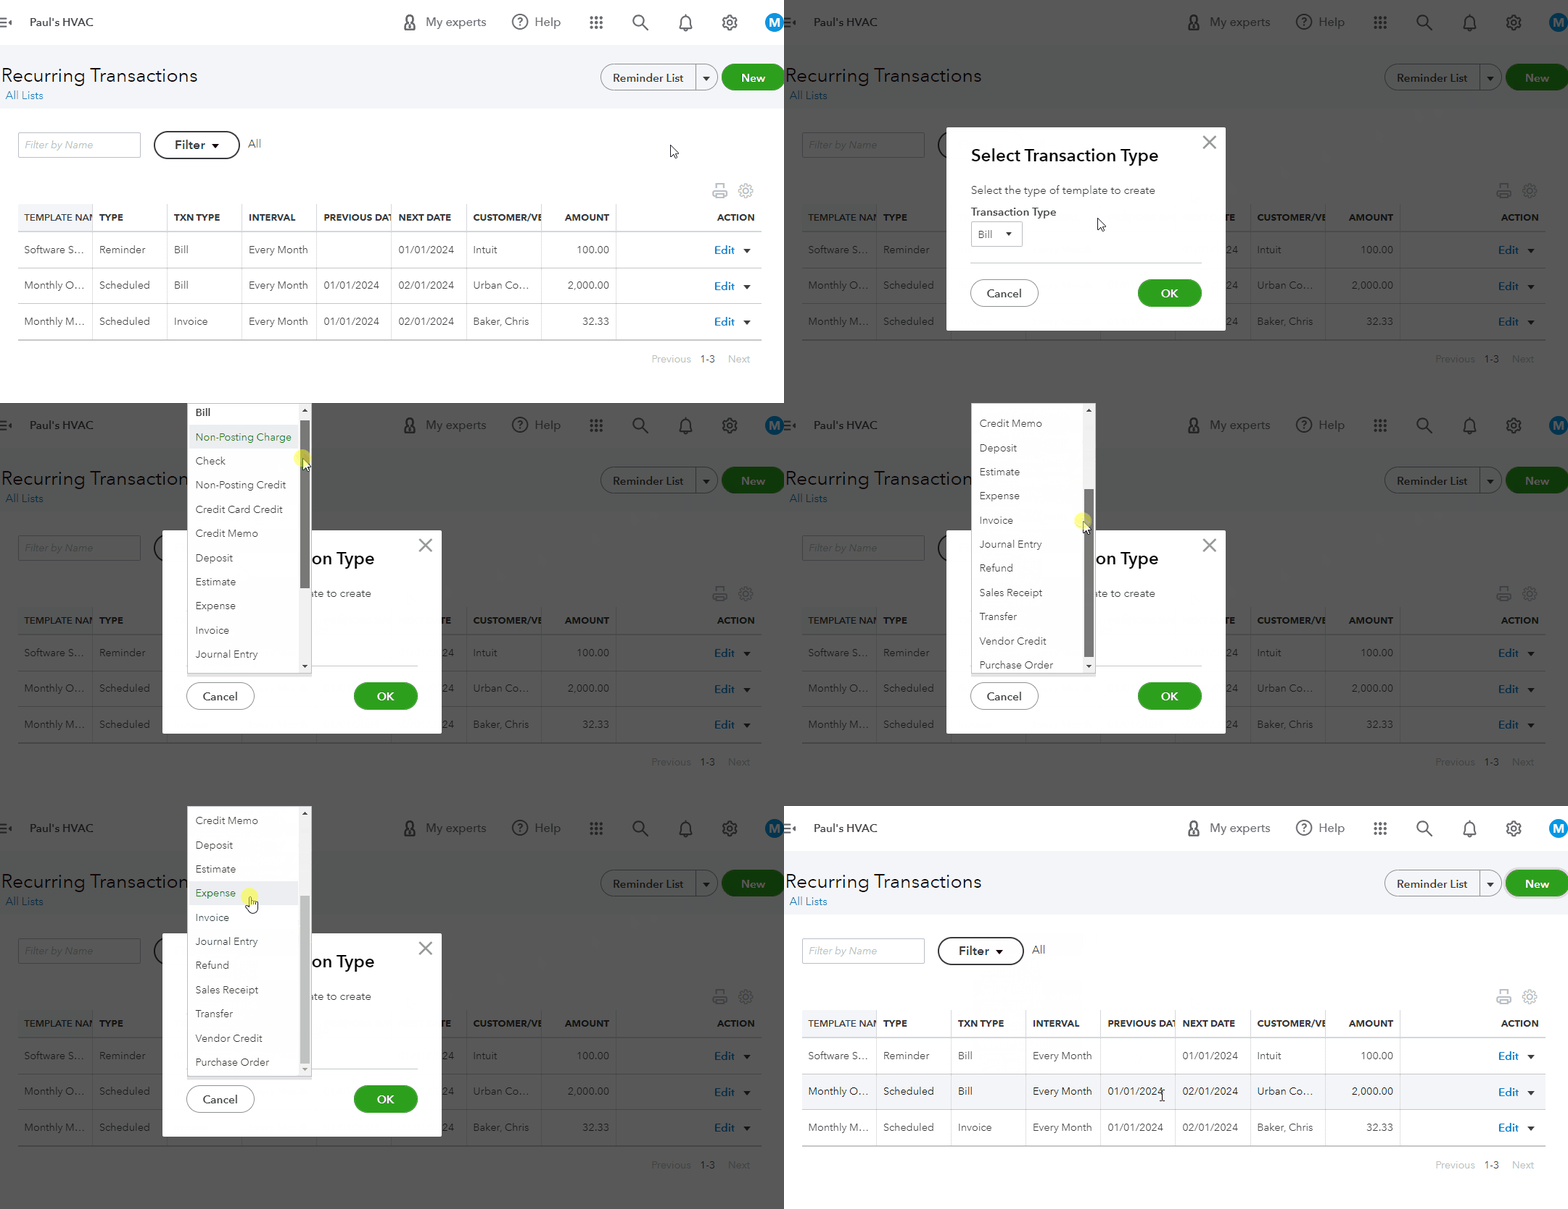
Select recurring transaction type
To give you an idea of how to set up recurring transactions, let’s create a recurring expense and a recurring invoice. This will show you what fields to complete when setting up recurring transactions.
Let’s complete the Recurring expense form using a sample scenario where our fictitious company, Paul’s HVAC, pays a fixed monthly office rental fee of $2,000 to Urban Commercial Properties by an automatic bank transfer. We want to create a recurring expense for the period of January to June 2024 to record this payment automatically.
The image below and the discussion that follows explain how the recurring expense is set up based on our sample scenario.
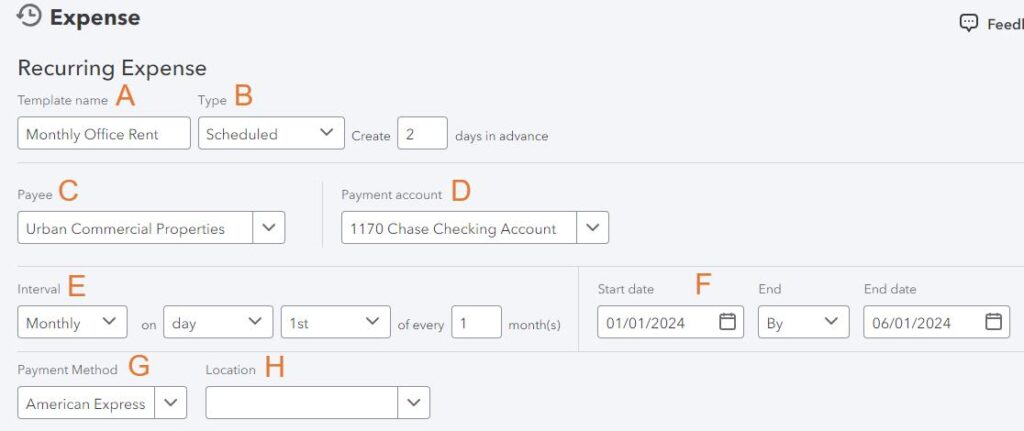
Recurring expense form in QuickBooks Online
A. Template Name: Enter a name that helps you easily identify the recurring expense. For our example, we used “Monthly Office Rent.”
B. Type: You can select from three transaction types:
- Scheduled: Select this if you have regular, predictable expenses, like rent or utilities. When creating a scheduled recurring expense, you must indicate how many days in advance the system should automatically generate the recurring bill.
- Reminder: When you set up a recurring expense as a reminder, QuickBooks Online won’t automatically generate the expense on your specified schedule. Instead, it serves as a reminder for you to record the expense manually. You may need to select this type if you have expenses that may vary in amount or require verification before being recorded.
- Unscheduled: Unscheduled recurring expenses don’t have timetables, and you can use the template whenever needed.
Based on our example, the appropriate type to use is scheduled. To the right of the Type field, we also indicated that QuickBooks will generate the expense two days before it becomes due.
C. Payee: Select the vendor to whom the fixed monthly office payment is to be made. In our case, we selected Urban Commercial Properties.
D. Payment account: Select the bank or credit card account from which the recurring expense will be paid.
E. Interval: Specify the frequency of the recurring expense. Since it’s a fixed monthly payment, we set the interval to “Monthly,” occurring on the first day of the month.
F. Start and End dates: Enter the time frame during which the recurring transactions will be automatically generated. In our example, we input the start date as January 1, 2024, and the end date as June 1, 2024.
G. Payment Method: Specify the method by which the recurring expense will be paid, such as credit card.
H. Location: If applicable, choose the location for which this expense is associated. You may need to use this if your business has multiple locations.
In the lower portion of the recurring expense form, you’ll need to provide other important details, including the expense category and amount.
If you’re creating a new recurring invoice, then QuickBooks Online will use the Recurring invoice form. You will find fields similar to the Recurring bill form discussed above, including the template name, type, interval, and start and end dates. However, instead of a vendor, you’ll need to select the name of the customer you’re billing.
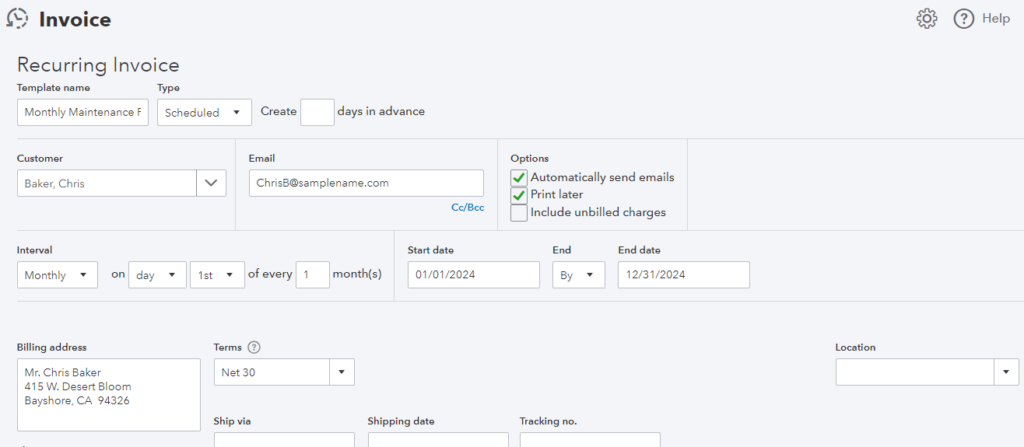
Recurring invoice form in QuickBooks
When you scroll down the Recurring invoice form, QuickBooks will ask for information related to the product or service rendered, including the quantity and cost.
For the other types of recurring transactions, you’ll see many familiar fields and sections, including recurrence settings, amount, and customer or vendor.
Step 3: Save Your New Recurring Transaction
Once you complete all the necessary information in the Recurring transaction form, click Save template in the lower left corner of the screen.
Your new recurring transactions will now appear on the Recurring Transactions screen. In the screenshot below, we see that the new recurring expense and invoice we just added are recorded in QuickBooks Online.
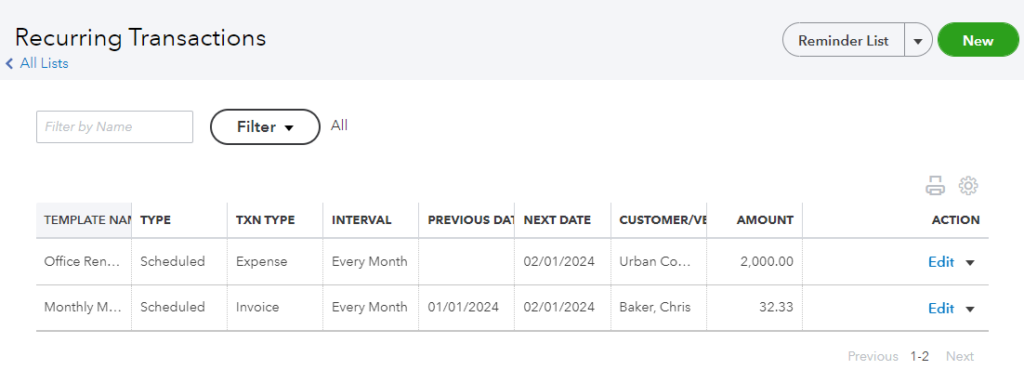
Recurring transaction templates successfully recorded in QuickBooks Online
If you need to make changes to those transactions, you can do so by clicking the Edit button next to the transaction entry under the Action column. You may also delete recurring transactions in QuickBooks Online by clicking on the small arrow next to Edit and selecting Delete (not shown).
Step 4: Run a Recurring Template List Report (If Needed)
If you need to run a recurring template list report, such as for sharing with team members and stakeholders, then you can run a report easily by clicking the small arrow next to Reminder list and then selecting Run Report, as shown below.
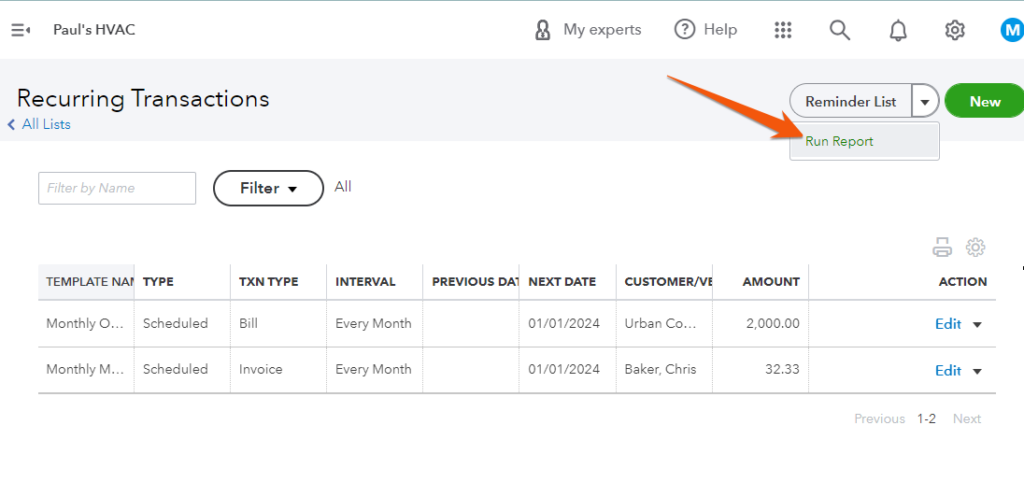
Running a recurring template list report in QuickBooks Online
QuickBooks will run a report showing all the recurring templates that you have set up in QuickBooks Online.
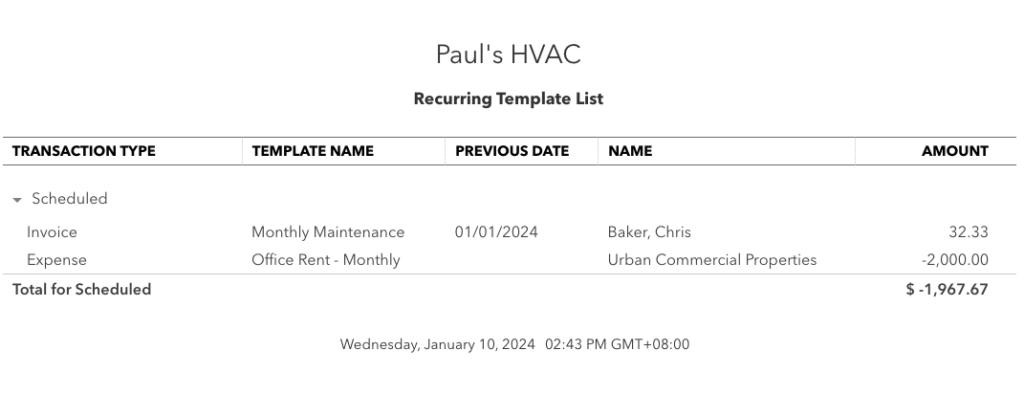
Sample recurring template list report in QuickBooks Online
Types of Recurring Transactions in QuickBooks and When To Use Each
As our overall best small business accounting software, QuickBooks Online allows you to set up different types of recurring transactions. To use these transactions effectively, you must understand the purpose of each recurring transaction type and when to use them:
- Recurring Invoices: Creating a recurring invoice will create an invoice to be sent to the client automatically. The invoice will be shown as unpaid until you manually record a payment. Use this transaction type only if you send invoices to customers before they pay.
- Recurring Sales Receipts: Recurring sales receipts will record revenue and the funds received when a customer pays an amount each month without sending invoices automatically. For example, if a customer’s credit card is charged automatically each month, you can create recurring sales receipts to simplify the process.
- Recurring Bills: Creating a recurring bill in QuickBooks Online will generate and record bills automatically at specified intervals, which you can manually review and pay as they become due. Recurring bills are ideal when the amounts to be paid each month are not fixed and may vary, such as utility bills.
- Recurring Expenses: When you set up a recurring expense, QuickBooks will create an expense entry and deduct the specified amount from checking or credit card account automatically. You may need recurring expenses if you have fixed monthly payments, such as the monthly office rent example that was illustrated earlier.
- Recurring Checks: For businesses issuing recurring payments through paper checks, QuickBooks allows you to set up recurring checks. For instance, if you have a recurring bill that is always paid with a check, you can set up this transaction type and QuickBooks will create a check automatically and place it in the check printing queue.
- Other Recurring Transaction Types: QuickBooks also offers some less common types of recurring transactions:
- Non-Posting Charge
- Non-Posting Credit
- Credit Card Credit
- Credit Memo
- Deposit
- Estimate
- Journal Entry
- Refund
- Transfer
- Vendor Credit
- Purchase Order
Frequently Asked Questions (FAQs)
No, QuickBooks Online doesn’t have a specific limit on the number of recurring transactions you can set up.
QuickBooks automatically calculates taxes based on the information provided in the recurring invoice template.
Yes, you can by heading to the Recurring transactions screen.
Wrap Up
You’ve just learned how to create recurring transactions in QuickBooks Online, such as recurring expenses and invoices. If you want to learn more about how to use QuickBooks Online for your business, check out our free QuickBooks Online tutorials.
