In this tutorial, I’ll walk you through how to set up products and services in QuickBooks Online. I’ll cover how to navigate to the Products and services section where you can adjust options for displaying product and service information on sales forms and tracking product quantity and price. If you’re instead looking to add products and service items, then my guide on how to set up the products and services list for your company is what you’re looking for.
Step 1: Navigate to Account and settings
I clicked on the gear icon (⚙︎) in the upper right corner of my dashboard and then selected Account and settings under Your Company, as shown below.
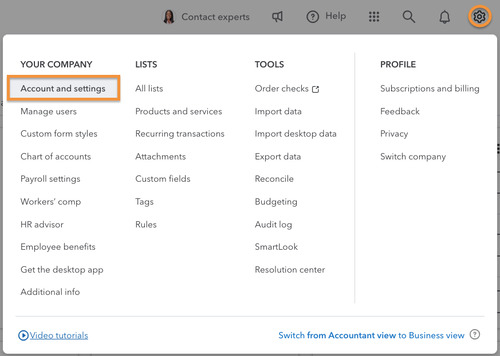
Navigate to Account and Settings in QuickBooks Online
Step 2: Go to Products and Services
Next, I clicked on Sales in the left menu bar, then navigated to the Products and services section.
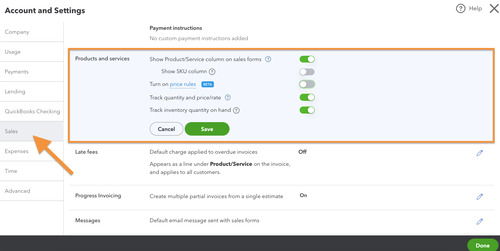
Click on Product and Services Under Sales
Step 3: Adjust Product and Service Options
The Products and services section provides five options to set up your products and services.
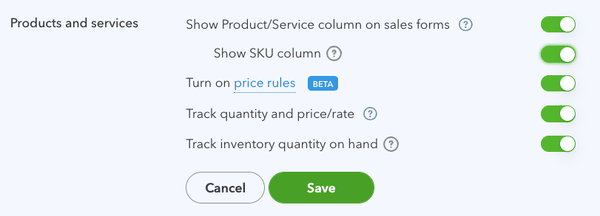
1. Show Product/Service column on sales forms: This option will provide a column on all sales forms, including invoices, estimates, and sales receipts, allowing you to select from your list of products and services. If you plan on using a list of products and services—which I highly recommend—then you should have this option turned on.
2. Show SKU column: A stock-keeping unit (SKU) number is an alphanumeric code used for inventory tracking. By turning this option on, all sales forms will include a column for the SKU number. This is very convenient if you use SKU numbers, but, otherwise, keep this option turned off.
3. Turn on price rules: Price rules allow you to provide discounts for specific products to certain customers for a specified period. They are very flexible and can be applied to all customers, specific customers, or customer types. They can also be applied to all products and services, by product and service category, or to specific products or services.
For example, I want to offer homebuilders 10% off all faucet purchases in June. By creating a price rule, all June invoices to homebuilders for faucets will automatically reflect the 10% discount.
4. Track quantity and price/rate: If you carry an inventory of products, then you must turn this feature on to add a quantity and rate field to the data input screen for invoices, estimates, and sales receipts. Without these fields, QuickBooks cannot properly track inventory quantity and cost.
If you don’t want customers to see the quantity and rate fields on their invoices and receipts but still need to use them internally, then you must turn them on here and remove them from my invoices.
5. Track inventory quantity on hand: If your business carries inventory, you must turn this feature on. It will track both the quantity and cost of the products you have in inventory. In addition to calculating the cost of inventory sold, you’ll be notified of how many units of a product are available anytime you add a product to a sales form.
Once done, click the Save button to apply your settings.
Frequently Asked Questions (FAQs)
It’s essential to set up the product and service options in QuickBooks Online if you plan to provide customers with an invoice or a sales receipt for products or services. These settings determine how much product and service information is included on all sales forms created in QuickBooks Online.
You can add a new product or service in QuickBooks Online using the new product/service information screen, which you can access from the Products and services section. I covered the steps in detail in my tutorial on how to set up product and service lists in QuickBooks Online.
Wrap Up
You should now understand the five options available for displaying and tracking product and service information in QuickBooks Online. The next tutorial in our QuickBooks Online Training Course covers how to set up messages in QuickBooks Online. It’ll teach you how to customize the email messages sent with sales forms and how to send automatic payment reminders to your customers.

